Conversational AI Modules
Conversational AI uses below modules to process user's query for a use case/small talk/faqs:
- SmallTalk
- faqs
- spellchecker
- ParseQuery
- NER
- PreClassification
- PrimaryClassifier
- Dialog
- RuleValidator
There are two different ways in which One can prepare training data for Conversational AI Modules:
- Data preparation via Admin
- Data preparation from scratch
- Incremental data preparation
- Data preparation via GIT
- Data preparation from scratch or incremental data preparation
- Data resync from Production
Introduction about each modules and their usage in conversation AI are given below:
SmallTalk
Smalltalk includes general greetings, and queries not relating to use cases that a user might engage in. The expected smalltalk queries and their responses received by the customer needs to be trained into the system. SmallTalk data can include questions like "Hi" to "Who are you" and "What is your name".
For example: 1
Q: can we end this conversation now
Ans: Definitely! This was fun. We should chat again soon.

Q: can we end this conversation now
Ans: Sure. I hope I was able to help you out.

Q: can we end this conversation now]
Ans: Sure! It's been great talking to you.
FAQs
FAQ (Frequently asked Questions) are the generic customer specific questions that might be asked by the users irrespective he/she owns a product in bank or not. They may be pertaining to one or more of their business oriented product and service offerings. FAQs are usually interrogative in nature.
For example: 2
- "How do i open an account ?"
- "What is credit card ?"
Static vs Grid FAQ’s:
Static FAQ: Static FAQ is the category of FAQ where the answers provided by bank will be static and generic in nature.
For example: 3
- "How can I do bill Payment?"
- "How do i open an account?"
Grid FAQ: Grid FAQ is the category of FAQ where the answers provided by bank will be in the form of a grid because the answers consists of dynamic attribute values which will keep changing over a period of time. The grid FAQ's generally consist of charges related questions for different products and services of a bank.
For example: 4
- "What are the issuance charges for AMEX credit card?"
- "What is the offer for movie tickets on Legend credit card?"
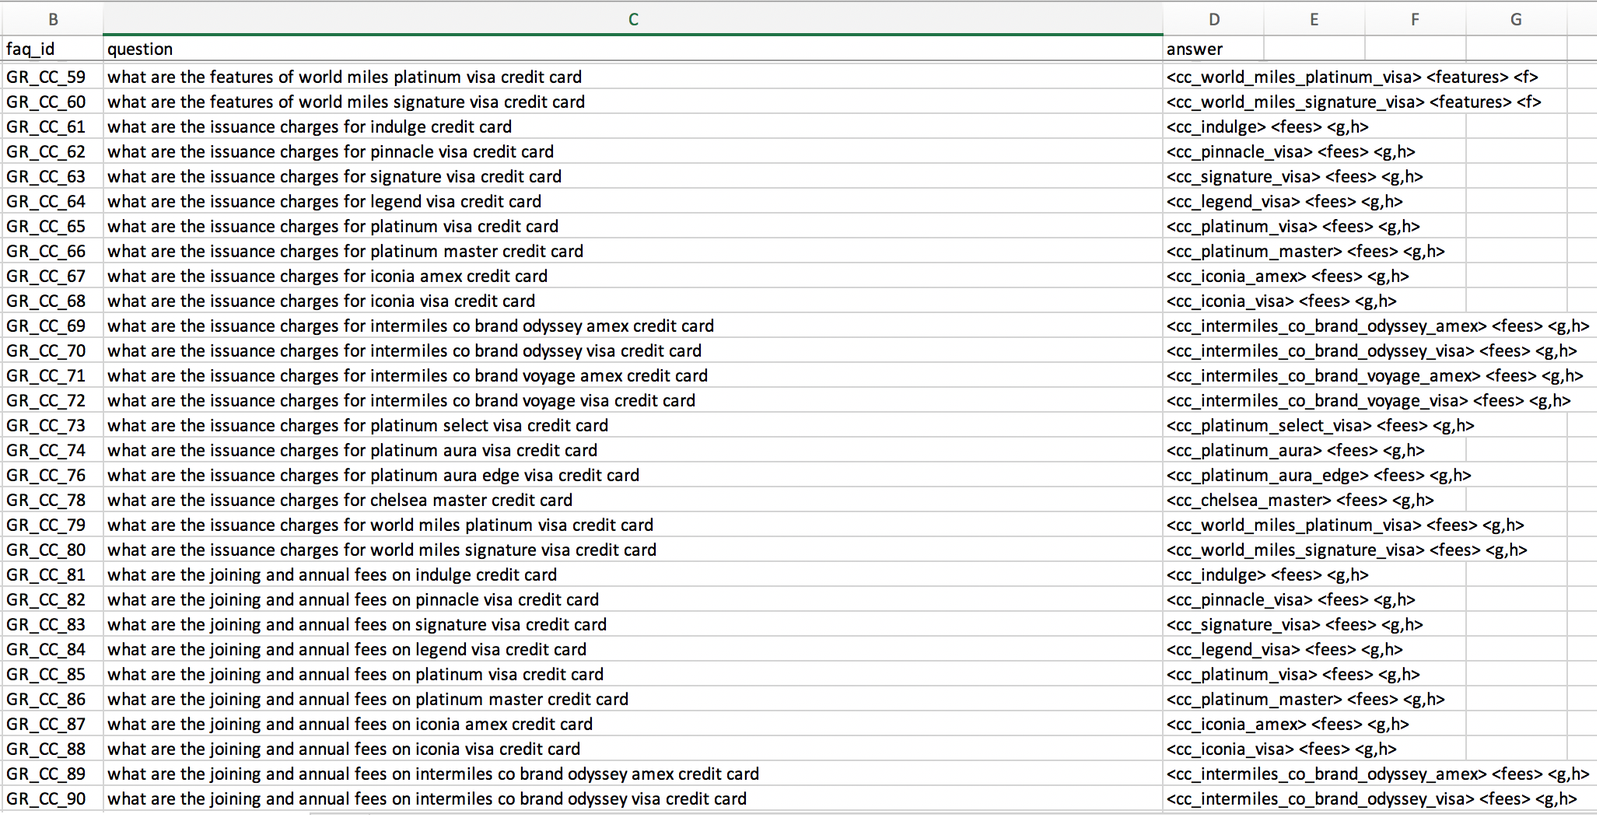
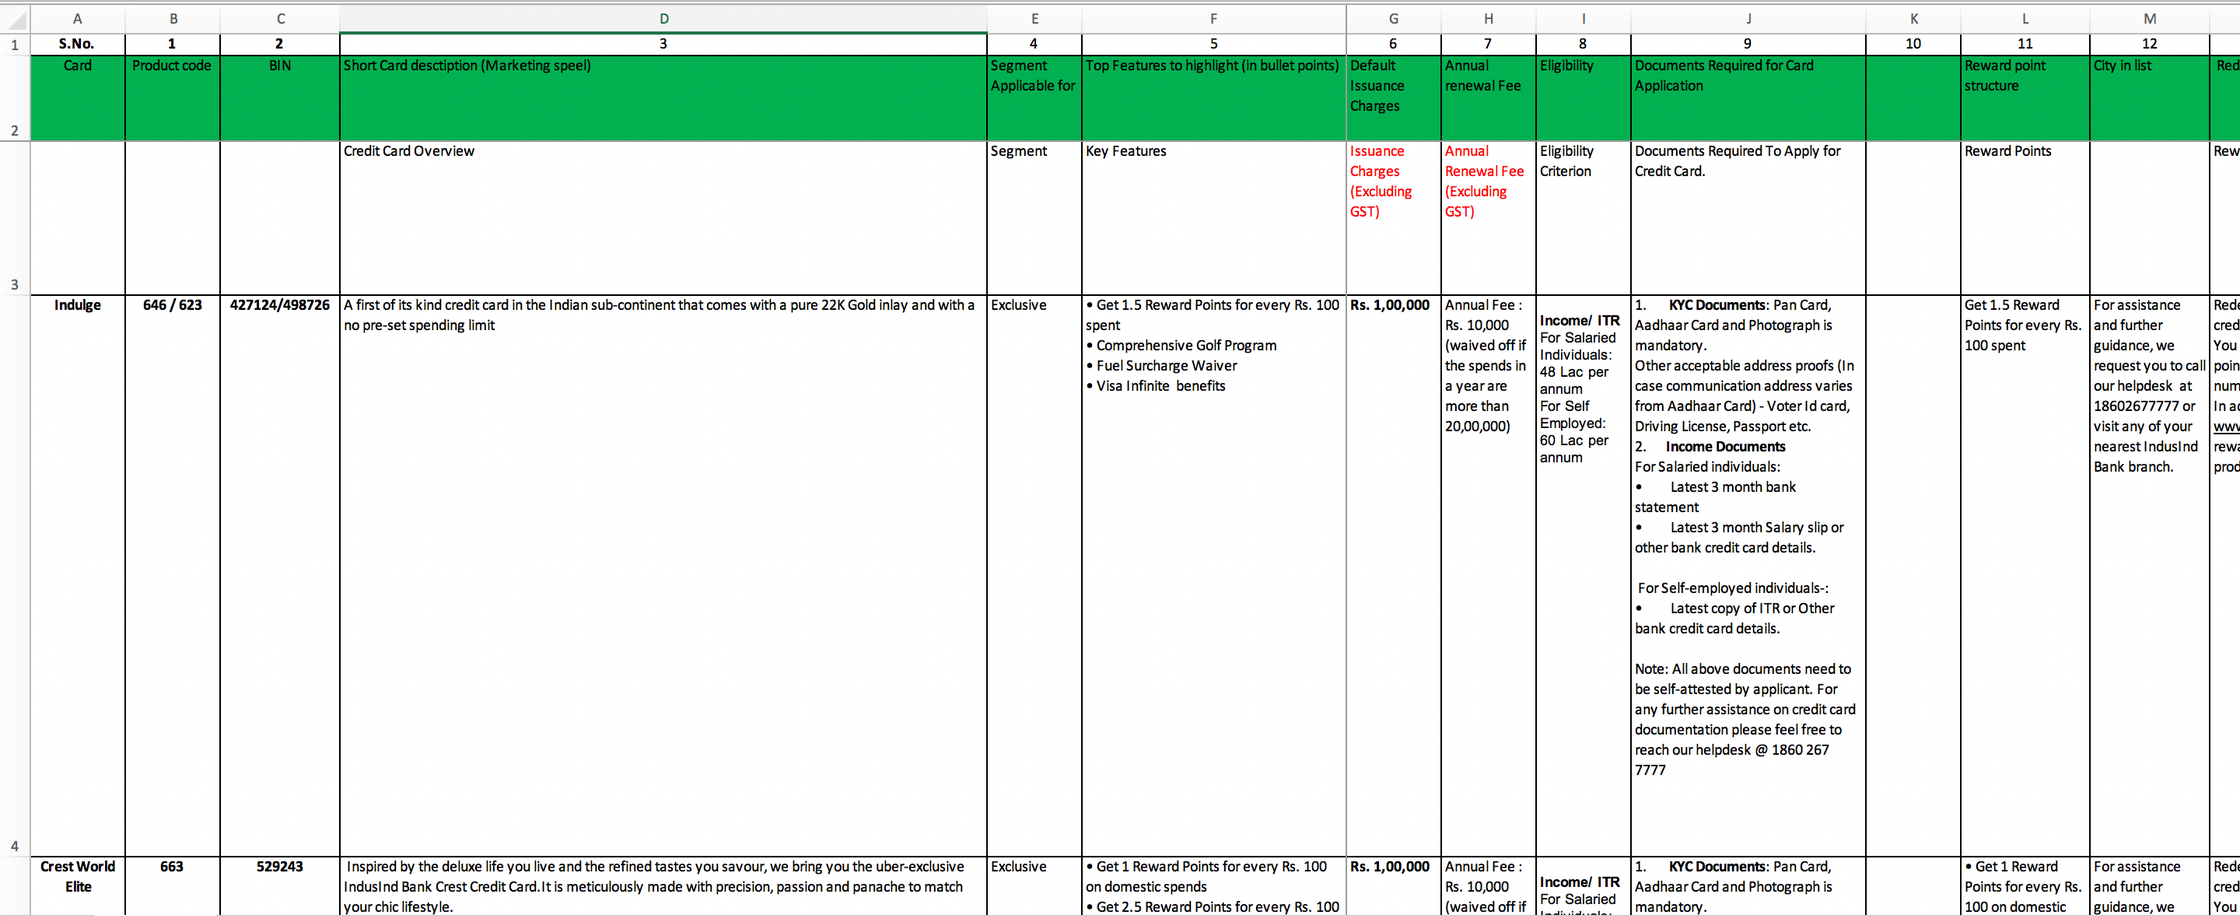
Guidelines for providing FAQs:
-
All the questions that might be asked by the users should be thought of .... should be provided by the customer along with the answers that are to be displayed. Variations for the questions will help increase the accuracy of the system which can be included incrementally.
- Primary questions should be in their most basic form only.
For example: 5
A. CAN BE ADDED:
- "How do I apply for a card?"
- "How do I block a card?"
B. SHOULD BE AVOIDED: Below type of questions should be avoided to consider as primary Questions rather should be considered as semantic variations to the Primary Questions.
- "I am planning to apply for a card, what is the process for that?"
- "I have lost my credit card on the flight, how can I block it?" - Every primary question should have the same tonality or style.
For example: 6
A. SHOULD BE:
- "How do I apply for a card?"
vs.
- "How do I block a card?"
vs.
- "How do I find the nearest ATM?"
B. SHOULD NOT BE:
- "How do I apply for a card?"
vs.
- "What is the process to block a card?"
vs.
- "What is the way to find the nearest ATM?"
In the "SHOULD BE" case, all questions are having the same pattern such as "How do I <remaining intention> ?" and in the case of " SHOULD NOT BE" all questions are having different forms, which is not a good practice. If we follow examples from A above, it gives:
- Much more consistent feel when suggestions show up.
-
Reduces false positives caused by bias in the language of some FAQs. (i.e. in case any variations have been added for one primary question with a pattern "How do I <remaining intention> ?" then it should be added across all such pattern-based primary questions).
- Avoid Questions that are Rhetoric (i.e. ignore questions that will be asked rarely or never) as mentioned in the below examples.
For example: 7
- "Why is the other credit union foreign exchange rate different ?"
- "Why should I recharge ?"
- "Why should I pay using internet banking?"
- "What is the meaning of blocking a credit card using internet banking?"
- "What do you mean by recharge my mobile?"
- "What are the different ways in which mobile bill pay can be done under bill payment?" - Do not remove the question which is "grievances", neither change them into process question.
For example: 8
- "Why my account debited twice?"
- "Why my transaction has not been completed?Faqs which are starting with "Why" or "What to do" or similar in nature which is actually grievances and complaint related should be kept but the question to be briefly be re-written by maintaining the tonality.
For example: 9
- "What to do in case my mobile bill payment is failing":-
Should be modified to:-
- "Why my mobile recharge is failing?" - Faqs which are starting with "Why…." or "What to do…" or similar in nature can actually be duplicates of each other in case the rest of the content is the same or synonymic-ally/semantically similar.
For example: 10
- FAQ_1: What to do in case my mobile recharge is failing:- Should be modified to:- Why my mobile recharge is failing.
- FAQ_2: Why am I not able to recharge:- Duplicate of FAQ_1 - Avoid Questions that are not going to be asked commonly (look at actual usage)
For example: 11
- "How can transferring money to another person at another financial institution be possible?"
- If the product inquiry is the focus for the FAQ set then questions that compare two products/services should be included otherwise avoid Questions that Compare two products/services.
For example: 12
- "What is the difference between an in-store and online Cash Advance ?"
- "What is the difference between NEFT and RTGS?" - Avoid connecting two products in a question, it will help to reduce the FAQs set and false positive.
For example: 13
- "How to purchase NEO DineOn Plans through my NEOCU account ?"
- Pick one question that is most common for a given Product + Action/Attribute
For example: 14
- "How to apply for Loan (For Loan + Apply)"
- Avoid creating uncommon questions for a Product + Action/Attribute
For example: 15
- "Where to apply for Loan (For Loan + Apply)"
- "When to apply for Loan (For Loan + Apply)"
Note: If they are really required. Ensure they are added under the same FAQID and the answer for the 3 above are the same.
- Avoid creating Definition and affirmative with definition as a separate question, park them under one FAQID.
For example: 16
- "What do you mean by Loan ?"
- "Can you tell me about Loan ?"
Note: If they are really required. Ensure the above questions are added under the same FAQID and the answer for the above 2 questions should be the same.
- Avoid creating Charges related questions separately for process and confirmation/affirmative rather than park them under one FAQID.
For example: 17
- "What are the charges for Loan ?"
- "Can you tell me about Loan charges ?"
In other words, in case of apply/book/open/register related process question regarding "charges" vs affirmative questions regarding "charges" are there then keep only process type question and not the affirmative type of question.
For example: 18
- "FAQ_1: What are the charges to apply for a loan?"
An affirmative question to be converted into process type question or can be ignored in case it is becoming duplicate to any other question. For example, below mentioned updated question (mentioned on the right side of “==>”) is becoming a duplicate of the above question “What are the charges to apply for a loan ?” then the updated question to be ignored.
For example: 19
- "FAQ_1: Are there any charges to apply for a loan?" ==> What are the charges to apply for a loan?
Note: If the above questions are really required. Ensure we add the above questions under the same FAQID and the answer for the above 2 questions should be the same.
- "FAQ_1: How do I apply for a Loan?"
- "FAQ_1: Can you tell me the process to apply for a Loan?"
- "FAQ_1: Can you tell me the steps to apply for a Loan?"
- "FAQ_1: Can you tell me the procedure to apply for a Loan?"
- Merge generic "Charges", "service tax" and "annual charges question under one FAQ_ID. If the required answer can be modified to include the content of all such questions post merging the questions in-case earlier was parked under different FAQ_IDs.
For example: 20
- "FAQ_1: What are the charges for Credit Card?"
- "FAQ_1: What is the service tax levied on Credit Card?"
- "FAQ_1: What are the annual charges for Credit Card?" - Process type Question of applying/downloading/registering vs Location type questions of applying/downloading/registering should be merged under one FAQ_ID. Rather answer can be modified to include the content for both questions.
For example: 21
- "FAQ_1: How can I open an account?"
- "FAQ_1: Where can I open an account?" - Channel-specific questions should be merged with generic questions and instead of keeping channel-specific different questions, answers should be modified to cover generic as well as specific channel-based answer content. An easier way to do this is by giving a link or brief navigation steps.
For example: 22
- "FAQ_1: How can I do Funds Transfer ?"
- "FAQ_2: How can I do Funds Transfer using Internet Banking?"
- "FAQ_3: How can I do Funds Transfer using Mobile Banking?"
- "FAQ_4: How can I do Funds Transfer using a chatbot?"
- "FAQ_5: How can I do Funds Transfer by visiting a branch?"
- "FAQ_6: How can I do Funds Transfer using Phone Banking?"
- "FAQ_7: How can I do Funds Transfer Online?"
- "FAQ_8: How can I do Funds Transfer by WhatsApp Banking?"
- "FAQ_9: How can I do Funds Transfer via ATM?"All these questions from "FAQ_1".... "FAQ_7" should be merged under single FAQ_ID as "FAQ_1", and instead of keeping different channel-specific questions answer should be updated to include the content for all the generic and specific channel answer content.
- "FAQ_1: How can I do Funds Transfer?"
- In case of apply/book/open/register related process question vs affirmative questions are there, then keep them in different FAQIDs because affirmative question with apply/book/open/register action is semantically referred to the eligibility question rather than process type question. But Affirmative questions to be converted into normal non-affirmative/process type questions (referring to eligibility) and if required then answer can be modified to suit the converted process type questions rather than affirmative questions, only if required.
For example: 23
- "FAQ_1: How do I apply for a Loan?"
- "FAQ_2: Can I apply for a Loan? ==> What are the eligibility criteria to apply for a loan ?" - Most of the affirmative type of questions should be converted into eligibility type of process questions if the questions are affirmative and revolves around actions like apply/book/open/register for a specific product or services.
For example: 24
- "FAQ_1: Can I apply for a loan? ==> What are the eligibility criteria to apply for a loan?"
- "FAQ_2: Can I register for e-statement? ==> What are the requirements to register for an e-statement? - No Phrases, or partial fragments, or Instructive Data should be added.
For example: 25
- "Charges for card"
- "Apply Loan"
- "Show balance"
- "Block card" - Any question which is written grammatically incorrect should be corrected. For checking the grammar any tool such as "Grammarly" can be used. Also, the spelling or typo correction needs to be taken care of.
For example: 26
- "FAQ_1: before correction >> in how much time will the mobile bill payment transaction be processed?"
- "FAQ_1: after correction >> how much time will it take for a mobile bill payment transaction to be processed?" -
FAQs containing "/" - we should split into two questions one with 1st product(Account)/Action(open) or Attribute (Statement) and another 2nd product(Card)/Action(unfreeze) or Attribute (interest certificate). In case product/Action or Attribute is different and not the synonym to each other, then they should be parked under different FAQ_IDs.
For example: 27
- "FAQ_1: How do I open/unfreeze an account?":-
Should be split into two different questions under two different FAQ_IDs:-
- "FAQ_1: How do I open an account?
- "FAQ_2: How do I unfreeze an account?In case product/Action or Attribute is a synonym in nature, then remove one synonym from product/Action or Attribute provided using "/"
For example: 28- "FAQ_1: How to generate/create the 3d secure pin for my debit card?":-
Should be split into two different questions but not under two different FAQ_IDs rather should be parked under the same FAQ_IDs as variations to each other:-
- "FAQ_1: How to generate the 3d secure pin for my debit card?"
- "FAQ_1: How to create the 3d secure pin for my debit card?"Before correction:-
- "FAQ_1: How do I update my mobile number/email address in credit card"
After correction:-
- "FAQ_1: how do I update my mobile number on a credit card?"
- "FAQ_1: how do I update my email address on a credit card?" - FAQs Containing "()" - We should remove bracketed word/phrase/attribute if the word/phrase/attribute mentioned in the bracket is an acronym or synonym of immediately preceding phrase or abbreviation.
For example: 29
- "FAQ_1: How can I set up standing instruction (SI) in my account?" (acronym in bracket)
For example: 30
… should be modified as:-
- "FAQ_1: How can I set up standing instruction in my account?"
- "FAQ_2: How can I recharge (top-up) my mobile?" (Synonym in bracket)
… should be modified as:-
- "FAQ_2: How can I recharge my mobile?" - "FAQ_2: How can I top-up my mobile?" - Faqs containing "&/and/or" should be split into two questions except if the actual product name contains and/or.
For example: 31
- "FAQ_1: What is the daily limit for IMPS & NEFT transaction for my NEO full KYC account?"
… should be modified as:-
- "FAQ_1.1: What is the daily limit for IMPS transaction for my Kotak 811 full KYC account?"
- "FAQ_1.2: What is the daily limit for NEFT transaction for my Kotak 811 full KYC account?" - The answers provided should be suitable and help in engaging the user in the conversational journey:
- Answers should be limited to a few lines which can be displayed in a chat format.
- Tables in the answers should be avoided.
- In case the answers can not be shortened and contain sizeable content, a shorter FAQ response and a redirection link can be viewed as an option.
-
Question for bill payment or recharge/reload pertaining to mobile/DTH/Data Card should be merged under one single generic question's FAQ_ID.
For example: 32
- FAQ_1: "How can I pay my bill?"
For example: 33
- FAQ_1: "How can I pay my mobile bill?"
- FAQ_1: "How can I pay my DTH bill?"
- FAQ_1: "How can I pay my Data Card bill?"
- FAQ_1: "How can I Reload?"
- FAQ_1: "How can I Reload my mobile?"
- FAQ_1: "How can I Reload my DTH?"
- FAQ_1: "How can I Reload my Data Card?" - If the semantic meaning same for generic and questions with a product, then those questions should also be merged under one FAQ_ID. This happens, when the main focus or goal or them of the question is not on the product rather than the process/services.
For example: 34
- FAQ_1: "How can I find the Routing Number?"
For example: 35
- FAQ_1: "How can I Locate the Routing Number for my account?"
- FAQ_1: "How can I do Funds Transfer?"
- FAQ_1: "How can I Funds transfer from my account?"
- FAQ_1: "How can I transfer funds to an external account?"
- FAQ_1: "How can I transfer money to a registered payee?" -
Similar sounding questions which have different answers must be merged by considering one ideal answer for both the questions and merged under FAQ_ID.
-
In case the answers are expected to have a CTA (Click to Action), the requirement should be specifically mentioned.
For example: 36
- "How to transfer funds?":-
Here, the expectation from the above FAQ - can be for a user to be directed to fund transfer flow after getting the answer. The respective intent to be directed to and the text to be displayed in the CTA button should be provided with each faq answer.
-
Definition question about the product is fine, but don't require/avoid to prepare definition question regarding the process on a product.
For example: 37
- "What does Credit Card refer to?" ==> Can be included
vs.
- "What do you mean by reloading?" ==> Not to be included
- "What do you mean by blocking a Credit Card?" ==> Not to be included
- "What do you mean by Funds transfer to other accounts?" ==> Not to be included -
If the generic service request is common to all the products or some products then such questions to be merged. In such a case, the answer should be accommodative of differences based on the product.
For example: 38
- FAQ_1: "How can I register for e-statement?"
For example: 39
- FAQ_1: "How can I register for an e-statement for my account?"
- FAQ_1: "How can I register for an e-statement for my savings account?"
- FAQ_1: "How can I request a cheque-book?"
- FAQ_1: "How can I register for a cheque-book for my account?"
- FAQ_1: "How can I register for a cheque-book for my savings account?"
For example: 40
- "How to make a transfer"
- "Can one make a transfer"
These are separate questions and should be treated as such.
Keyphrases
What is Keyphrase?
Key phrase is part of the users query that must be present (as is or in synonymous form) for that question. But In enhanced module of FAQ, by default only two keyphrases to be added which are as below:
credit_card=credit card
debit_card=debit card
For example: 41
Question =  what is Home Insurance ?
Keyphrase = home insurance ==> Yes, Can be considered!

Question = How to renew Home Insurance ?
Keyphrase1 = renew ==> Yes, Can be considered!
Keyphrase2 = home insurance ==> Yes, Can be considered!

Question = How to apply for Car Insurance ?
Keyphrase = Apply ==> No, Can't be considered!
Keyphrase = Car Insurance ==> Yes, Can be considered!
SpellChecker:
SpellChecker maintains acronym to abbreviation mapping file for finance / banking / trading / insurance (FBTI) domain related vocabs.
Because in general the "WHO" can signify many objects, like; a. world health organization; b. it can be the question word.
The variations which needs to be corrected has to be one word only. As currently Conversational AI only supports one word (input variant – i.e. billpayment) to many word (root word/phrase – i.e. bill payment) and not the other way around (i.e. bil pyment (input variants) cannot be mapped to root word/phrase bill payment.
Three types of corrections happens at the spellcheck level:-
- Acronym to abbreviation
- Map the regular expression words with the same value to stop the auto correction
- Spell typo to correct word mapping

For example: 42
- balance=balnc,blance (spell typo correction)
- Amit=Amit (regular expression)
- account=ac.,a/c (acronym)
SpellChecker: Usage
spellcheck/ acronyms file is useful to correct the three types of single token based corrections before user input gets processed by any other modules. This helps to prepare the training data without creating variations at the typo errors or acronyms based variations. In return such variations will become redundant.
ParseQuery:
It is a mapping of product vs action or attributes.It is used to fill out all unsupported products and action within a client's defined scope.

Here in the above figure 2,
- A2="action_synoym" header will include variations for action as in row number 3, 5, 6, and 7 and attribute variations as in row number 4.
- B2="action" header will include only root values for action and attribute.
- Row number 1 will include only the variations of the products.
- Row number 2 will include only the root values of the products.
NER – Named entity recognition:
Introduction
As Conversational AI is expected to process user's generated content (UGC) it is viable to use only required information from the user's input and process the required flow. To achieve this we require NER.
What is NER ?
Named Entity Recognition (NER) is used to extract/capture noun/noun phrases/attributes from the user's input.
For example: 43
Transfer 500 to Charu from my account
From the above statement we require three information namely 500, charu, and account. These values will be extracted from the utterance and will be used to hit the client's API.
NER: Types of Entities
Within NER, there are three different types of Entities:
Dictionary (edict – for all finite values)
- banking.product-type, banking.product-account-type, banking.product-name, etc..
Regex (Universal Pattern)
- sys.email, banking.otp, banking.pin, sys.itemNumber
Train (for Infinite Values)
- banking.product-account-number, banking.product-card-number, sys.person-phone-number, sys.amount, etc..
- For NER train entity one has to prepare a sample value file and annotate all the occurrences of the entity with curly braces "{<train entity name>}" while preparing PC or Dialog data.
Modifiers:
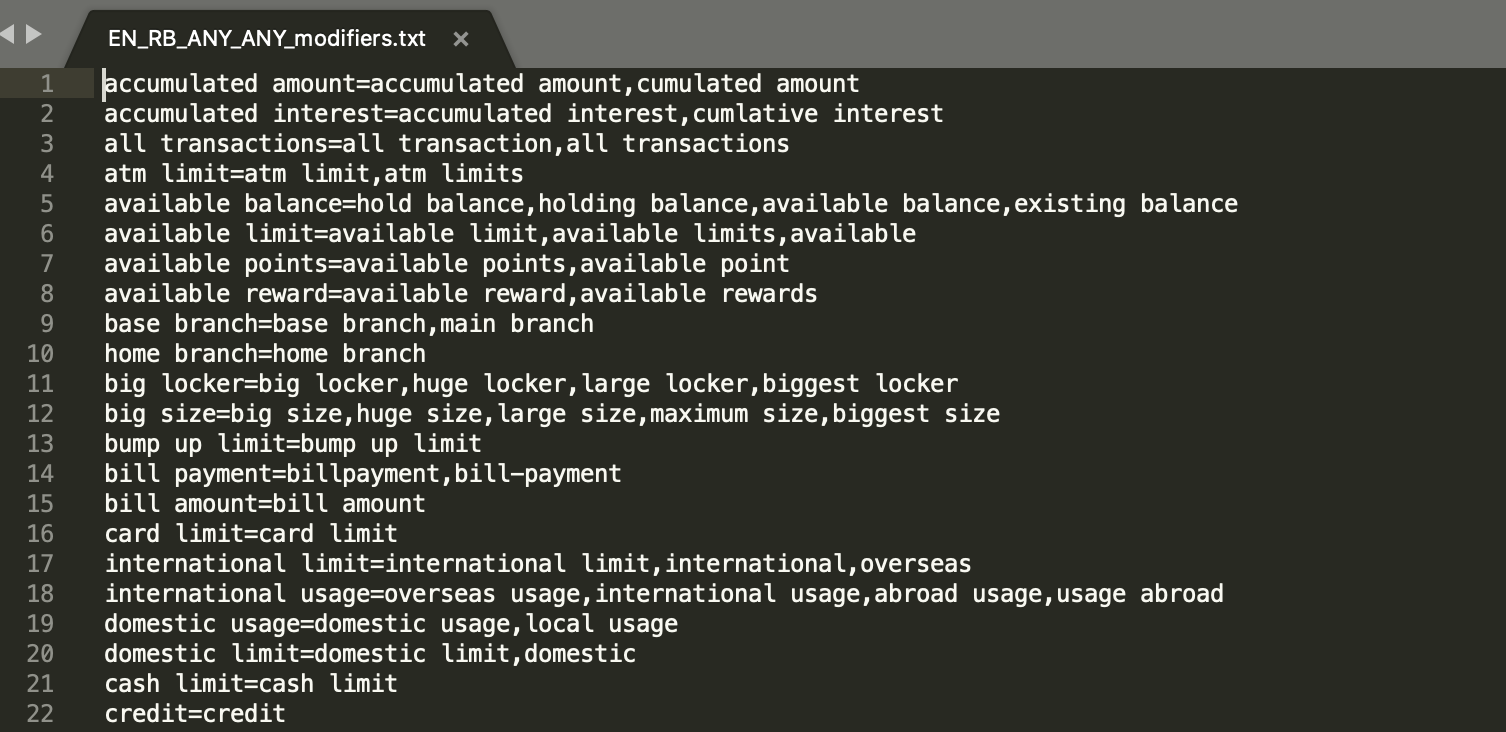
Modifier is an adjectival word or phrase which modifies the entity or gives additional information about the theme or goal from user's input.
Modifier values should be stored as "rootvalue=(comma separated) variations(i.e. synonyms)" as shown in below figure 3.
Preclassification:
Pre-classification is a look up file to override the actual classification which may be used for the existing use case's specific fulfilment or to handle and create unsupported dummy intent for its fulfillment.
PrimaryClassifier:
Classifier is a module, which classifies the user's input into broader categories based on the action and attribute-based use case utterances.
For example: 44
- Wish to pay my mobile bill (txn-moneymovement)
- want to do funds transfer (txn-moneymovement)
- recharge my mobile number 8347423748 (txn-recharge)
Dialog:
A Dialog need to be prepared for follow-up utterances which might be keyed in by a user. These utterances might lack the intent level context but still contain the required entity or modifier related information, required to complete the flow.
For example: 45
Use case name: FundsTransferGeneral – with full conversations journey
Intent: txn-moneymovement
User: transfer money
Bot/Prompt: Select your source account
User: proceed with my saving account number 122342342332
Bot/Prompt: How much do you want to transfer ?
User: it would be 500
Bot/Prompt: select payee
User: the payee would be amit
Bot/Prompt: provide 6 digit otp received on your registered mobile number
User: the otp is 847537
Bot/Prompt: You have requested to transfer 500 rupees from saving account number XXXXXXXXX2332 to amit, please confirm the transaction at your end.
User: please proceed/confirm
Bot/Prompt: Your transaction is successful.
Example 7 gives conversational journey between the user and the Bot from 1- 12 steps.
For any transaction or enquiry flow there might be intermediate steps which are necessary as user may or may not give all the information at one go. These intermediate steps will be probed by asking related questions by the bot which is known as "prompt".
In brief, any question which is being asked by the bot to the user, where user is required to provide some information to complete the flow is known as "prompt"
Dialog: Usage
Dialog data will be used for two of the triniti modules, namely; 1. NER, and; 2. CP (conversation processor).
For example: 46
| Table 1 Dialog vs PC File Name Comparision | ||
| Dialog file name | PrimarClassifier file name | Triniti Utilization |
|---|---|---|
| EN_RB_ANY_ANY_FundsTransferGeneral_dialog.txt | EN_RB_ANY_ANY_FundsTransferGeneral_primaryClassifier.train.csv | YES |
| EN_RB_ANY_ANY_FundsTransferOverseas_dialog.txt | EN_RB_ANY_ANY_FundsTransferGeneral_primaryClassifier.train.csv | NO |
Dialog is normally refers to the follow up utterances which will be keyed in by the user within any flow. we can better understand the flow by looking at the user bot journey mentioned below:
###journey starts from here....

1.U. User - show balance - Primary utterance

2.B. Bot - Select the account for which you want to enquire the balance.
    - (Bot Question to the user)

3.U. User - That would be savings account number ending with 1234
    - (User response to Bot Question)

4.B. Bot - Shows the balance summary for user's savings account number ending with 1234.

###journey ends here...
Dialog/follow up utterances lack the intent specific information rather it provides the required information for a specific flow fulfillment. It is used to detect the context change. Context change is the scenario where in the middle of the current flow, user is trying different action which is actually part of the other intent and flow.
###journey starts from here....

1.U. User   - show balance - Primary utterance

2.B. Bot  - Select the account for which you want to enquire the balance.
      - (Bot Question to the user)

3.U. User - transfer 500 rupees to amol

      - (Here user is trying funds transfer instead of providing the
        required information for balance enquiry).

4.B. Bot  - You are already in the middle of the flow.
      Do you still want to proceed for the another flow or not? please confirm.

###journey ends here...
This context change can be detected by training the follow up utterances under conversation processor module.
As we can see above user bot journey, user has mentioned trained entity 1234 as "{banking.product-account-number}" which needs to be extracted by NER. Thus dialog data will be used in NER as well.
Parameters to prepare dialog data for a prompt:
Entity banking.payee-name
Prompt Please provide the beneficiary name.
Type1: Beneficiary name is Aliya. (Strong lexical cohesion , synonym used)
Type2: Payee name is Aliya. (Strong lexical cohesion)
Type3: Transfer to Aliya (Intent attribute coherence)
Type4: It is Aliya (Referenced cohesion )
Type5: Her name is Aliya (collocation[assuming 'name' occurs frequently after the 'payee' word] , Referenced cohesion )
Type6: Aliya ( implicit cohesion) - Direct response
Type7: Amount is 500 ( Concepts associated with co-ordinate relationship , also 'amount' is an attribute to the intent 'fund transfer')
Type8: change/update/edit/amend/revise/modify/alter payee name to john
Rule Validator:
Rule validator is mainly used to provide custom level message configuration support on top of parseQuery and Classifier out put.
Rule Validator: Usage
Rule validator/ blocklist.csv file is useful to configure the profanity, negation, or unsupported products or functionality related custom messages by overriding the actual Triniti output based on the client's request or agreement.
Preparing Data for a USE CASE
What is Use Case?
A Use Case is a specific business requirement in which a Conversational AI Product could potentially be deployed.
We analyse the business problem statement and break them into small functional units which we call it as use case.
For Example: 9
| Table 2 Problem Statement, Use Case, and Description | ||
| Problem Statement | Use Case | Description |
|---|---|---|
| One should be able to do Funds Transfer | Funds Transfer to Own Account | Moving Funds from one account to Another "OWN" account |
| Funds Transfer to Registered Payee | Moving Funds from one account to Registered Payee/Beneficiary | |
| Funds Transfer to Overseas | Moving Funds from one account to Overseas account | |
| One should be able to do Bill Payment | Bill Payment adhoc | Moving Funds from one account to Biller/Service Provider |
| Utility Bill Payment | Sending Money to utility Biller | |
| Bill Payment to Registered Biller | Sending Money to registered Biller | |
| Credit Card Bill Payment | Transferring or paying money for credit card bill | |
How to Prepare data for a Use Case ?
One has to derive the related actions and attributes with respect to all the Business requirements received from the customer like: Product types, product names, other product attributes and their properties, attribute validation properties, and the business logic with expected conversational flows.
The above requirements will give us the idea as in what types of module data we will require to prepare to train Conversation AI.
For Example: 10
Refer to the below table 3 for "Funds Transfer" use case with required parameters based on the business logic.
| Table 3 Use Case Requirement Details | ||
| Use Case | Actions | Attributes |
|---|---|---|
| Funds Transfer to Own Account | Transfer, Pay, send, give | Money, currency, amount |
| Overseas transfer, Intra bank transfer, inter bank transfer | ||
| Own Account Transfer | ||
| Wire transfer | ||
| remittance | ||
Based on the above requirement received from the customer we decide the Intent.
What is Intent?
An Intent is a class/basic block of how conversations are identified.
***Note: Please note that it is not the case - one use case is equal to one intent
For example: 11
| Table 4 Use Case, Intent Mapping | |
| Use Case | Intent |
|---|---|
| Funds Transfer to Own Account | Txn-moneymovement |
| Funds Transfer to Registered Payee | Txn-moneymovement |
| Funds Transfer to Overseas | Txn-moneymovement |
| Bill Payment adhoc | Txn-moneymovement |
| Utility Bill Payment | Txn-moneymovement |
| Bill Payment to Registered Biller | Txn-moneymovement |
| Credit Card Bill Payment | Txn-moneymovement |
Mapping Intents to Use Cases
Intents are used to understand what the end user wants to do on the platform. The system understands the intent of the user based on their utterances.
Post the use case design, and the definition of different intents, each use case must be mapped to an intent, and its respective entities identified.
Step-by-step guide to mapping intent to use cases
- Intent designing process begins post the use case definition.
- Intents should be named based on their purpose or nature:
- qry- - if the intent is for the purpose of making a query. Examples include qry-balance-enquiry,qry-stockquote, etc.
- txn- -Indicates the purpose to make a transaction. Examples include txn-buysecurity,txn-fundtransfer, etc.
- faq - All the frequently asked questions are included in this intent.
- Overlapping use cases which have similar intentions can be clubbed together into an intent. The difference between the use cases can be figured on basis of entities, or sub-intents later.
- Each use case must be associated to an intent. Multiple use cases are allowed to have the same intent.
For Example: 12
- Good and Bad Examples of Intents
Using the example of capital markets product for purpose of illustration.
Use cases include:
- Mutual Fund purchase
- Equity Purchase
- Portfolio valuation
The user utterances for the first 2 use cases will be very similar, hence they can use the same intent - txn-buysecurity. However, the user utterances for checking ones portfolio will be different, and hence it should be a separate intent - qry-portfolio.
File Format
intent=qry-securityquote
entities=globalmarkets.security-type,globalmarkets.security-name,globalmarkets.security-identifier,globalmarkets.exchange-name,globalmarkets.exchange-code,sys.date,sys.country
modifiers=52wkhigh,7daylow,6monthreturn
[Utterances]
NAV
Price
Net Asset Value
Quote
Value
Purchase value
Purchase price
Cost
Show me the NAV
Show me the price
Show me the Quote
FAQs
Q. I have two use cases that are very similar. Should I use the same intent for them
A. If the two use cases are similar, and can be differentiated using entities or modifiers, it is a good idea to use the same intent for them.
Typical Symptoms:
- Symptom : Particular Intent is getting misclassified a lot.
- Solution : If two intents is getting misclassified, it could be due to one of the following reasons:
- The user utterances for both the intents are very similar. Merging the intents can be considered as an option
- The intent might not have the right amount, variety of data. Increasing the amount, and variation of data will help.
Content Planning
Content Planning for data preparation of the Specific Intent can be construed as shown below:
- Need to list down all the actions which can be used to prepare the utterances
- Whether the use case is enquiry 1 (qry) or a transaction 2 (txn)
- If the use case is enquiry then specific types of sentence structure3 can be used like; interrogative, imperative with actions like:- show, give, tell, provide, etc..
For Example: 13Use Case Name: Balance Enquiry
Intent: qry-balance-enquiry or qry-balanceenquiry
Utterance Samples:
- Show balance – Imperative
- What is the available balance in my savings account – Interrogative
- Give me the balance for savings account number 7237463832 – Imperative
- Tell me the balance for my saving account number ending with 8948 – Imperative
- If the use case is transaction then specific types of sentence structure can be used like; declarative, imperative.
For Example: 14Use Case Name: Funds Transfer
Intent: txn-money-movement or txn-moneymovement
Utterance Samples:
- Transfer funds – Declarative
- Send money to AMIT – Declarative
- Give 500 usd to an account number 783.7734723 – Declarative
- Pay money to AMIT from account number ending with 4587 – Declarative
- help me to do funds transfer – Imperative
- I want to transfer money overseas to an account number 847537374745 – Imperative
- List down all the attributes related to the use case which can be used to prepare utterances.
Content Planning to prepare utterances for a use case "FundsTransferGeneral":
To do a funds transfer in general we require below details from the user to execute the flow successfully.
- Requirement based information
- Source information
- Target Information
- Account name (women's)
- Account type (savings)
- Product type (account)
- Account number (complete account number/ number ending with 1234 (always 4 last digits)
- Registered payee name (regular expression)
- Registered mobile number (can be captured under TE)
- Registered email id [ReGEx8] (can be captures under ReGEx expression)
- Other information
- Payment gateway [DE] (IMPS, RTGS, etc..)
- Payment methods [DE] (interbank transfer, intrabank transfer, overseas transfer, wire transfer, etc..)
- Business logic
- Authentications [ReGEx] (OTP based, transaction code based, or biometric based, etc..)
- Editing the provided details before completing the flow
- Data level content planning based on the gathered requirements
- Actions to be used while preparing data (i.e. transfer, send, give, pay)
- Sentence structures to be used (declarative, imperative, request questions)
- "Simple to complex" and "general to more specific" structures to be prepared
For Example: 15
| Table 5 Content Planning based on the Complexity, Abstraction for Utterances | ||||
| Complexity | Abstraction | Utterances | Structure Type | |
|---|---|---|---|---|
| a. | Simple | general | Transfer9 | DS10 |
| b. | Simple | general | Do funds transfer | IS11 - General |
| c. | Simple | general | I Want to do funds transfer | IS – General |
| d. | Simple | general | Want to do funds transfer | IS - General |
| e. | Simple | Specific | Transfer {sys.amount}12 usd | DS - 1 TE (sys.amount) + 1 DE (sys.currency-code:usd) |
| f. | Simple | specific | Transfer {sys.amount} usd to {banking.payee-name} | DS - 2 TE (sys.amount, banking.payee-name) + 1 DE (sys.currency-code:usd) |
| g. | Complex | More specific | Send money to saving account number {banking.product-account-numebr} from my current account number ending with { banking.product-account-numebr } | DS - 2 TE (banking.product-account-numebr) + 4 DE (ban king.product-type:account; banking.product-account-type: savings,current) |
Data Preparation - via Admin
Data can be prepared via admin dashboard. The data preparation via admin can be done in two ways:
- Data preparation - via admin UI
- Data preparation - for admin file based (i.e. which can be imported in the admin)
Conversational AI modules data can be prepared directly in the admin UI or can be prepared in a file and then can be imported to the admin directly. Under these approach all the module data cannot be prepared rather for following modules only the data can be prepared using UI or directly in a file and then can be imported to the admin.
- Small Talk
- faqs - faqs along with keyphrases
- Primary Classifier - Setup Intents data
- Dialog - Dialog data within
"Setup Intents" - SpellCheck - Setup spellcheck data
- NER - Dictionary, train and regex entity data can be prepared directly in an
".XML"file and then can be imported.
Data preparation - via admin UI
Below are the steps by which incremental data or a new use case data can be prepared via admin.
Select a desired Workspace or create a new Workspace
a. Create FAQ Workspace
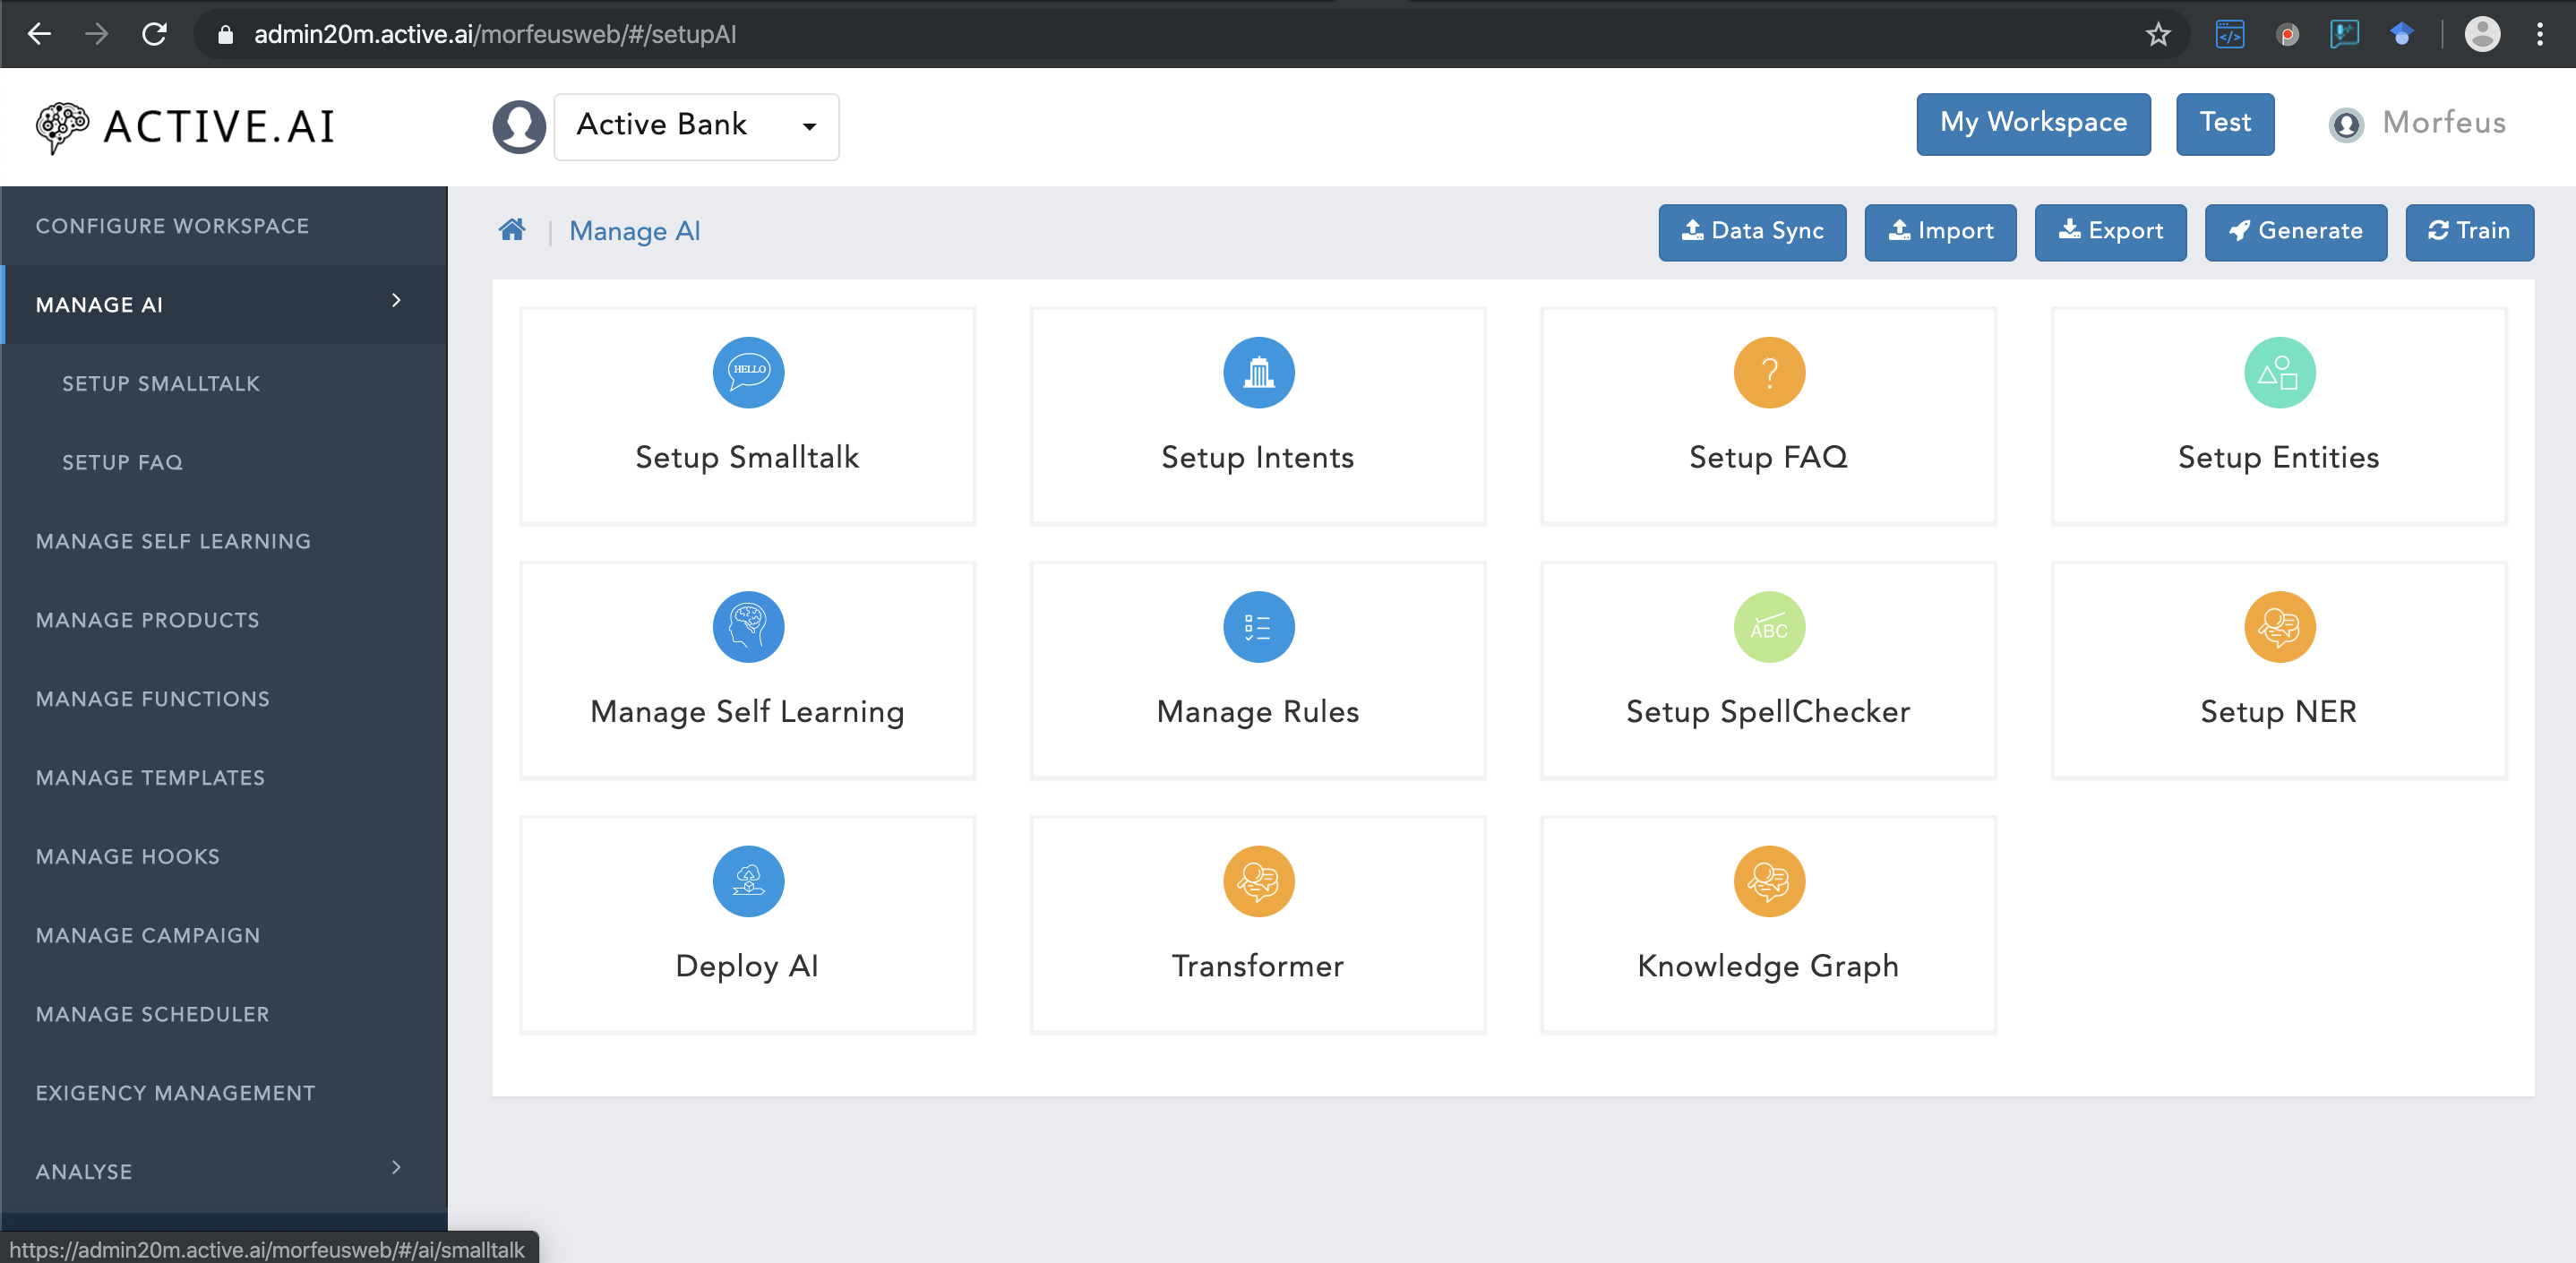
b. Create Conversational WorkspacePlease visit Manage AI for completing the below steps.
- Create Small Talk
- Create SpellChecker
- Create CognitiveQnA (FAQs)
- Create Keyphrases
- Create Entities
- Create Intents
- Create Dialogs
Conversation Processor
Conversation processor will utilize primaryClassifier data, dialog data, and NER edict data as well as Train and RegEx entities.
Primary Classifier data will be prepared under Setup Intents and NER entities will be prepared under Setup Entities.
Data preparation - For Admin (file based)
Smalltalk
To prepare smalltalk data directly in a file where certain informations are required like; headers, formatting of the file; and how it can be imported. One needs to follow below steps to prepare smalltalk data in a .csv file.:
- Click on Manage AI
- Click on Setup SmallTalk
- Click on
"Export"button located on the top right corner of theSetup SmallTalkwindow to get the format of the file from the admin as shown in figure 5 below.smalltalk.csvfile will be exported.
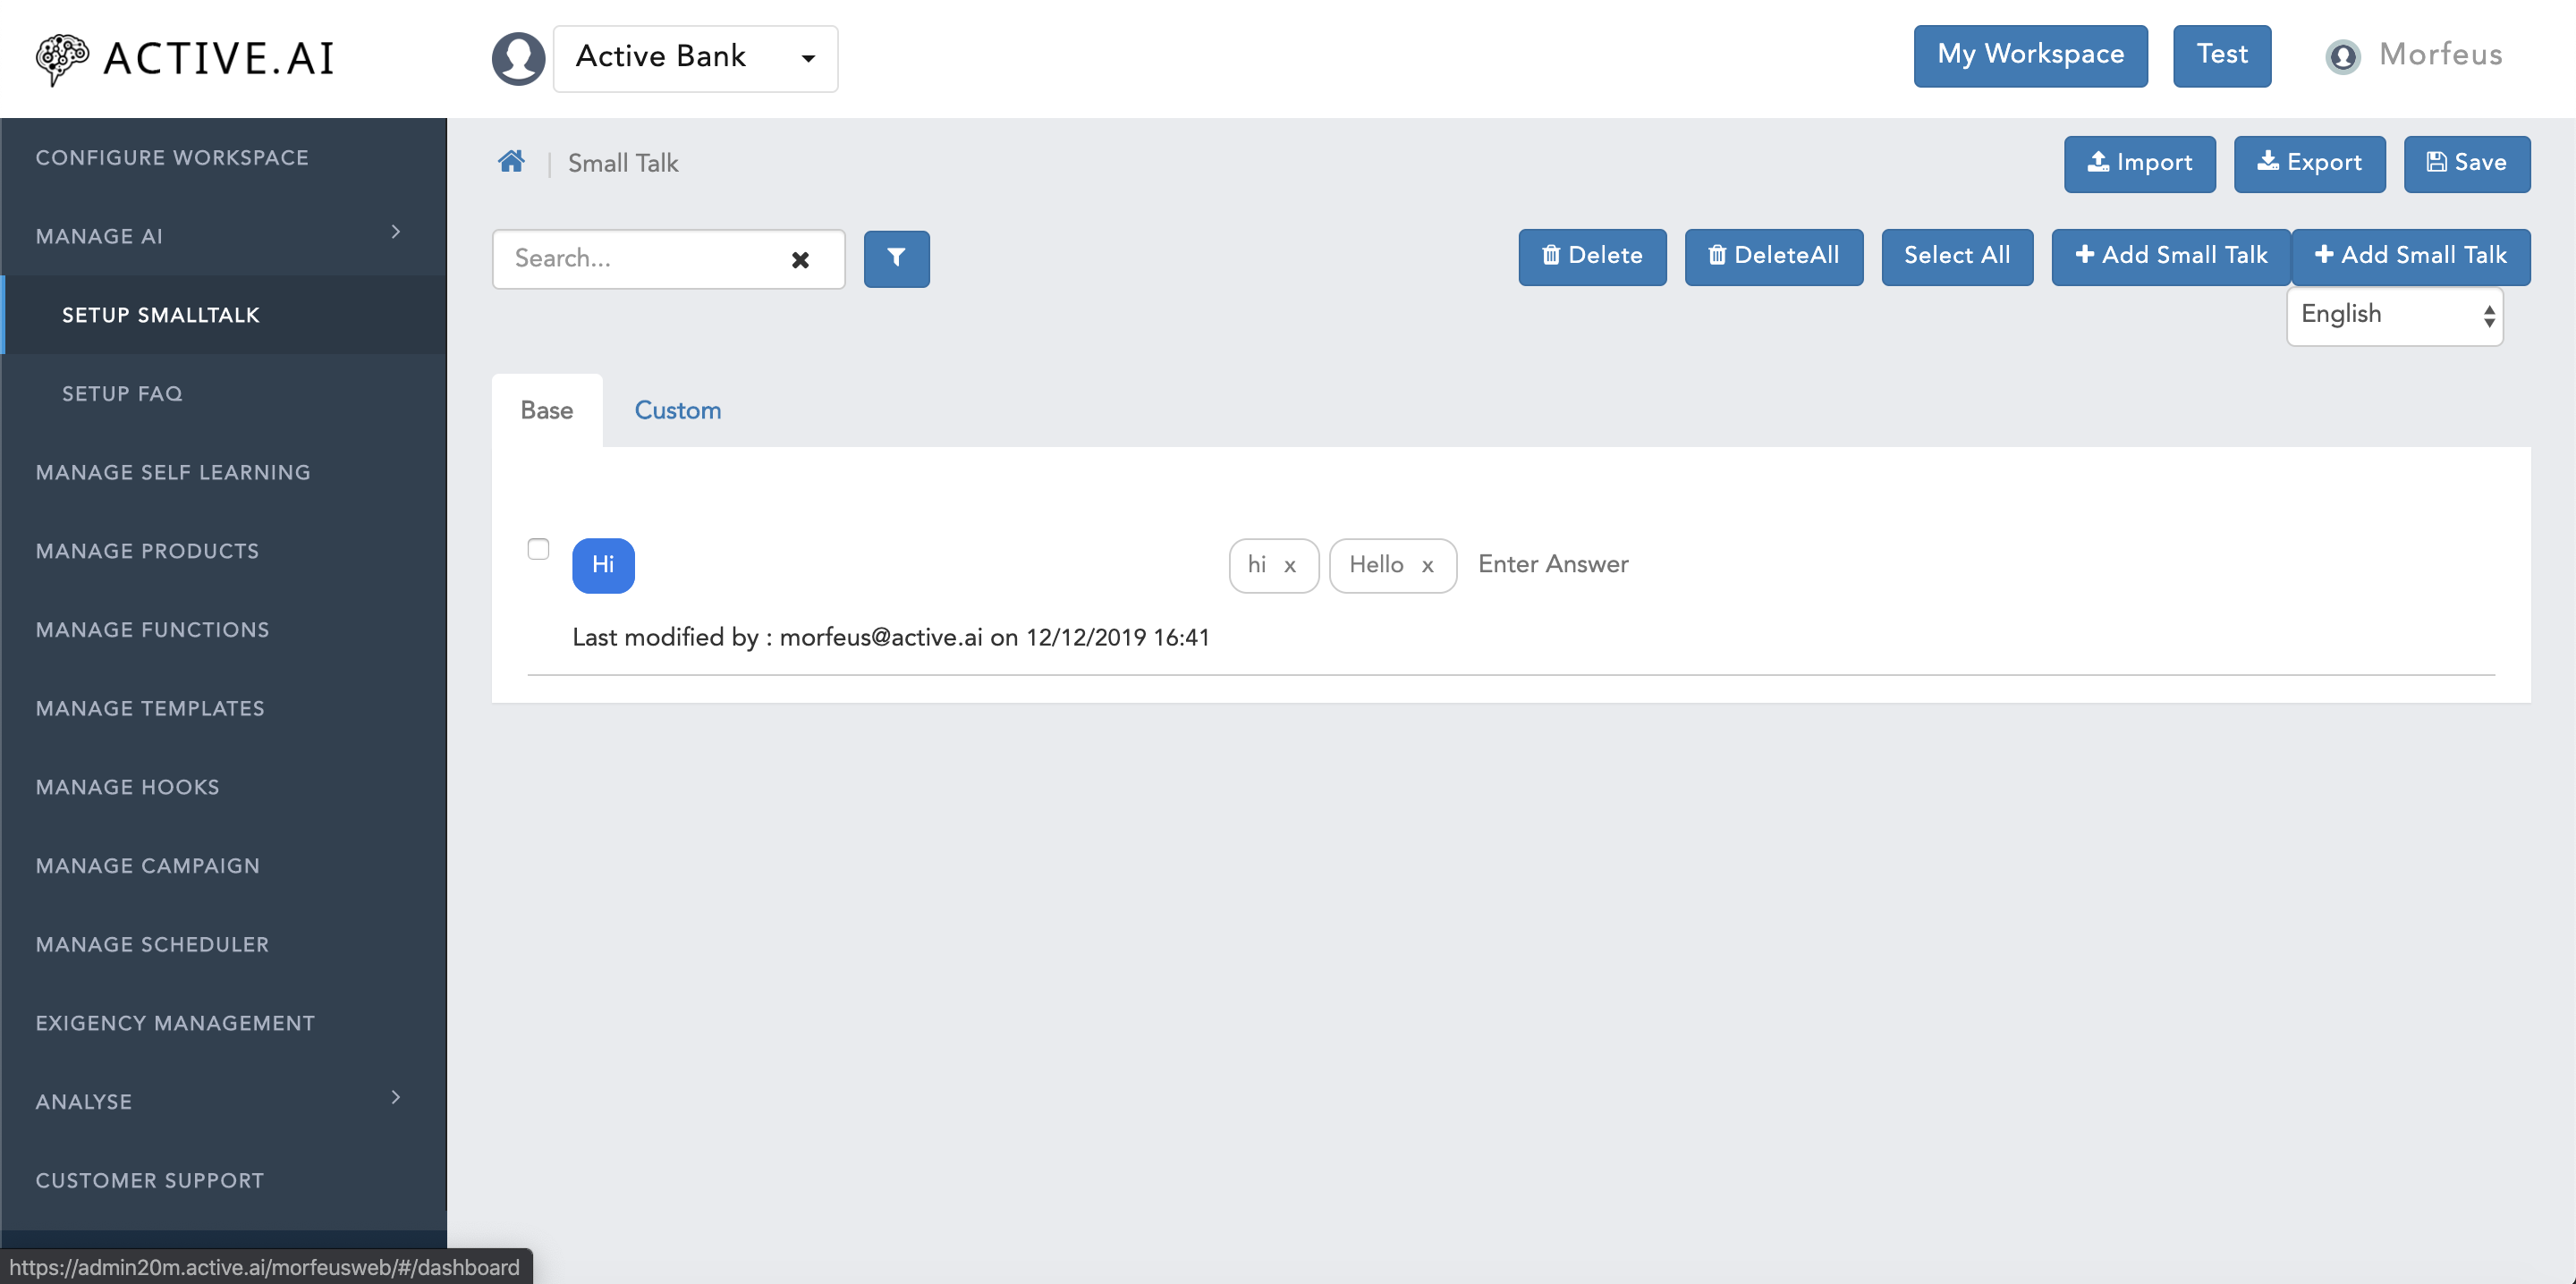
- Open the exported
smalltalk.csvfile.

Here in figure 6, there are 6 columns. Each column has its own importance as mentioned below:
- ID - identification number / serial number.
- Question - Users smalltalk query should be populated here.
- Answer - SmallTalk Answer/response should be populated here.
- Category - all the category should be by default marked with "greetings"
- Type - Type should be always marked as "B".
- Language - Language code "en" should be populated here.
- Once the smalltalk data has been prepared, one has to make sure that there are no any additional empty columns or rows.
- On the safer side, it is advised to select all the empty columns and rows turn by turn and delete them.
- save the file as
smalltalk.csv. - Go to the
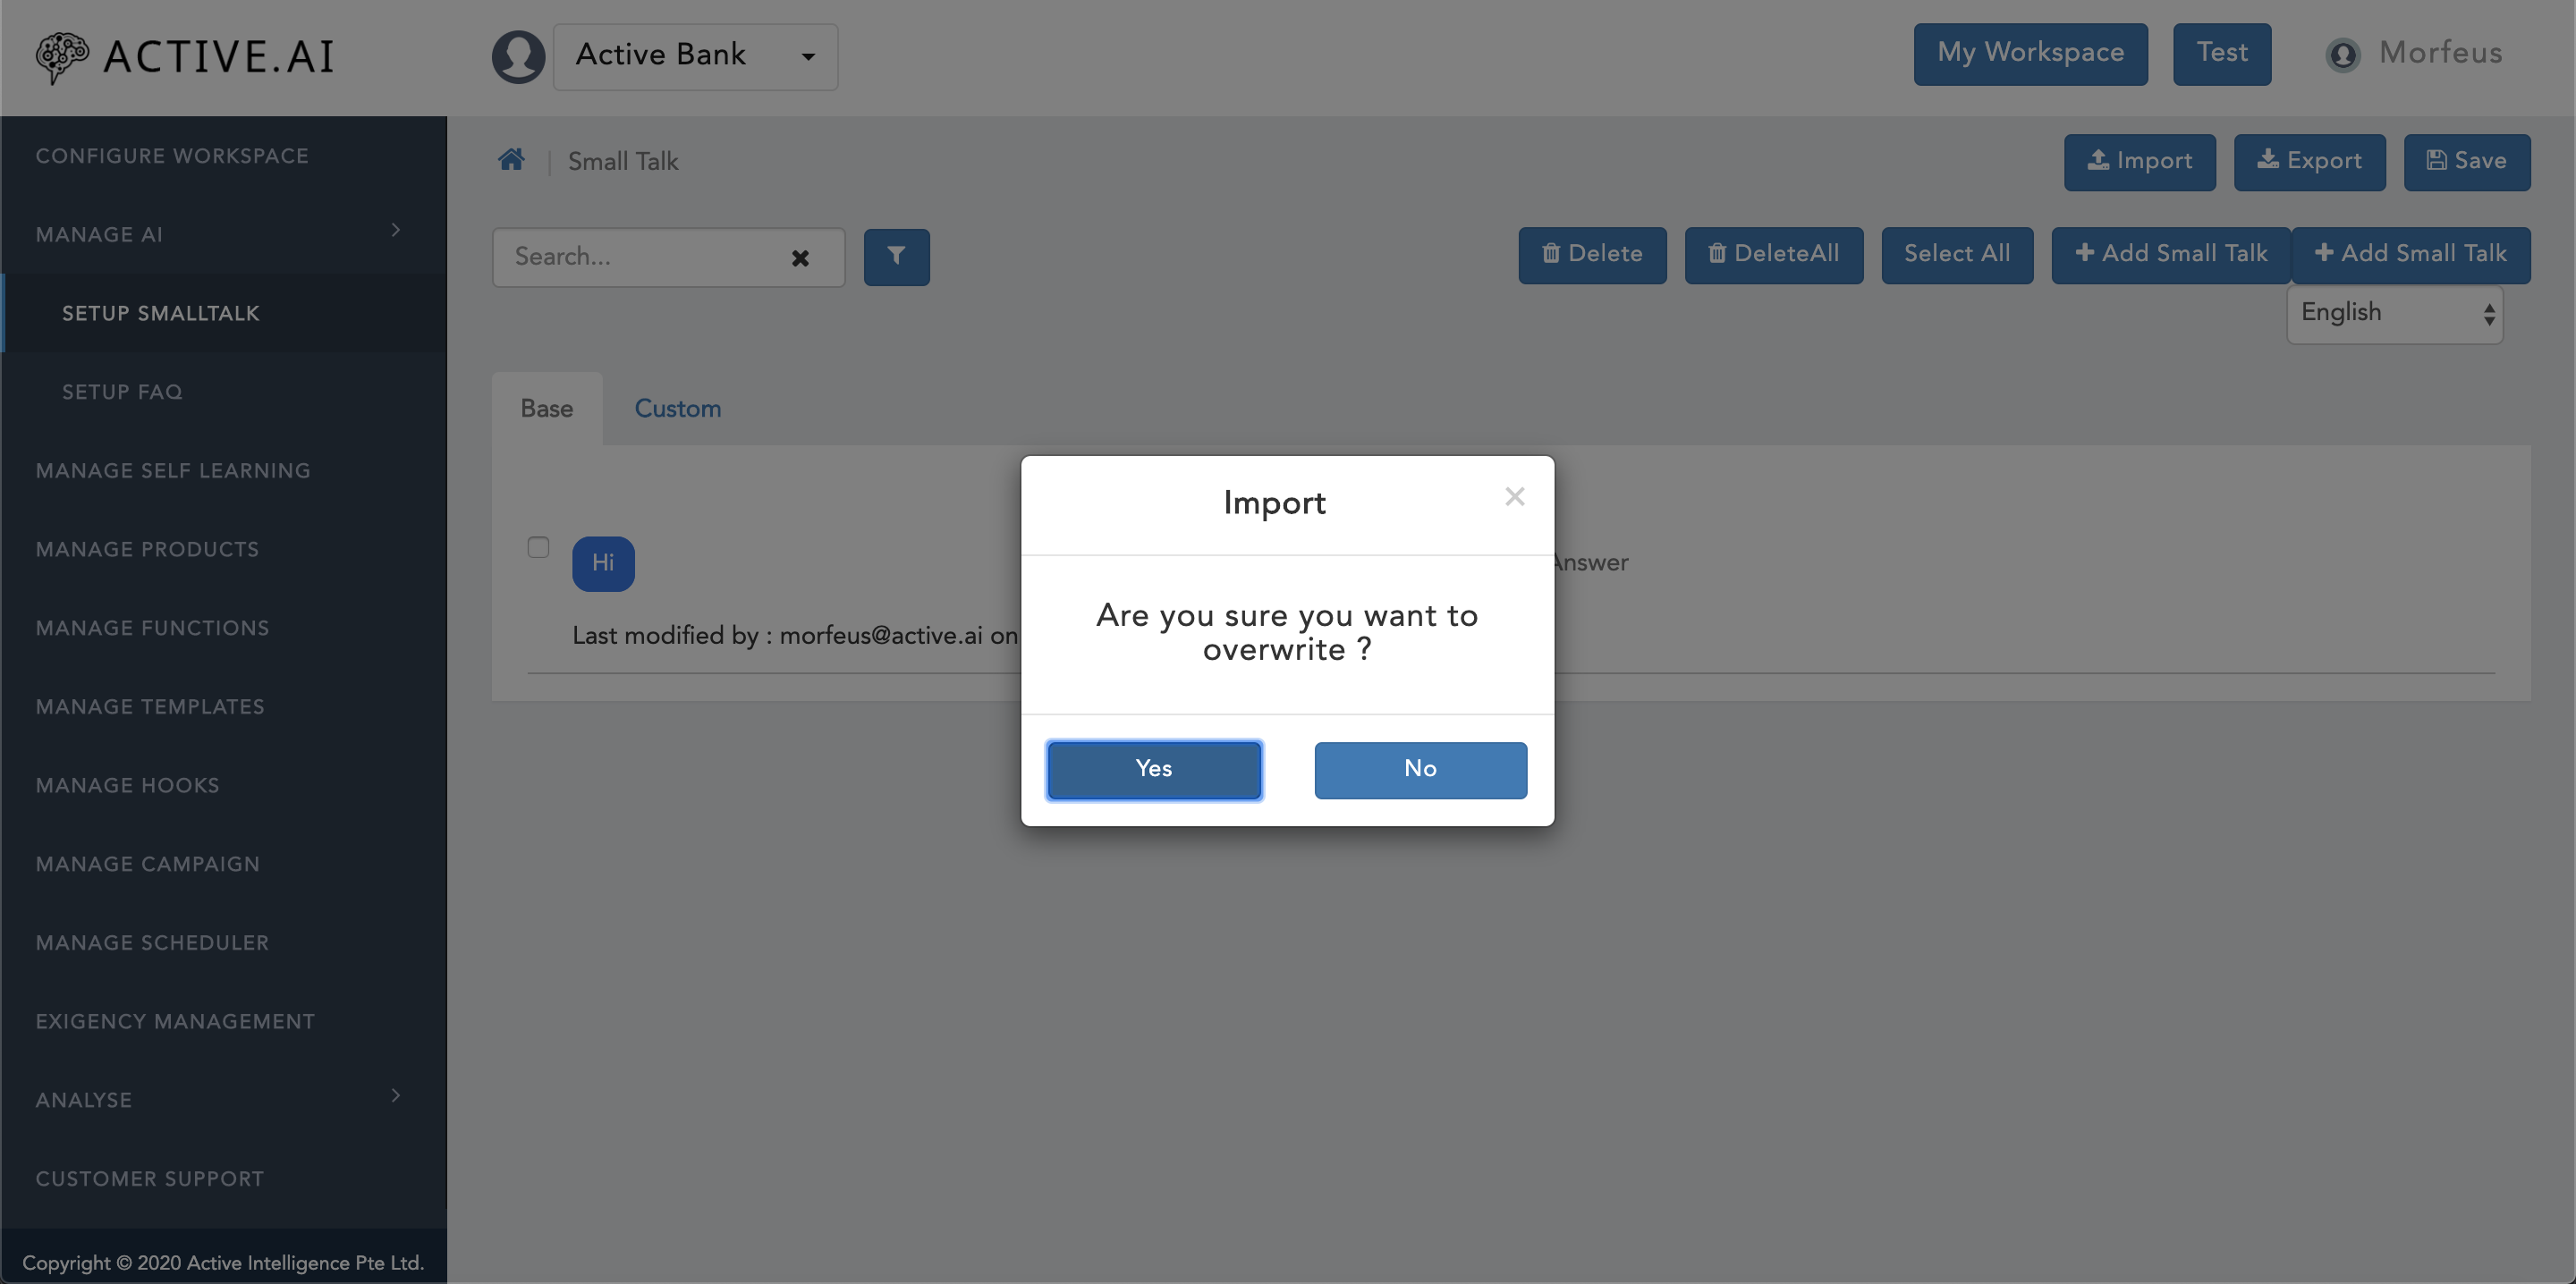
admin dashboard, and click on"import"button located on the top right corner. Confirmation window will prompt as shown in figure 7 below with message asAre you sure you want to overwrite ?. - Select
Yesif want to overwrite else selectNoto import delta only. - Finder/explorer window will open up. Select the updated
smalltalk.csvfile and click onOpenbutton located on the right bottom corner of the Finder/explorer window. - Post successful import of
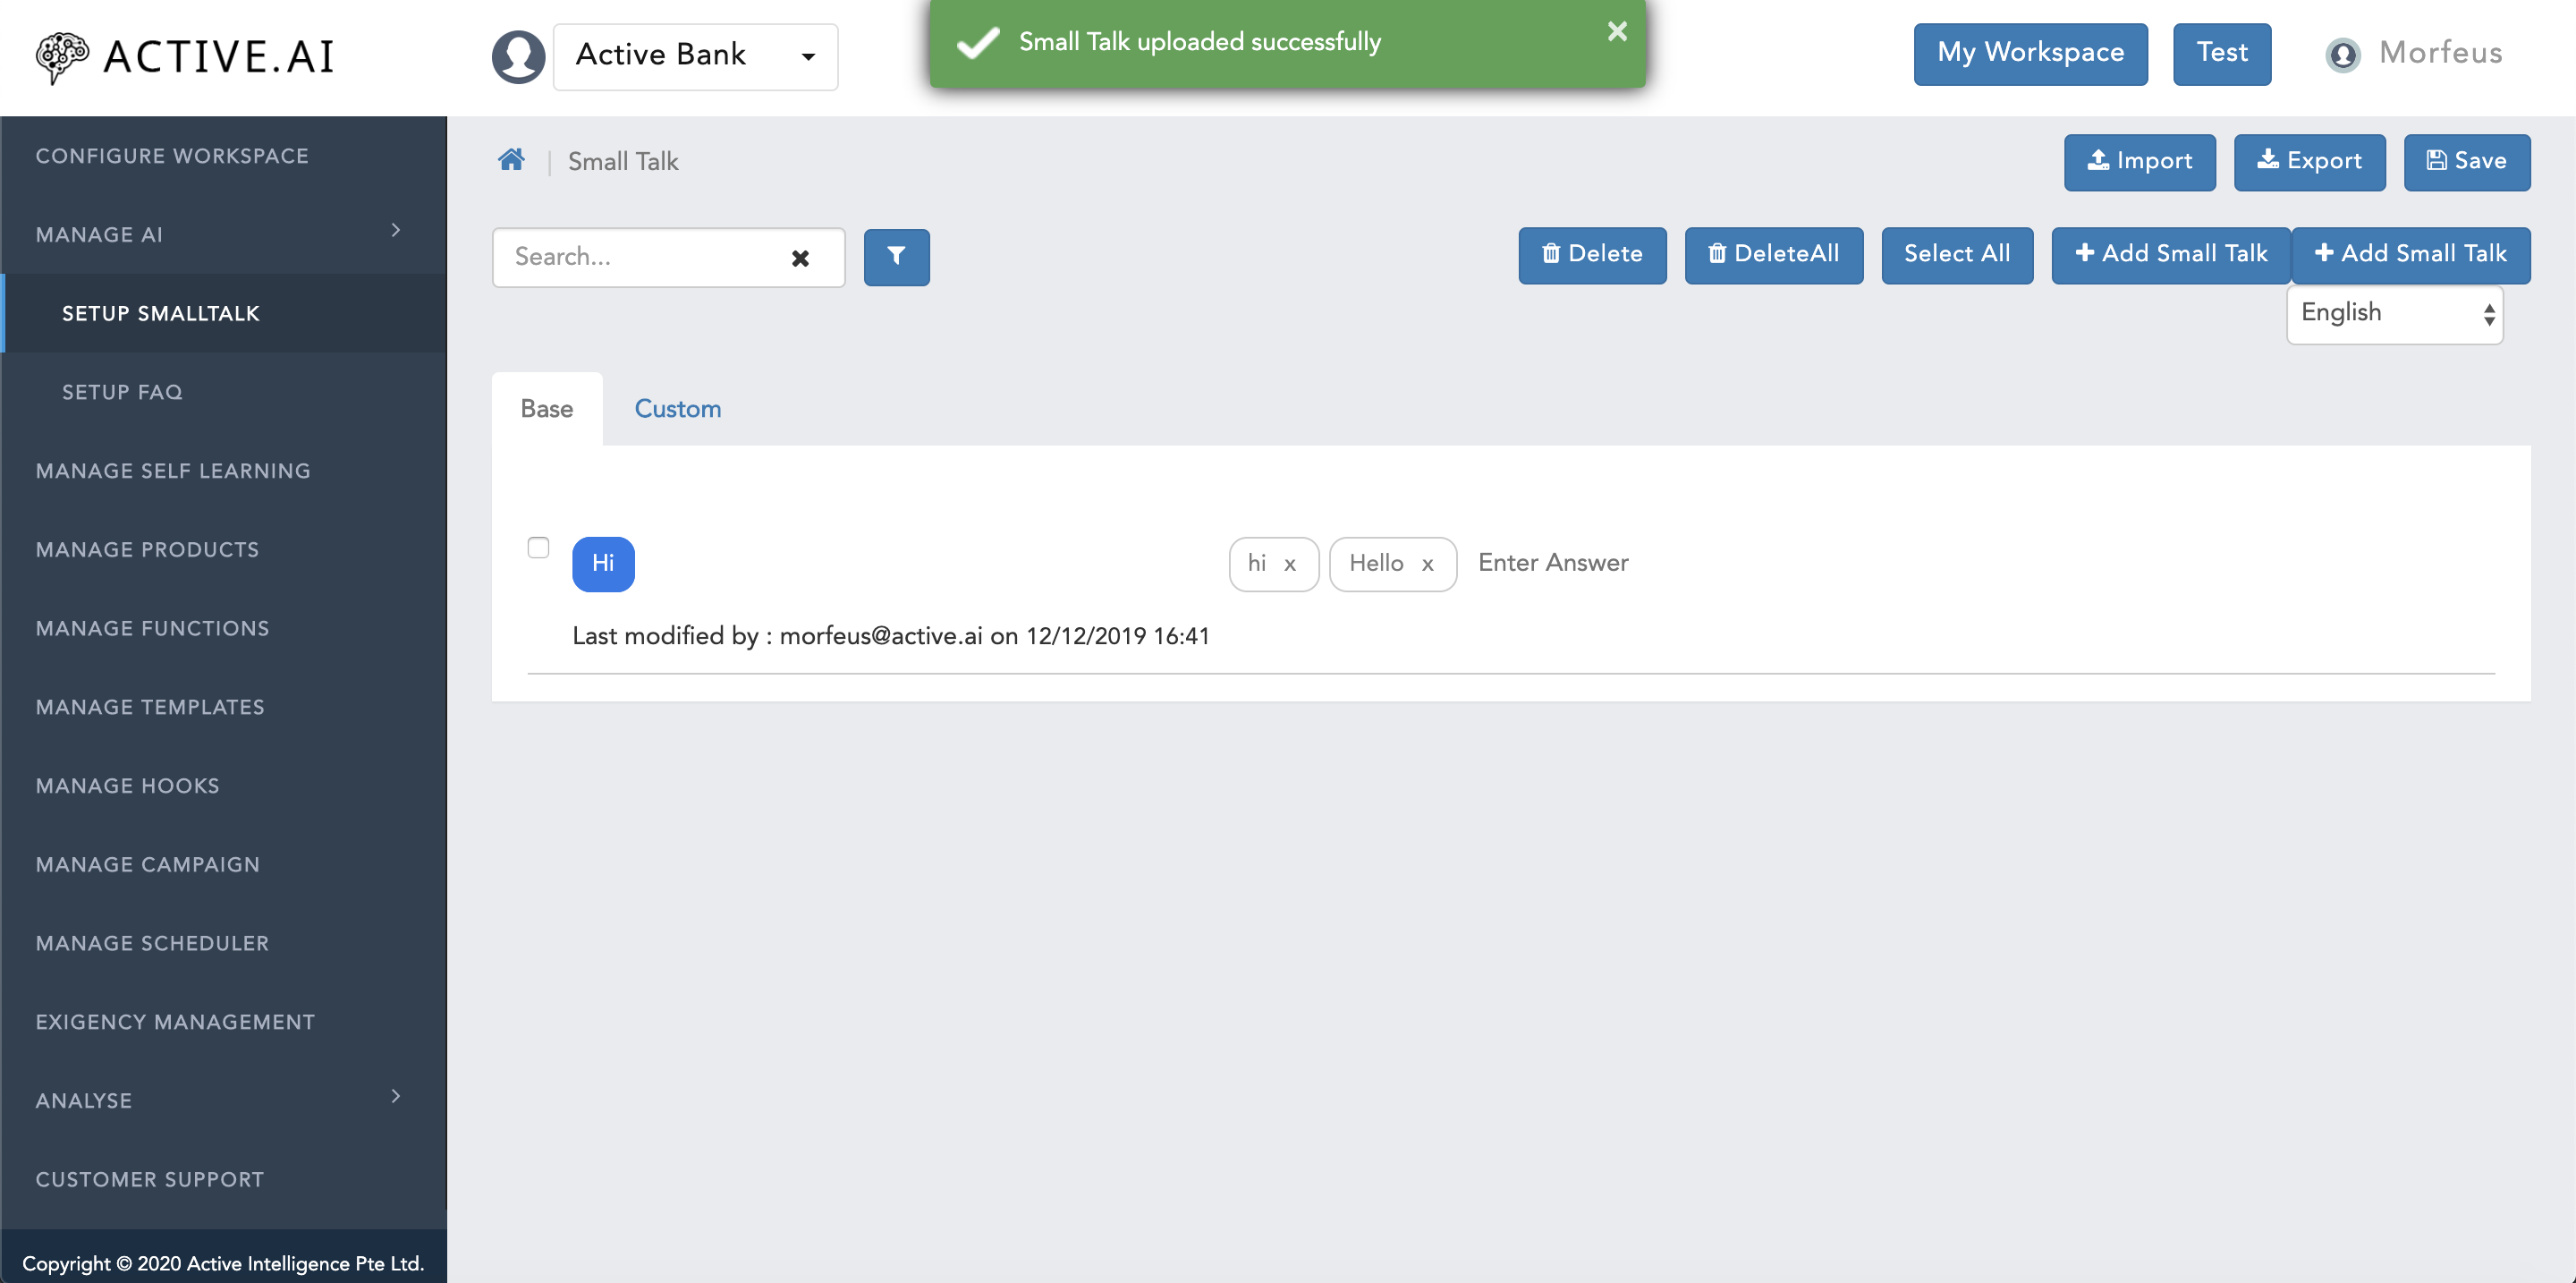
smalltalk.csvfile, a message ribbonSmall Talk uploaded successfullywill be prompted on the top of the window in green colour as shown in figure 8 below.
FAQs
To prepare faq data directly in a file where certain informations are required like; headers, formatting of the file; and how it can be imported. One needs to follow below steps to prepare faq data in a .csv file.:
- Click on Manage AI
- Click on Setup FAQ
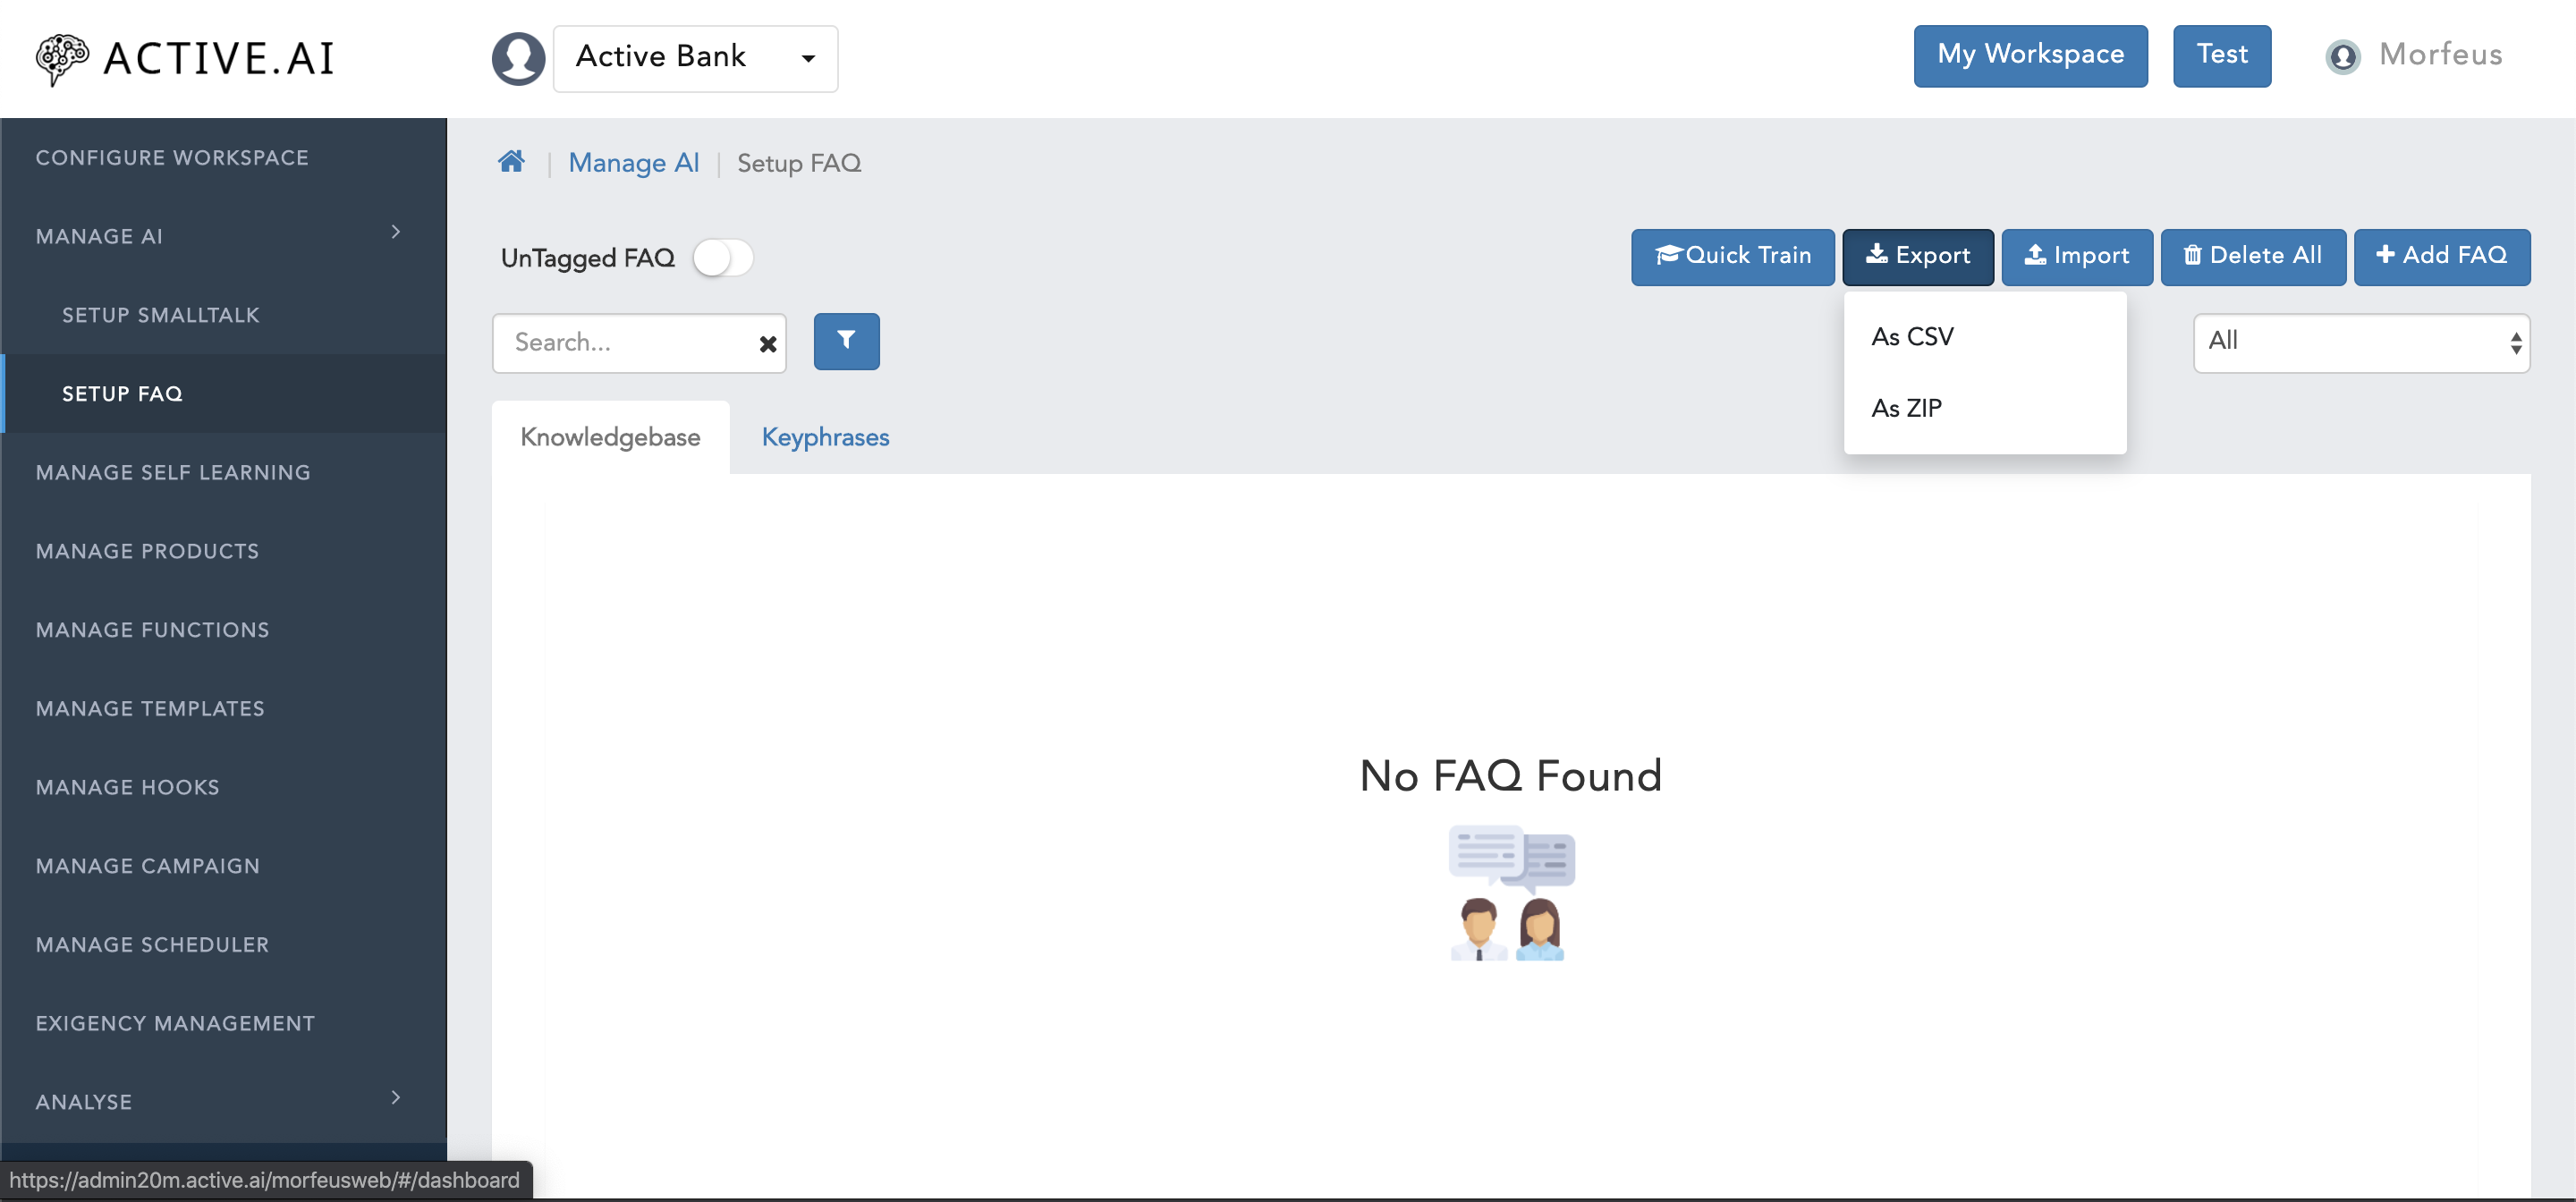
- Hover cursor on
"Export"button located on the top right corner of theSetup FAQwindow. - Two options will be prompted namely; a.
As CSVand b.As ZIP. - Select
As CSVoption to get the format of the file from the admin as shown in figure 9 below.. FAQ.csvfile will be exported.
Open FAQ.csv file.

FAQ.csv file contains 7 different column where each of the column has its own importance as mentioned below:
- FAQ ID - FAQ id should be assigned for each unique set of questions (Original question + variations)
- FAQ Category - Category of an faq should be broad under which many faq sets can be covered.
- Question -
- Main Utterance - Main question of an faq set should be marked as
Y. - Rest of the variations should be marked as
NunderMain Utterancecolumn. - Language - Language code
"en"should be populated here. - Answers - Answers.responses should be populated here.
- Response Type - Response type can either be
Text,Workflow, orTemplate - Once the faq data has been prepared, one has to make sure that there are no any additional empty columns or rows.
- On the safer side, it is advised to select all the empty columns and rows turn by turn and delete them.
- save the file as
FAQ.csv. - Go to the
admin dashboard, and click on"import"button located on the top right corner. Confirmation window will prompt as shown in figure 11 below with message asAre you sure you want to overwrite ?. - Clock on
"import"button from the prompted window, file will get imported. - Import successful message will along with the progress bar will be prompted on the right bottom corner of the window as shown in figure 12 below.
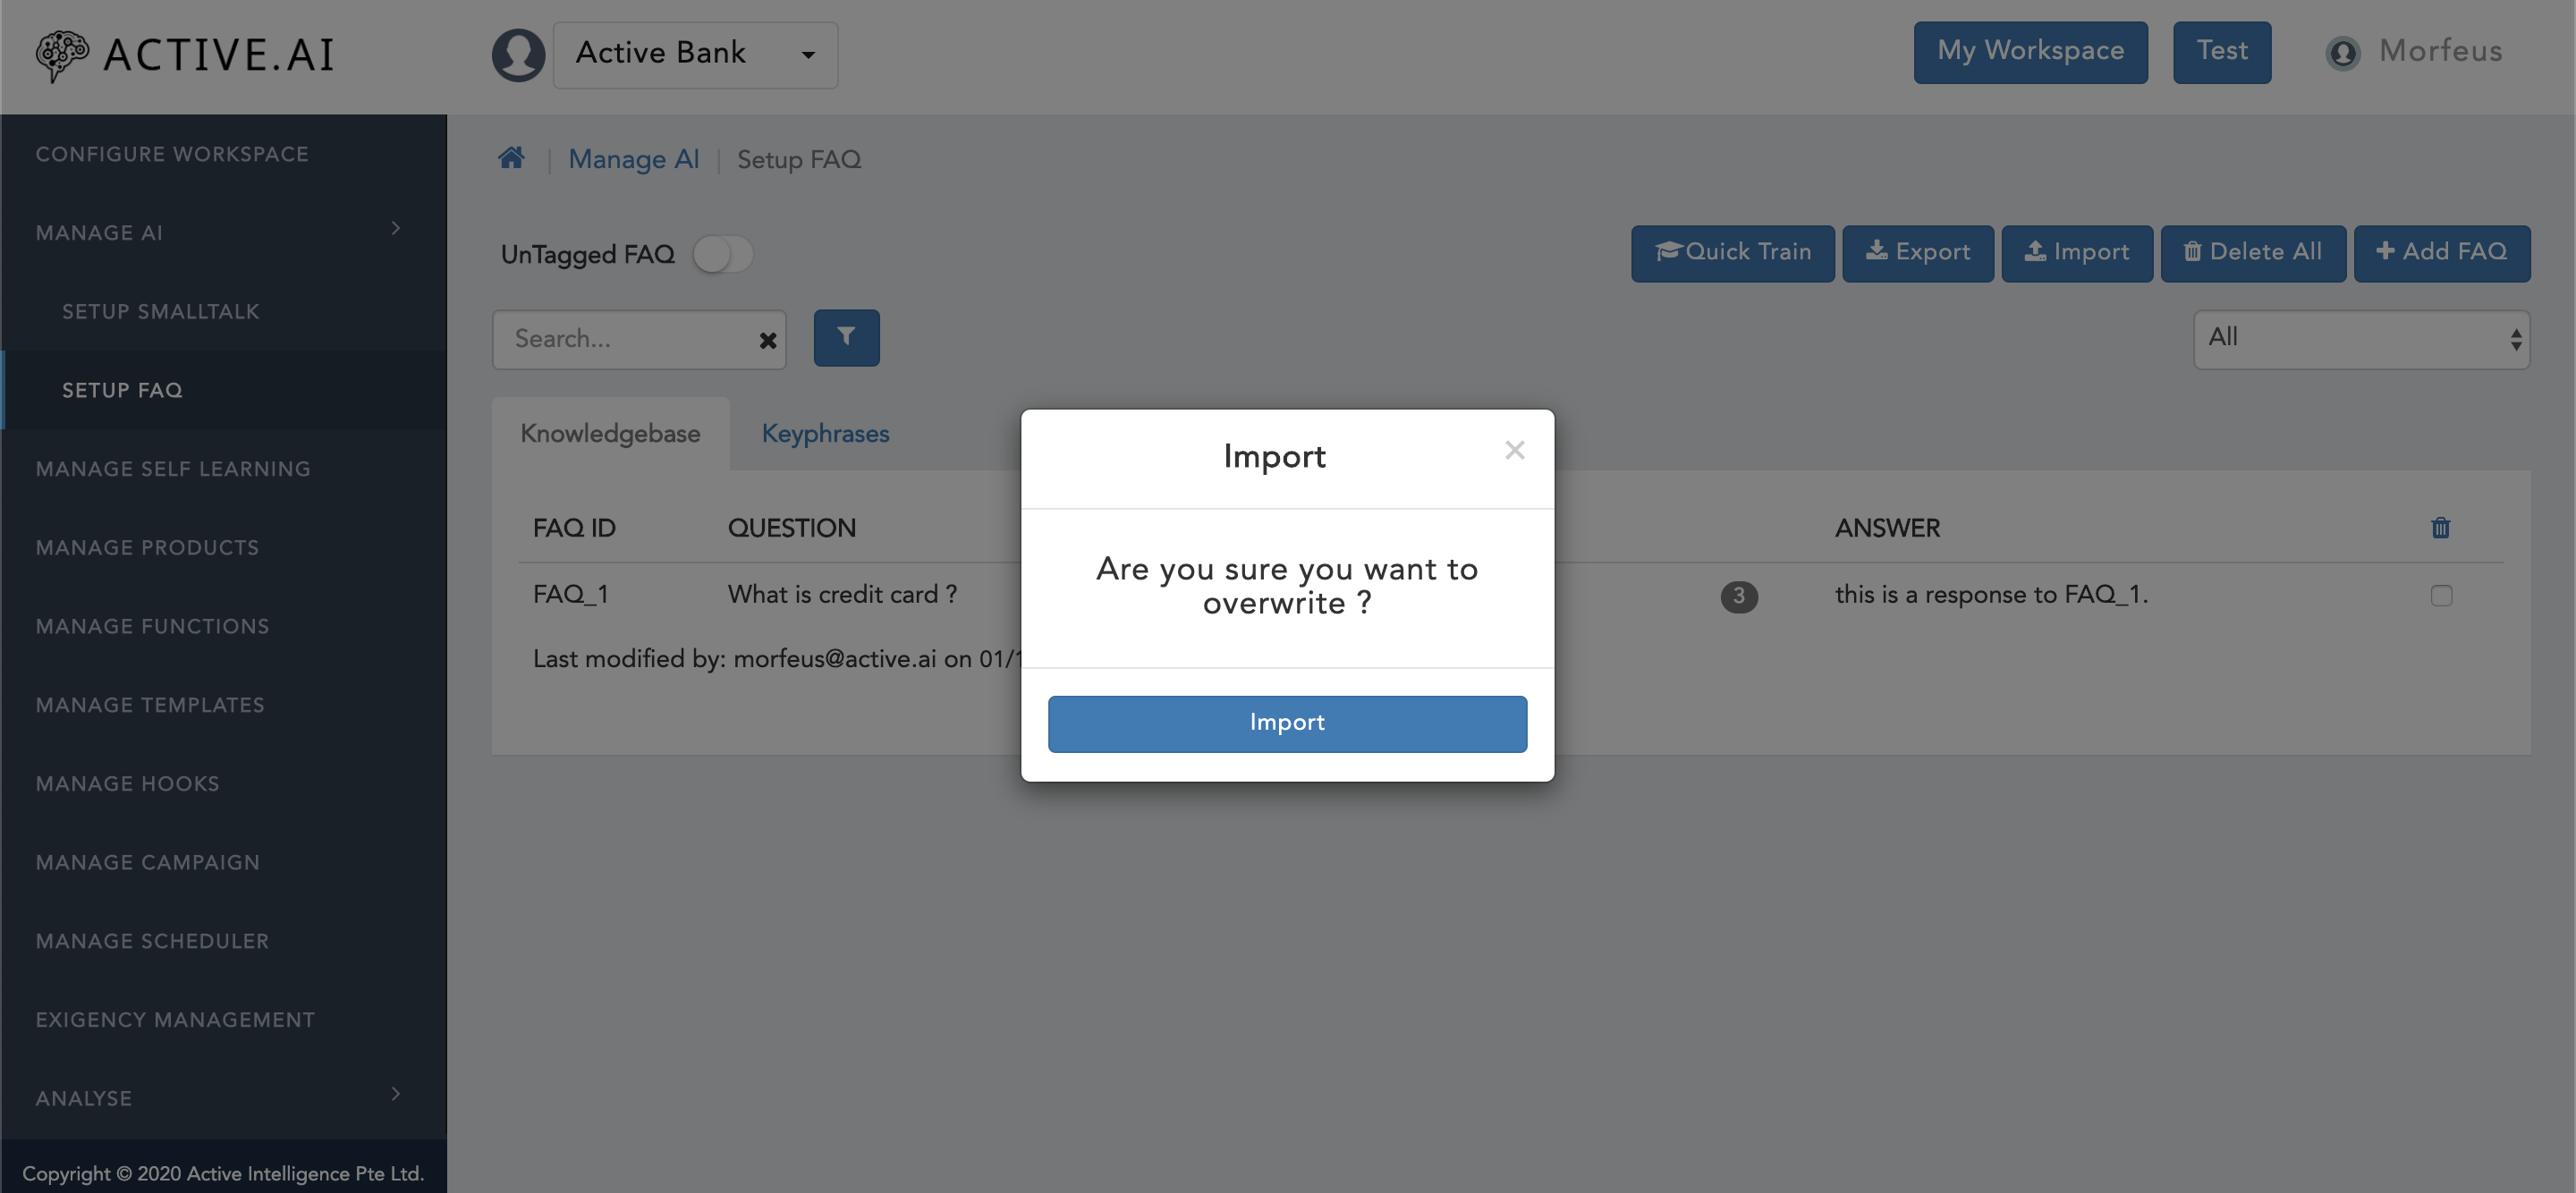
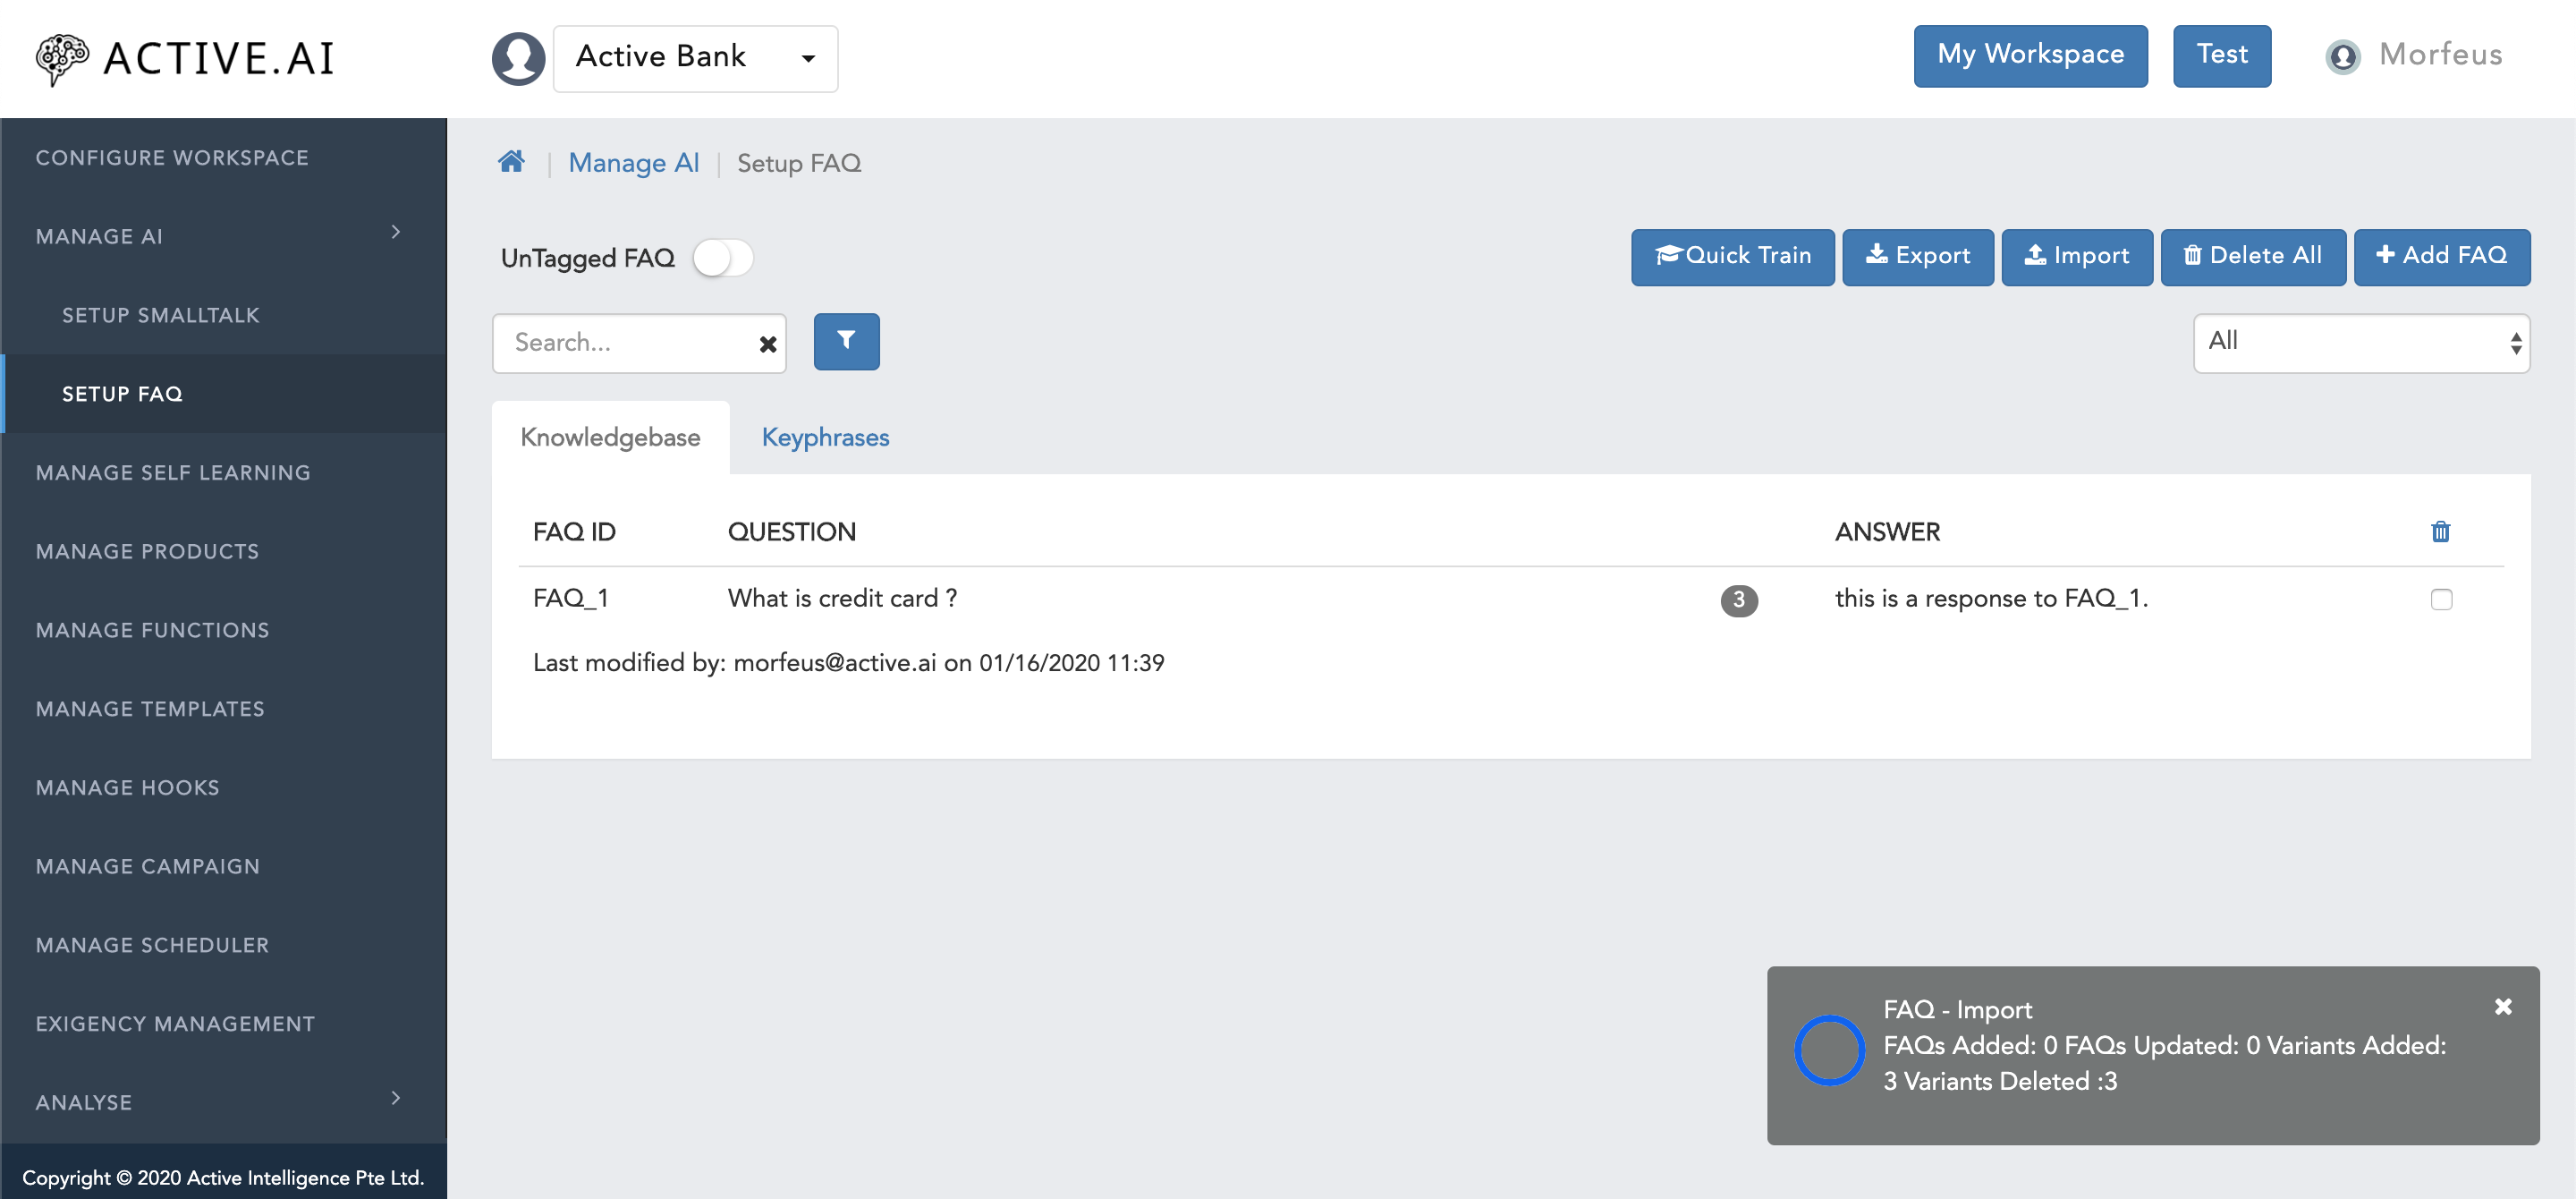
Keyphrases
To prepare data for keyphrases, one has to export file by following below steps:
- One has to follow the same steps defined for adding a keyphrase(s) via admin UI under the section of "Data preparation via admin".
- As to export the file minimum one entry should be present in the admin UI.
- Click on "Export CSV" button located on the top side the of the window as shown in figure 13 below.
- On click on "Export CSV" button, "KeyPhrases.csv" file will be successfully exported.
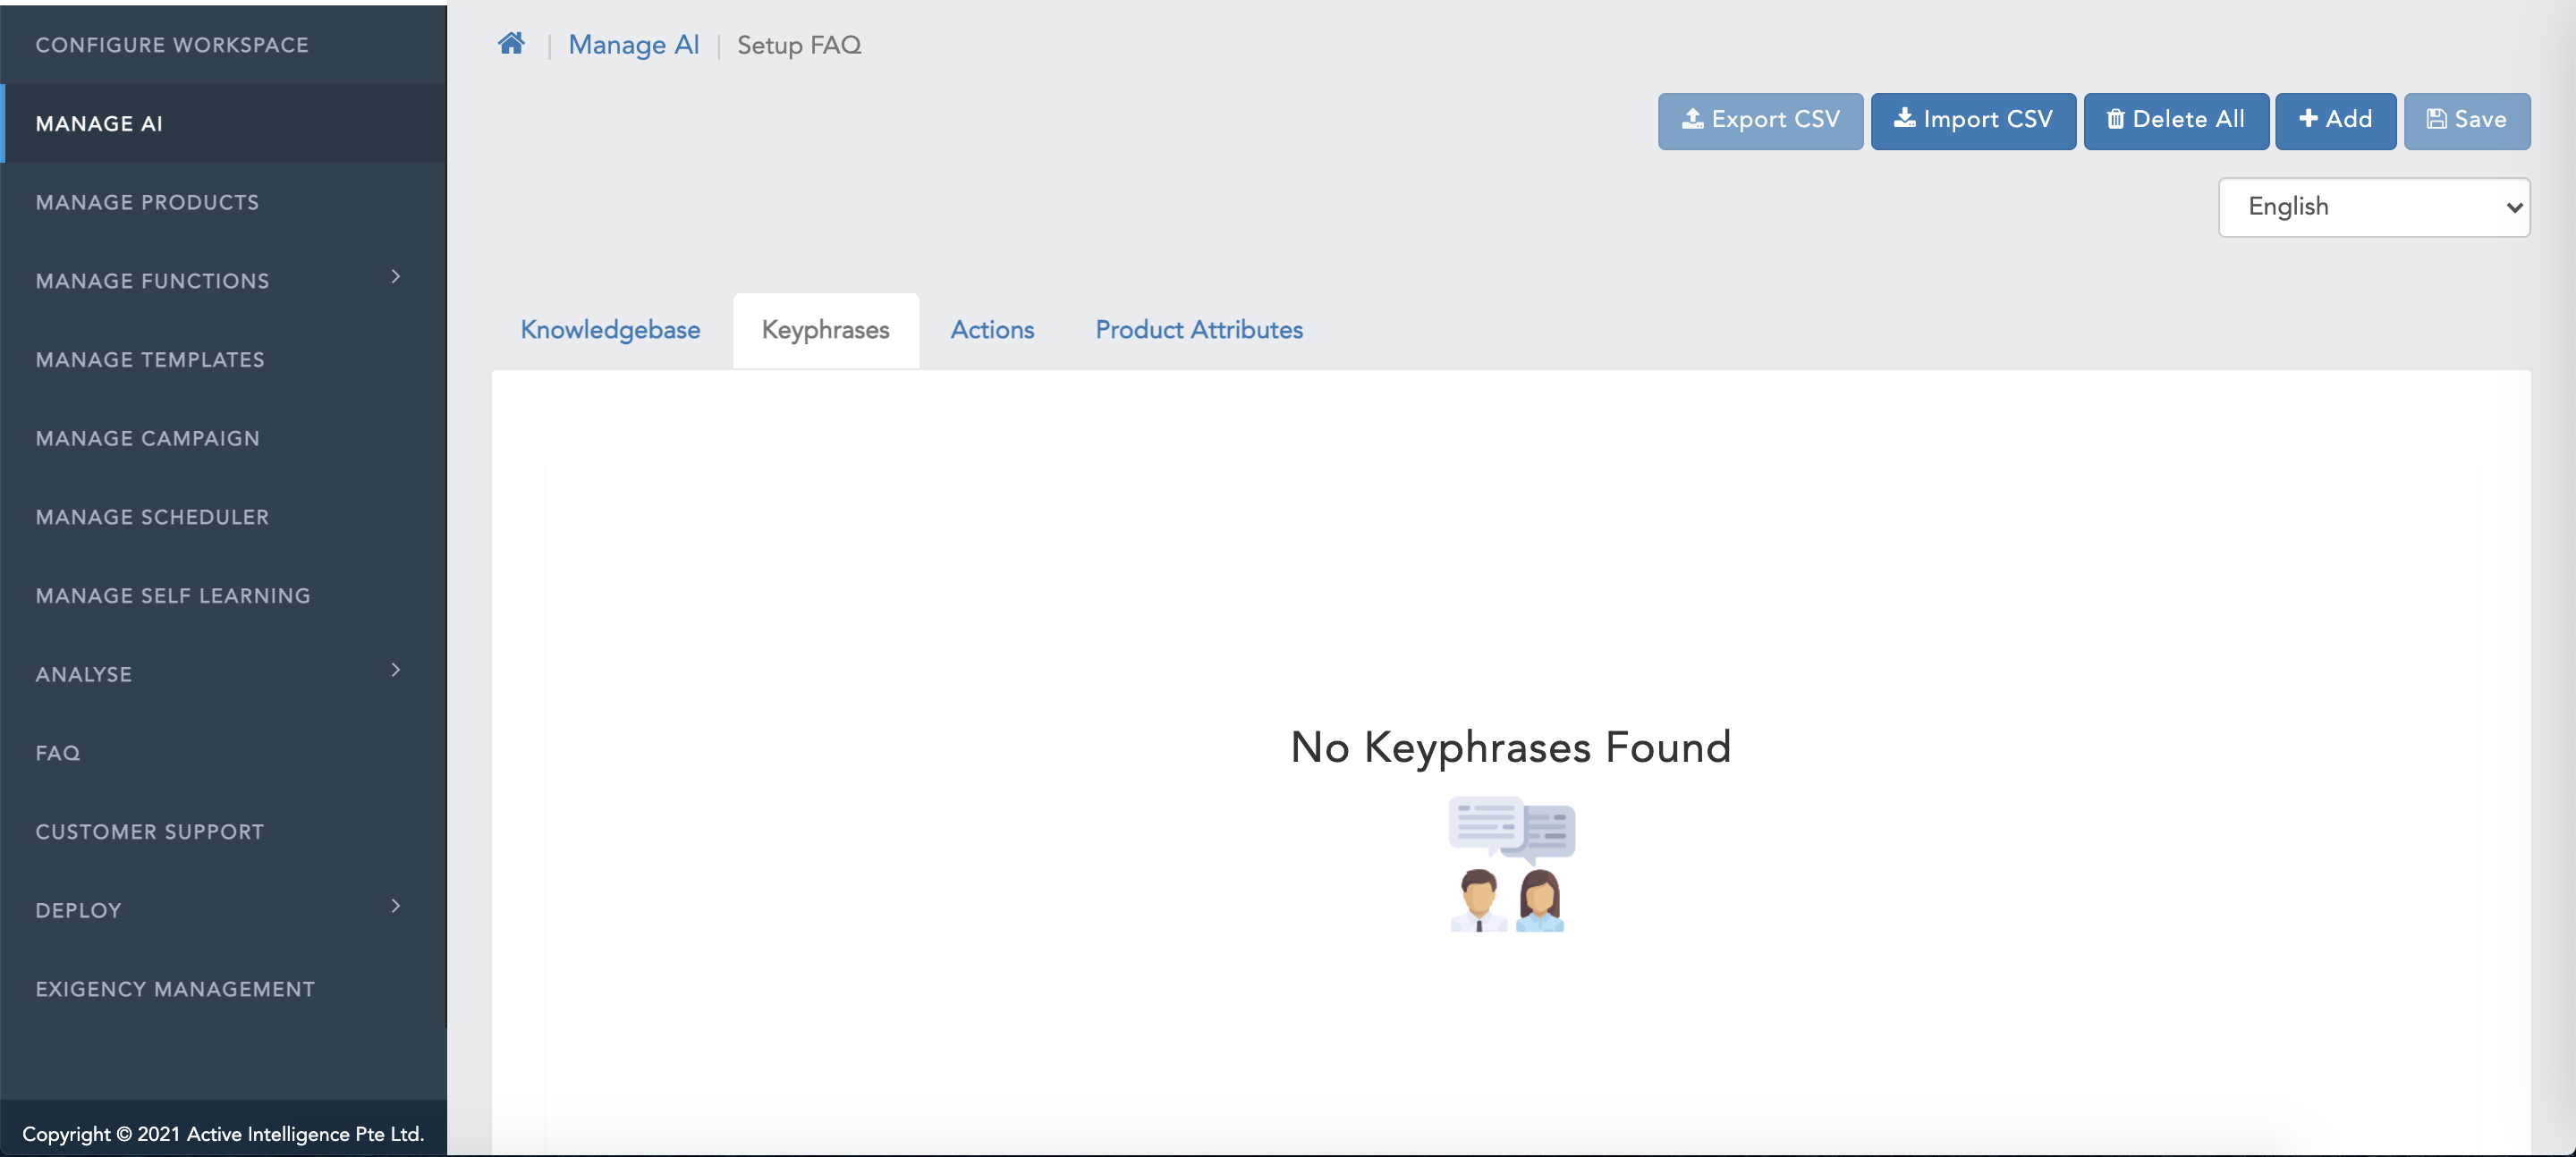
To populate the content for "KeyPhrases.csv", one has to follow below steps:
- Open the file - "KeyPhrases.csv".
- "KeyPhrases.csv"file contains mainly two columns with headers like; "Keyphrase Name", and "Synonym1".
- Column "Synonym1" can be extented by just changing the serial number located at the end of the "Synonym" header to immediate consecutive number.
- basically "Synonym1" column header has to be replicated to extend or accomodate multiple synonyms as required for a single kephrases, by simply changign the number to immediate consecutive serial number at the end as shown in below figure 14.
- Once the all the content has been populated, once has to delete all empty columns without any header in it as well delete all empty rows.
- Save the file as "KeyPhrases.csv" with an extension as ".csv" file.

Post updation/addition of the keyphrases in "KeyPhrases.csv", one has to import the file in "setup FAQ" >> "Keyphrases" screen by following below steps:
- Click on "Import CSV" button located on the top of the window as shown in figure 15 below.
- A new window will be prompted along with check box (refer figure 15 below) and confirmation message as "Do you want to delete existing Keyphrases if any ?".
- One has to select the check box and click on "Choose Files" from the prompted window.
- Locate the "KeyPhrases.csv" file from the finder/explorer and from the saved directory location.
- Click on "open" button in the finder/explorer post locating the and selecting the "KeyPhrases.csv" file.
- Click on "Import" button in the prompted window.
- File will be imported successfully.
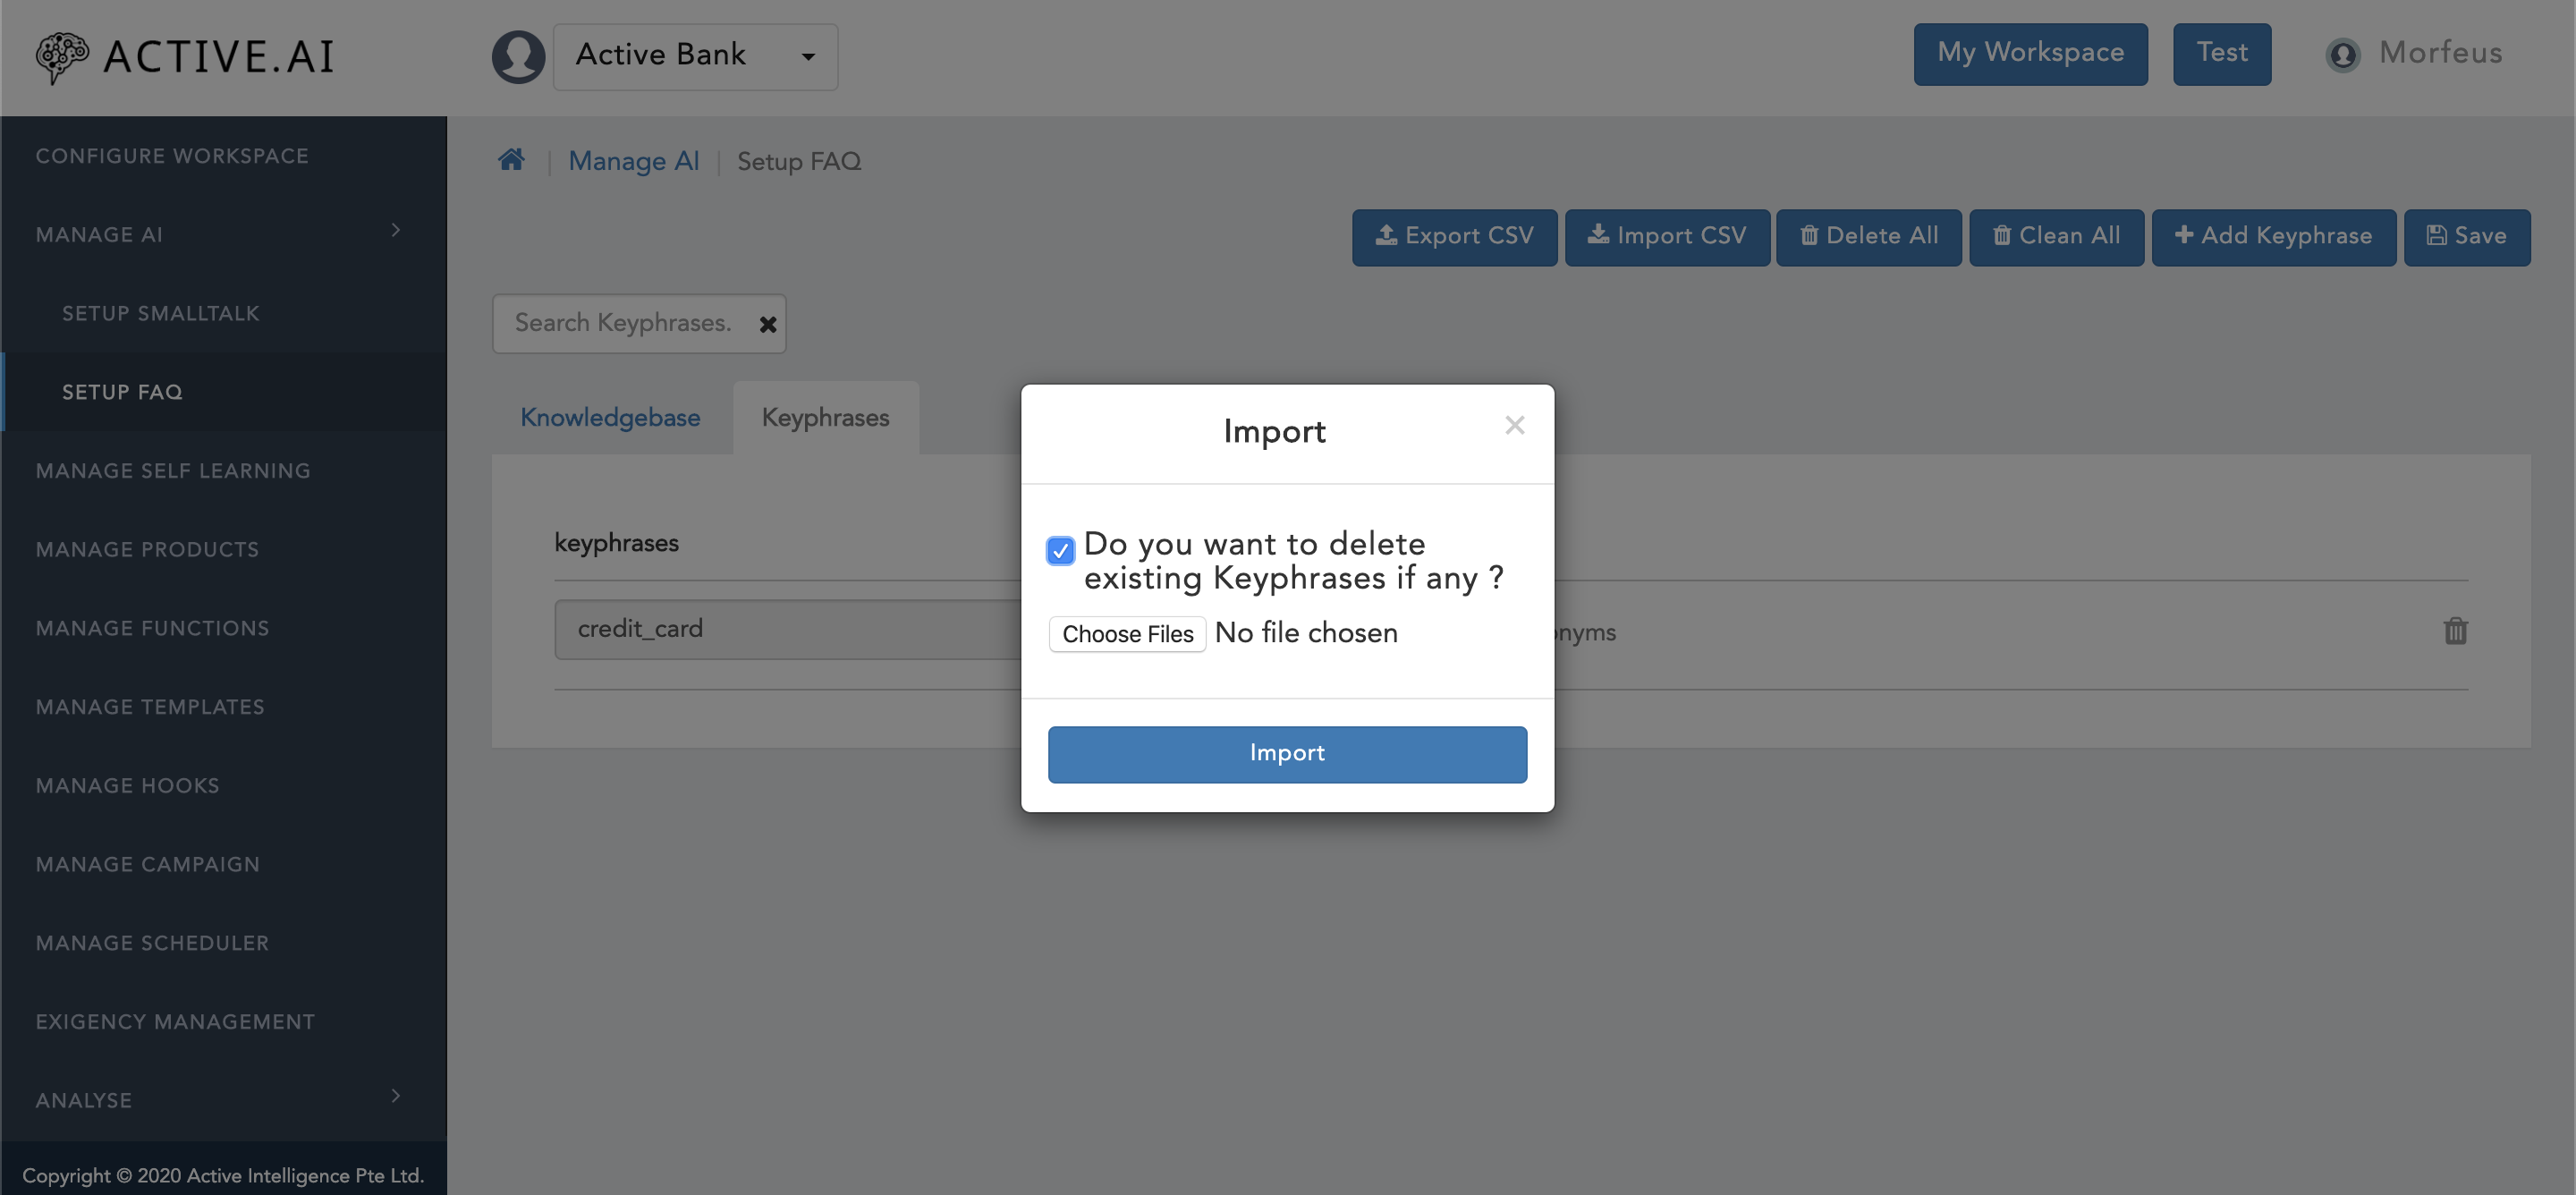
For "Kephrase Review Guideline", please refer to "KeyPhrases" section under "Data preparation via Admin UI".
PrimaryClassifier
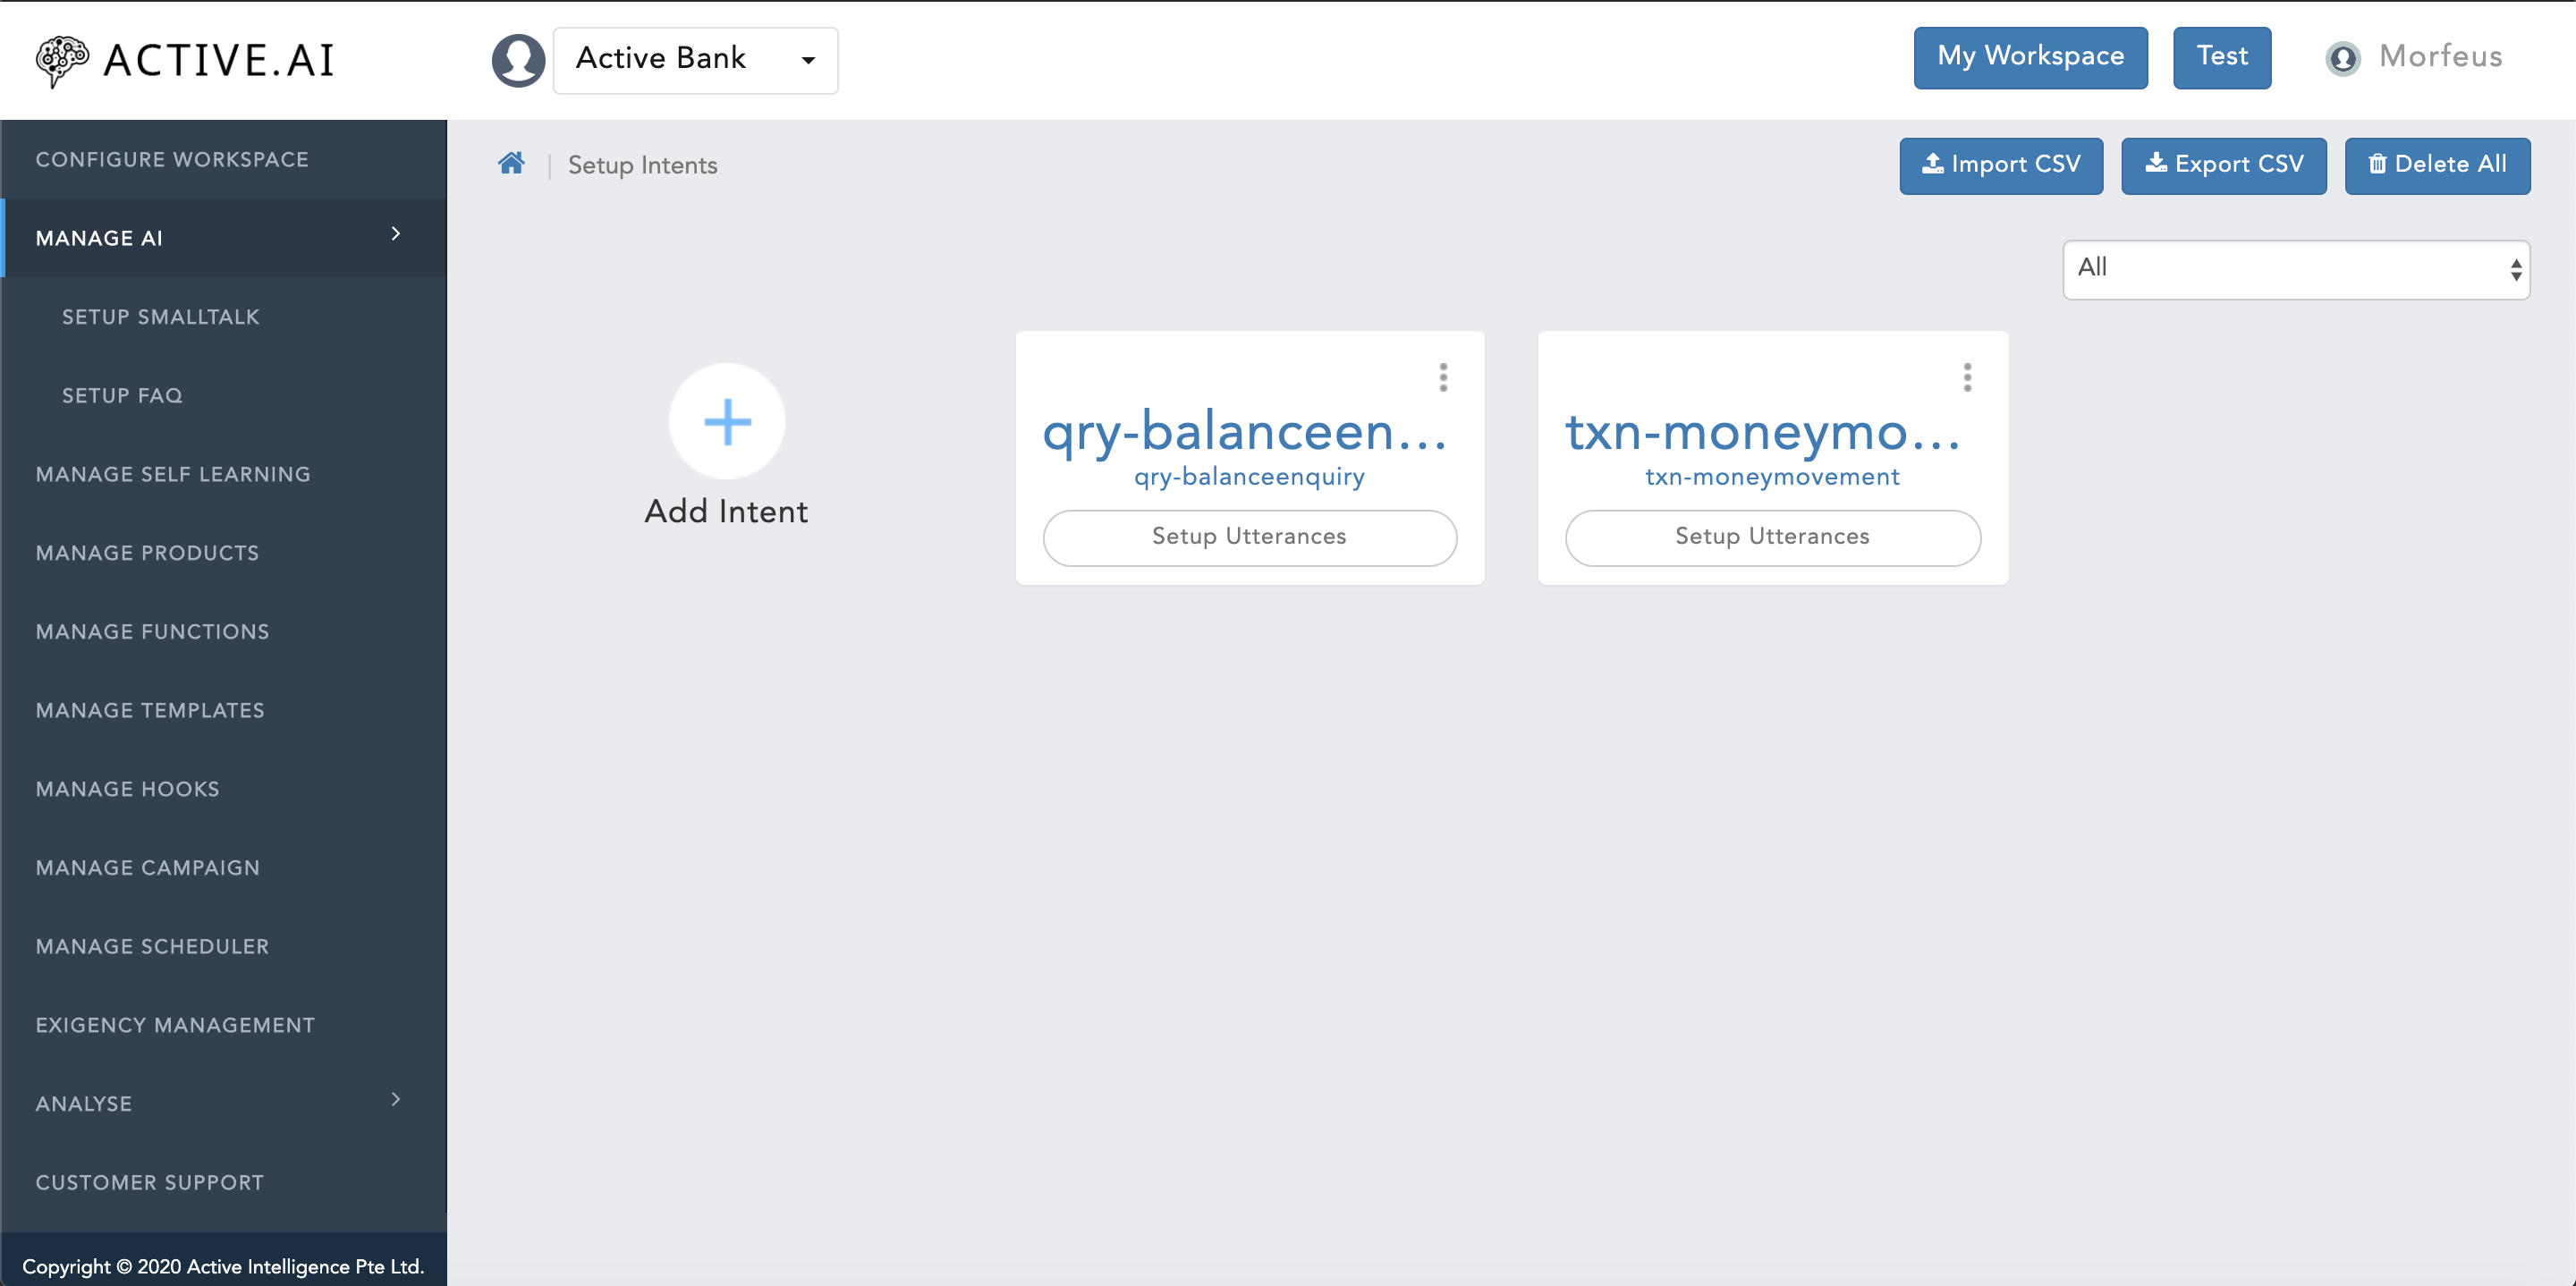
To prepare data for Primary Classifier, one has to prepare training data file for setup intents which can be exported under below context path:
- Click on "Manage AI".
- Click on "Setup Intents"
- Click on "Expoprt CSV" located on the top right corner of figure 16 below.
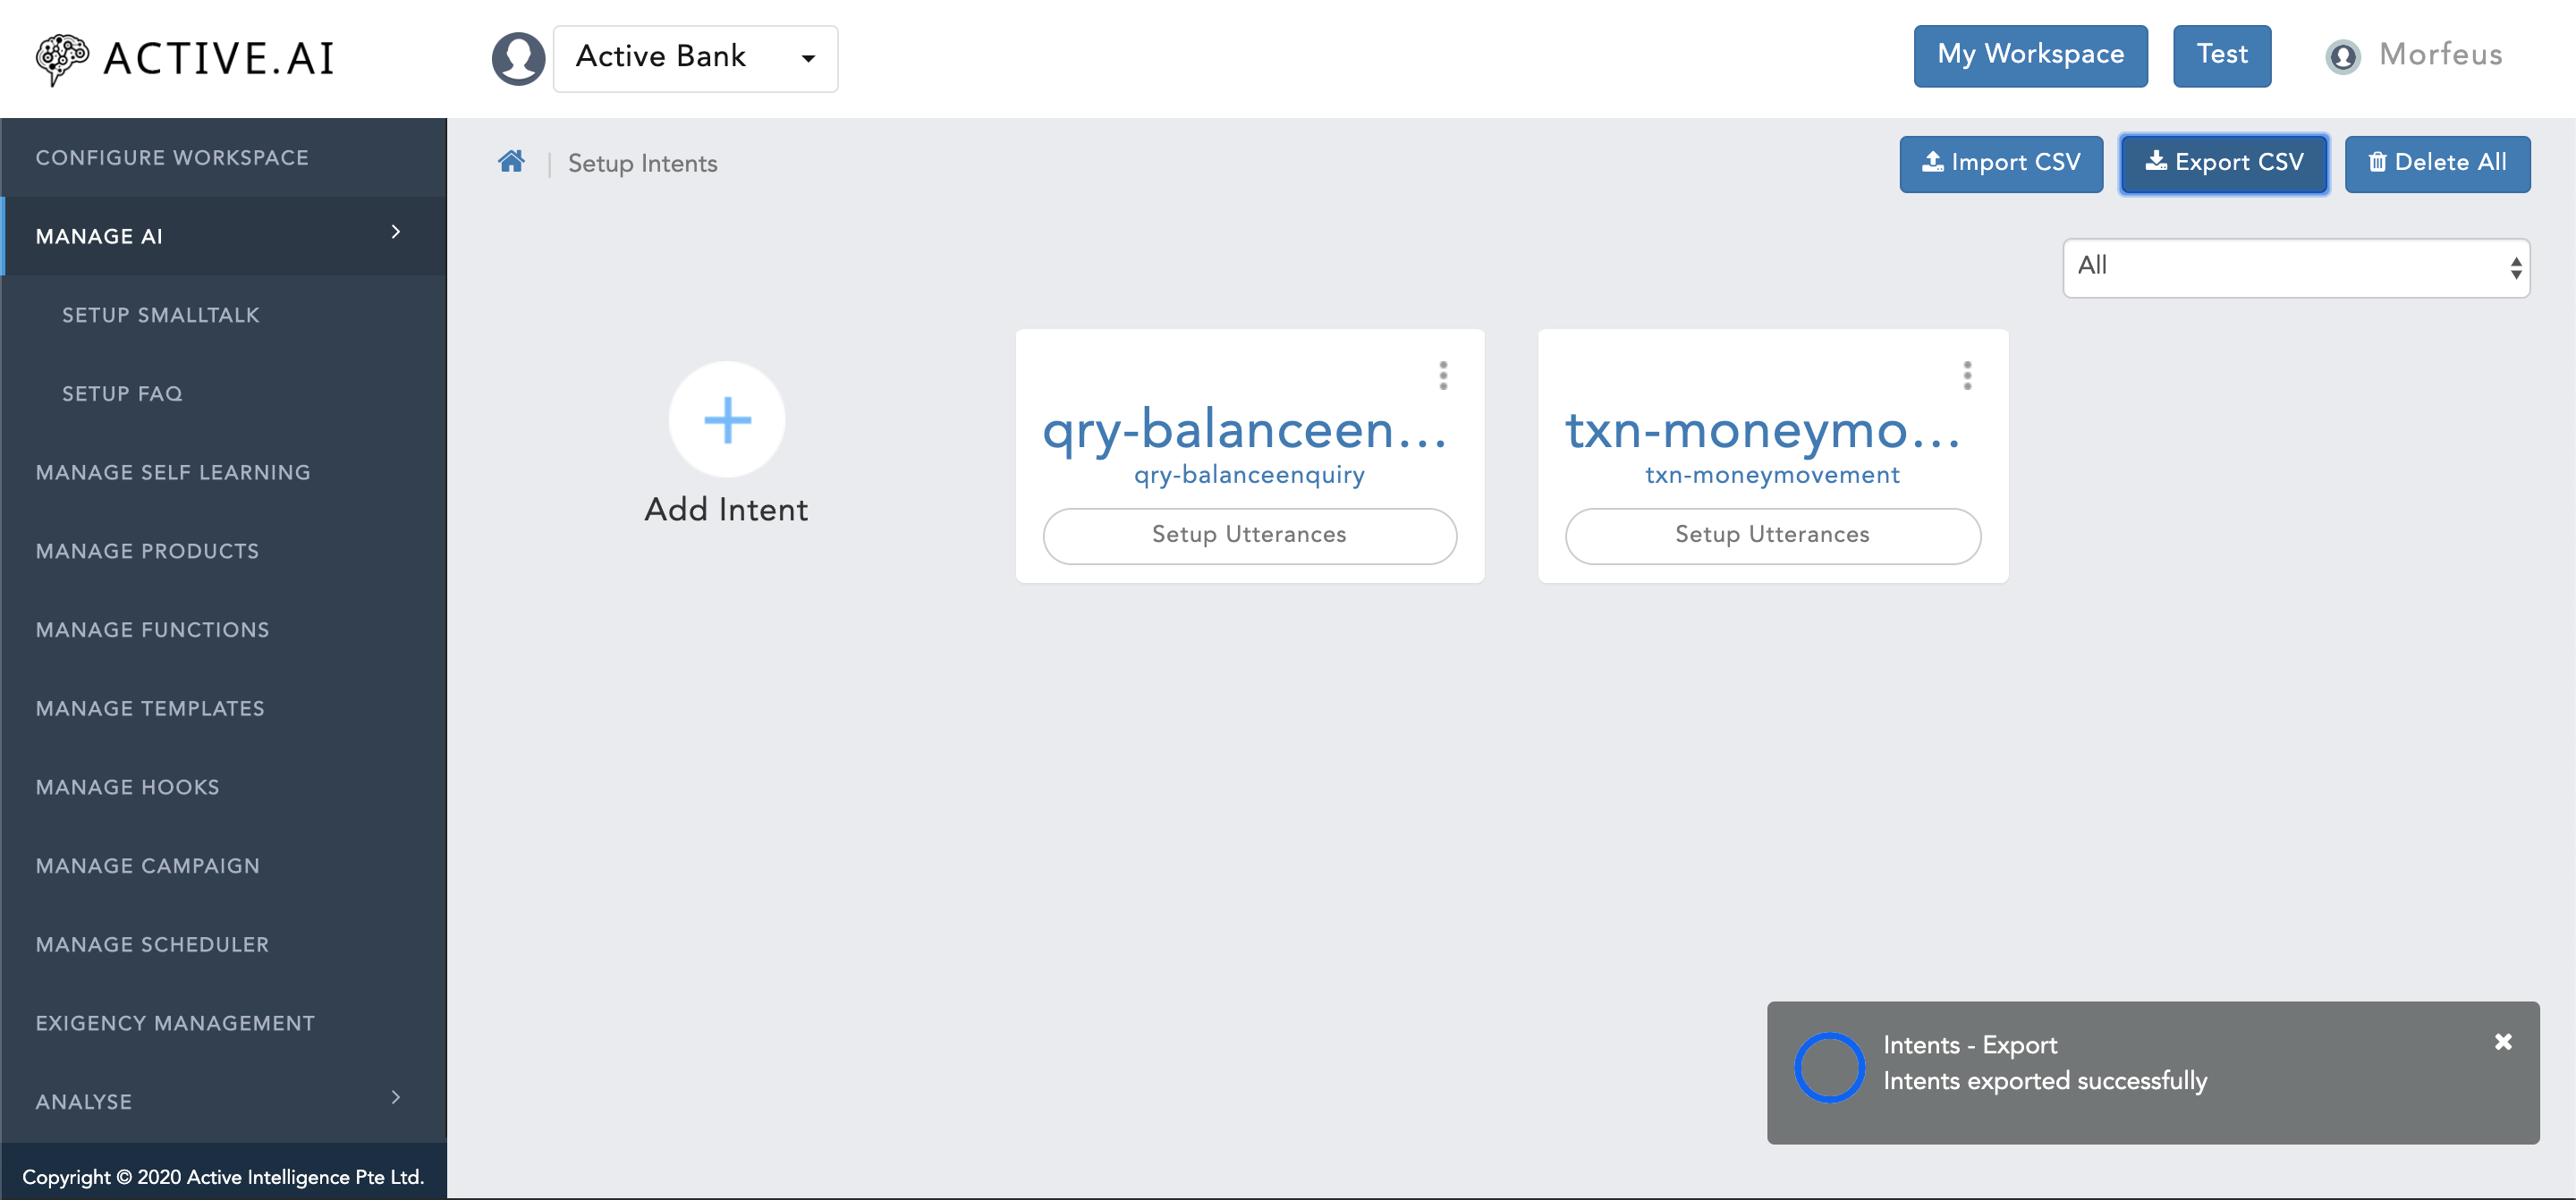
- "Progress bar" for "Export CSV" will prompt on the right bottom corner as shown in figure 17 below.
- Post successful export the prompted "progress bar" will show completion action with a message "Intents exported successfully" as shown in figure 17 below.
Exported "intents.csv" file contains below list of headers as shown in below figure 18:

- There are total 16 headers out of which 9 columns in total
- "Intent Id" = should contain the intent name.
- "Intent Name" = should contain the intent name.
- "Intent Category" = Should contain the category or brief 2-3 words about the intent
- "Utterance Name" = Should contain the actual utterances of the respective intent.
- "Utterance Type" = Should always be populated with "p" (i.e. "p" in LOWER case only) for all primary utterances or user's first utterances which will trigger the flow.
- "Language" = Two letter language code should be populated in LOWER case.
- "Main Utterance" = This should be always populated with UPPER case letter "N".
- "Learning Type" = Learning type should be always populated with UPPER case letter "C".
- "Training Type" = Training type should always be populated with UPPER case letter "B".
- Post updation/addition of data, one has to delete all the empty rows and empty columns (i.e. post all headers only).
- save the file as ".csv"
To import updated "intents.csv file" under "Setup Intents", one has to follow below steps:
- Click on "Manage AI".
- Click on "Setup Intents"
- Click on "Import CSV" located on the top right corner of figure 18 above.
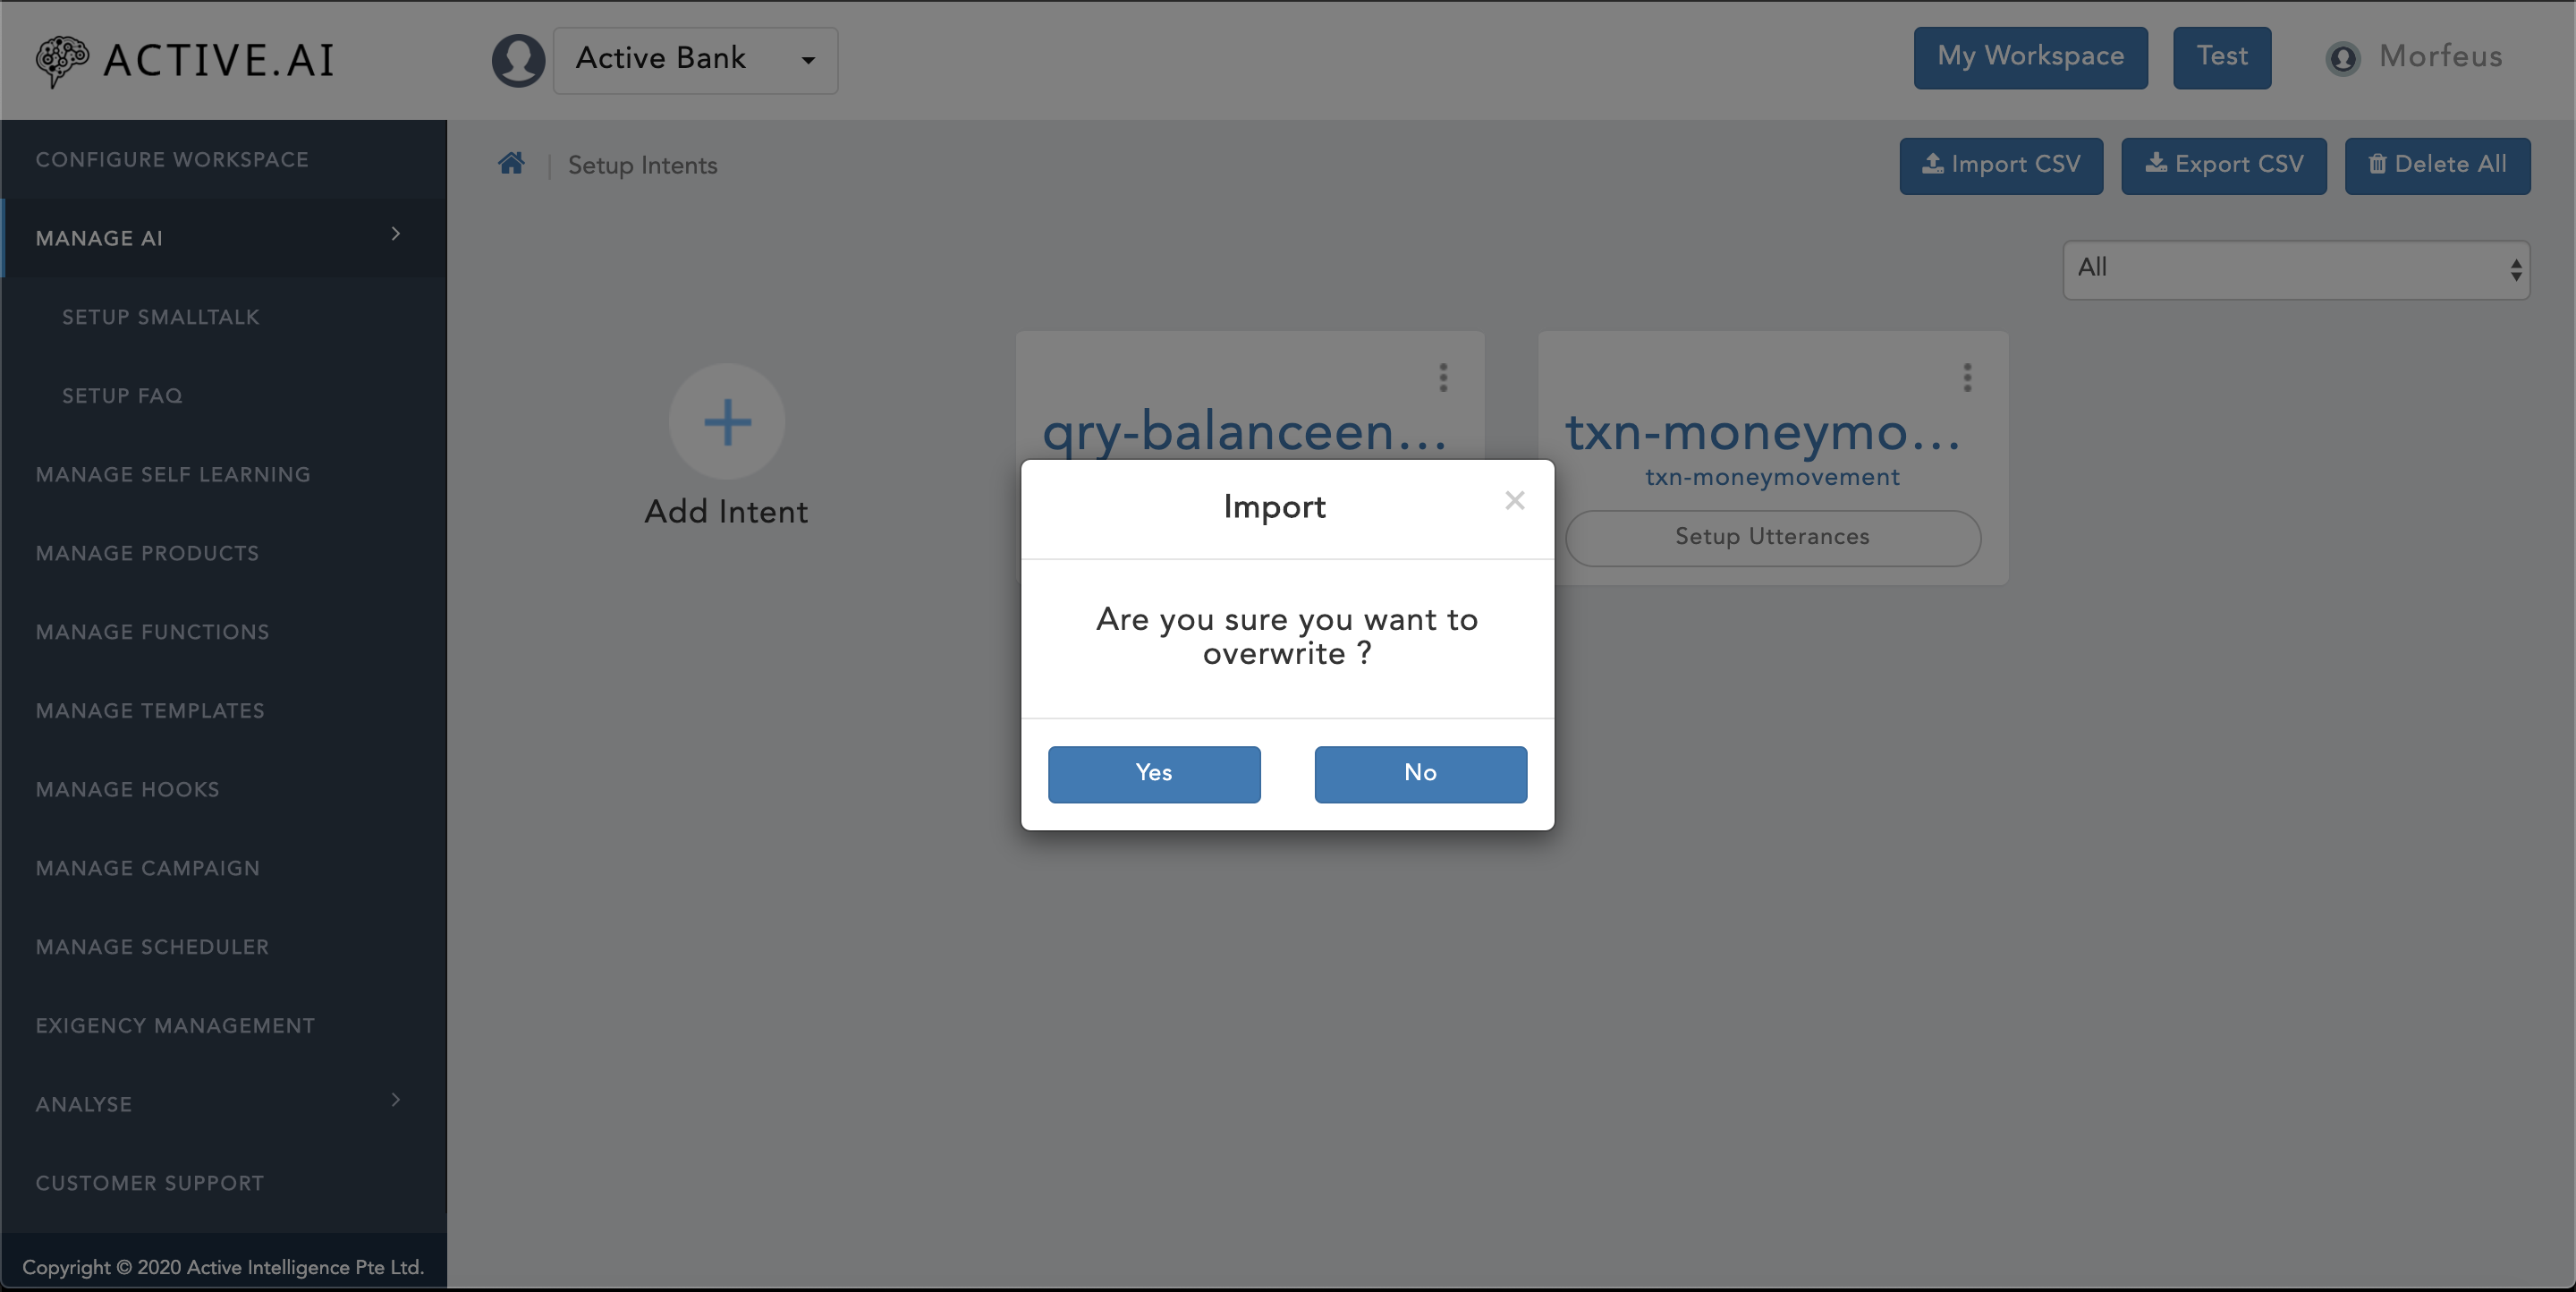
- A new window will prompt up with confirmation for "Are you sure you want to overwrite ?" as shown in figure 19 below.
- One can select "Yes" if one wants to overwrite as shown in figure 19 below.
- One can select "No" if one wants to only import delta changes as shown in figure 19 below.
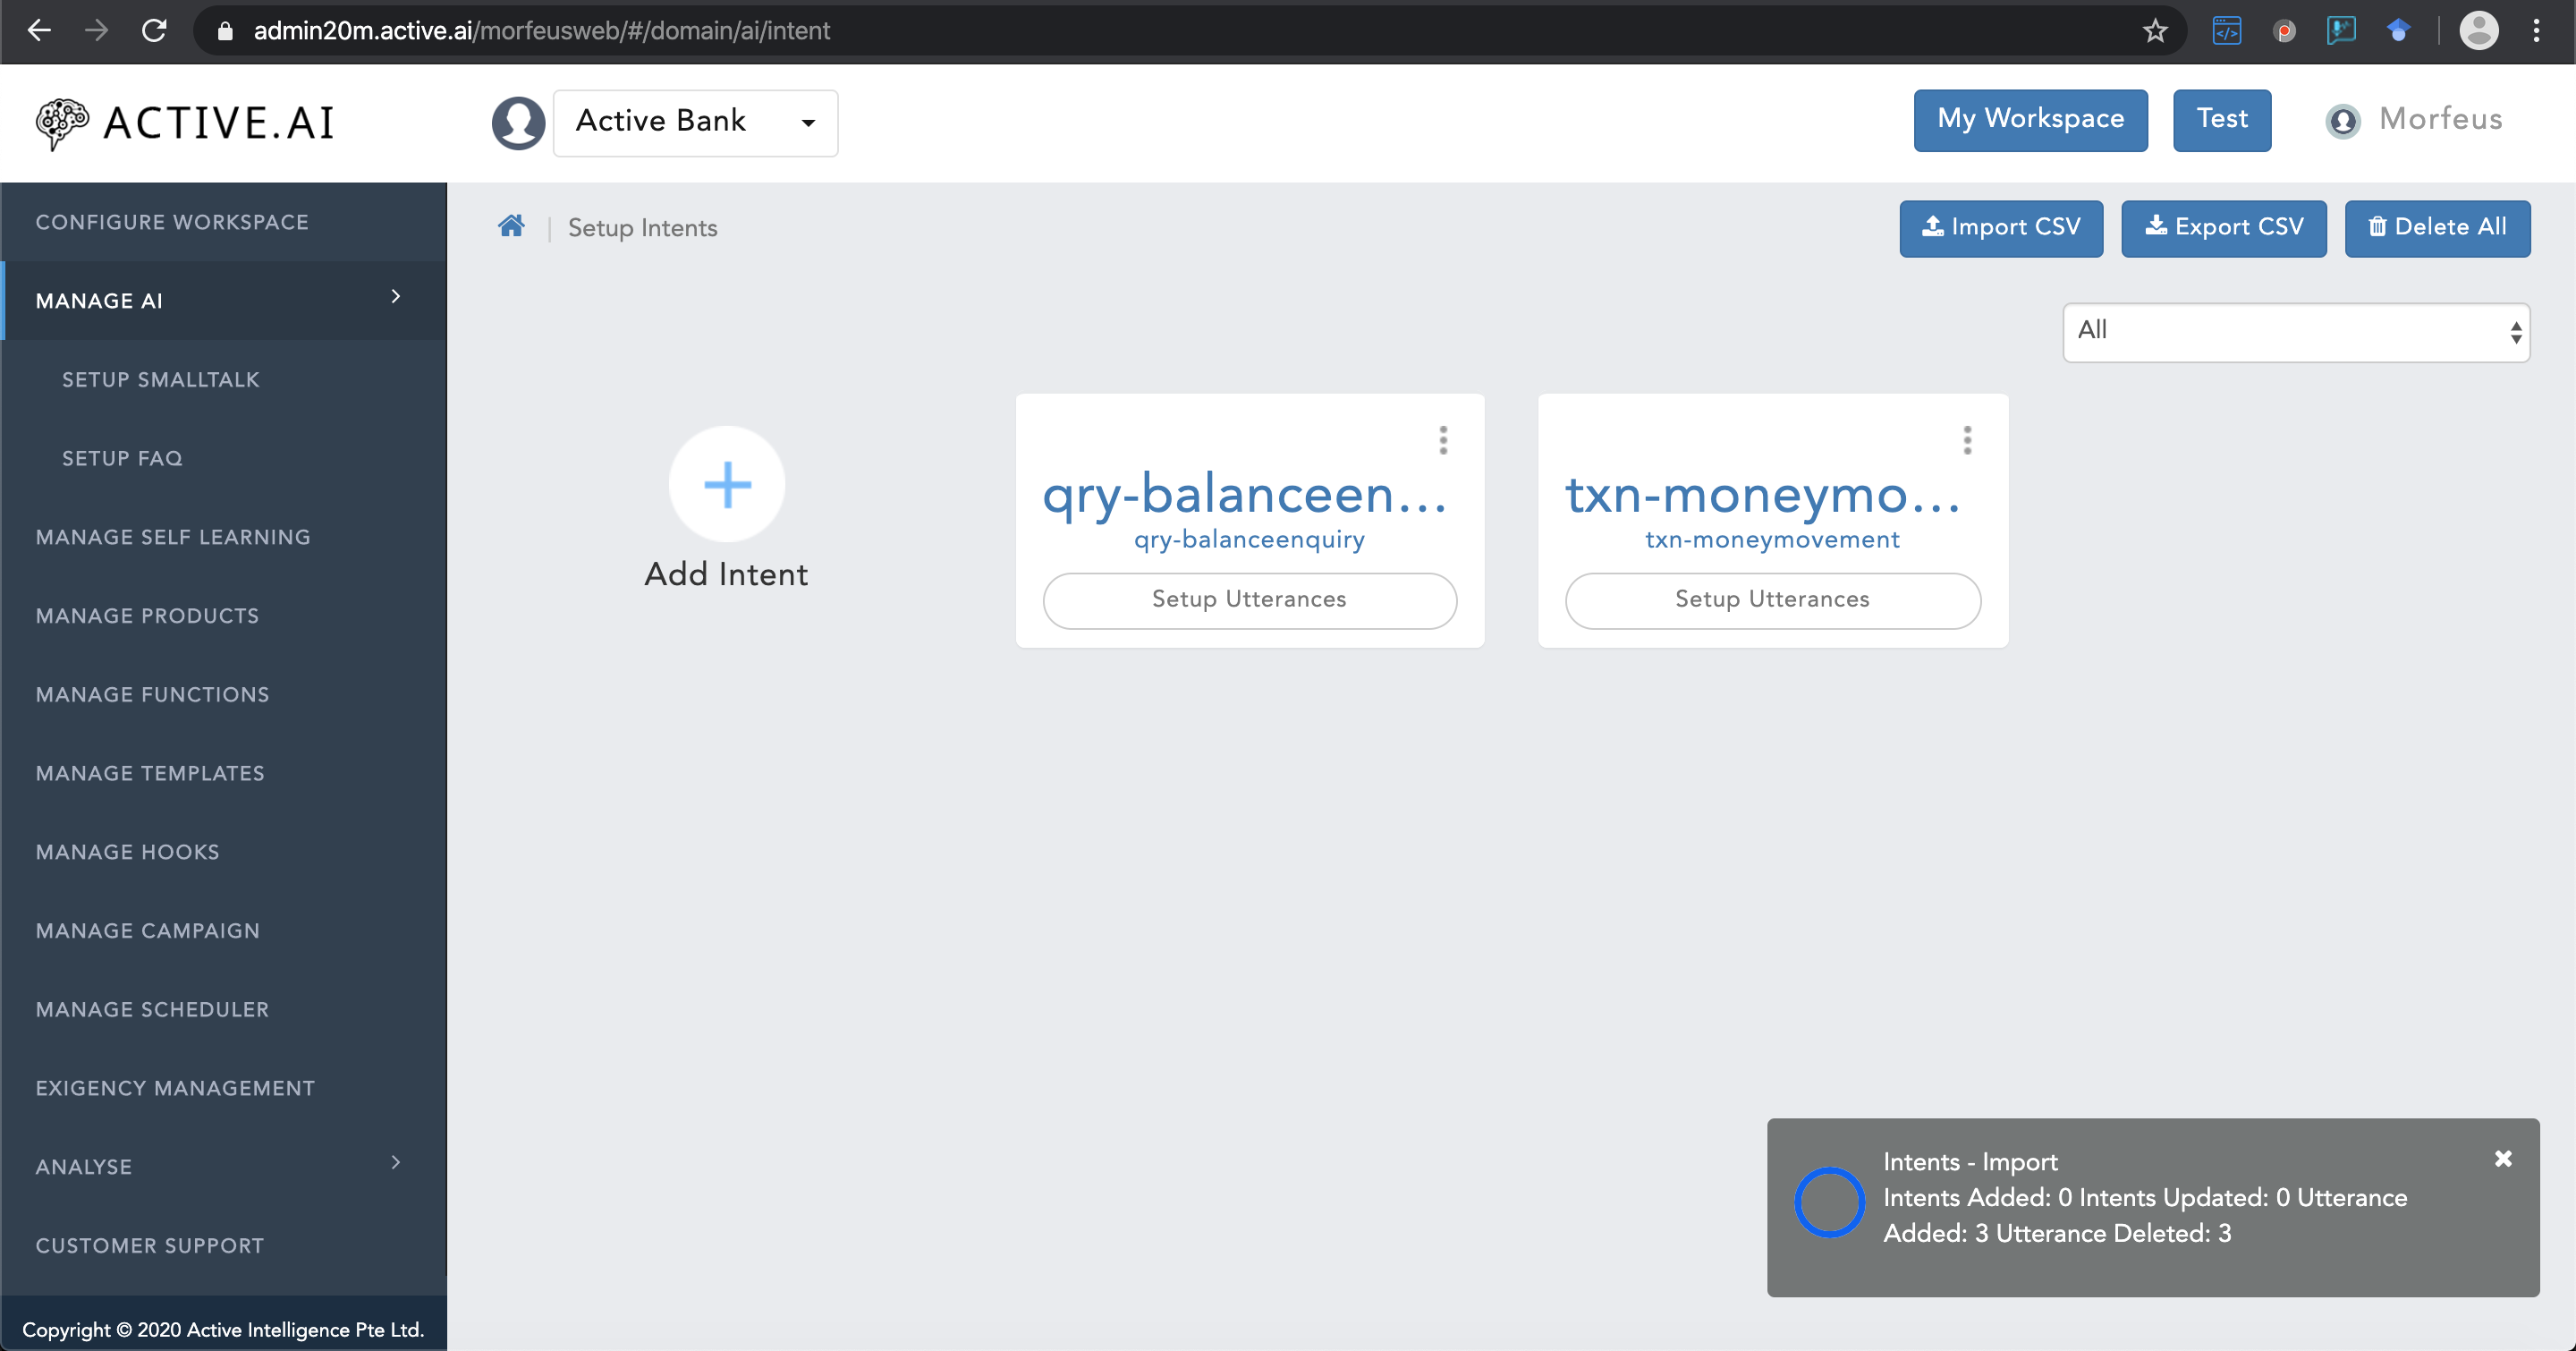
- Post selection of "Yes" or "No" option from the prompted window, a new "Progress bar" will be visible on the right bottom corner of the screen as shown in below figure 20.
- In the same "Progress bar" prompt, a successful import message will be updated, once the import is a success.
Dialog
To prepare dialog data, one has to follow the same steps followed under PrimaryClassifier section above for exporting and importing a file by referring figure 17 and 18 to get the intents.csv file as well as figure 19 and 20 from above to upload the updated intents.csv file.
For dialog data, 7 columns needs to be populated in "Intents.csv" exported file (refer figure 21 below). Column details are as listed below:
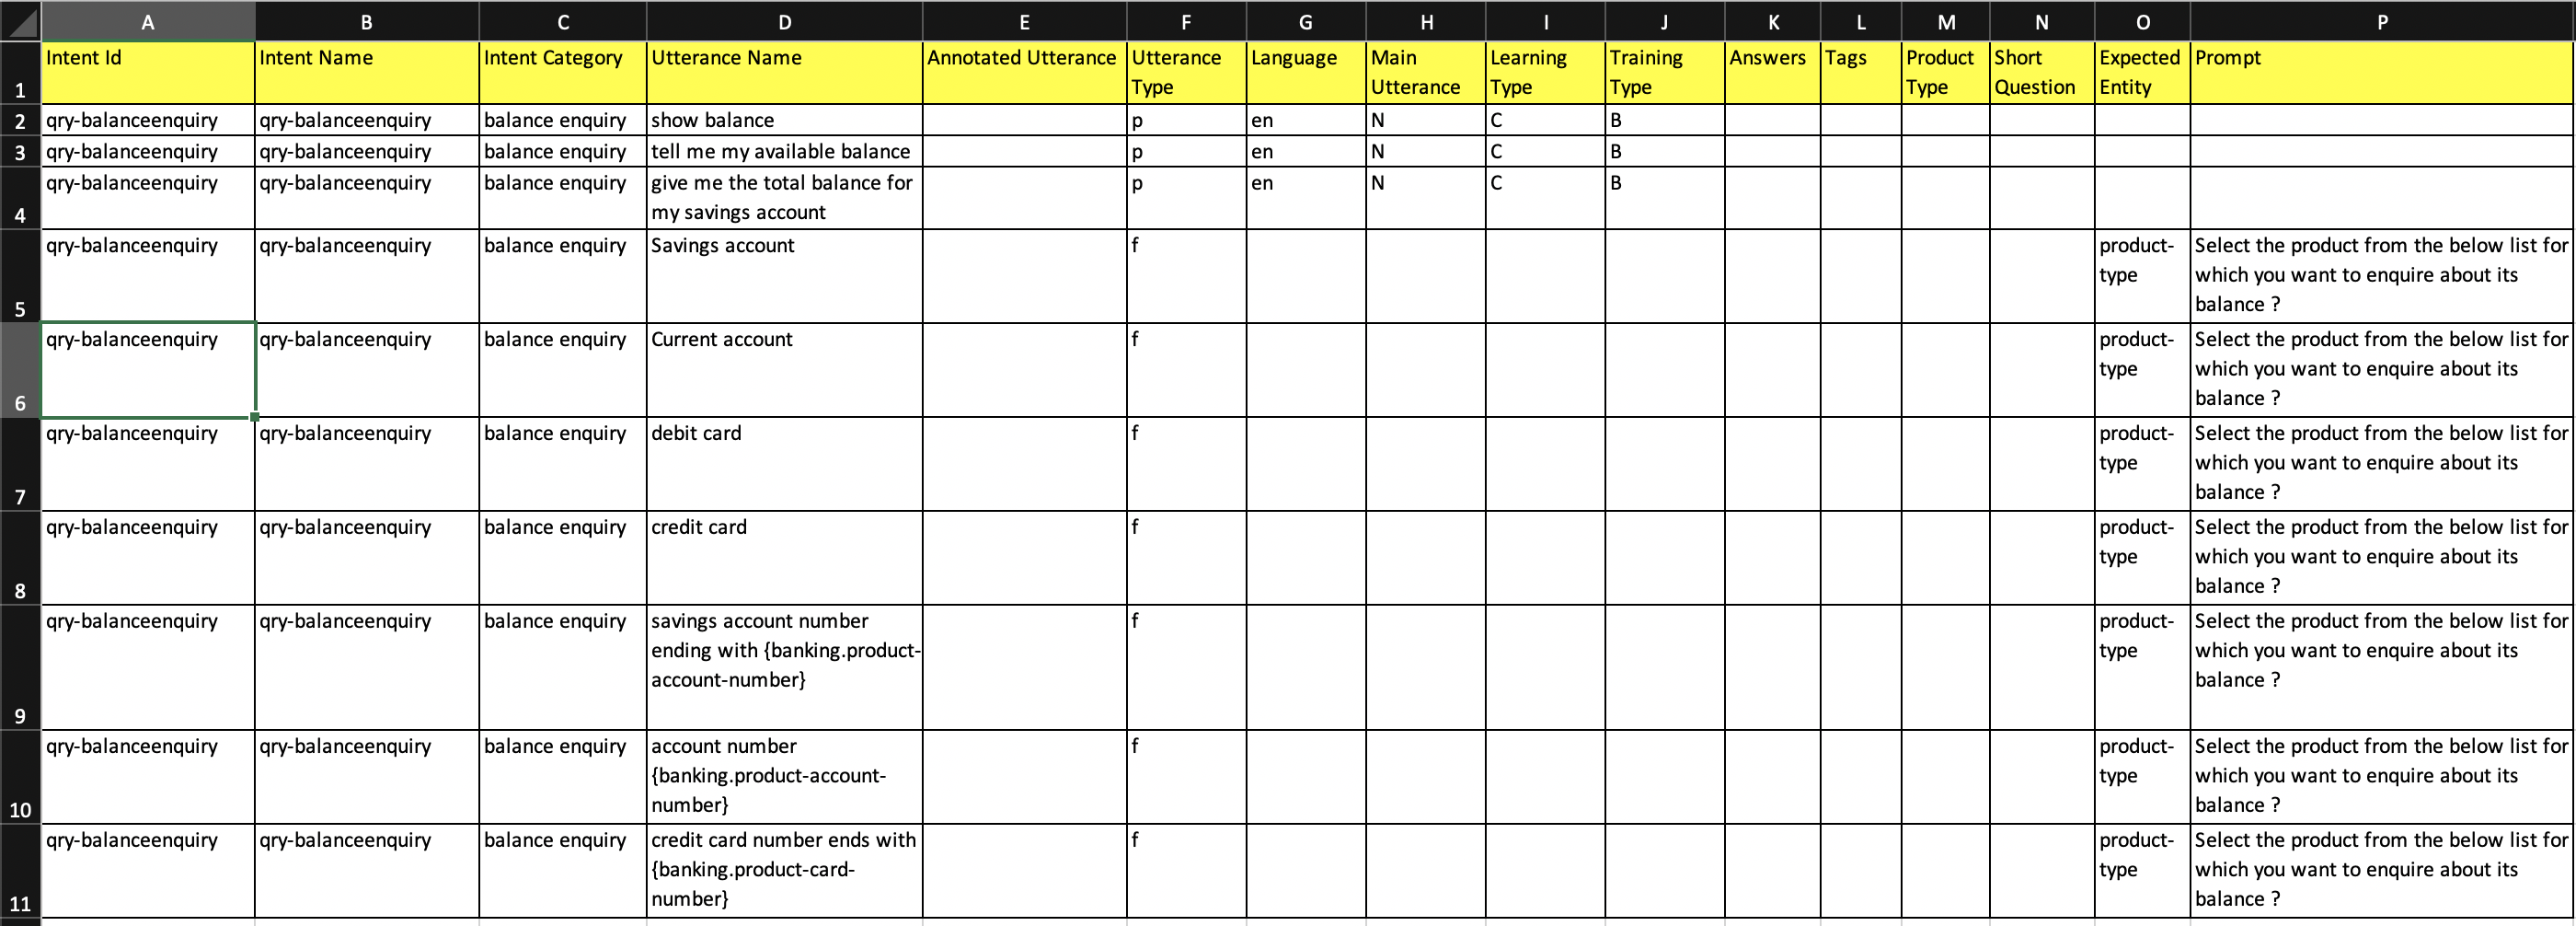
- "Intent Id" = should contain the intent name.
- "Intent Name" = should contain the intent name.
- "Intent Category" = Should contain the category or brief 2-3 words about the intent
- "Utterance Name" = Should contain the actual/viable user's responses for the respective Prompt based on the defined parameters under "Dialog" section of Conversational AI Module" section.
- "Utterance Type" = Should always be populated with "f" (i.e. follow up utterances - "f" in LOWER case only) for all follow up utterances or user's responses to the bot questions which will provide the flow fulfillment related information.
- "Expected Entity" = The expected entity name should be populated for which the Prompt/bot says needs to be included.
- "Prompt" = "Prompt/Bot says" needs to be included here in brief small structure.
- Post updation/addition of data, one has to delete all the empty rows and empty columns (i.e. post all headers only).
- save the file as ".csv"
SpellChecker
To prepare spell checker data one has to export SpellChecker file from the admin by following below steps:
- Click on "Manage AI".
- Click on "Setup SpellChecker".
- Click on "Export CSV" button located on the right top corner of the "Setup SpellChecker" window as shown in figure 22 below.
- Entity.csv file will get exported successfully.
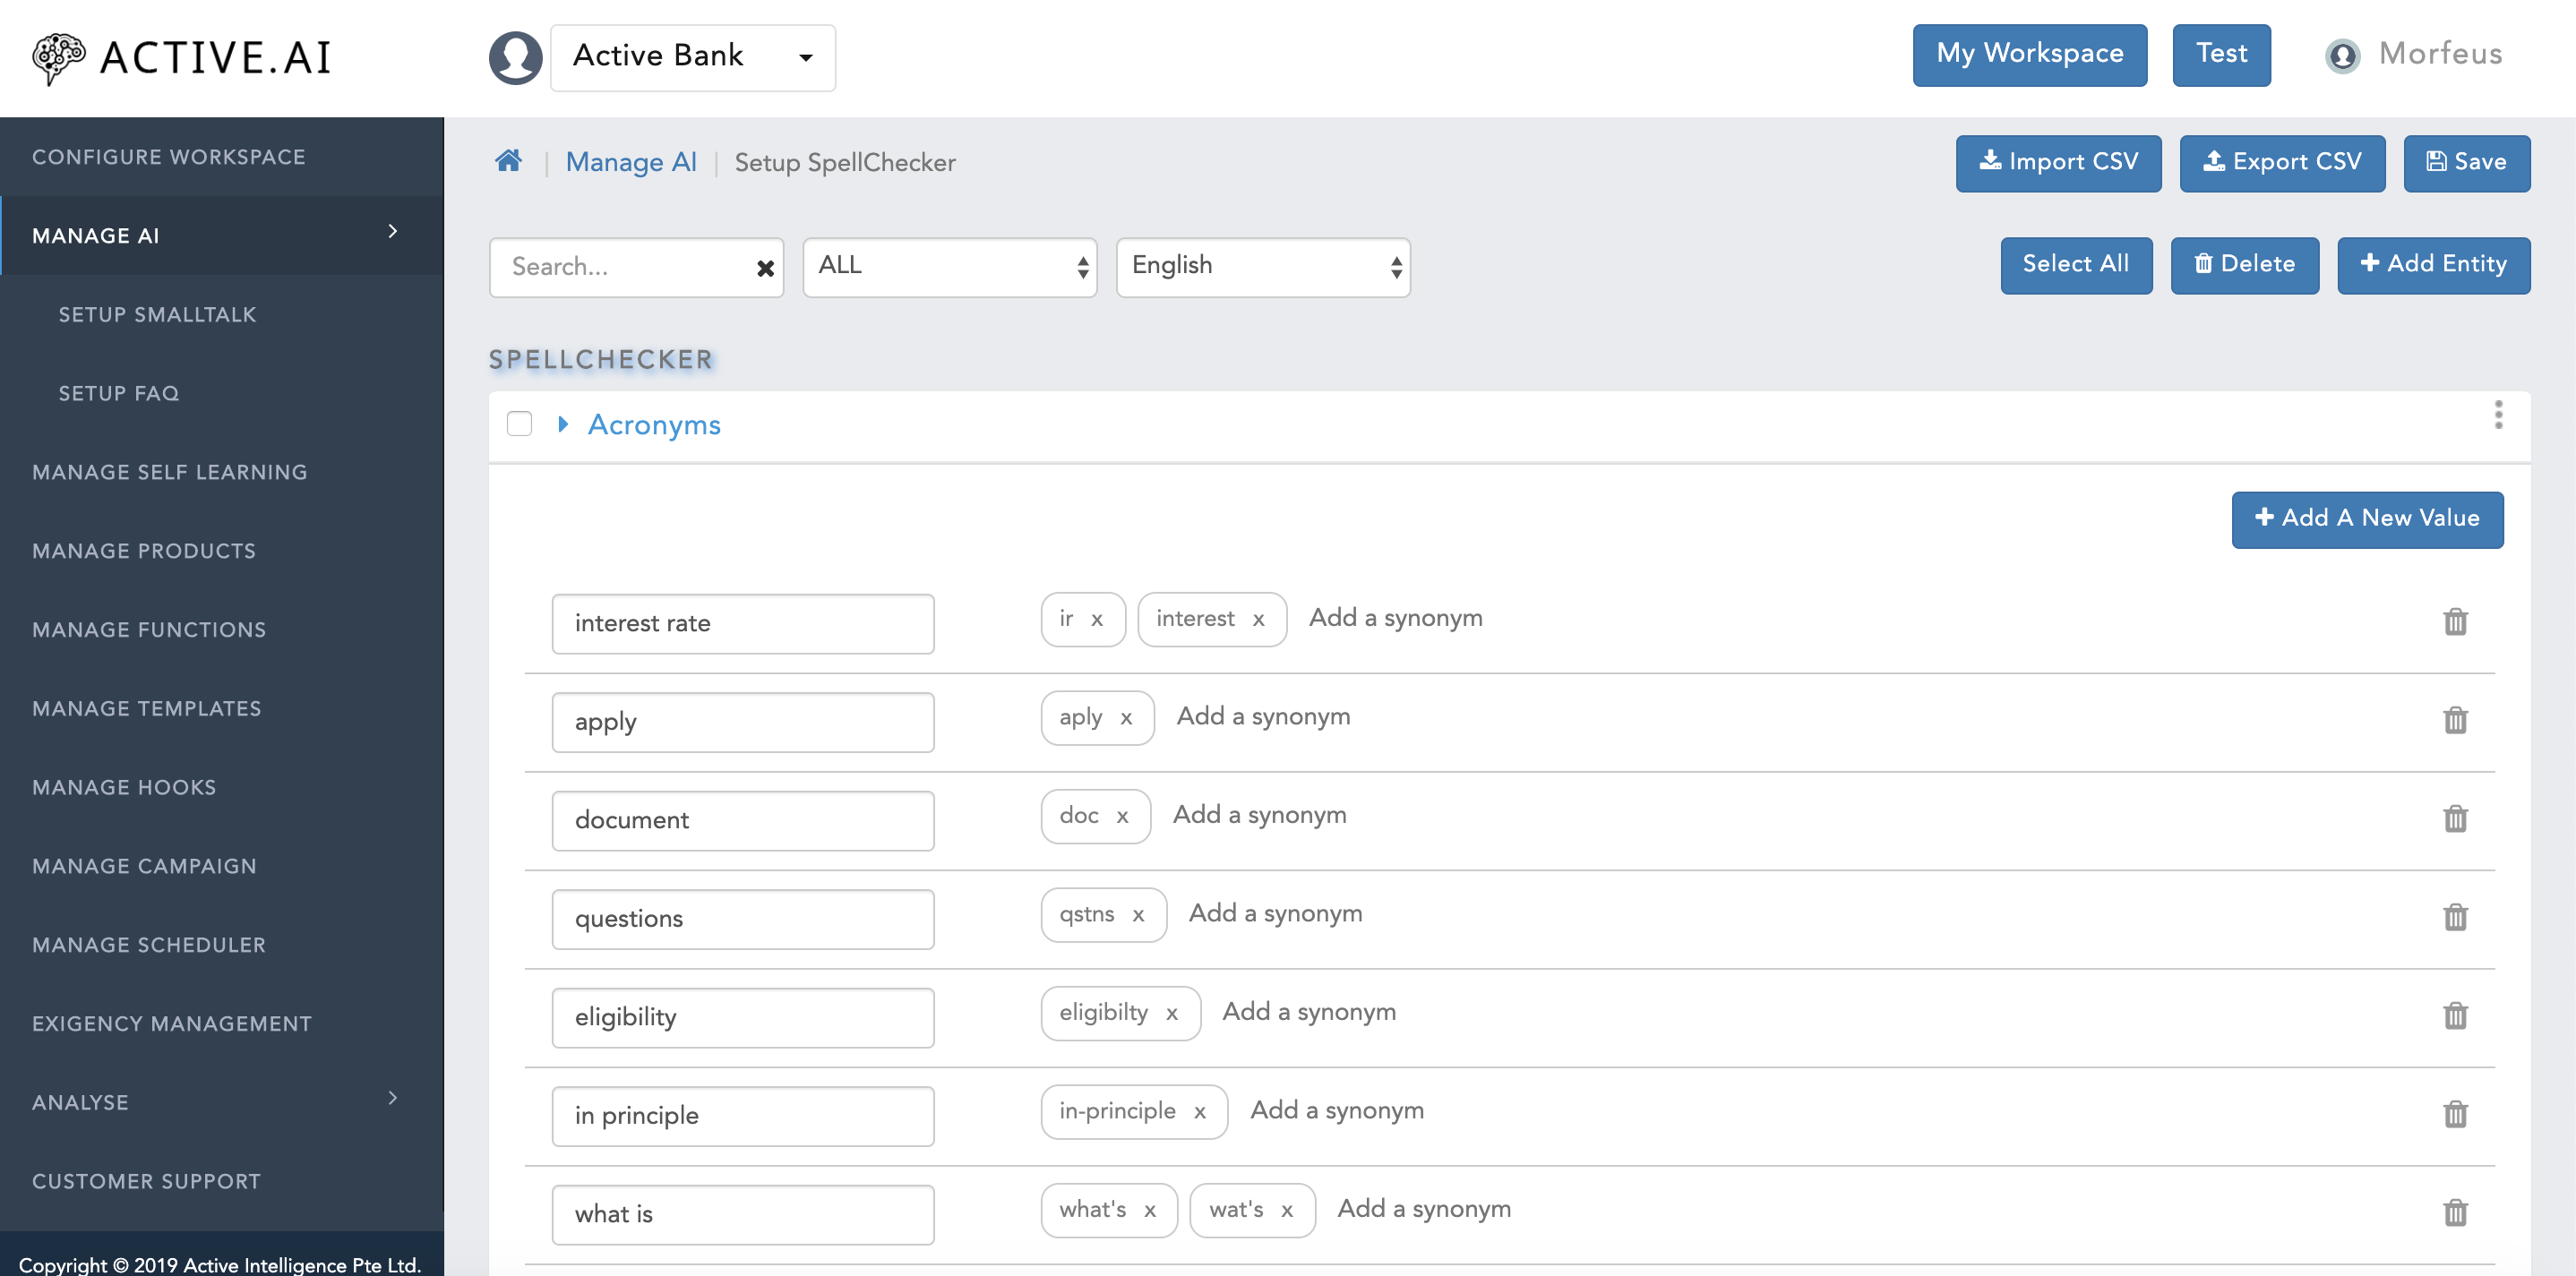
The exported "Entity.csv" file has 10 headers in total out of which 7 columns needs to be populated for which details are as below:
- "EntityName" = This column values should always be populated with "Acronyms" (attribute is a case sensitive).
- "EntityCode" = This column values should always be populated with "spellchecker_acronyms" (attribute is a case sensitive).
- "EntityCategory" = This column values should always be populated with "SpellChecker" (attribute is a case sensitive).
- "EntityType" = This column values should always be populated with "SpellChecker" (attribute is a case sensitive).
- "Language" = Two letter language code always in lower case should be populated under this column.
- "EntityValue" = Root value in which a input word should be converted can be captured under "EntityValue" column.
- "Synonyms" = Synonym(s) can be stored here under "Synonyms" column. Multiple Synonyms can be stored using "comma" (i.e. ",") as a separator.
- Post updation/addition select all the empty column and rows to be deleted, post which the file should be saved as ".csv".
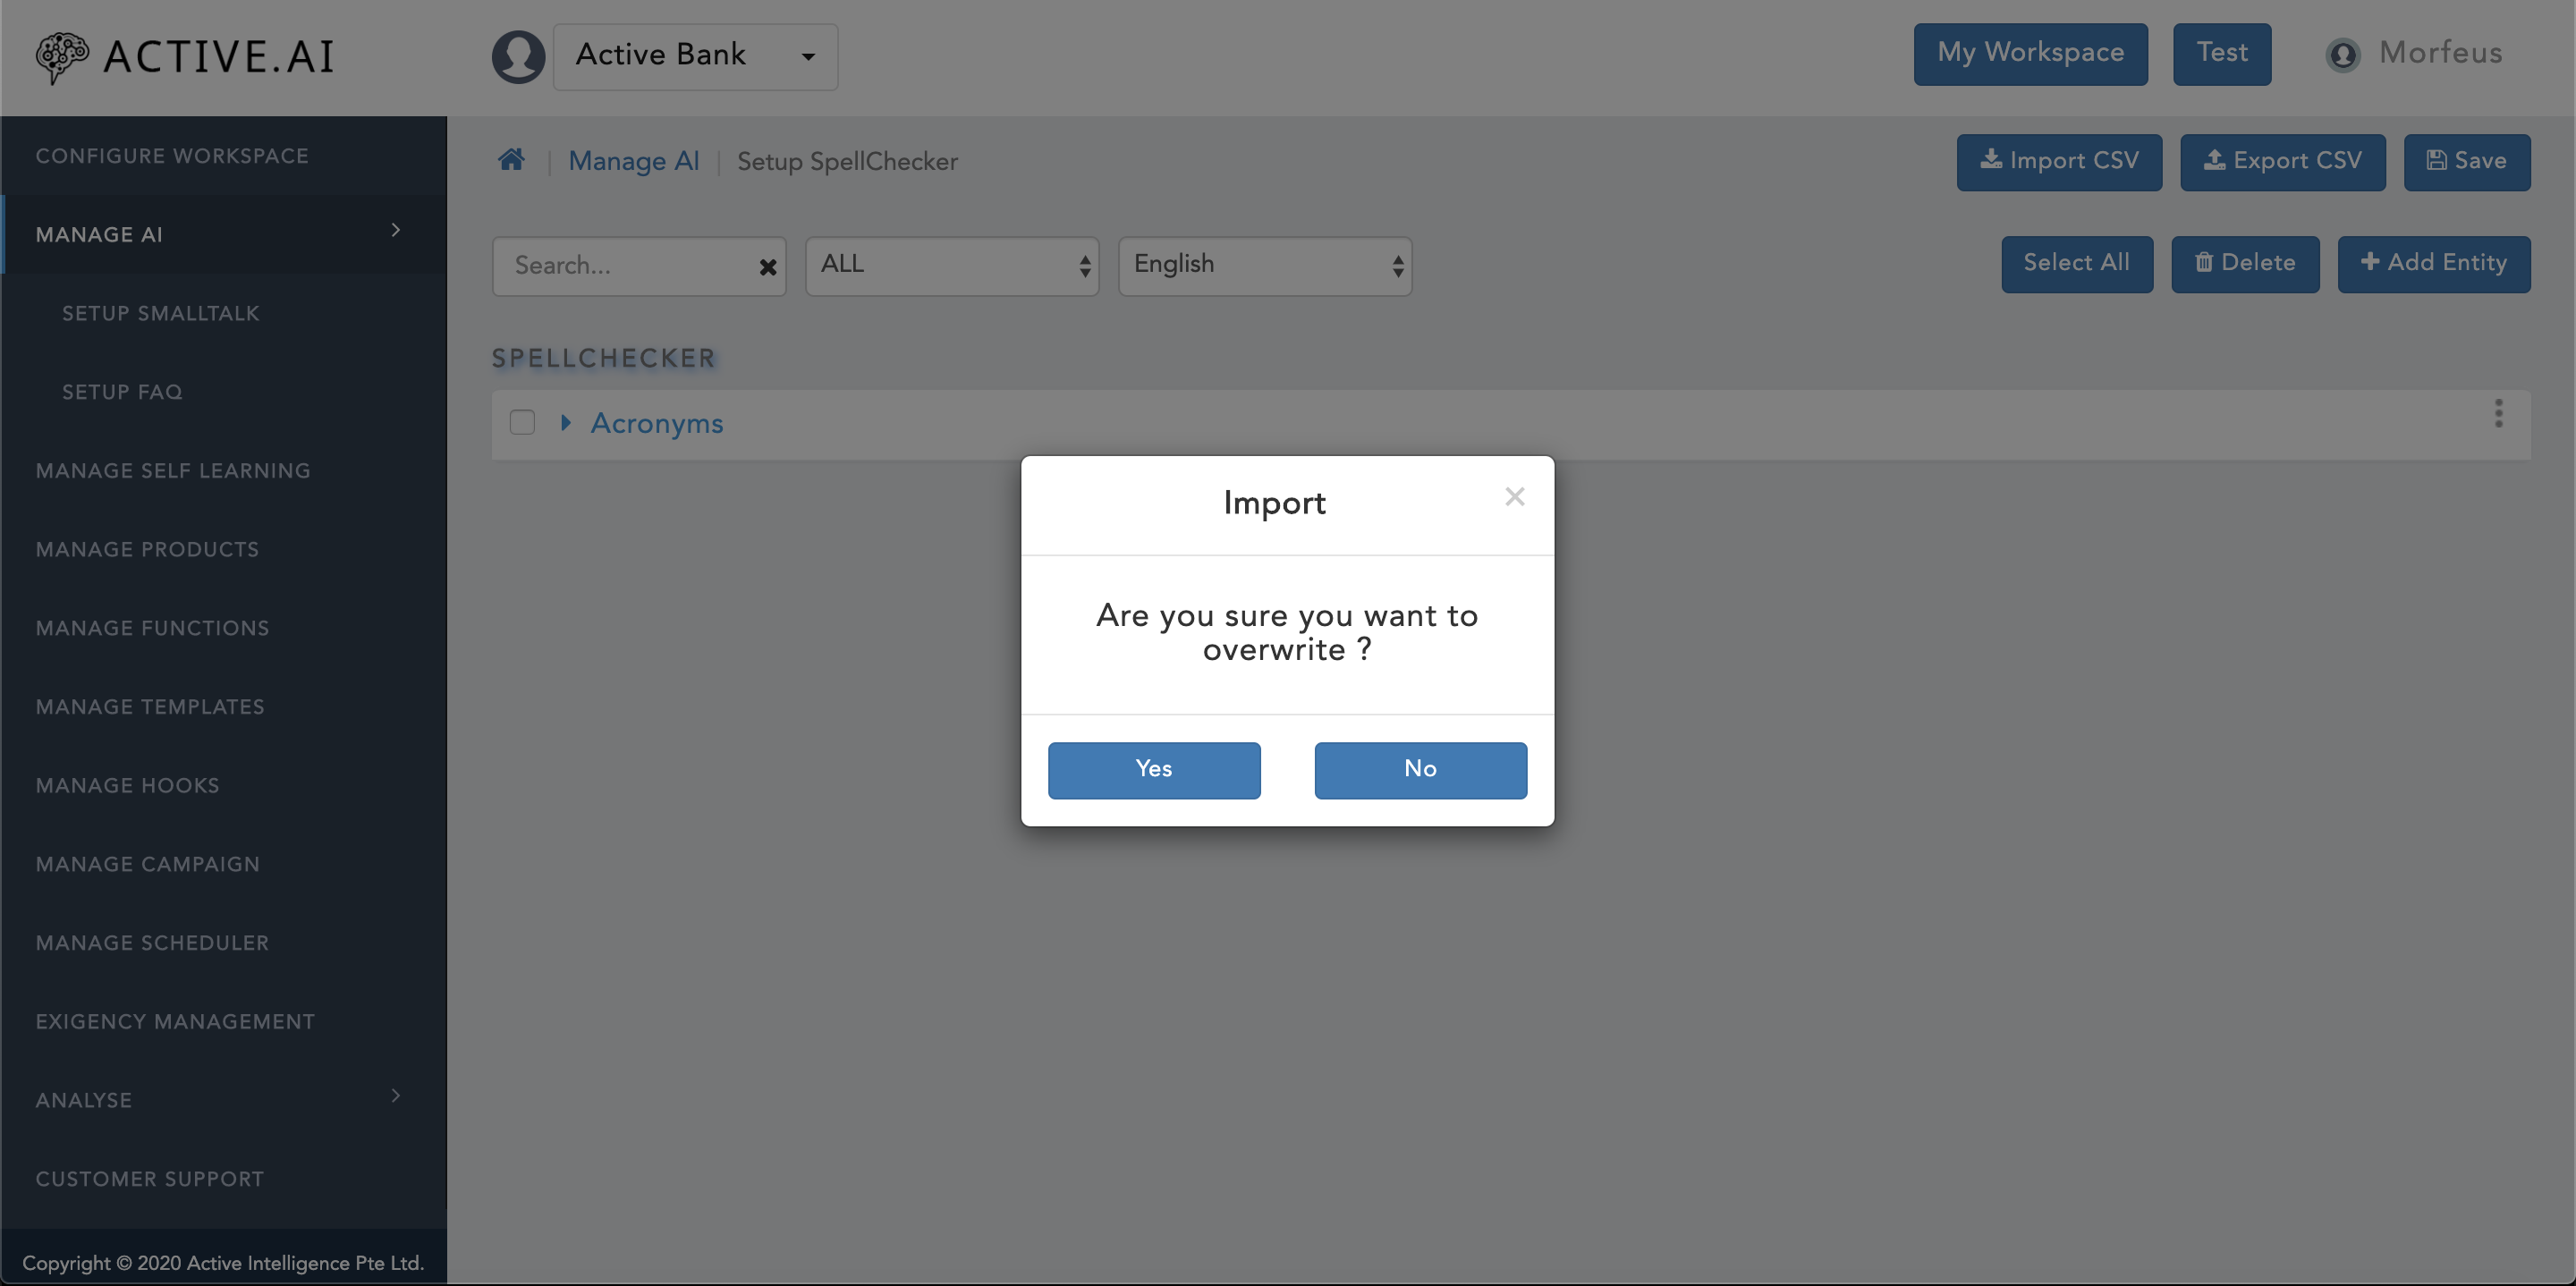
The updated "Entity.csv" file can be imported back by following below steps (refer figure 23 below):

- Click on "Manage Ai".
- Click on "Setup SpellChecker".
- Click on "Import CSV" button located on the right top corner of the "Setup SpellChecker" window as shown in figure 23 above.
- A new window will prompt up with confirmation for "Are you sure you want to overwrite ?" as shown in figure 23 above.
- One can select "Yes" if one wants to overwrite as shown in figure 23 above.
- One can select "No" if one wants to only import delta changes as shown in figure 23 above.
- Post selection of "Yes" or "No" from prompted confirmation window, finder/explorer will open up.
- Locate the updated "Entity.csv" and click on "open" button.
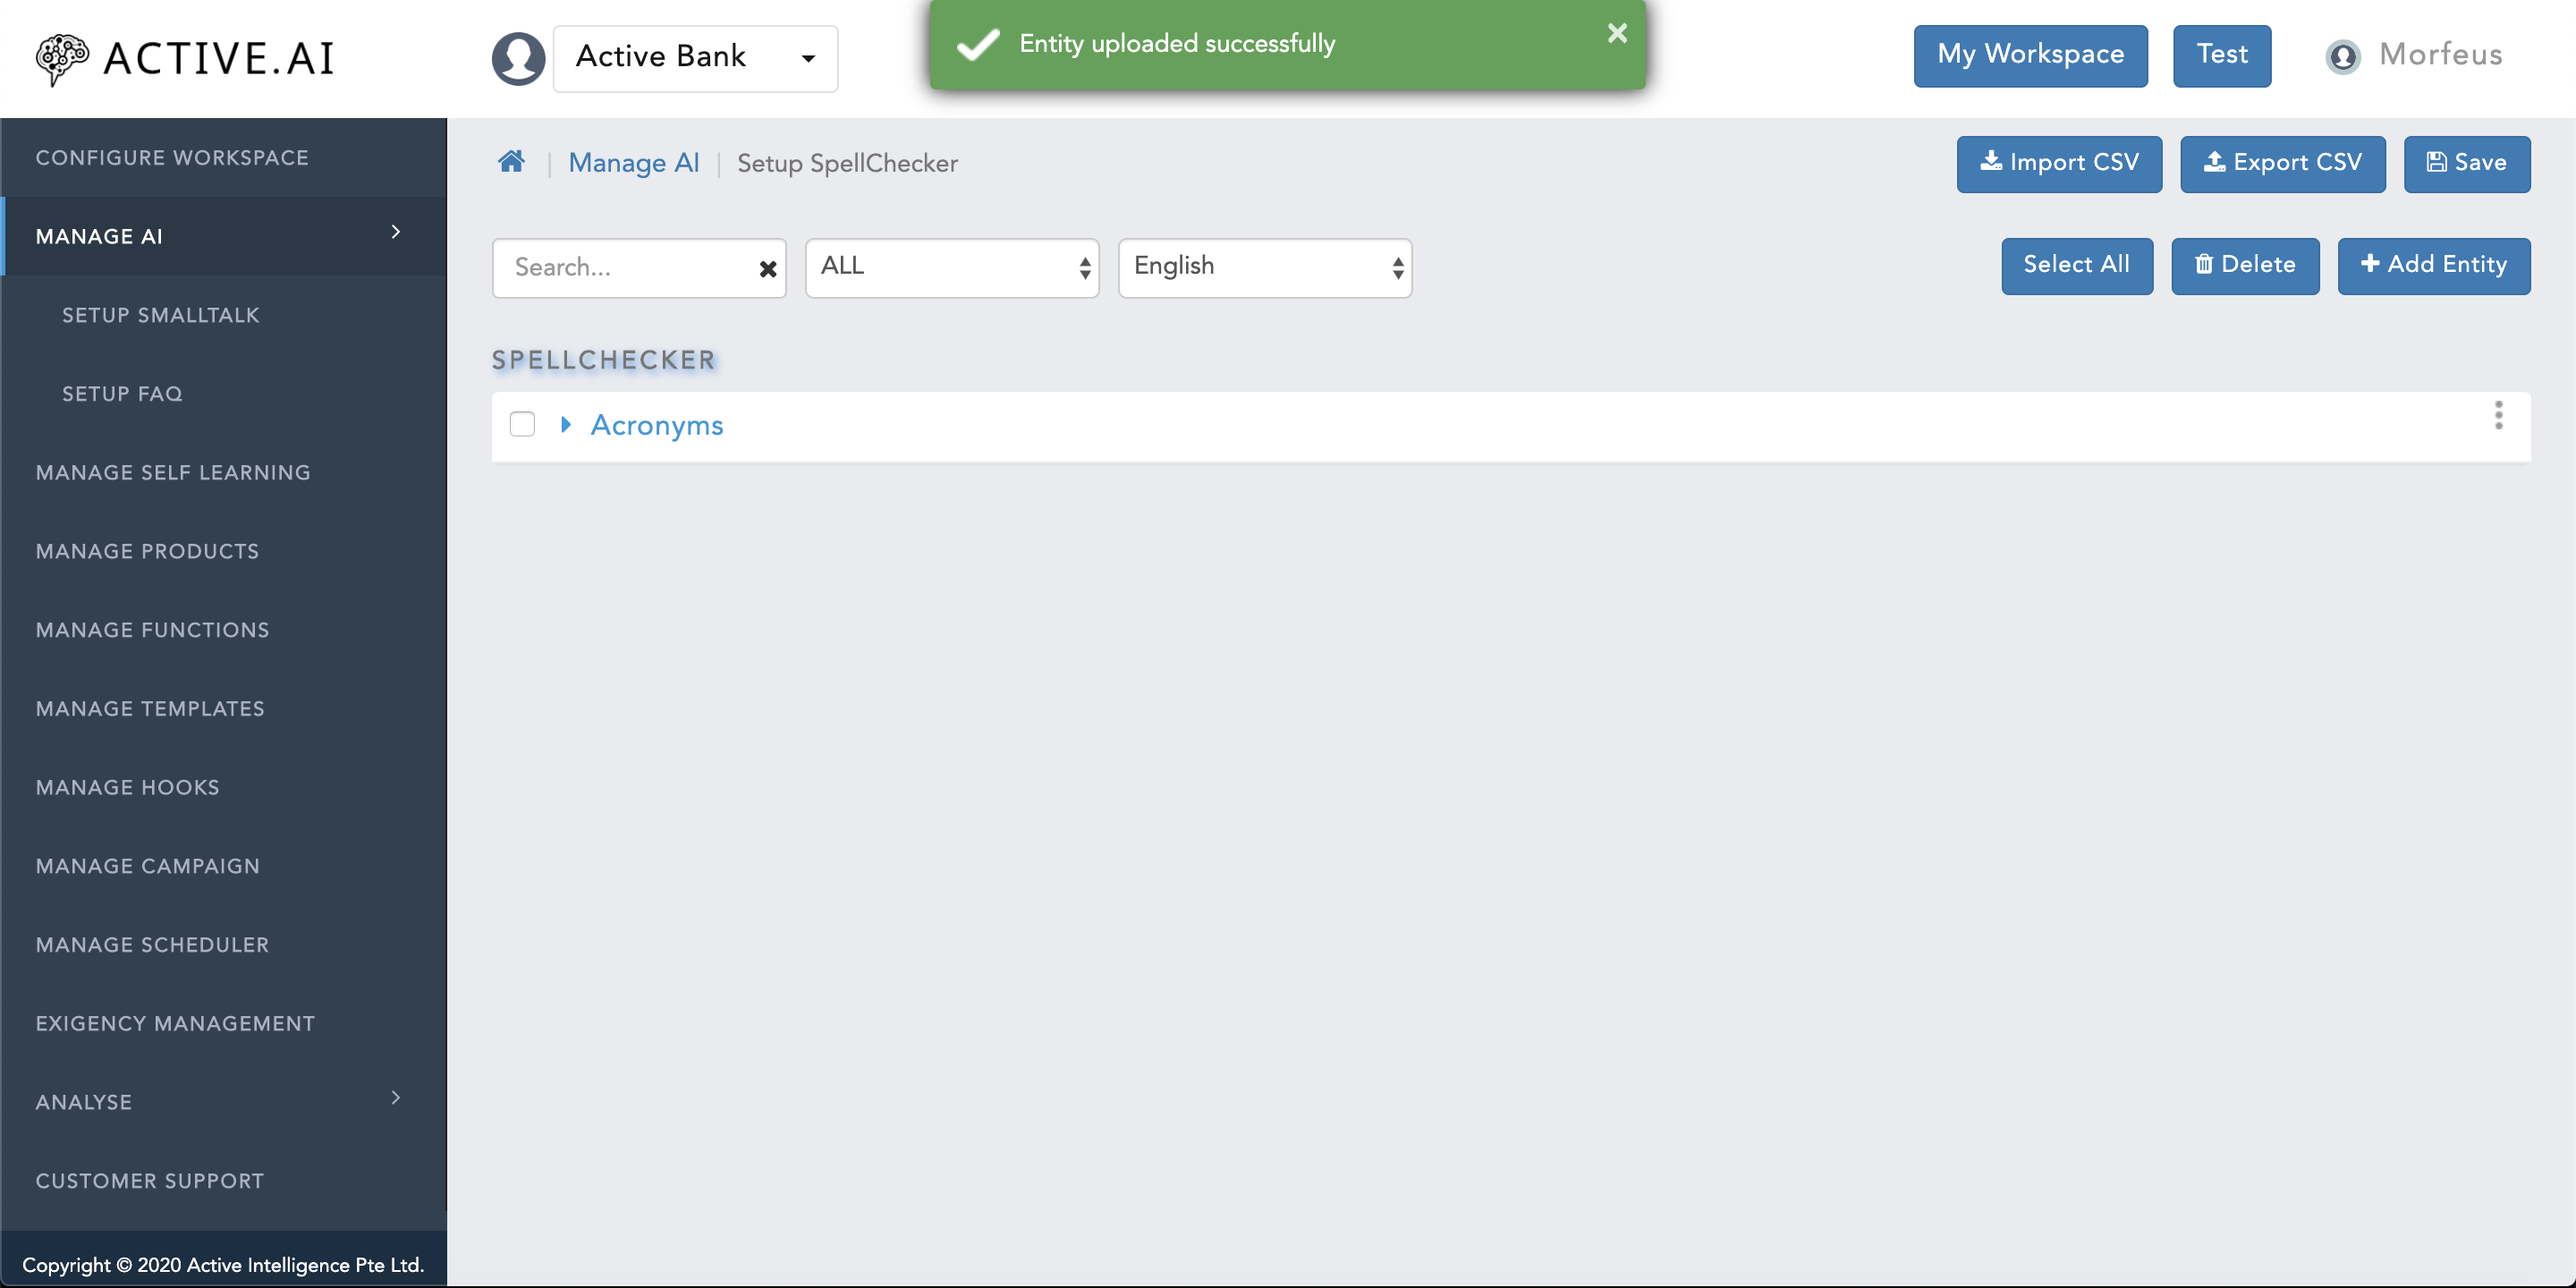
- Post successful import of "Entity.csv", a green coloured message ribbon will prompt on the top of the window with message "Entity uploaded Successfully" as shown in figure 24 below.
NER – Named entity recognition:
One needs to export the "Entity.XML" file from Setup Entities by following steps:
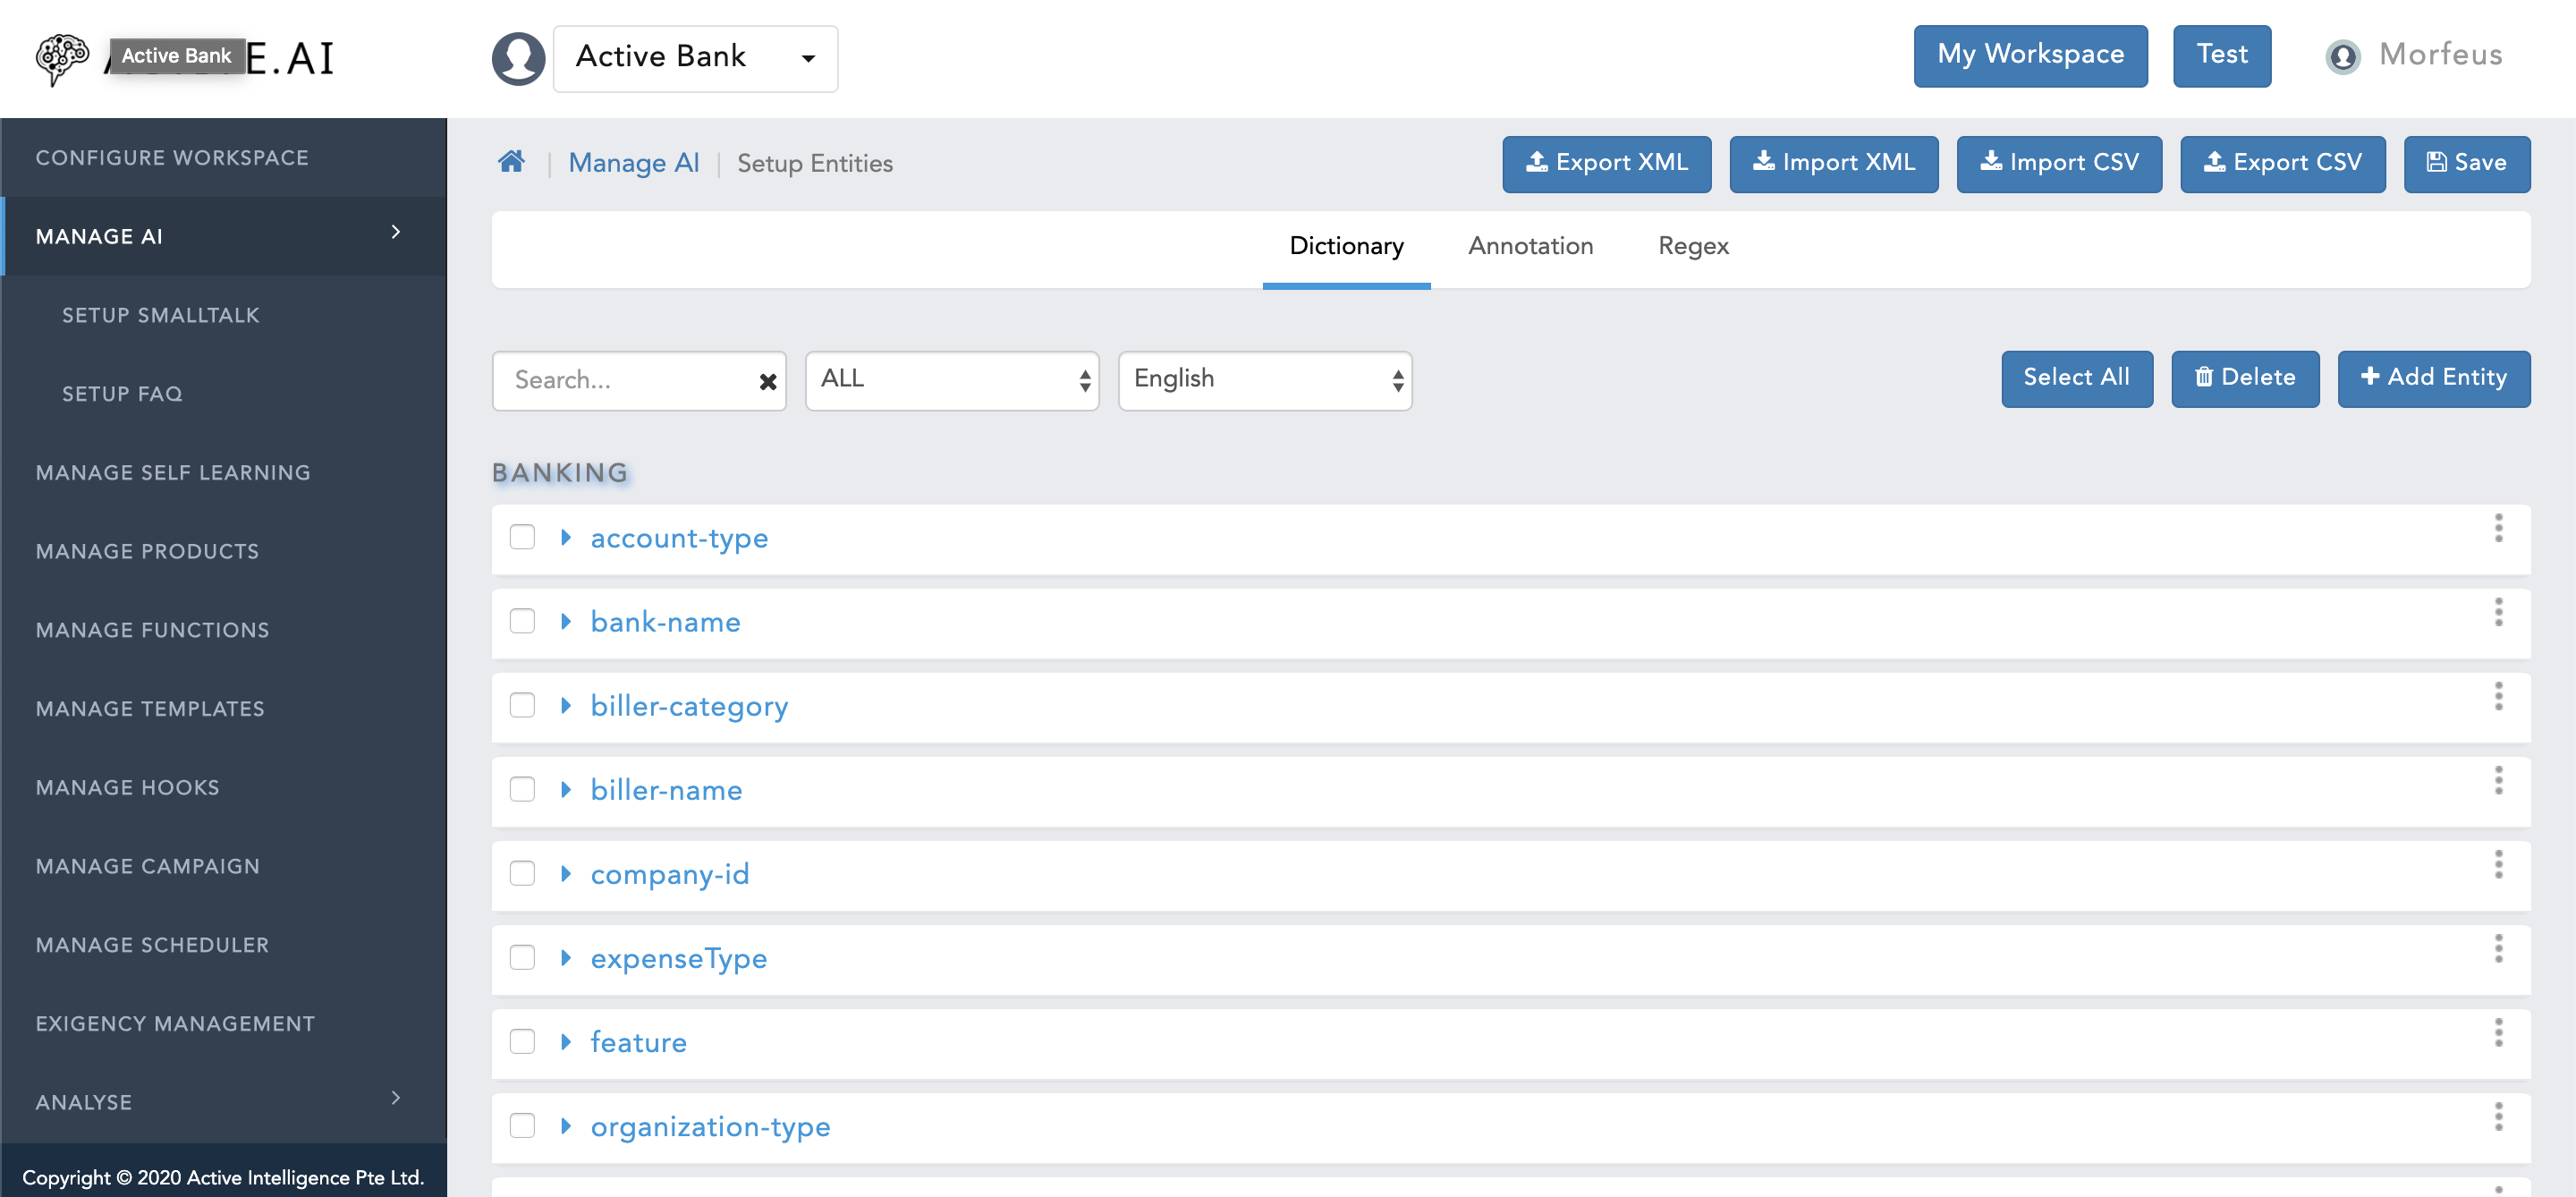
- Click on "Manage AI".
- Click on "Setup Entities".
- Click on "Export XML" button located on the top right corner of "Setup Entities" window, as shown in figure 25 above - ".XML" file will allow you to populate data for all the three types of entities; a. Dictionary; b. Train; and, c. Regex.
- "Entity.xml file will be exported"
Dictionary Entity:
To prepare data one has to follow below steps to populate the NER data in "Entity.xml" as shown in figure 26:
- Open a new file in text editor.
- 1st line should be "<?xml version="1.0" encoding="UTF-8" standalone="yes"?>". This line allows the utf-8 characters withing the xml follow up content.
- 2nd line should start with opening html tag as "<Entities>".

- For any entity, the 1st line should always start with "<Entity>".
- Next line should start with "<EntityGroup>" and then domain name like; banking/sys/insurance, following the closing html tag "</EntityGroup>".
- Next line should start with "<EntityName>" and ends with "</EntityName>". In between the two tag, one has to populate the entity name other than the domain as shown in above figure 26.
- Next line is optional but if the class is present in the entity name then it start with "<EntityClass>" and ends with "</EntityClass>". In between one has to populate the class of an entity name other than the domain as well as entity name.
- Next line should start with "<EntityType>" and ends with "</EntityType>". In between one has to populate the entity type as edict (i.e.dictionary). Entity type should always be in lower case.
- Next line should start with "<Dictionary>".
- All dictionary attributes can be populated within a HTML expression "<Item subtype="" rootvalue=""></Item>".
- Here subtype of an attribute can be populated again "subtype="<subtype of an attribute>".
- Actual root value of an attribute can be populated against the "rootvalue="<root value of an attribute>".
- Synonyms of an attribute can be populated in between "rootvalue=""><synonym(s) of an attribute (comma separated for multiple synonyms)></Item>"
- Dictionary tag should be closed with "</Dictionary>" once the dictionary entity attributes have been populated as shown in figure 26 above.
- the initial tag of an entity has to be closed with "</Entity>".
Train Entity:
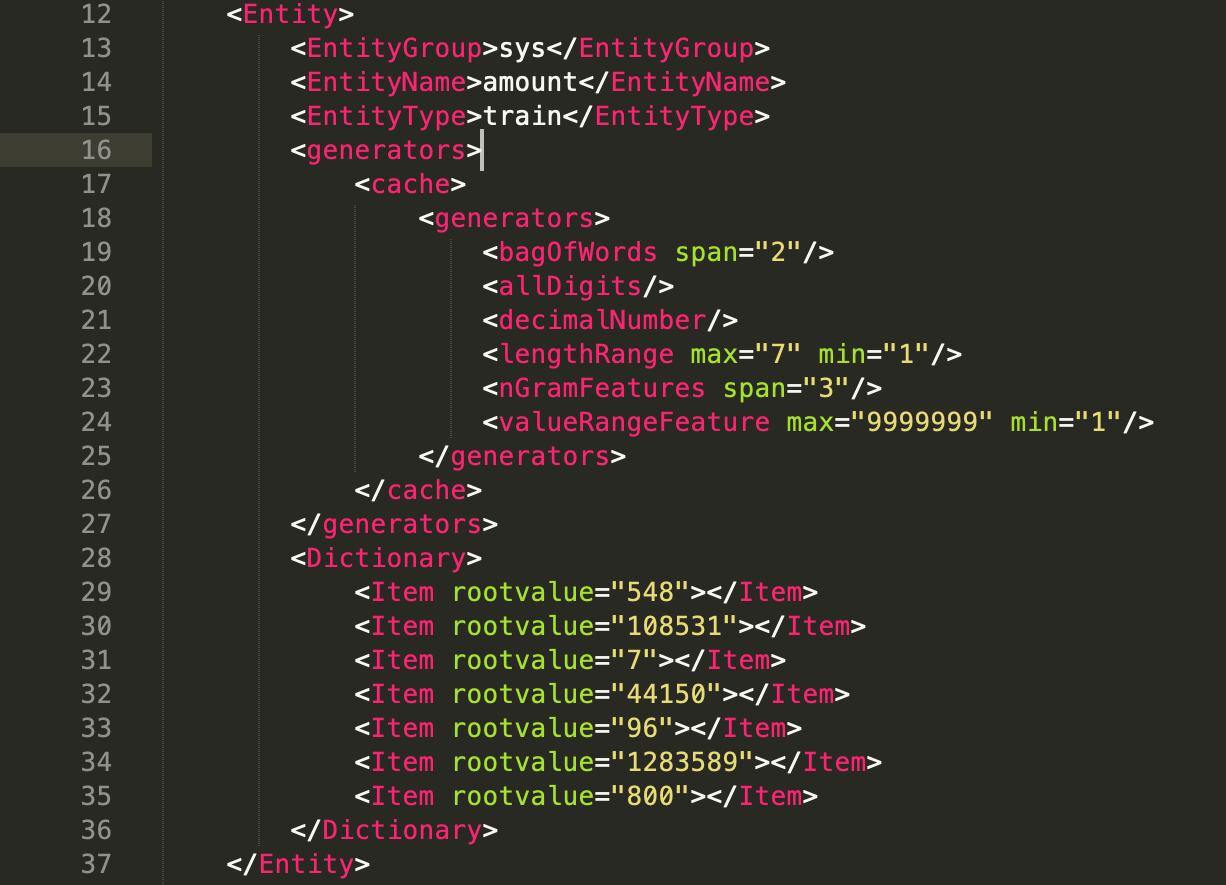
Here in figure 27 above, the entity starts with "<Entity>" tag follows the same structure till "</EntityClass>". From "<EntityType>" onwards, following steps to be executed:
- "<EntityType>" should be defined as "train" (always in lower case) followed by the closing tag "</EntityType>".
- Follow up lines will capture the feature set which can be used as it is everywhere for each train entity. As currently this feature is not being used in NER training.
- post feature set, all the steps will be followed just like 6-9 points listed under dictionary entity section above with only difference being the values will be sample values only.
ReGEx Entity:

For ReGEx entity data preparation, initial steps 1-4 has to be followed exactly same as described under Dictionary entity. From "
- "<EntityType>" should be defined as "regex" (always in lower case) followed by the closing tag "</EntityType>".
- Next line should start with "<RegEx>.".
- the regex pattern to be populated in-between "<pattern>the patter to be populated here</pattern>" which has been sorted for a respective "RegEx" entity.
- Followed by the pattern, the regex loop should be closed with "</RegEx>".
- Follow up should be the closing tag "</Entity>".
- At last, the "<Entities>" loop should be closed with "</Entities>".
- Save the file as "Entity.xml"
Post updation/addition of entities in "Entity.xml", one can import the file by following below listed steps:
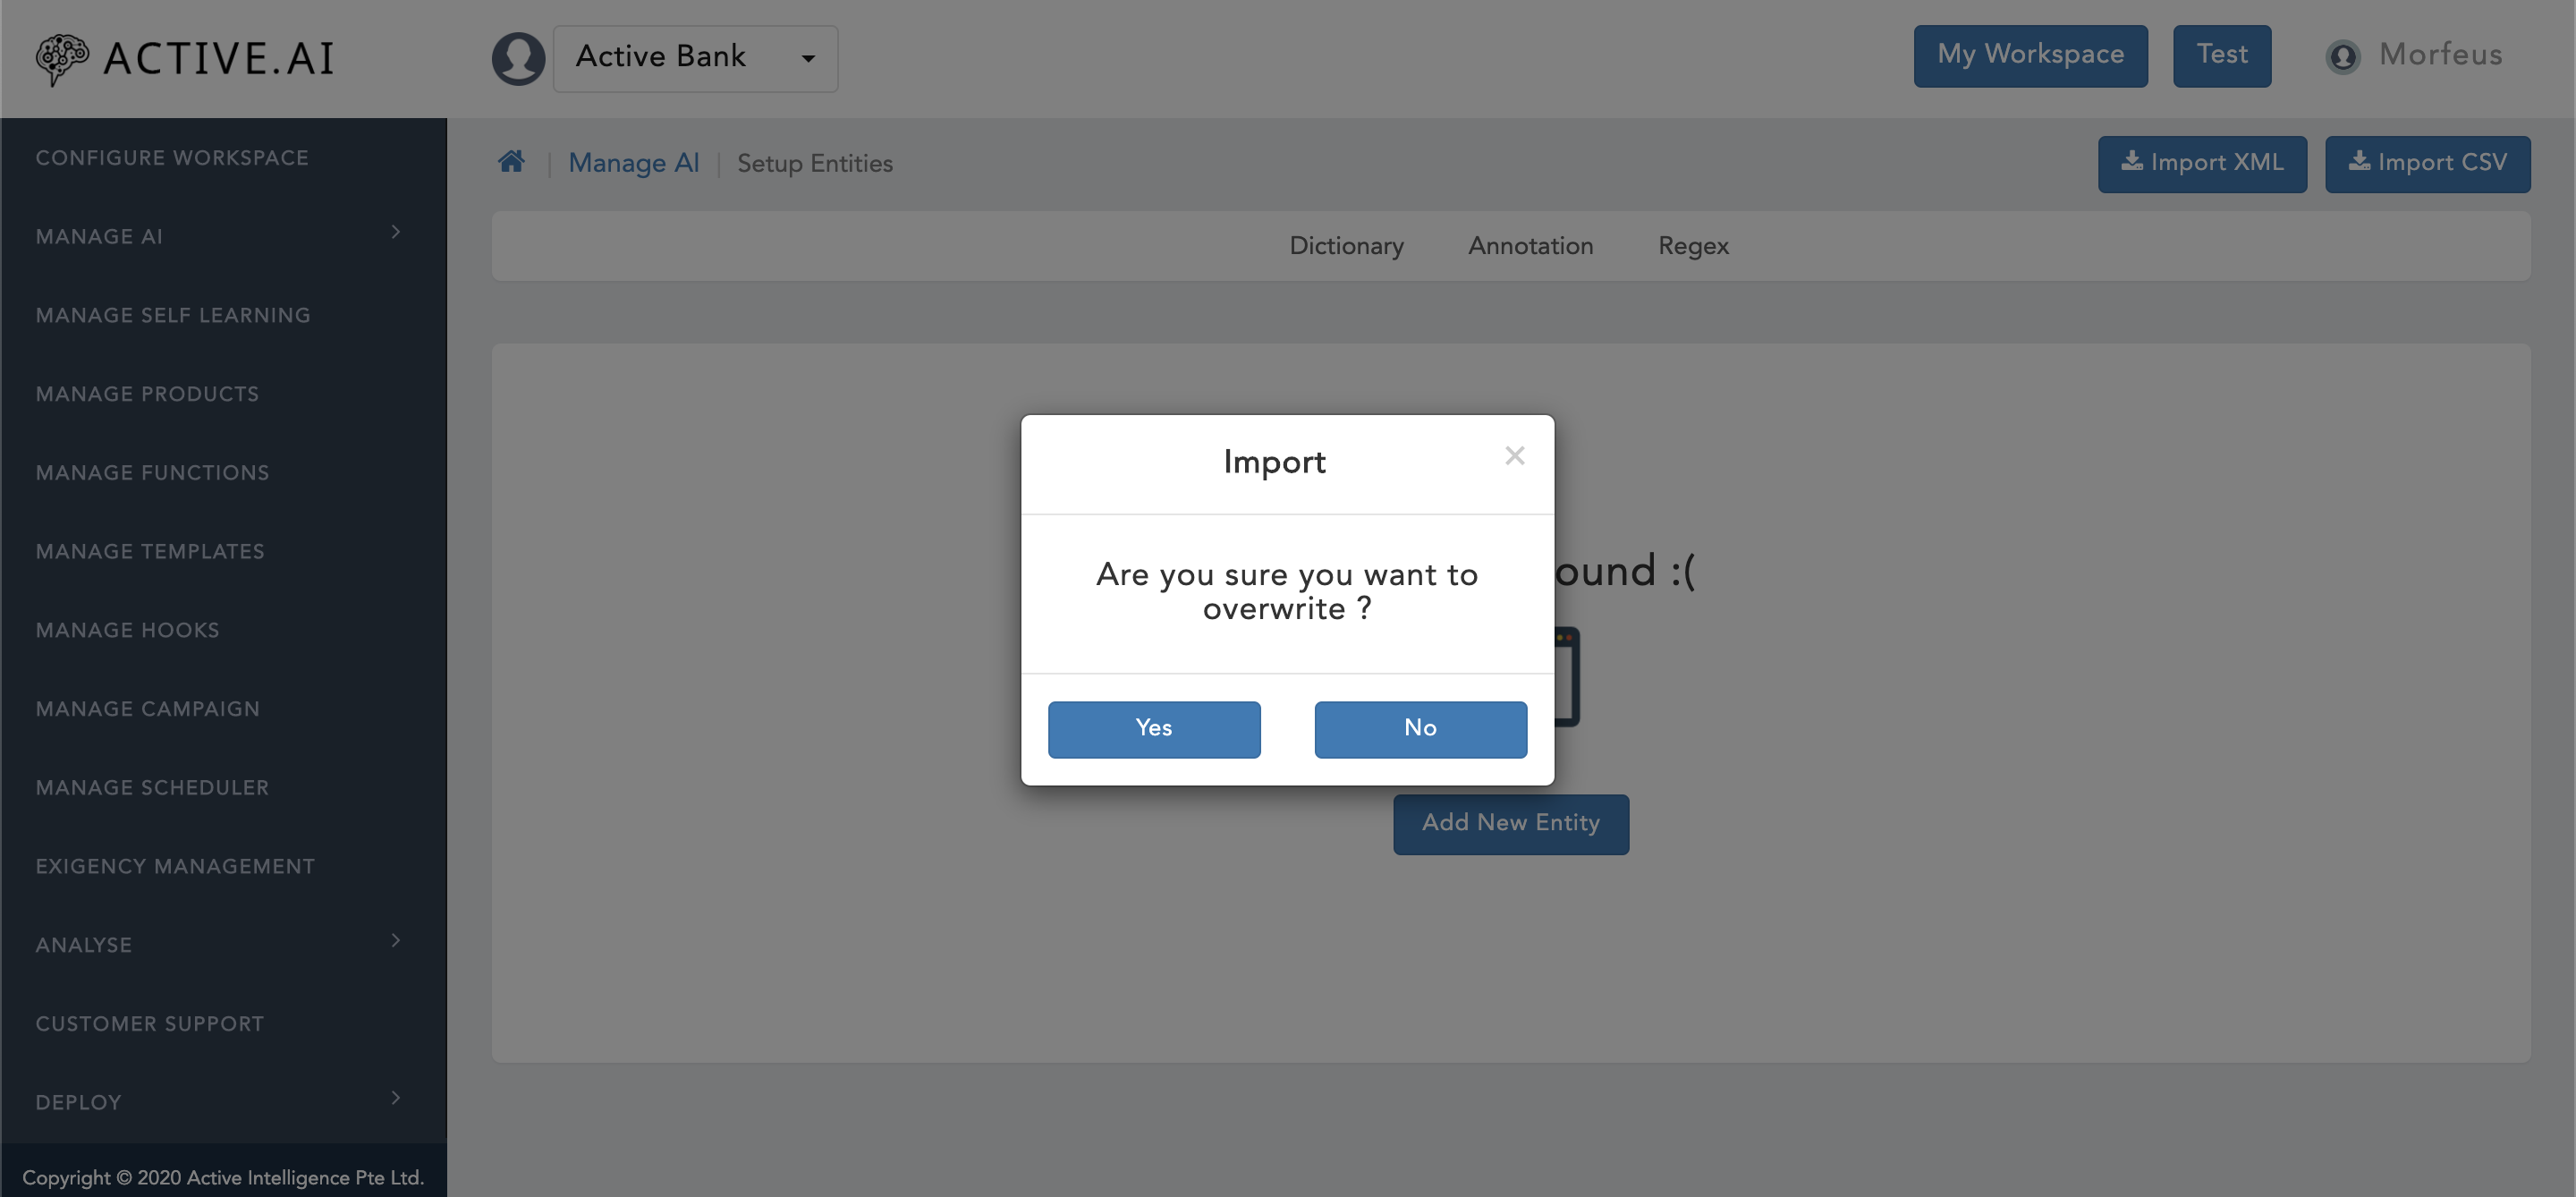
- Click on "Import XML" button located on the top right corner of "Setup Entities" window.
- A new window will prompt up with confirmation for "Are you sure you want to overwrite ?" as shown in figure 29 above.
- One can select "Yes" if one wants to overwrite as shown in figure 29 above.
- One can select "No" if one wants to only import delta changes as shown in figure 29 above.
- Post selection of "Yes" or "No" from prompted confirmation window, finder/explorer will open up.
- Locate the updated "Entity.xml" and click on "open" button.
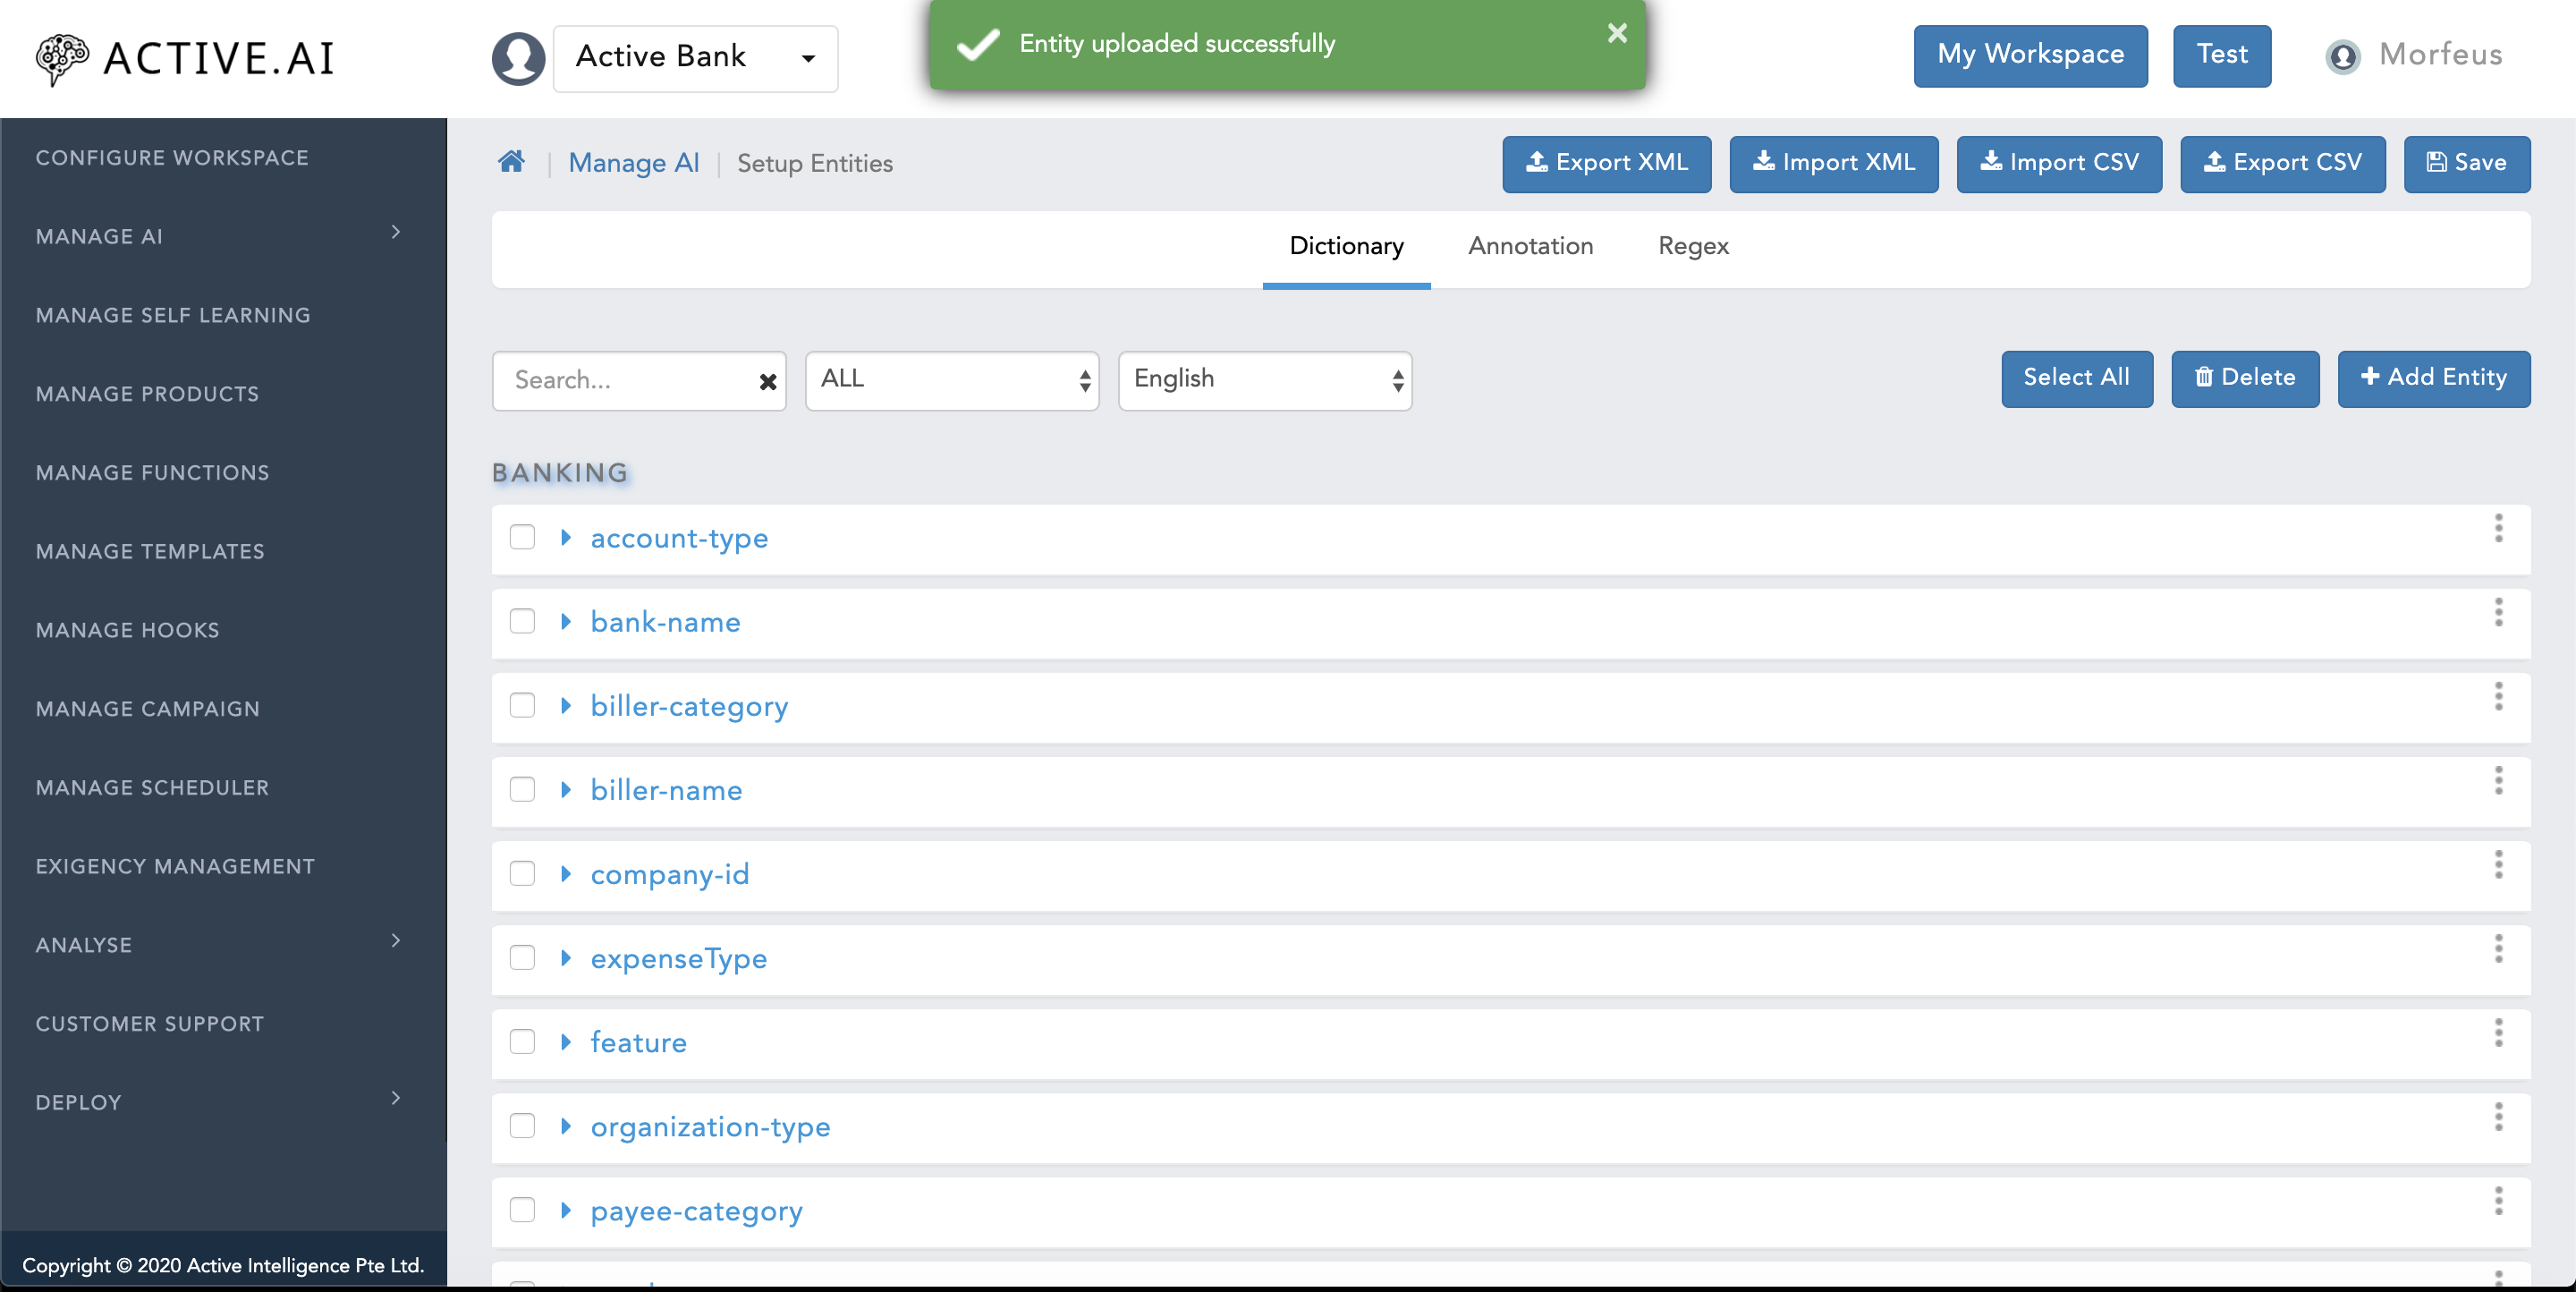
- Post successful import of "Entity.xml", a green coloured message ribbon will prompt on the top of the window with message "Entity uploaded Successfully" as shown in figure 30 below.
Data Preparation - via Git
To know more about "Git setup" and "how to start with git", one can access the guideline from here.
To prepare the data for Convesational ai modules via git, one requires to setup a new GIT repo with a workspace name in it, as shown in below screenshot.

As shown in figure 31, the module wise data will require to be stored in different directories. Each directory should be named exactly as shown in the figure 31.
Now let's proceed with the brief insight about each modules.
spellcheck:
It maintains acronym to abbreviation mapping file for finance / banking / trading / insurance (FBTI) domain related vocabs.
Because in general the "WHO" can signify many objects, like; a. world health organization; b. it can be the question word.
The variations which needs to be corrected has to be one word only. As currently Conversational AI only supports one word (input variant – i.e. billpayment) to many word (root word/phrase – i.e. bill payment) and not the other way around (i.e. bil pyment (input variants) cannot be mapped to root word/phrase bill payment.
Three types of corrections happens at the spellcheck level:-
- Acronym to abbreviation
- Map the regular expression words with the same value to stop the auto correction
- Spell typo to correct word mapping

For Example: 21
- balance=balnc,blance (spell typo correction)
- Amit=Amit (regular expression)
- account=ac.,a/c (acronym)
File naming convention:
File name should be "acronyms" with text only format without ".txt" extension. The file is used to store the root value and variations mapping.
File format:
The root value should be stored on the left side of "=" whereas the variations like; regular expressions, typo or acronym should be kept on the right side of the "=" as shown in the above figure 60. Multiple variations can be mapped to one root value by separating them with "," (comma).
SpellCheck: Requirements
- All the three types of spell corrections (refer 1.a., 1.b., and 1.c. above) should be used based on one to many word mapping convention, i.e. one word user's input should only be mapped to either one or multi word(s) root value.
- File Format should be followed as explained above
- "acronyms" file should be stored in git repo with context path
"/git_repo/workspace_name/spellcheck/.
SpellCheck: Usage
spellcheck/ acronyms file is useful to correct the three types of single token based corrections before user input gets processed by any other modules. This helps to prepare the training data without creating variations at the typo errors or acronyms based variations. In return such variations will become redundant.
ParseQuery:
It is a mapping of product vs action or attributes.It is used to fill out all unsupported products and action within a client's defined scope.

Here in the above figure 33,
- A2="action_synoym" header will include variations for action as in row number 3, 5, 6, and 7 and attribute variations as in row number 4.
- B2="action" header will include only root values for action and attribute.
- Row number 1 will include only the variations of the products.
- Row number 2 will include only the root values of the products.
NER – Named entity recognition:
Introduction
As Conversational AI is expected to process user's generated content (UGC) it is viable to use only required information from the user's input and process the required flow. To achieve this we require NER.
What is NER ?
Named Entity Recognition (NER) is used to extract/capture noun/noun phrases/attributes from the user's input.
For Example: 22
Transfer 500 to Charu from my account
From the above statement we require three information namely 500, charu, and account. These values will be extracted from the utterance and will be used to hit the client's API.
NER: Types of Entities
Within NER, there are three different types of Entities:
Dictionary (edict – for all finite values)
- banking.product-type, banking.product-account-type, banking.product-name, etc..
Regex (Universal Pattern)
- sys.email, banking.otp, banking.pin, sys.itemNumber
Train (for Infinite Values)
- banking.product-account-number, banking.product-card-number, sys.person-phone-number, sys.amount, etc..
- For NER train entity one has to prepare a sample value file and annotate all the occurrences of the entity with curly braces "{<train entity name>}" while preparing PC or Dialog data.
NER: Train Entity (TE) Norms
While preparing the primaryClassifier or dialog data one need to annotate the train entities within curly braces like; "{<train entity name>}"

In addition to that, sample values based on the properties of the entity should be prepared and stored in a text file without ".txt" extension as shown below:

NER: Dict/Edict Entity (DE) Norms
All dictionary entity values should be stored as rootvalue=(comma separated) variations as can be seen in below figure 36.

NER: Regex Entity (ReGEx) Norms
Regex entity file include the regular expressions which will be used to extract specific values from the user's input.

File naming conventions:
Let's say the NER entity data needs to be prepared within retail banking (RB) domain for Active bank India (IN) in English (EN) language for banking.product-account-number entity.
- The initials of a banking.product-account-number entity file would be "EN_RB_IN_ACTIVE_".
- If the utterances are applicable globally irrespective of the project name or geography/country name then the initials would be "EN_RB_ANY_ANY_"
- If the utterances are applicable globally but within a specific geography/country then the initials would be "EN_RB_IN_ANY_".
- The entity name will be written as it is.
- TE name should be followed by ".samples".
- DE name should be followed by "_dict".
- ReGEx Entity name should be followed by "_regex".
Modifiers:
Modifier is an adjectival word or phrase which modifies the entity or gives additional information about the theme or goal from user's input.
Modifier values should be stored as "rootvalue=(comma separated) variations(i.e. synonyms)" as shown in below figure 38.

File naming convention:
- Initials should be language code + domain + geography + project name like; "EN_RB_IN_ACTIVE_", "EN_RB_IN_ANY_", or "EN_RB_ANY_ANY_" in upper case only.
- Initials will be followed by "modifiers" in lower case letters.
- File should get ".txt" as an extension.
Modifier: Requirements
- All types of entity files based on the scope should be stored under NER folder path
"/git_repo/workspace_name/NER/". - All files ending with "_dict", ".samples", and "_regex" should be included under NER directory.
- Modifier file also should be present in NER.
Preclassification:
Pre-classification is a look up file to override the actual classification which may be used for the existing use case's specific fulfilment or to handle and create unsupported dummy intent for its fulfillment.
File naming convention:
Preclasification file name should always be "preclassification" with an extension of ".csv". The name is case sensitive, thus should be written exactly as it is.
File format:
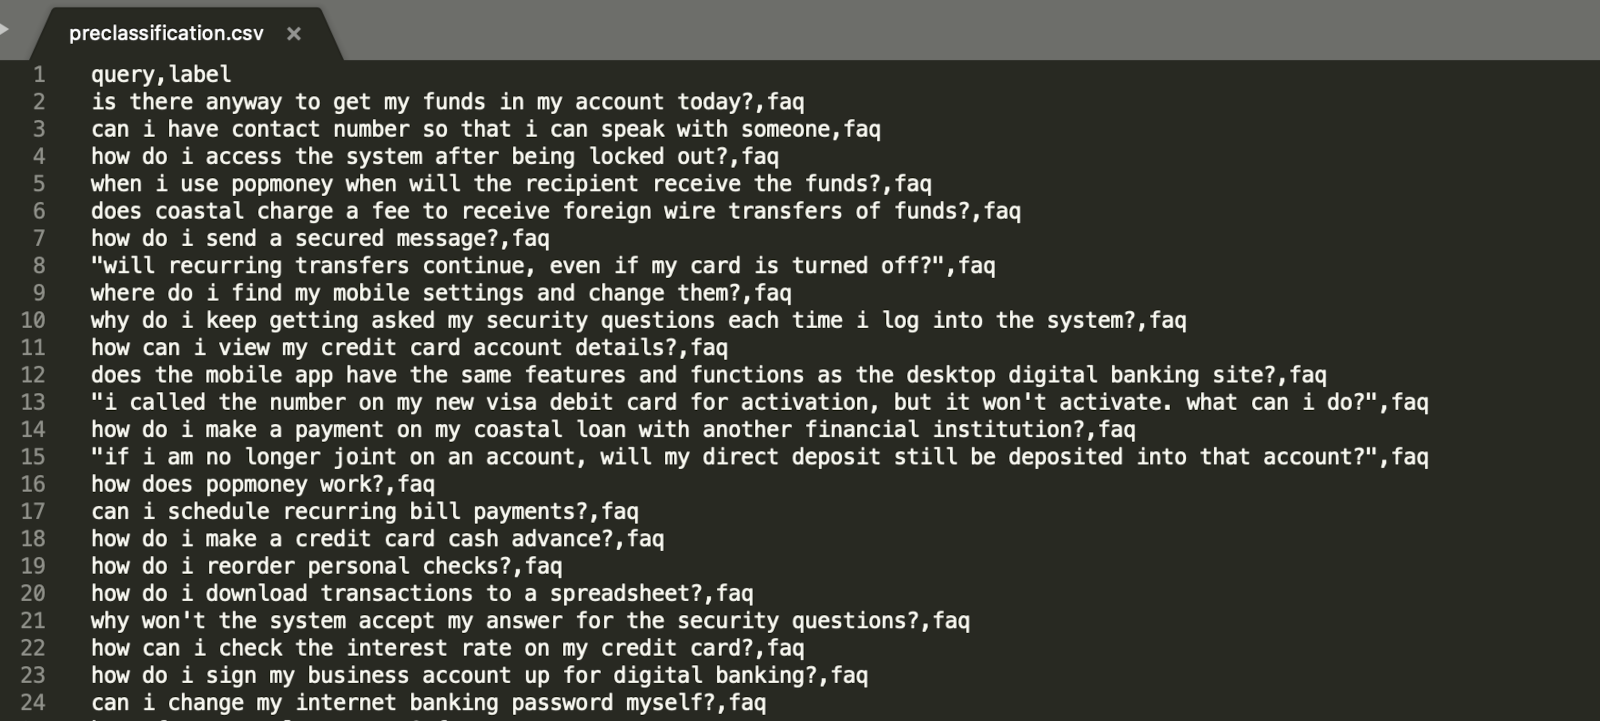
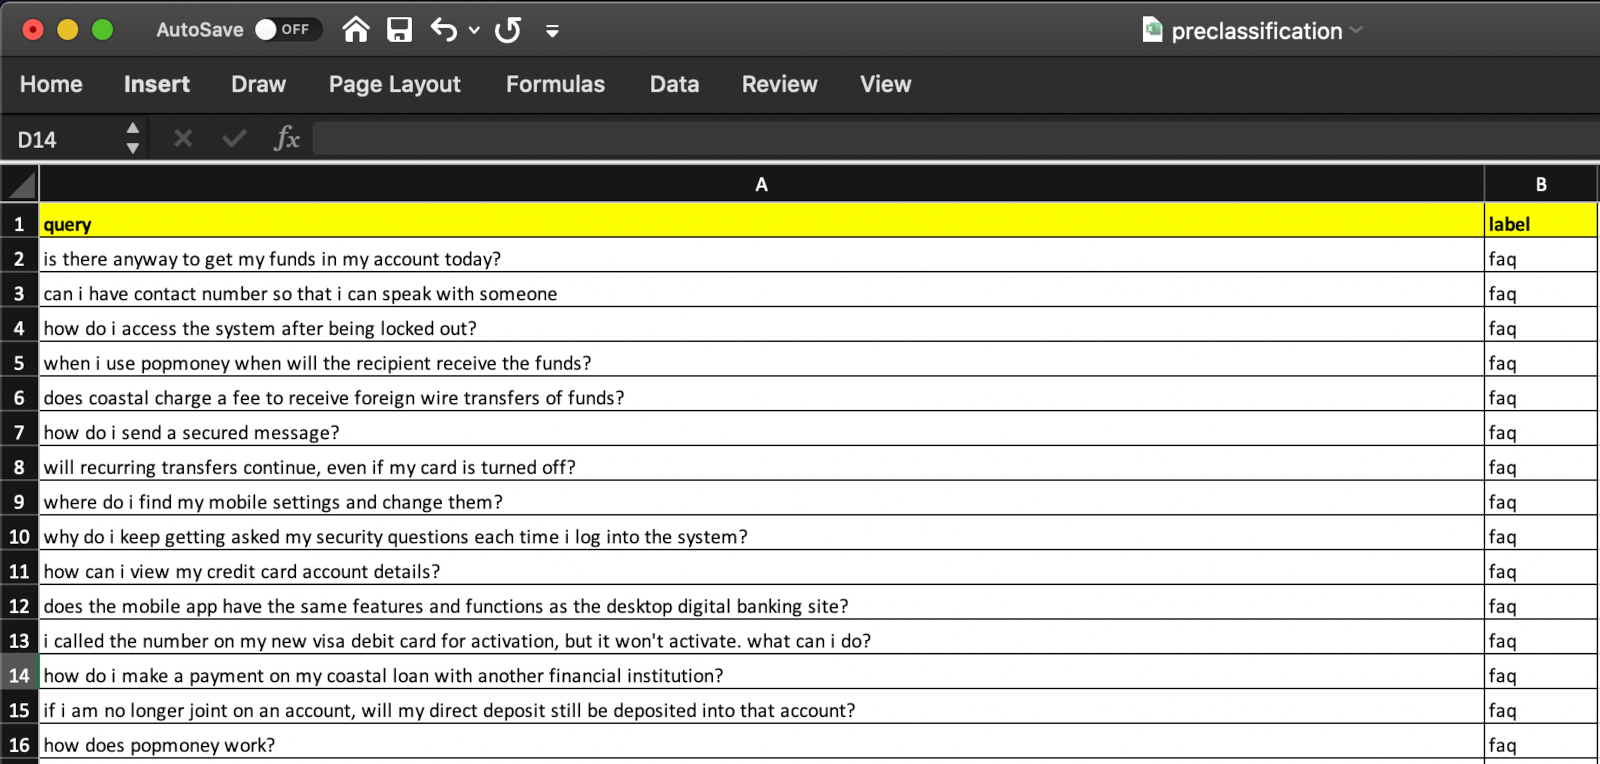
File format is a plain "csv" which can be prepared by using either any text editor as shown in figure 39 below or can be prepared by any text processor like; MS excel (as shown in figure 40 below), mac number, open source office suits like; libre office, google doc, open office etc...
Preclassification: Requirements
- To prepare preclassification.csv file in text editor:
- One has to make sure that there are two headers; 1. query and; 2. label – always in lower case.
- These headers should be always in lower case letters.
- One has to make sure that each utterance is always followed by single "comma" post which an intent name as shown in the above figure 39.
- If the utterance also has one comma then the whole utterance should be in double quotation as shown in the row 8 of figure 39. As CSV formatted file always uses "," as a column delimiter, thus utterance with single comma should be double quoted.
- To prepare preclassification.csv file in any text processor:
- One has to make sure that there are two header columns; 1. query and; 2. label – always in lower case.
- All the utterances should be kept under "query" column
- Respective intent name for each utterances should be kept under "label" column.
- The file format should be selected as "Comma-separated values (CSV)" while saving the file.
The file preclassification.csv should be kept under the git repo with below context path "/git_repo/workspace_name/PreClassification/"
Classifier:
Classifier is a module, which classifies the user's input into broader categories based on the action and attribute-based use case utterances.
For Example: 23
- Wish to pay my mobile bill (txn-moneymovement)
- want to do funds transfer (txn-moneymovement)
- recharge my mobile number 8347423748 (txn-recharge)
Classifier/Primary Classifier (PC) file name follows below convention: "2 letter Language Code" + "_" + "Domain code" + "_" + "Geography/country code" + "_" + "Project Name".
File naming convention:
Let's say the PC data needs to be prepared within retail banking (RB) domain for Active bank India (IN) in English (EN) language.
- The initials of a funds transfer use case file would be "EN_RB_IN_ACTIVE_".
- If the utterances are applicable globally irrespective of the project name or geography/country name then the initials would be "EN_RB_ANY_ANY_"
- If the utterances are applicable globally but within a specific geography/country then the initials would be "EN_RB_IN_ANY_"
- The use case name will be written in Camel Case without space or underscore or hyphen or any other character like; "FundsTransferGeneral".
- Use case name should be followed by "_primaryClassifier.train".
- The extension of the file should be ".csv"
Based on the above points there could be files with three types of initials which can be created.
- EN_RB_ANY_ANY_FundsTransferGeneral_primaryClassifier.train.csv - Global
- EN_RB_IN_ANY_FundsTransferGeneral_primaryClassifier.train.csv - Global within the geography
- EN_RB_IN_ACTIVE_FundsTransferGeneral_primaryClassifier.train.csv - Geography and project specific

File format:
- Brief details about the use case as shown in line 1st line of the Figure 41. Brief details line should always start with "#".
- The intent information which should be defined as "intent=<intent name>" as shown in the 2nd line of Figure 41. "intent=" is a case sensitive flag.
- All entities will be mapped against "entities= <entity 1>,<entity 2>, <entity 3>, <entity 4>, <entity 5>, and so on" as shown in Figure 41. "entities=" is a case sensitive flag.
- All unique modifiers can be mapped against "modifiers= <modifier 1>,<modifier 2>, <modifier 3>, <modifier 4>, <modifier 5> and so on" as shown in Figure 41. "modifiers=" is a case sensitive flag.
- The 5th line will always be "[Utterances]" (Figure 41). It is a case sensitive flag.
- From row number 6th onwards you can populate the related utterances4 .
Content Planning to prepare utterances for a use case "FundsTransferGeneral" is provided under "Content Planning" section of "Preparing data for a use case".
primaryClassifier: Requirements
The primaryClassifier file should be prepared as mentioned in "file format" with proper "naming convention" as mentioned above. The primaryClassifier file with proper name and format should be stored in git repo with below context path "/git_repo/workspace_name/PrimaryClassifier/".
Dialog:
To under what is dialog, please refer to the "dialog" section of "Conversational AI Modules"
How to prepare dialog data
As we can see in example 8, the user's response doesn't provide much of the intent related information rather the prompt related information only. This information is provided in partial or follow up based. We need to prepare all follow-up possible utterances which user might reply with, based parameters defined under section "dialog" within "Conversational AI Modules".
File naming convention:
Let's say the dialog data needs to be prepared within retail banking (RB) domain for Active bank India (IN) in English (EN) language for FundsTransferGeneral PC use case:
- The initials of a funds transfer use case file would be "EN_RB_IN_ACTIVE_".
- If the utterances are applicable _globally irrespective of the project name or geography/country name_ then the initials would be "EN_RB_ANY_ANY_"
- If the utterances are applicable globally but within a specific geography/country then the initials would be "EN_RB_IN_ANY_"
- The use case name should be exactly same as written in PC file for funds transfer use case as "FundsTransferGeneral".
- Use case name should be followed by "_dialog".
- The extension of the file should be ".txt"
Based on the above points there could be files with three types of files for different initials which can be created are as below:
- EN_RB_ANY_ANY_FundsTransferGeneral_dialog.txt - Global
- EN_RB_IN_ANY_FundsTransferGeneral_dialog.txt - Global within the geography
- EN_RB_IN_ACTIVE_FundsTransferGeneral_dialog.txt - Geography and project specific
File format:
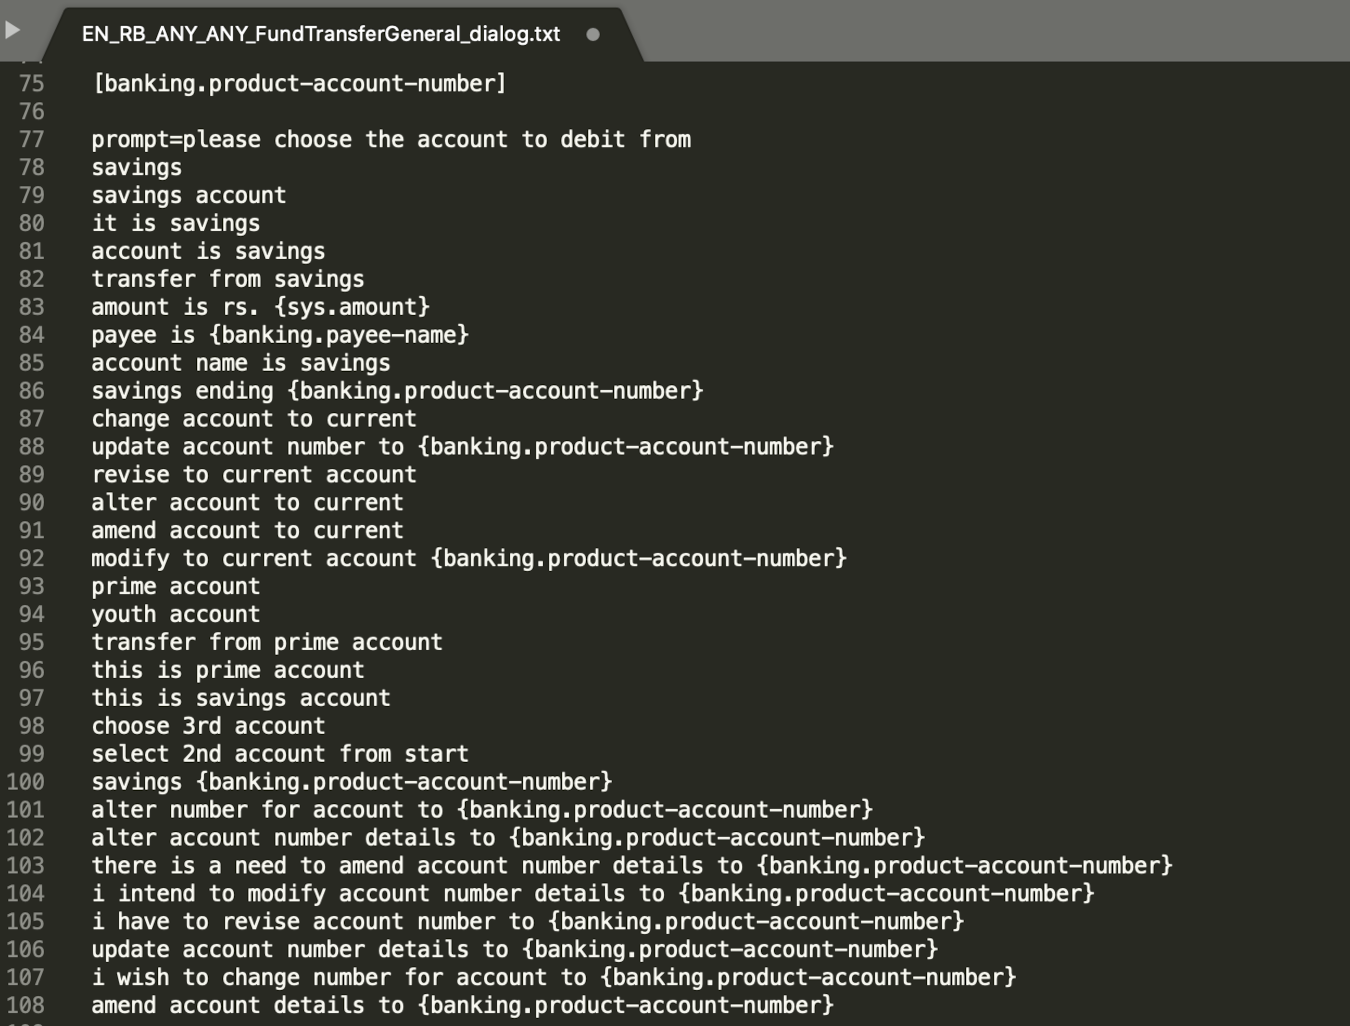
- Each prompt is linked with an entity or more than one entity which has to be listed within the square bracket "[]".
- If one prompt is linked with more than one entity then each entity should be listed within square bracket "[]" separated by comma ",".
- As given in figure 42, entity linked to prompt is mentioned in the square bracket "[]" (row number 75 with respect to row number 77 in figure 42.
- Each bot question (i.e. prompt) should be written post "prompt=".
- Any train entity should always be annotated with curly braces "{}" as mentioned in row number 83, 84, etc.. of figure 42.
- There should be one line gap between linked entity to prompt mentioned in "[]" and the actual prompt.
- Possible follow-up utterances for a respective prompt question should be prepared based on the Type 1 – 8 parameters mentioned above.
Dialog: Requirements
Dos:
- As dialog file's naming convention solely rely on primaryClassifier (PC) naming convention, it is important to have the same use case name as it has been used in PC along with the casing of letters too.
- All the dialog files should be stored in git repo with context path
"/git_repo/workspace_name/dialog/".
Don'ts:
- If there is a new use case for which dialog data is prepared but not the PC data then the dialog data will not be considered in TRINITI training.
- In return it may result in entity extraction, as well as context change module failure.
Dialog: Usage
Dialog data will be used for two of the triniti modules, namely; 1. NER, and; 2. CP (conversation processor).
For example: 24
| Table 6 Dialog vs PC File Name Comparision | ||
| Dialog file name | PrimarClassifier file name | Triniti Utilization |
|---|---|---|
| EN_RB_ANY_ANY_FundsTransferGeneral_dialog.txt | EN_RB_ANY_ANY_FundsTransferGeneral_primaryClassifier.train.csv | YES |
| EN_RB_ANY_ANY_FundsTransferOverseas_dialog.txt | EN_RB_ANY_ANY_FundsTransferGeneral_primaryClassifier.train.csv | NO |
Rule Validator:
Rule validator is mainly used to provide custom level message configuration support on top of parseQuery and Classifier out put.
File naming convention:
The file name for rule validator should be "blocklist.csv" which can be either prepared by MS excel (as given in figure 43) or any other text processor as well as in any text editor (as given in figure 43).


As we can see in figure (43, 44) the first line is consisting the headers for 5 different columns; 1. Intent, Products, Actions, Messages and Stop.
- Intent: the intent which is coming for primaryClassifier module for a specific utterance or if it is a new use case then data can be prepared for PC and trained, or if the specific utterances is expected to be handled as unsupported functionality or unsupported product then directly can be added to preclassification.csv with a dummy intent.
- Products: product column takes the root value recognized at parseQuery module. If the product is not supposed to be considered then should be filled with
"*". - Actions: Action column contains root value of action recognized at parseQuery module.
- Message: Customer message which needs to be shown based on the combination of
"Intent" + "Products" + "Actions"(i.e. all the three fields are not mandatory at one go). - If the blocklist.csv configuration entry needs to be prepared at global level (i.e. irrespective of the intent the configured message should be triggered based on the products only then the Intent should be filled with
"*"as shown in figure 43, and 44.
In brief, if any of the value for the headers; Intent/ Products/ Actions, the value need to be considered as global or the value doesn't have any weightage then it can be filled with "*" .
File format:
The file format is a plain CSV where each 5 columns will be separated by comma "," and if any of the message attribute contains "," then the whole message will automatically be included in double quotations when the file is being prepared with Text processor.
If the file is being prepared in text editor and there is a message which contains "," then the whole message should be manually kept in double quotation.
Rule Validator: Requirements
All the three dimensions namely "Intent", "Products", and "Actions" should be used in redundant order so that unnecessary configuration doesn't take place.
blocklist.csv file should be stored in git repo with context path "/git_repo/workspace_name/RuleValidator/" .
Rule Validator: Usage
Rule validator/ blocklist.csv file is useful to configure the profanity, negation, or unsupported products or functionality related custom messages by overriding the actual Triniti output based on the client's request or agreement.
Train AI Data via Admin
Below are the steps to train the data through admin:
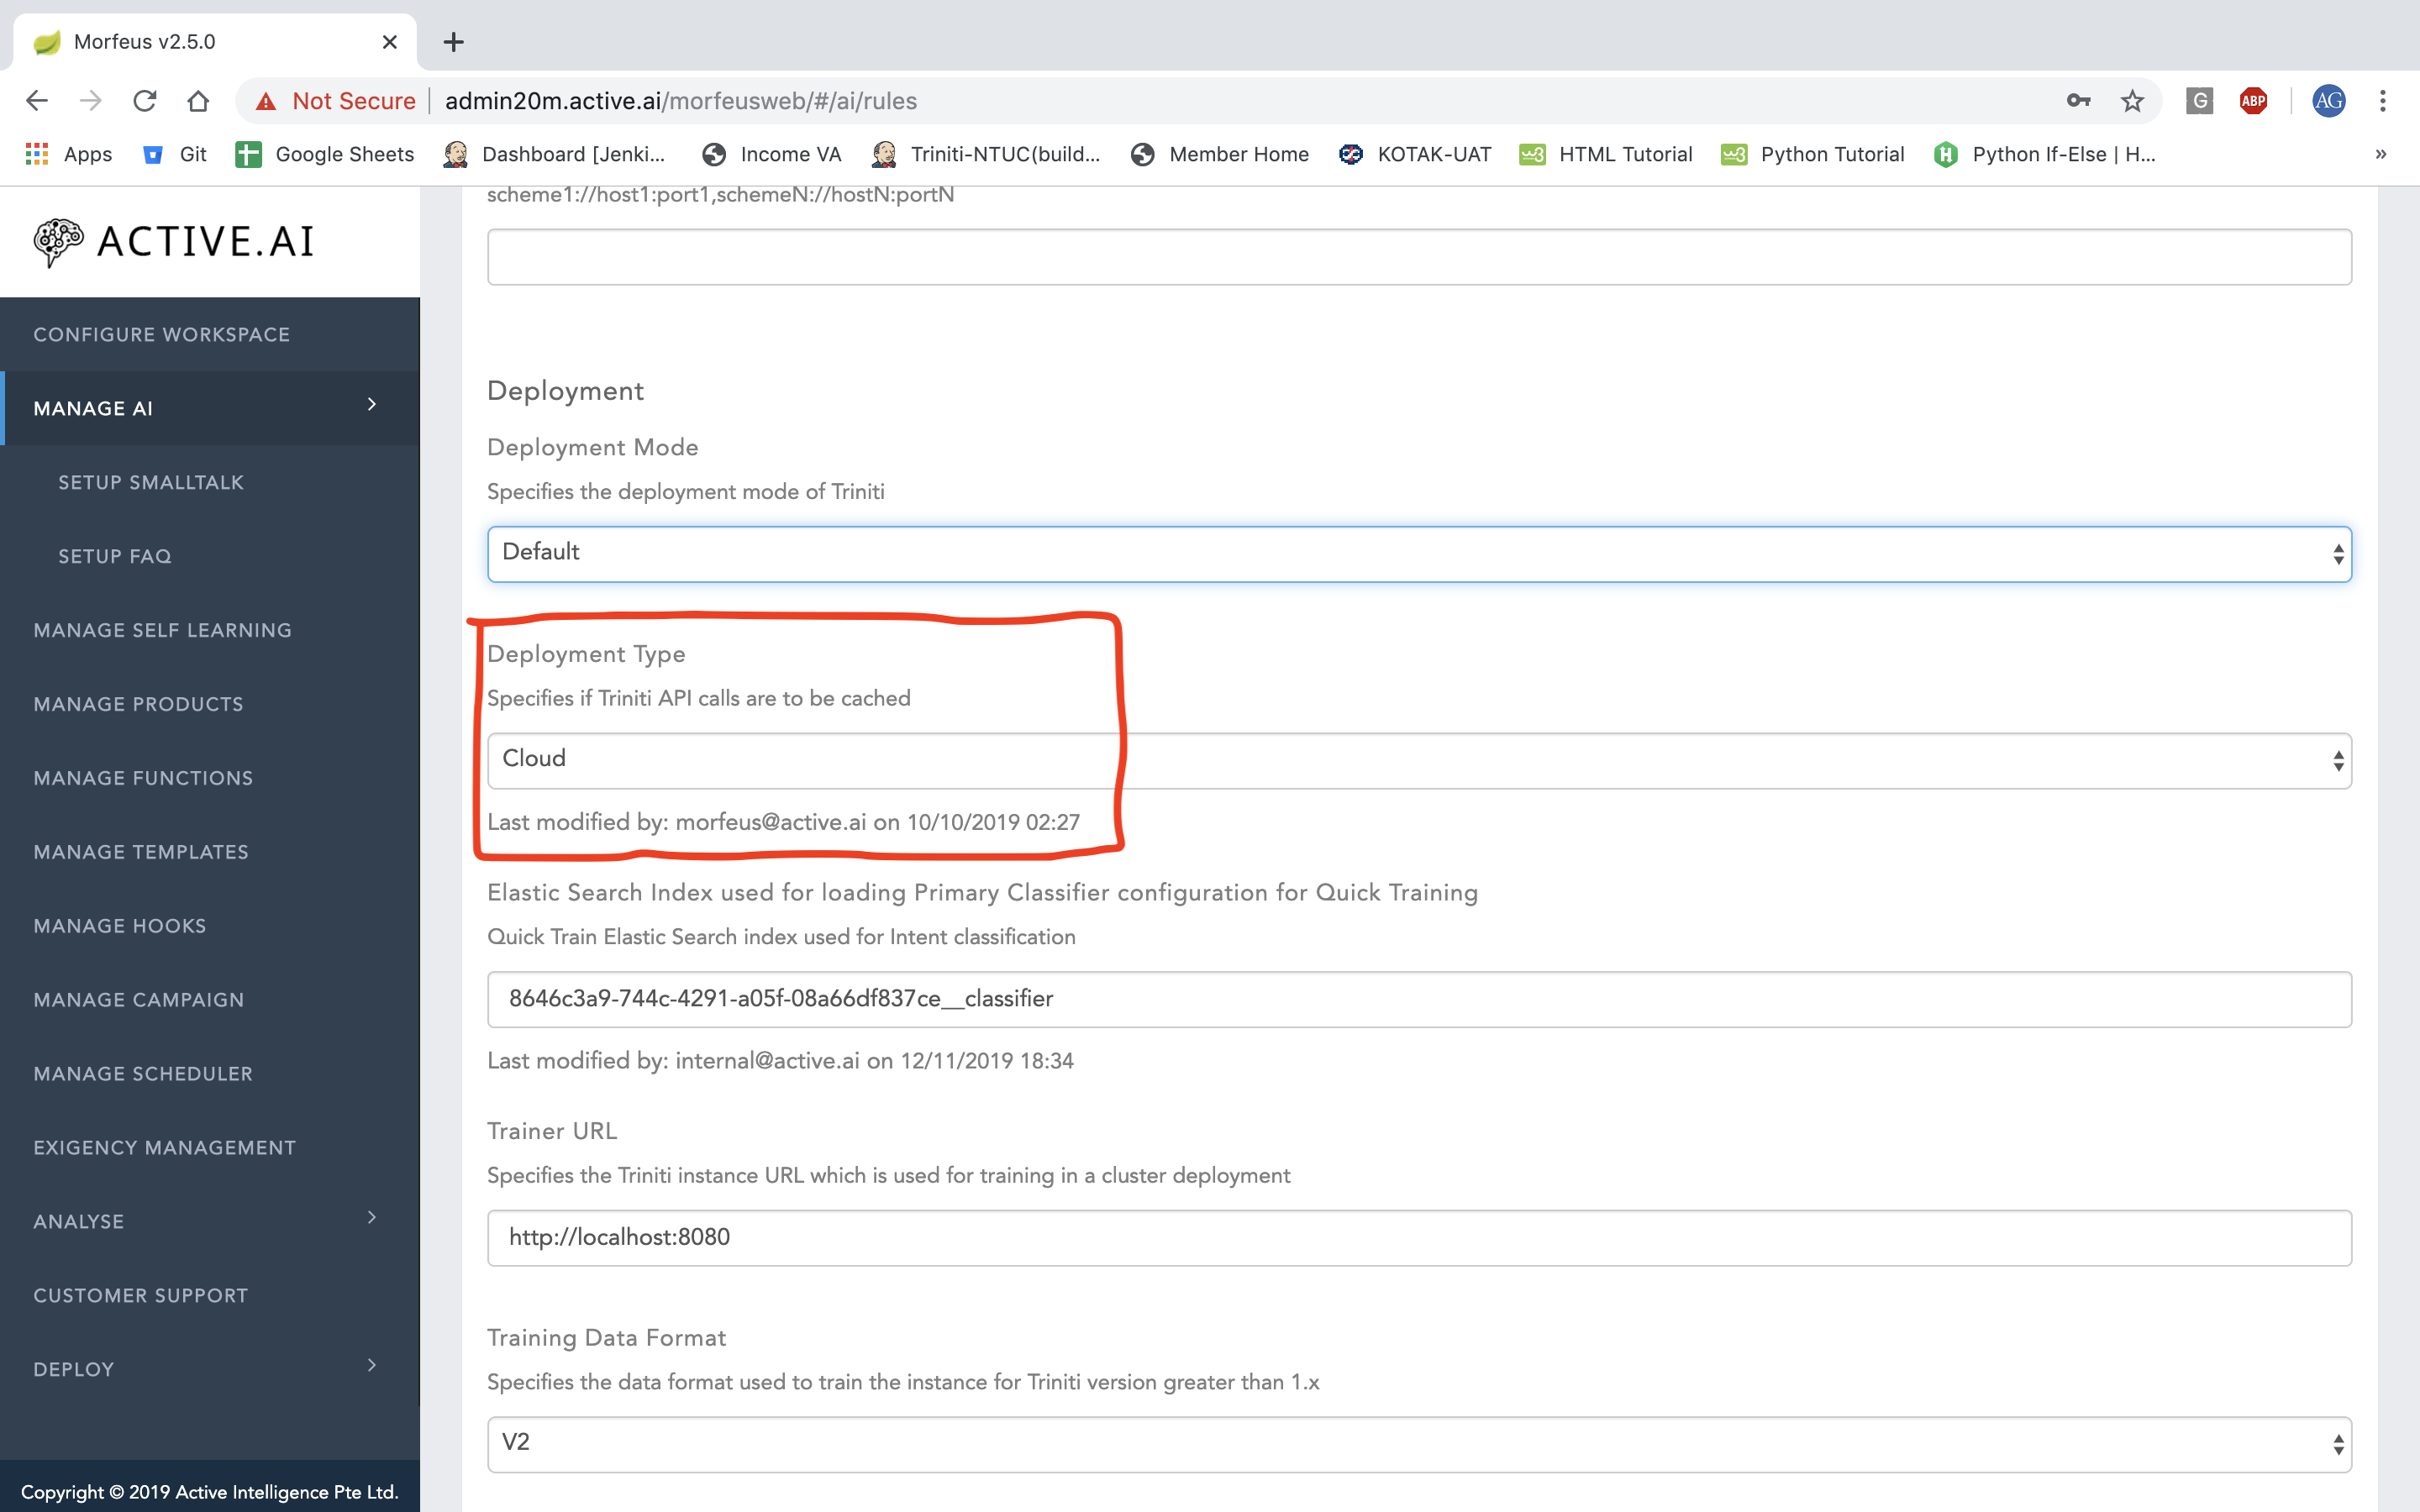
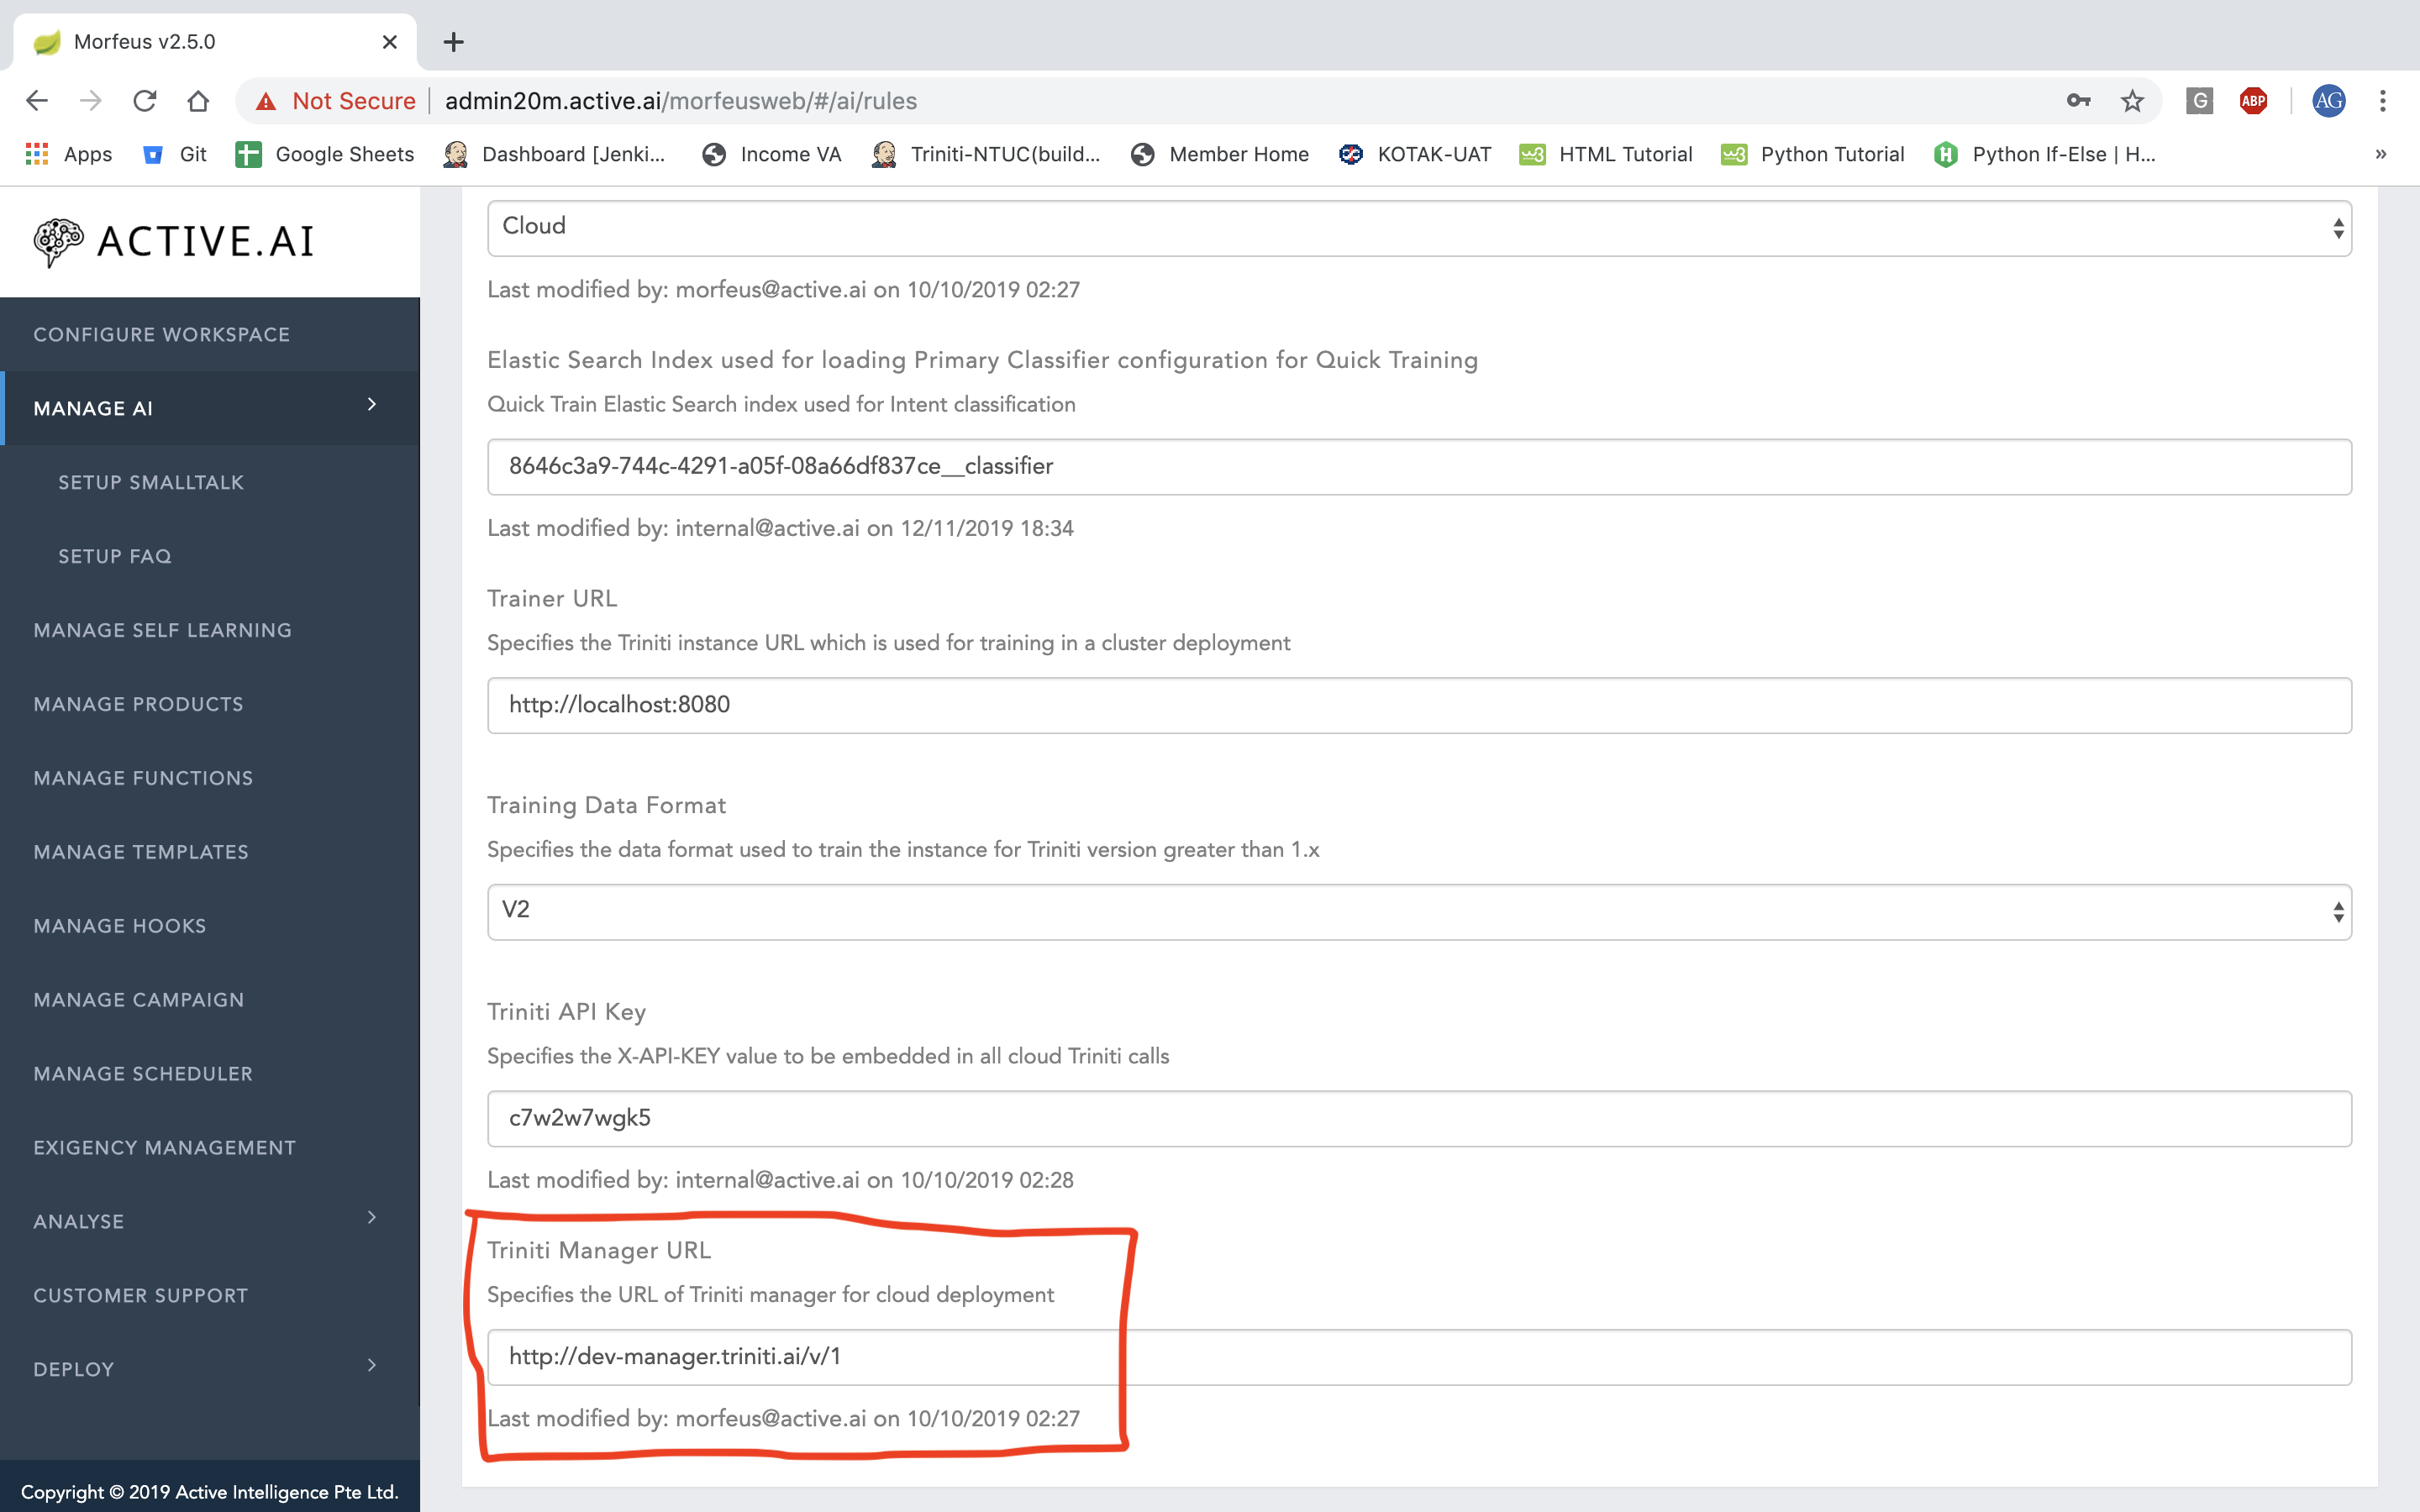
Required rules before training
Navigate to Manage AI -> Manage Rules -> Triniti Tab
| Rule Name | Description |
|---|---|
| Deployment Type | Cloud / Local |
| Triniti Manager URL | http://manager.triniti.ai/v/1 |
AI Data Generation & Training
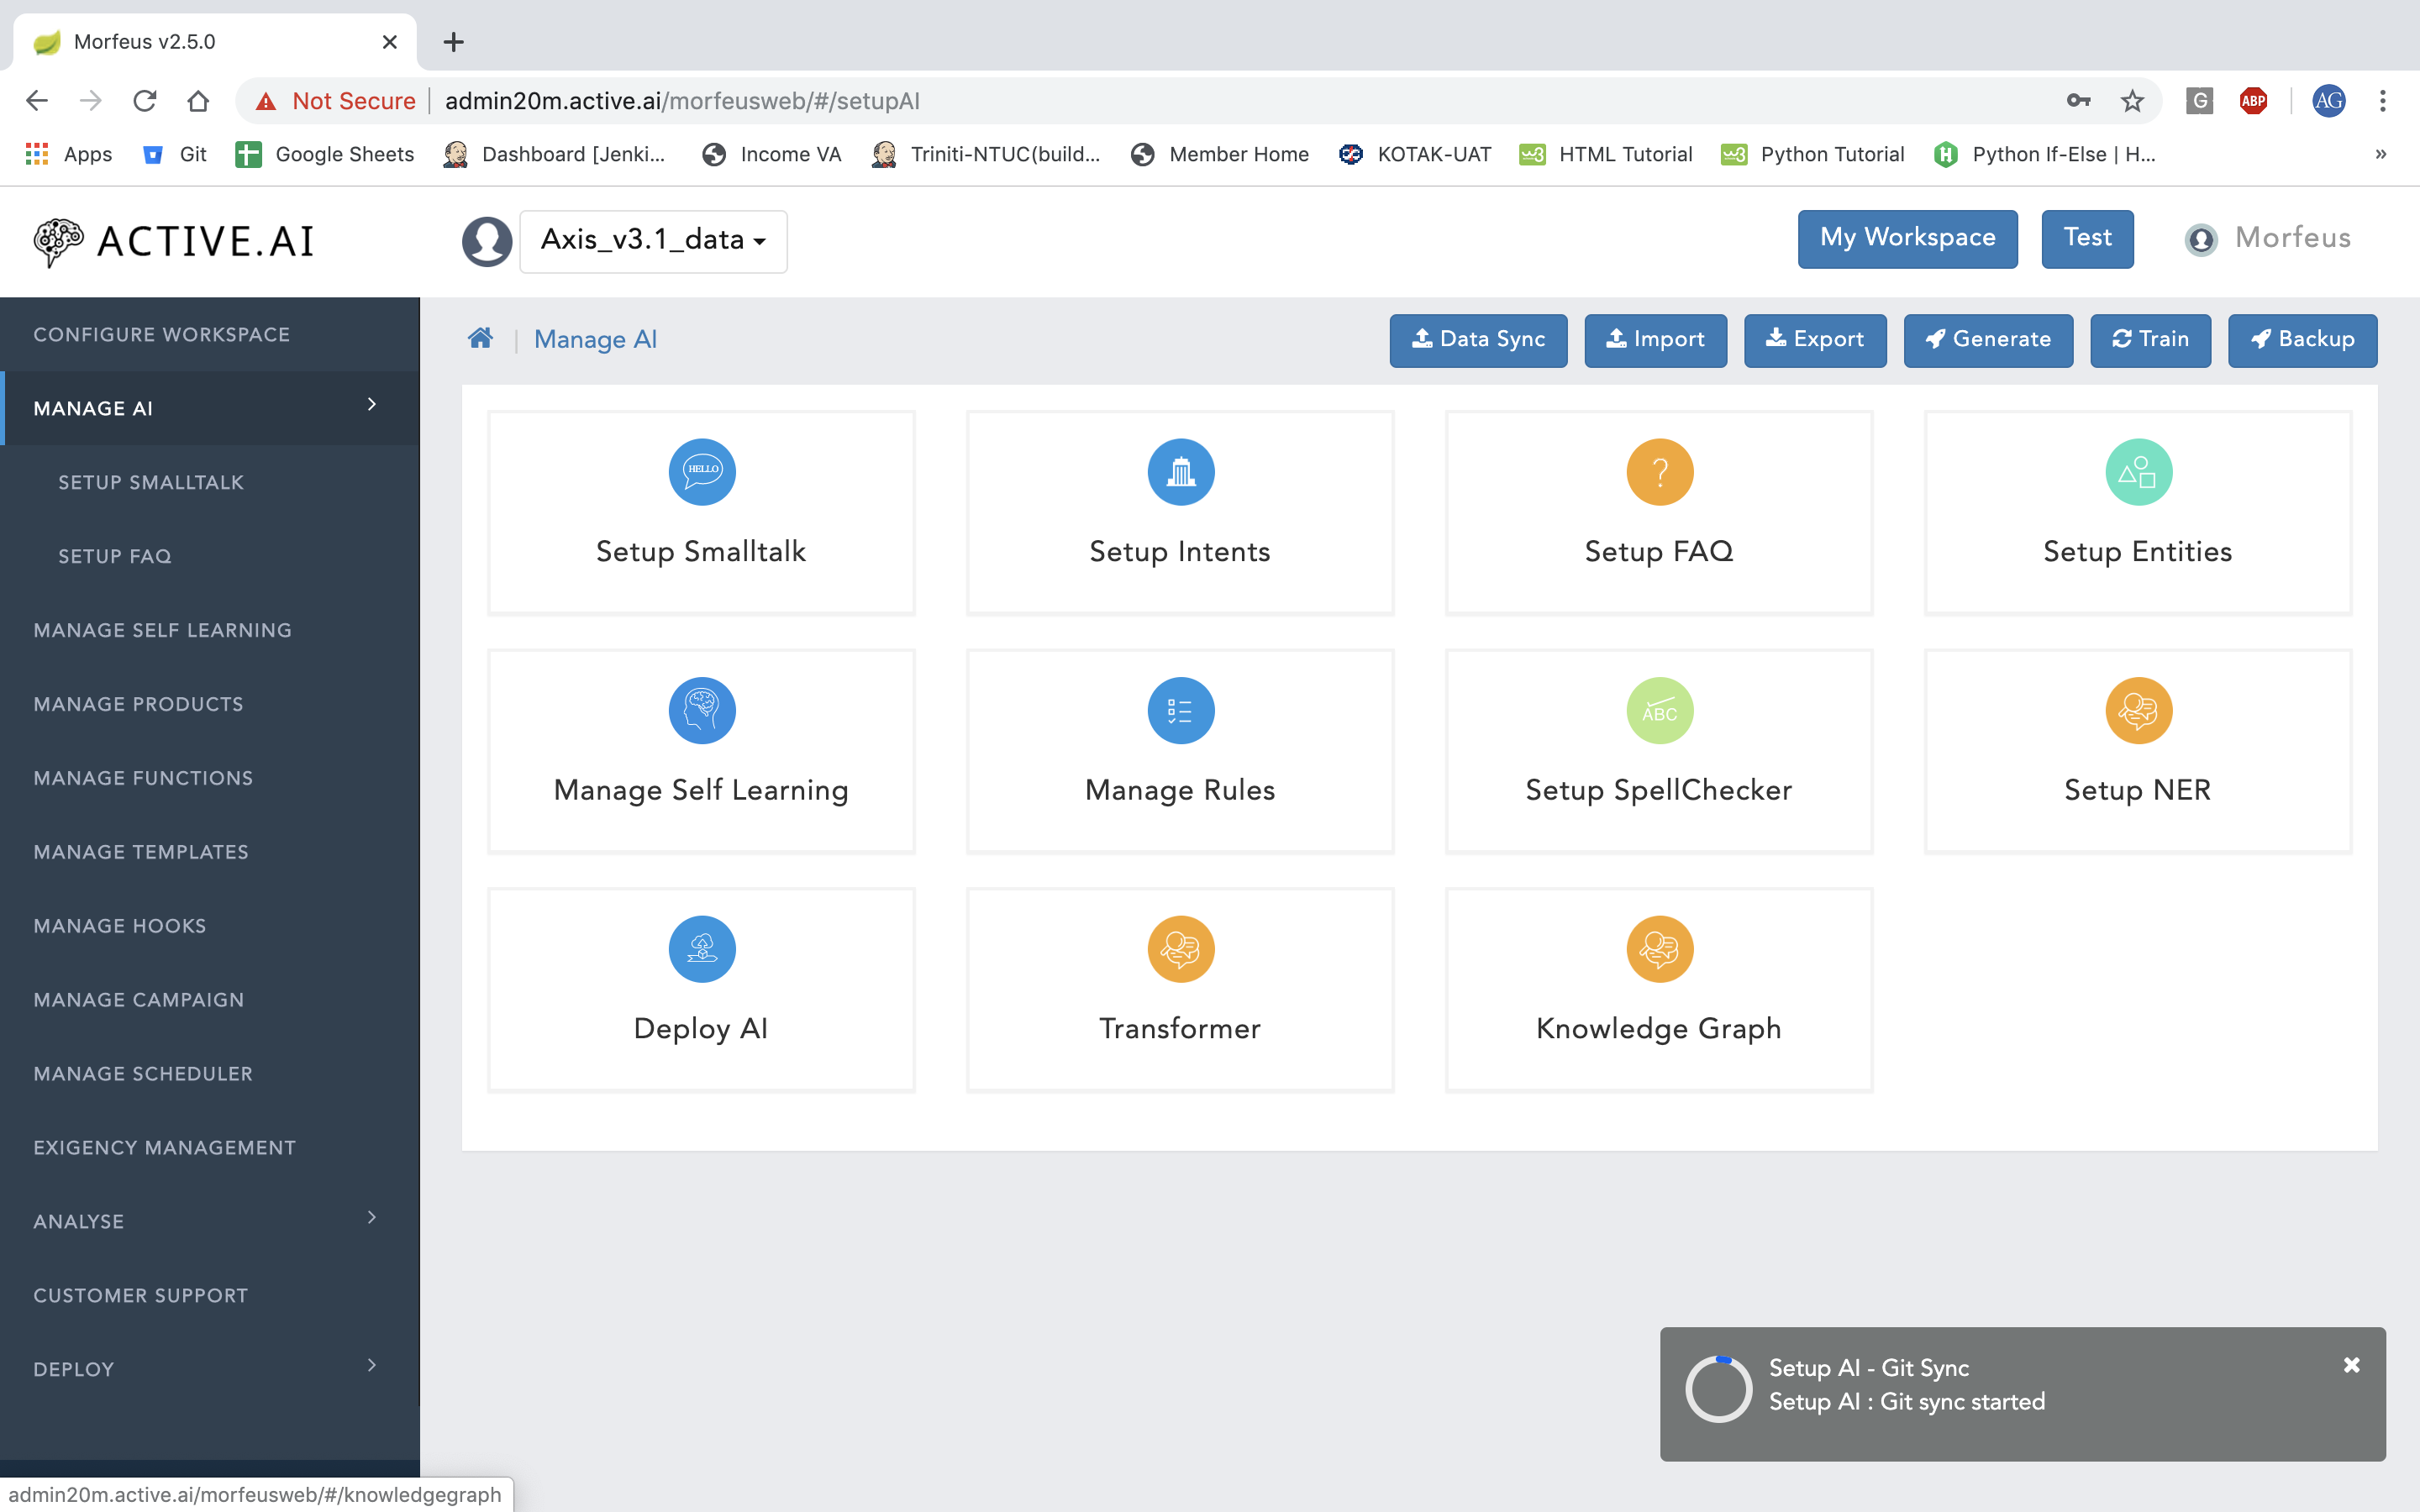
- Login and pick the workspace or create the new workspace
- Follow th link to execute Data Sync (Git/Zip for loading the desired AI domain data
- After Data Sync completion, proceed to the Workspace -> Deploy -> AI Ops and proceed with Generate
- Once generation is completed, proceed to the Workspace -> Deploy -> AI Ops and proceed with Train
References
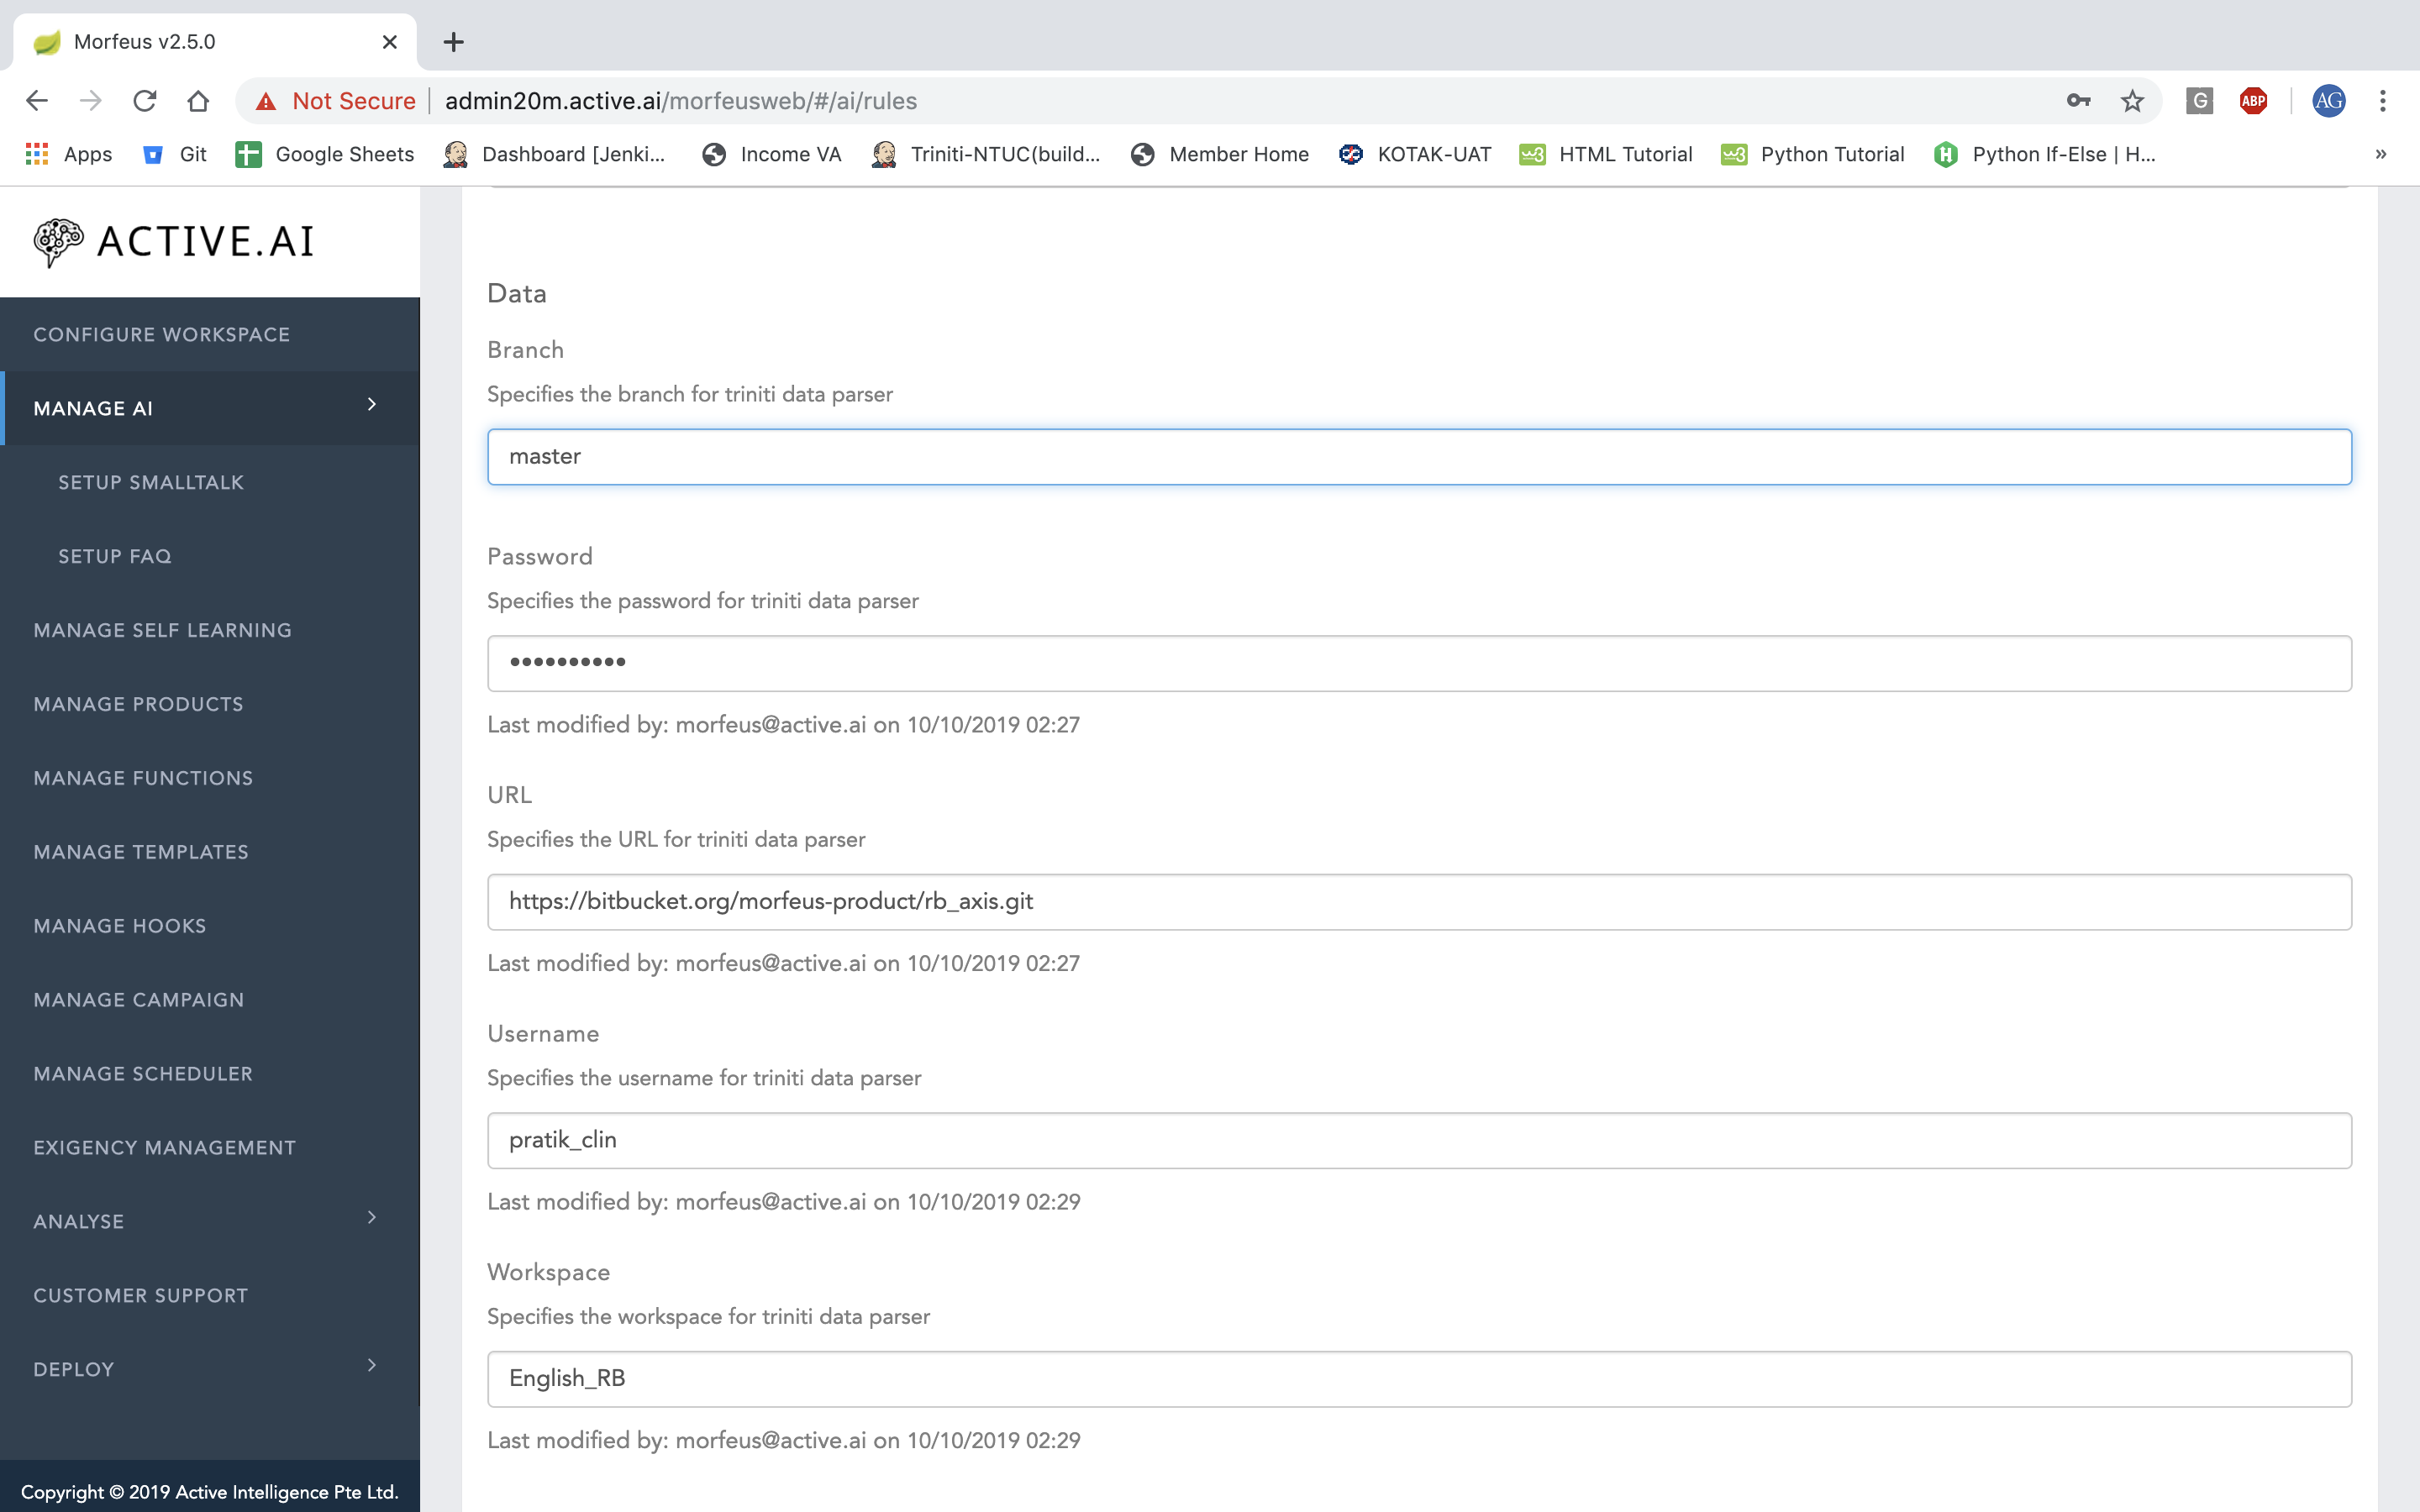
Launch Morfeus & AI Workers
- Refer to the Create Instances
- After launches, Workspace -> Deploy -> Infrastructure will list the machines with "Running" status
Guidelines
Endnotes
1 An enquiry is a statement where user is enquiring about a subject or topic with reference to product related transactions from the Conversational AI. This enquiry will be user specific as in user is already possessing a specific product with the bank for which he is enquiring. All enquiry intents should take the prefix as "qry-"
2 A Transaction is a statement where user is requesting a Conversational AI to execute a specific transaction or action on behalf of him from or towards his/her banking products. All Transaction intents should take the prefix as "txn-"
3 All types Sentence Structures which are applicable should be used to prepare training data otherwise the it might become a reason for classification failure.
4 There should not be any special characters in the utterances which can be located by enabling the regex pattern "[^a-zA-Z0-9\[\]\{\}\\\|\:\;\"\'\\>;\.\\<;\,\?\/\+\=\_\-\)\(\*\&\^\%\$\#\@\!\~\t\n ]" in any text editor.
5 DE – Dictionary Entity under Named Entity Recognition (NER)
6 TE – Train Entity under NER
7 Less than 4 digits are not allowed or supported with structure like "ending with …., ends with …., last four digits are …., etc...
8 ReGEx – Regex/regular expression-based entity
9 only action should only be used as a utterance if it is not overlapping or reefing in general i.e. show, get, need, want, provide, require, request, etc.. should not be used.
10 DS – Declarative Sentence Structure
11 IS – Imperative Sentence Structure
12 All attributes which is required to be extracted from the user's input
Appendix
-
Sentence Structure: There are 3 types of Sentence Structure which we use:
- Declarative
- Imperative
- Interrogative
-
Imperative: Imperative sentences give commands or make requests. Imperative sentences end with a period.
- Imperative Examples:
- Open an account
- transfer money
- show balance for my savings account
- Imperative Examples:
-
Interrogative: An interrogative sentence is a type of sentence that asks a question, as opposed to sentences that make a statement, deliver a command, or express an exclamation. Interrogative sentences are typically marked by inversion of the subject and predicate; that is, the first verb in a verb phrase appears before the subject.
- Interrogative Examples:
- How to do funds transfer ?
- Can i do funds transfer ?
- How much time does the funds transfer take ?
- Interrogative Examples:
-
Declarative: Declarative sentences are used to state information or facts. They are the most commonly used sentence type.
- Declarative Examples:
- I have to do funds transfer.
- I need to get loan of 500000 rupees.
- I need to get the two wheeler insurance worth rupees 5000000.
- Declarative Examples:


