Configure the Conversational Experience
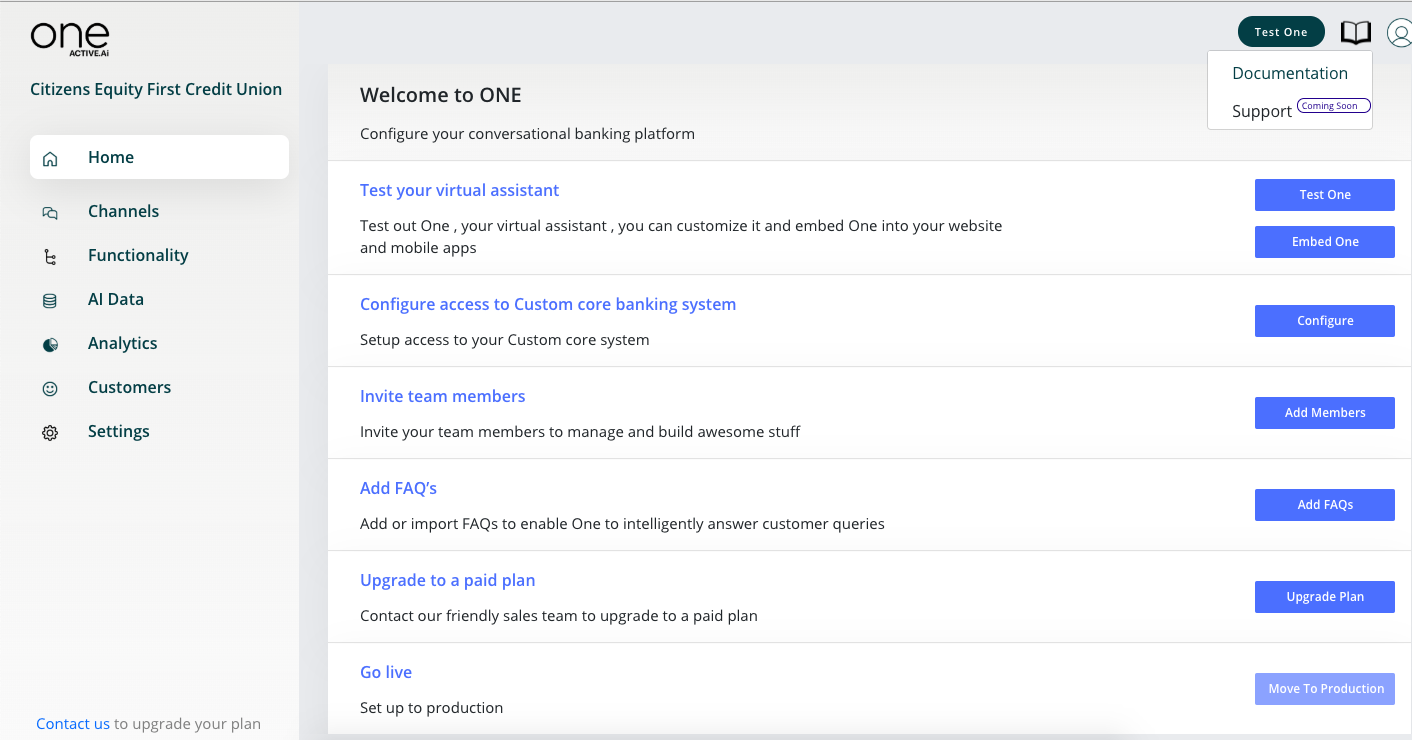
Once you enter the conversational sandbox you will be redirected to the sandbox ‘homepage’ on further logins.

The following sections are available in this area
1.Home
2.Channels
3.Functionality (Use Case Management)
4.AI Data
5.Analytics
6.Customers
7.Settings
Home
The home page will show some of the key things to be done to set the ball rolling like adding FAQs, configuring the core system, add team members who will co-manage this conversational workspace with you. These are also accessible from corresponding menus on the left side pane.
Channels
We have provided easy to use interfaces to configure the channel and core system endpoints for the selected channels. This can be done by the IT user as per business requirements.
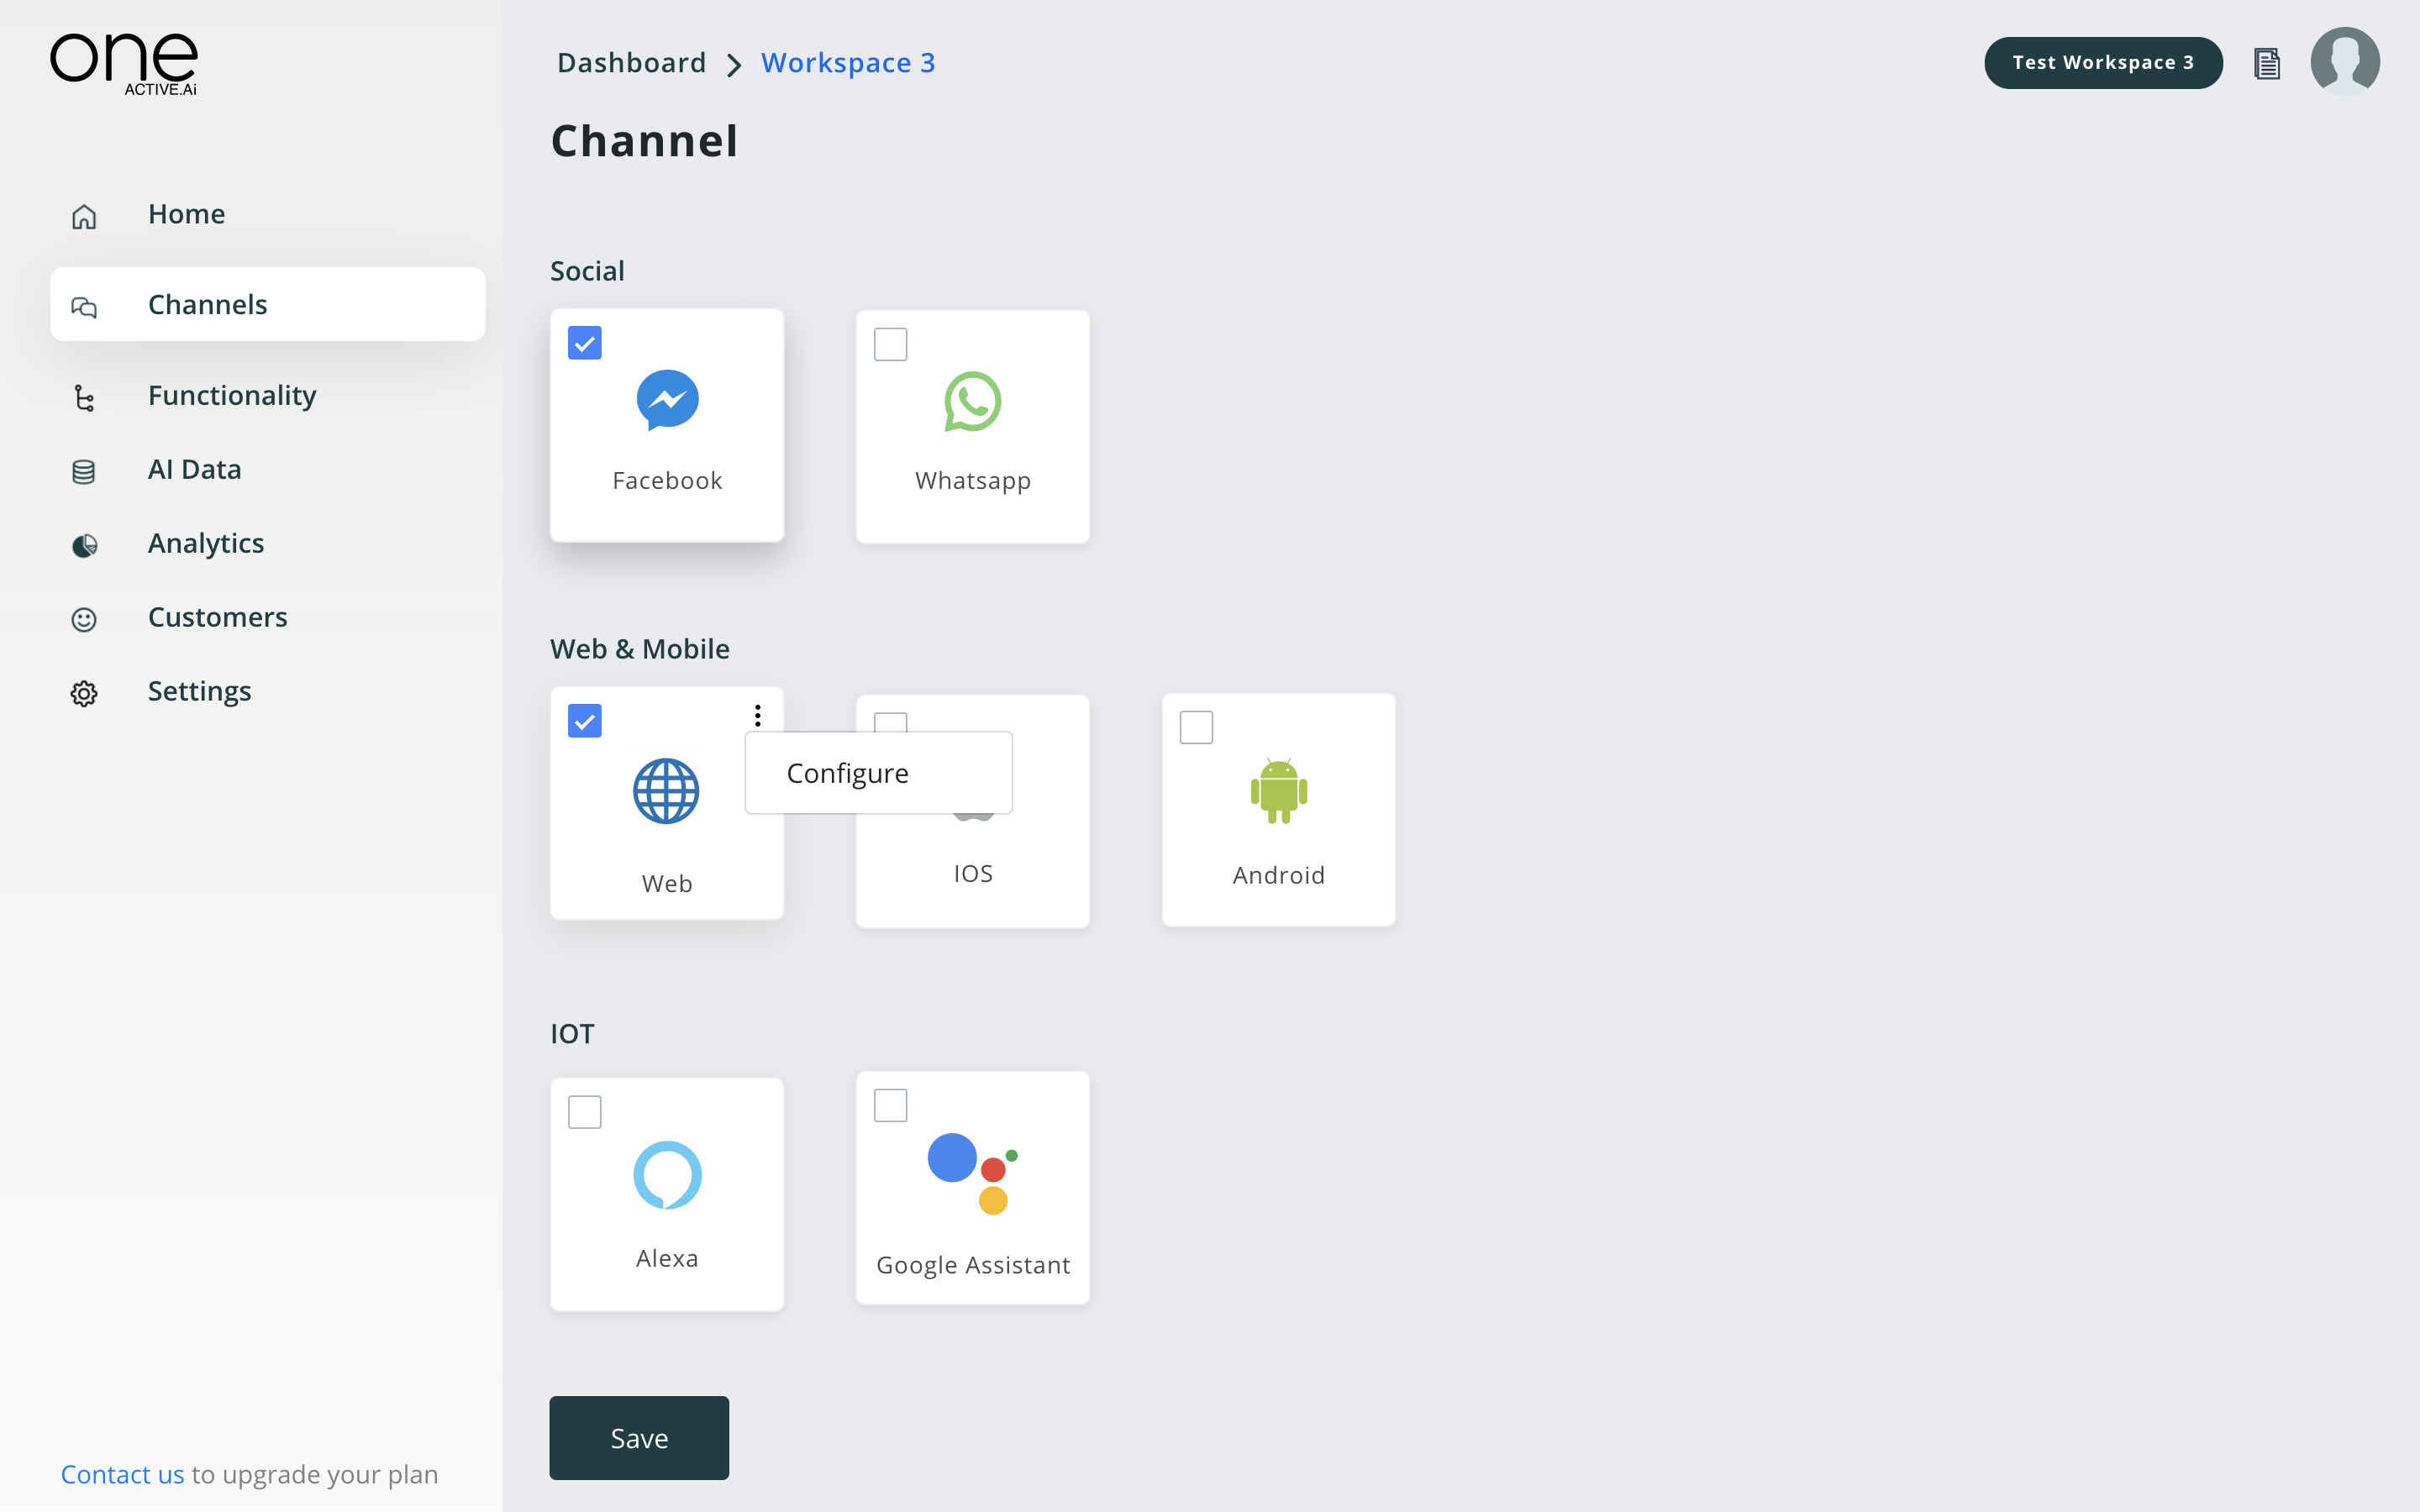
You can enable conversations on the following channels
- Web
- Mobile - ios / android
- Facebook messenger
- Alexa
- Google Home
On selecting a particular channel, you will be shown a pop-up to enter the corresponding endpoints. Depending on the channel the number of parameters would vary.
Web
~Coming Soon~
Create Developer Account on Facebook here
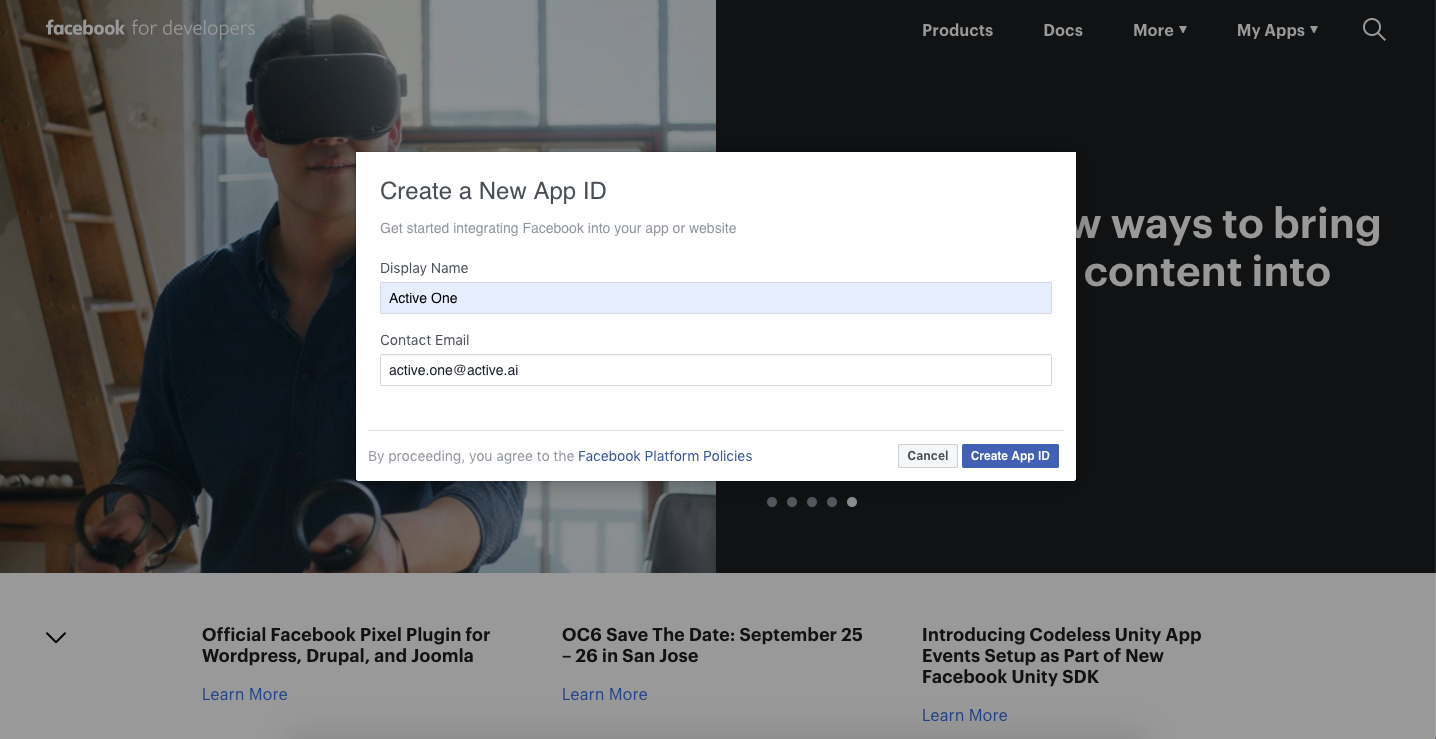
Create a new Facebook App by choosing a name for your app and selecting Create New Facebook App and filling in the required details.
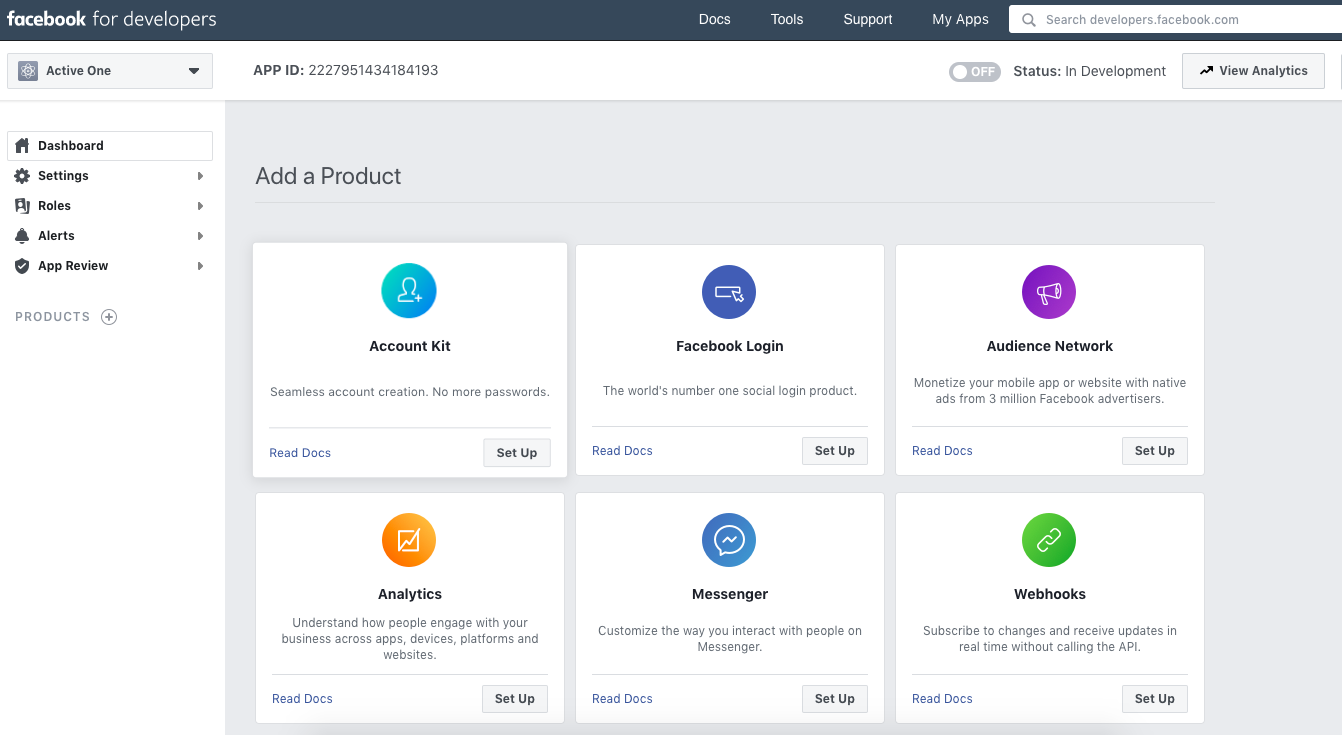
- Click on Add Product in your app page and select Messenger by clicking on set-up.
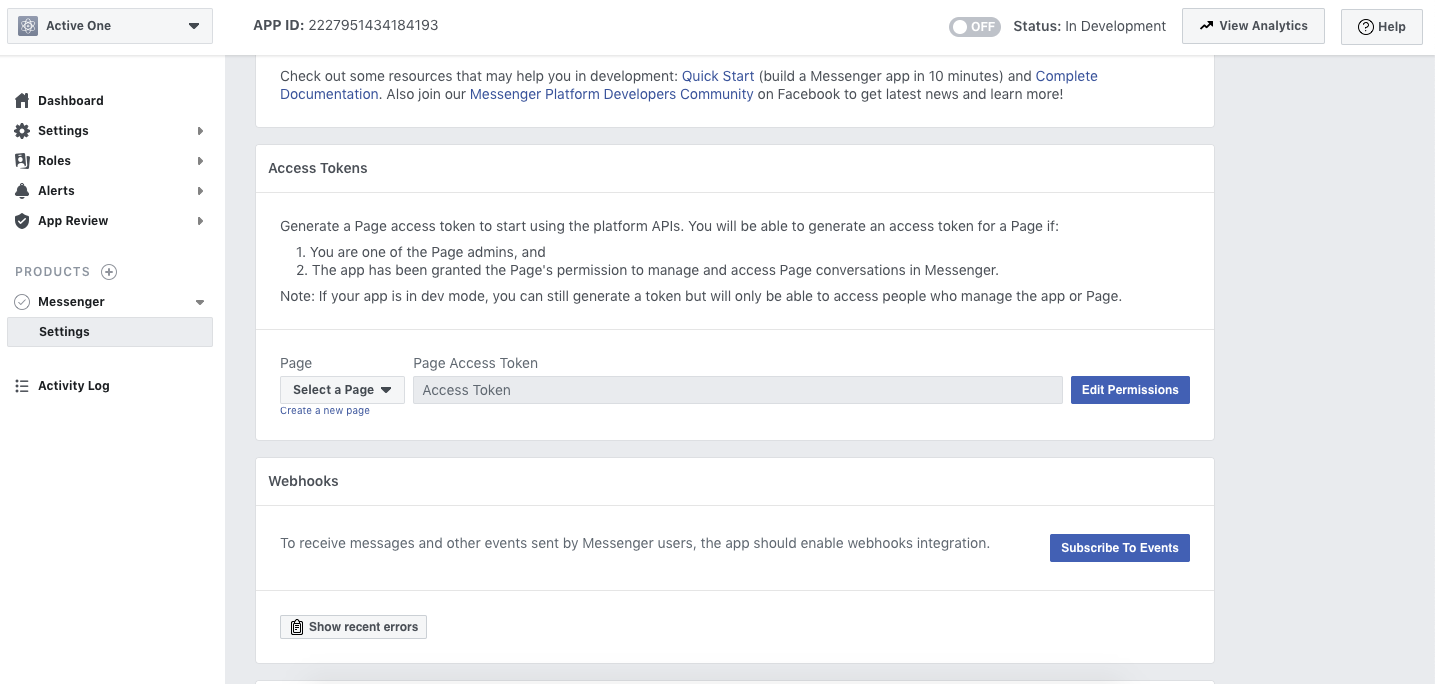
- Token Generation: Find Token Generation Division and select the page you have created (which you can create by clicking the Create a new page button). Once done, a page access token will be generated.
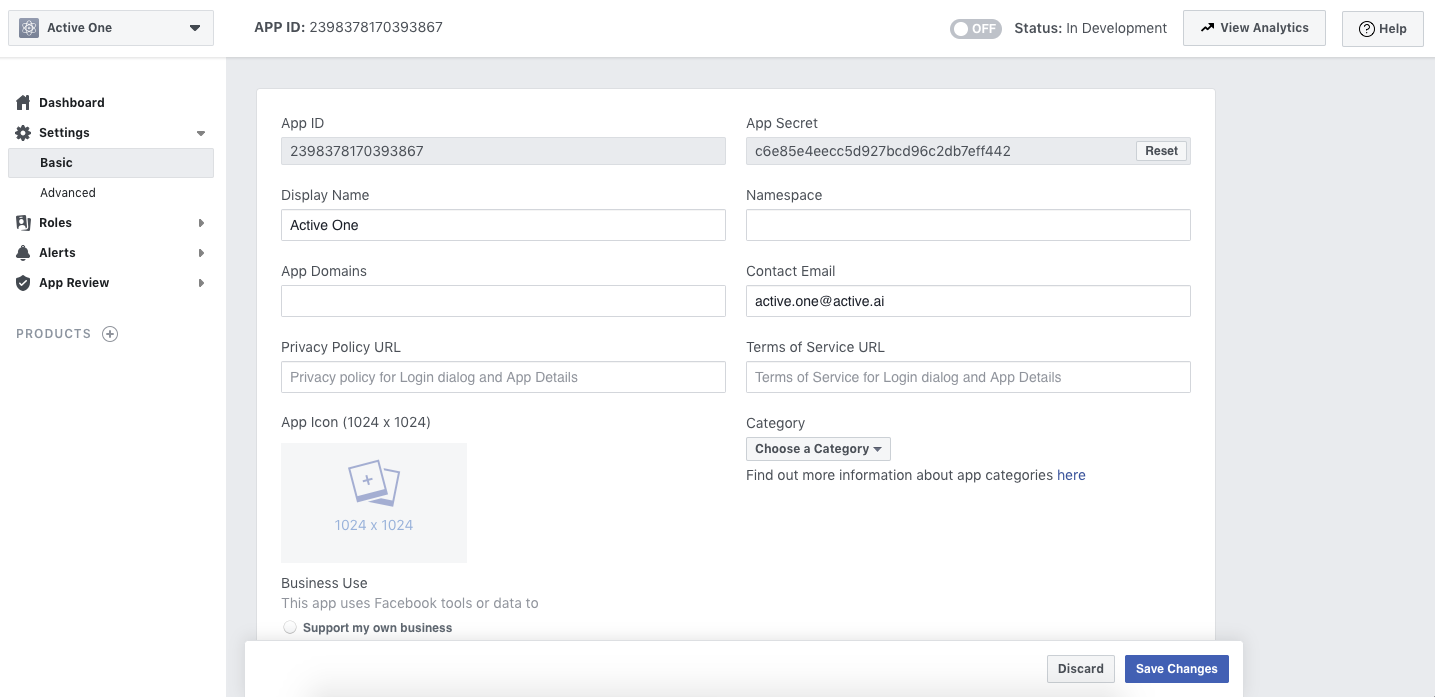
- Go to Dashboard tab in your app page where you could find App Secret and click on show.
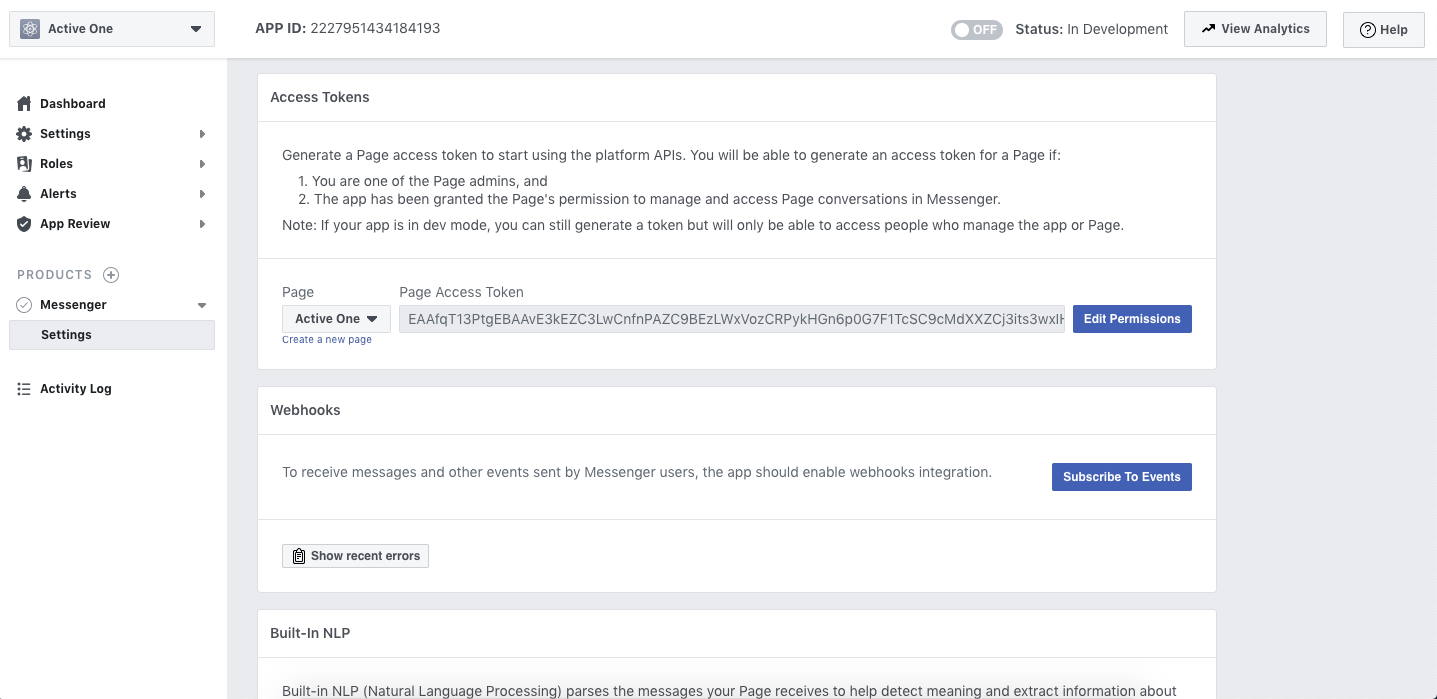
- Setup Webhooks, which is below the Token Generation Division.
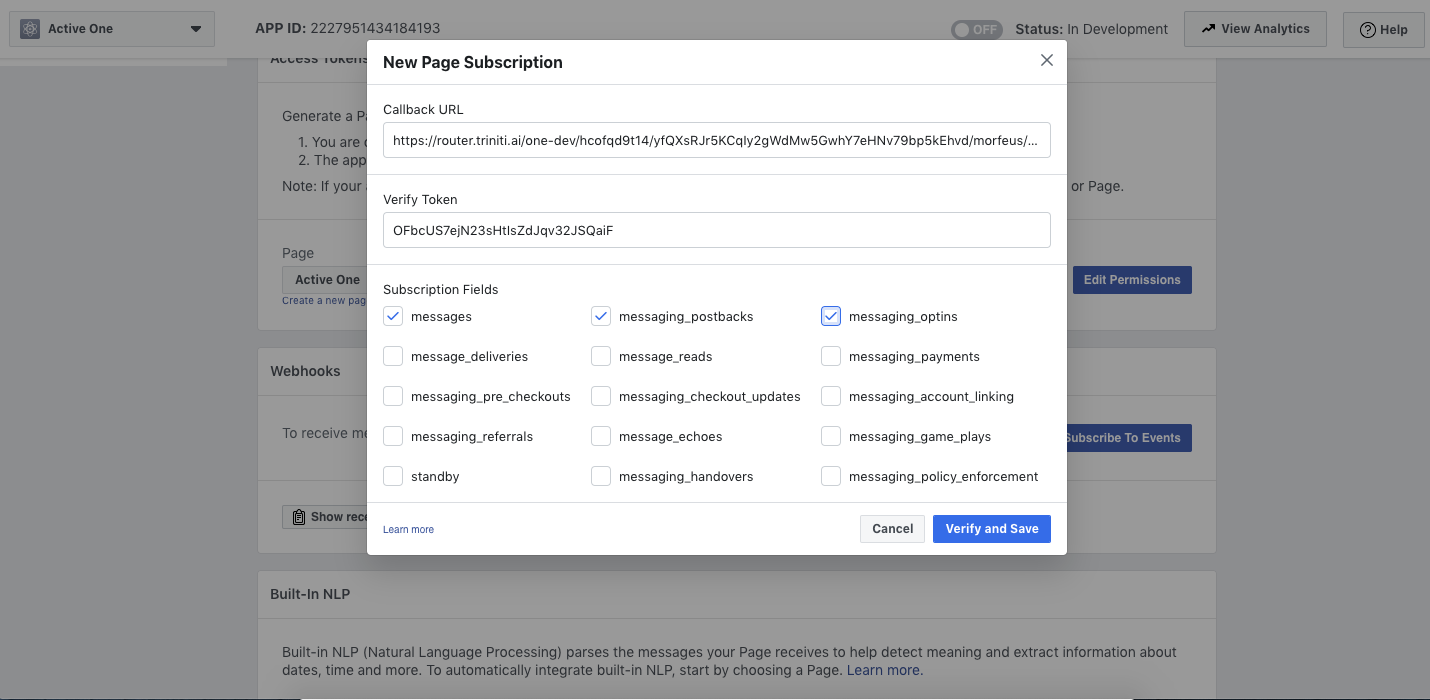
- Fill the Callback URL and Verify Token and select messages, messaging_postbacks and messaging_options.
Configuring facebook in sandbox
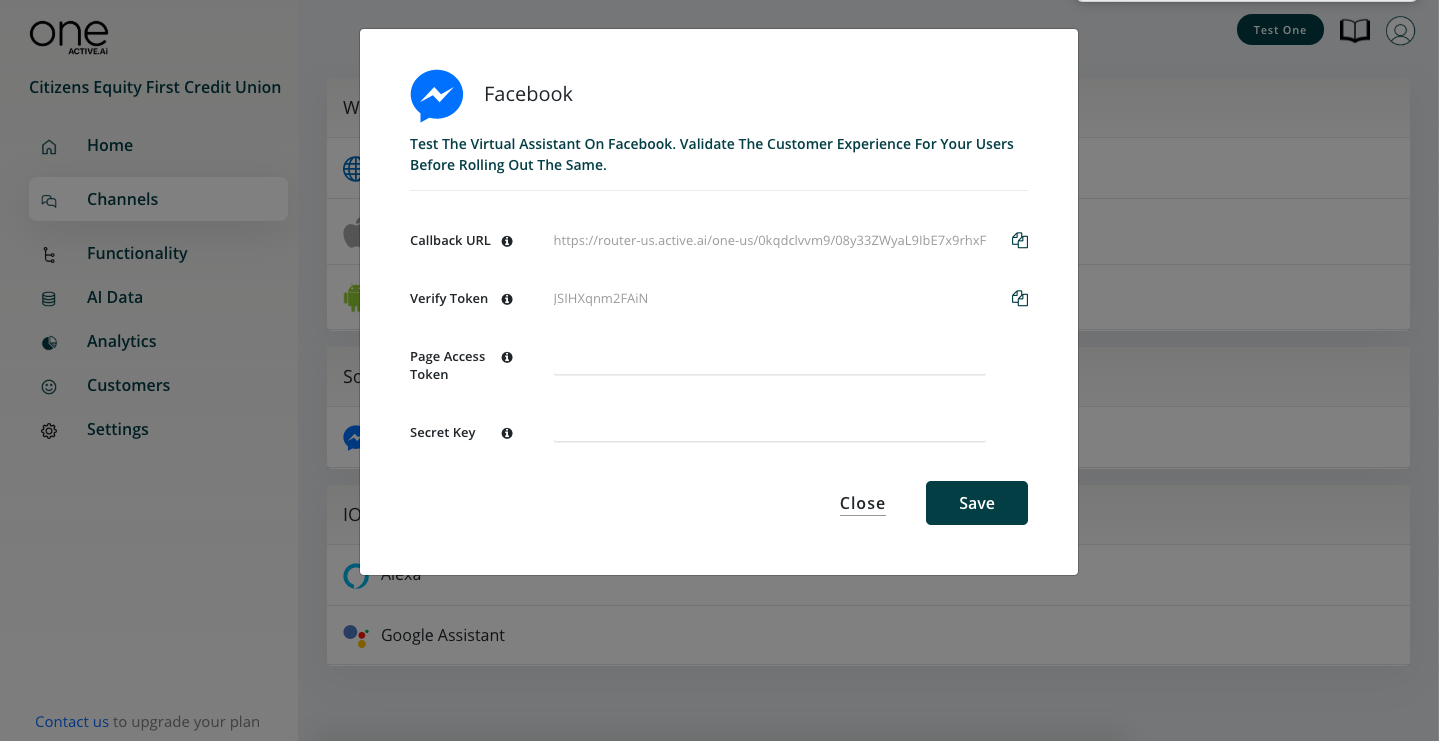
Details of the fields to be configured in sandbox to enable facebook
| SNo | Fields | Description |
|---|---|---|
| 1 | Callback URL | To be configured from portal to your facebook app. |
| 2 | Verify Token | To be configured from portal to your facebook app. |
| 3 | Page Access Token | To be configured from facebook to portal. |
| 4 | Secret Key | To be configured from facebook to portal. |
- Now, go to your Facebook messenger account, search and add the app that you have created, to try the enabled functionalities.
Android
Overview Android SDK provides a lightweight conversational/messaging UX interface for users to interact with the One Active Platform. The SDK enables rich conversation components to be embedded in existing Android Mobile Apps.
Pre Requisites Android Studio 2.3+ Android 4.4.0+
Install SDK
To install SDK add the following configuration to your project level build.gradle file.
 And add below configuration to your module level build.gradle file.
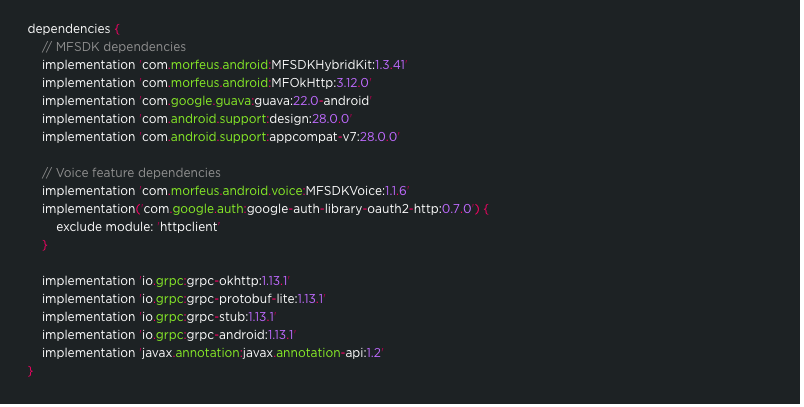 Note:If you get 64k method limit exception during compile time then add following code into your app-level build.gradle file.

Initialize the SDK
To initialize Morfeus SDK you need workspace Id. Workspace Id you can get through nevigating to Channels > Android click on settings icon.
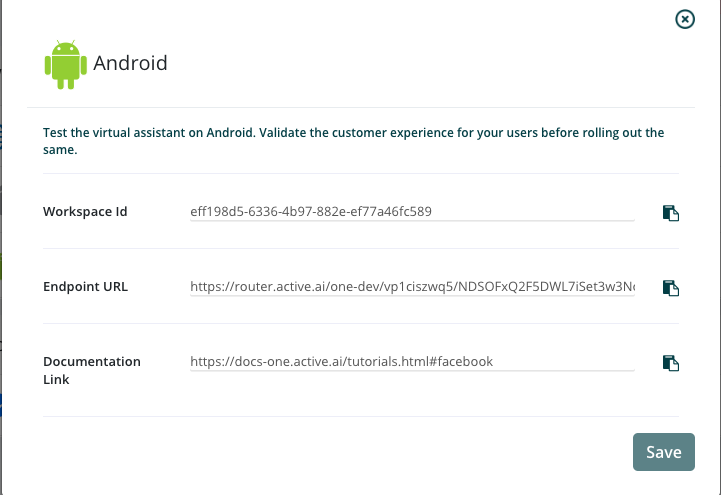
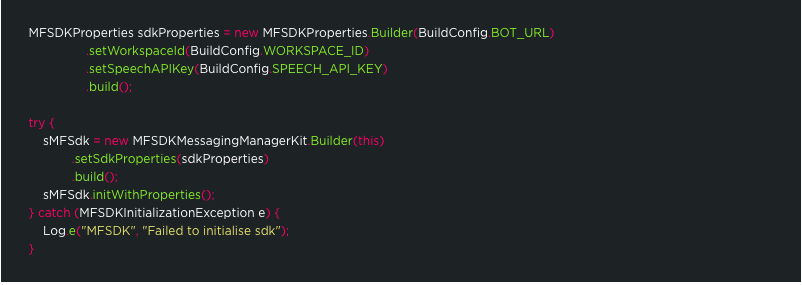
Add following lines to your Activity/Application where you want to initialize the Morfeus SDK.onCreate()of Application class is best place to initialize. If you have already initialized MFSDK, reinitializing MFSDK will throw MFSDKInitializationException.
Invoke Chat Screen
To invoke chat screen call showScreen() method of MFSDKMessagingManager. Here, sMSDK is an instance variable of MFSDKMessagingManagerKit.

You can get instance of MFSDKMessagingManagerKit by calling getInstance()of MFSDKMessagingManagerKit. Please make sure before calling getInstance() you have initialized the MFSDK. Please check following code snippet.

Compile and Run
Once above code is added you can build and run your application. On launch of chat screen, welcome messages will be displayed.
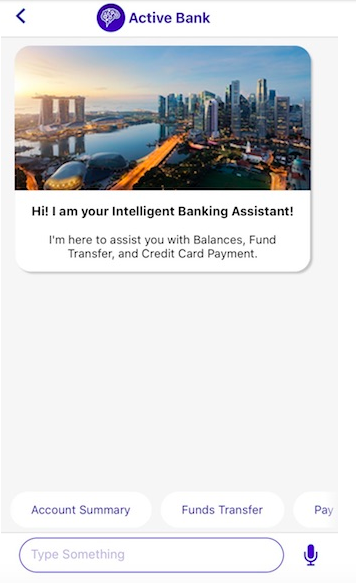
Enable voice chat
If you haven't added required dependencies for voice than please add following dependencies in your app/build.gradle
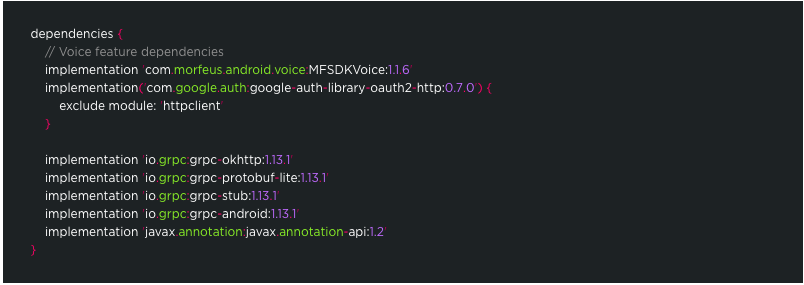
Call setSpeechAPIKey(String apiKey) method ofMFSDKProperties builder to pass speech API key.

Set Speech-To-Text language
In MFSDKHybridKit, English(India) is the default language set for Speech-To-Text. You can change STT language bypassing valid language code using setSpeechToTextLanguage(Language.STT.LANG_CODE)method ofMFSDKSessoionProperties.Builder.

Set Text-To-Speech language
English(India) is the default language set for Text-To-Speech. You can change TTS language by passing valid language code using setTextToSpeechLanguage(Language.STT.LANG_CODE) method of MFSDKSessoionProperties.Builder.

Provide Speech Suggestions
You can provide additional contextual information for processing user speech. To provide speech suggestions add a list of words and phrases into the MFSpeechSuggestion.json file and place it under the assets folder of your project. You can add a maximum of 150 phrases intoMFSpeechSuggestion.json. To see sample MFSpeechSuggestion.json, please download it from here
Security
Enable SSL Pinning
To enable ssl pinning set enableSSL(boolean enable, String[] pins) to true and pass set of set of certificate public key hash(SubjectPublicKeyInfo of the X.509 certificate).

Enable Root Detection
To prevent chat usage on rooted device set enableRootedDeviceCheck() to true.

Prevent user from taking screenshot
To prevent user or other third application from taking chat screen screenshot set .disableScreenShot(true).

Enable APK Tampering Detection
Enable tamper-detection to prevent illegitimate apk from executing. Set checkAPKTampering(true, certificate digest) to true and pass your sha256 digest of apk signing certificate.

IOS
Overview
iOS SDK provides a lightweight conversational / messaging UX interface for users to interact to the One Active Platform. The SDK enables rich conversation components to be embedded in existing iOS Mobile Apps.
Prerequisites
- OS X (10.11.x)
- Xcode 8.3 or higher
- Deployment target - iOS 8.0 or higher
Install and configure dependencies
1. Install Cocoapods
CocoaPods is a dependency manager for Objective-C, which automates and simplifies the process of using 3rd-party libraries in your projects. CocoaPods is distributed as a ruby gem, and is installed by running the following commands in Terminal App:

2. Update .netrc file
The Morfeus iOS SDK are stored in a secured artifactory. Cocoapods handles the process of linking these frameworks with the target application. When artifactory requests for authentication information when installing MFSDKWebKit, cocoapods reads credential information from the file.netrc, located in ~/ directory.
The .netrc file format is as explained: we specify machine(artifactory) name, followed by login, followed by password, each in separate lines. There is exactly one space after the keywords machine, login, password.

One example of .netrc file structure with sample credentials is as below. Please check with the development team for the actual credentials to use.
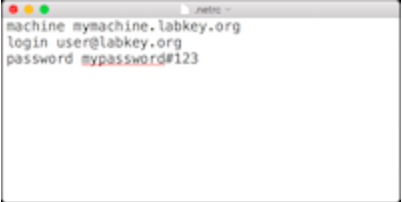
Steps to create or update .netrc file
Start up Terminal in mac Type "cd ~/" to go to your home folder Type "touch .netrc", this creates a new file, If a file with name .netrc not found. Type "open -a TextEdit .netrc", this opens .netrc file in TextEdit Append the machine name and credentials shared by development team in above format, if it does not exist already. Save and exit TextEdit
3. Install the pod
To integrate 'MFSDKHybridKit' into your Xcode project, specify the below code in your Podfile

Once added above code, run install command in your project directory, where your "podfile" is located.

If you get an error like "Unable to find a specification for ", then run below command to update your specs to latest version.

When you want to update your pods to latest version then run below command.

Note: If we get "401 Unauthorized" error, then please verify your .netrc file and the associated credentials.
4. Disable bitcode
Select target open "Build Settings" tab and set "Enable Bitcode" to "No".

5. Give permission
Search for ".plist" file in the supporting files folder in your Xcode project. Update NSAppTransportSecurity to describe your app's intended HTTP connection behavior. Please refer apple documentation and choose the best configuration for your app. Below is one sample configuration.

6. Invoke the SDK
To invoke chat screen, create MFSDKProperties, MFSDKSessionProperties and then call the method showScreenWithBotID:fromViewController:withSessionProperties to present the chat screen. Please find below code sample.
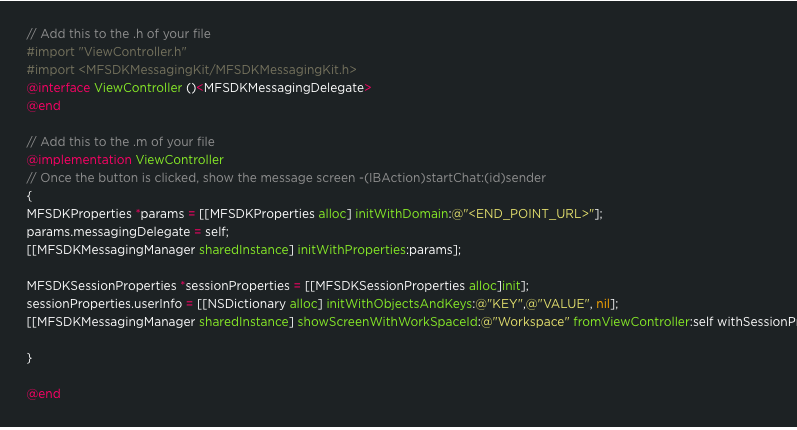
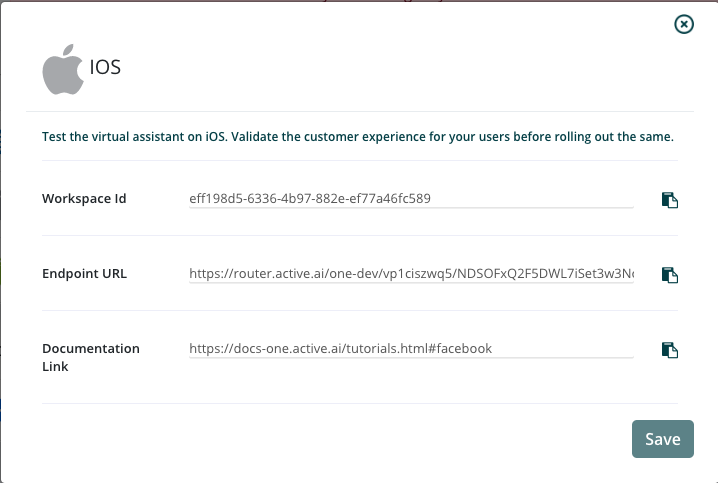
Properties:
| Property | Description |
|---|---|
| Workspace_Id | The unique ID for the bot |
| END_POINT_URL | The bot API URL |
Above properties you can get through nevigating to Channels > iOS click on settings icon.
Compile and Run
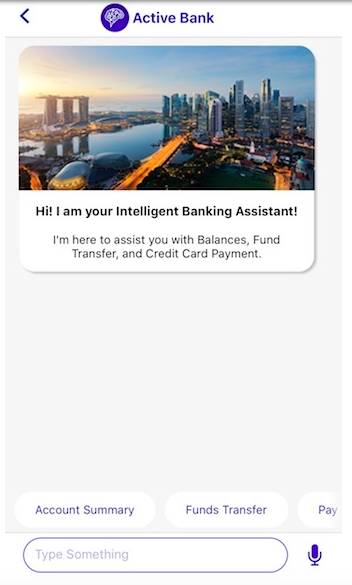
Once above code is added we can build and run. On launch of chat screen, welcome message will be displayed.
Providing User/Session Information
You can pass Speech API key if the SDK uses voice recognition feature.

For SSL Secure
You can pass Hash keys of SSL certificates

For Security from Jailbrroken iPhones
You can set YES bool value for following method

Enable voice chat
Provide Speech API Key
MFSDKWebKit supports text to speech and speech to text features. The minimum iOS deployment target for voice feature is iOS 8.0. The pod file also needs to be updated with the minimum deployment target for voice features. A speech API key can be passed using speechAPIKey in MFSDKSessionProperties as below.

Search for ".plist" file in the supporting files folder in your Xcode project. Add needed capabilities like below and appropriate description.

Set Speech-To-Text language
English(India) is the default language set for Speech-To-Text. You can change STT language by passing valid language code using speechToTextLanguage property of MFSDKSessionProperties. You can find list of supported language code here

Set Text-To-Speech language
English(India) is the default language set for Text-To-Speech. You can change STT language by passing valid language code using textToSpeechLanguage property of MFSDKSessionProperties.Please set language code as per apple guidelines.

Provide Speech Suggestions
You can provide additional contextual information for processing user speech. To provide speech suggestions add list of words and phrases into MFSpeechSuggestion.json file and add it to main bundle of your target. You can add maximum 150 phrases intoMFSpeechSuggestion.json. To see sample MFSpeechSuggestion.json, please download it from here
Google Assistant
Overview
Google Assistant provides a lightweight conversational/messaging UX interface for users to interact with the One Active Platform. It enables rich conversation components to be embedded.
One Active Configurations
- Go to your one account and under the channels tab, click on the Google Assistant settings icon.
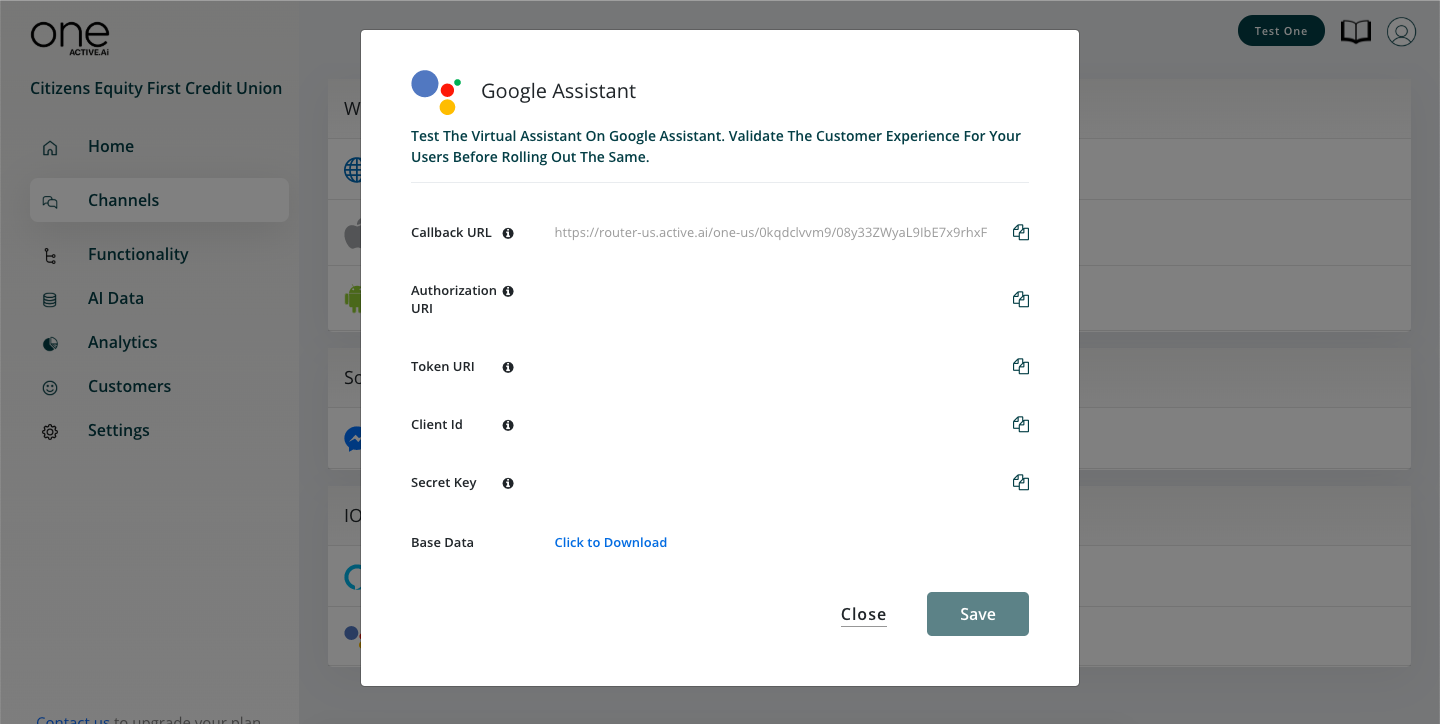
- For Oauth configuration refer Oauth documentation.
Steps to setup the Google Assistant :-
The Actions on Google integration in Dialogflow allows interoperability between the Google Assistant and Dialogflow, letting you use Dialogflow agents as conversational fulfillment for your Actions.
Before developing, you should design your conversation or the user interface for your Actions. The conversation describes how users invoke your Action, the valid things that they can say to your Action, and how your Action responds to them. See our comprehensive design site with guidelines and best practices to help you build the best conversation possible.
First to setup for Google Assistant we need to create an Agent.Sign-in with your google account to create the agent.Visit here.
After Sign-in click on go-to-console, sign-in again with the same google account.
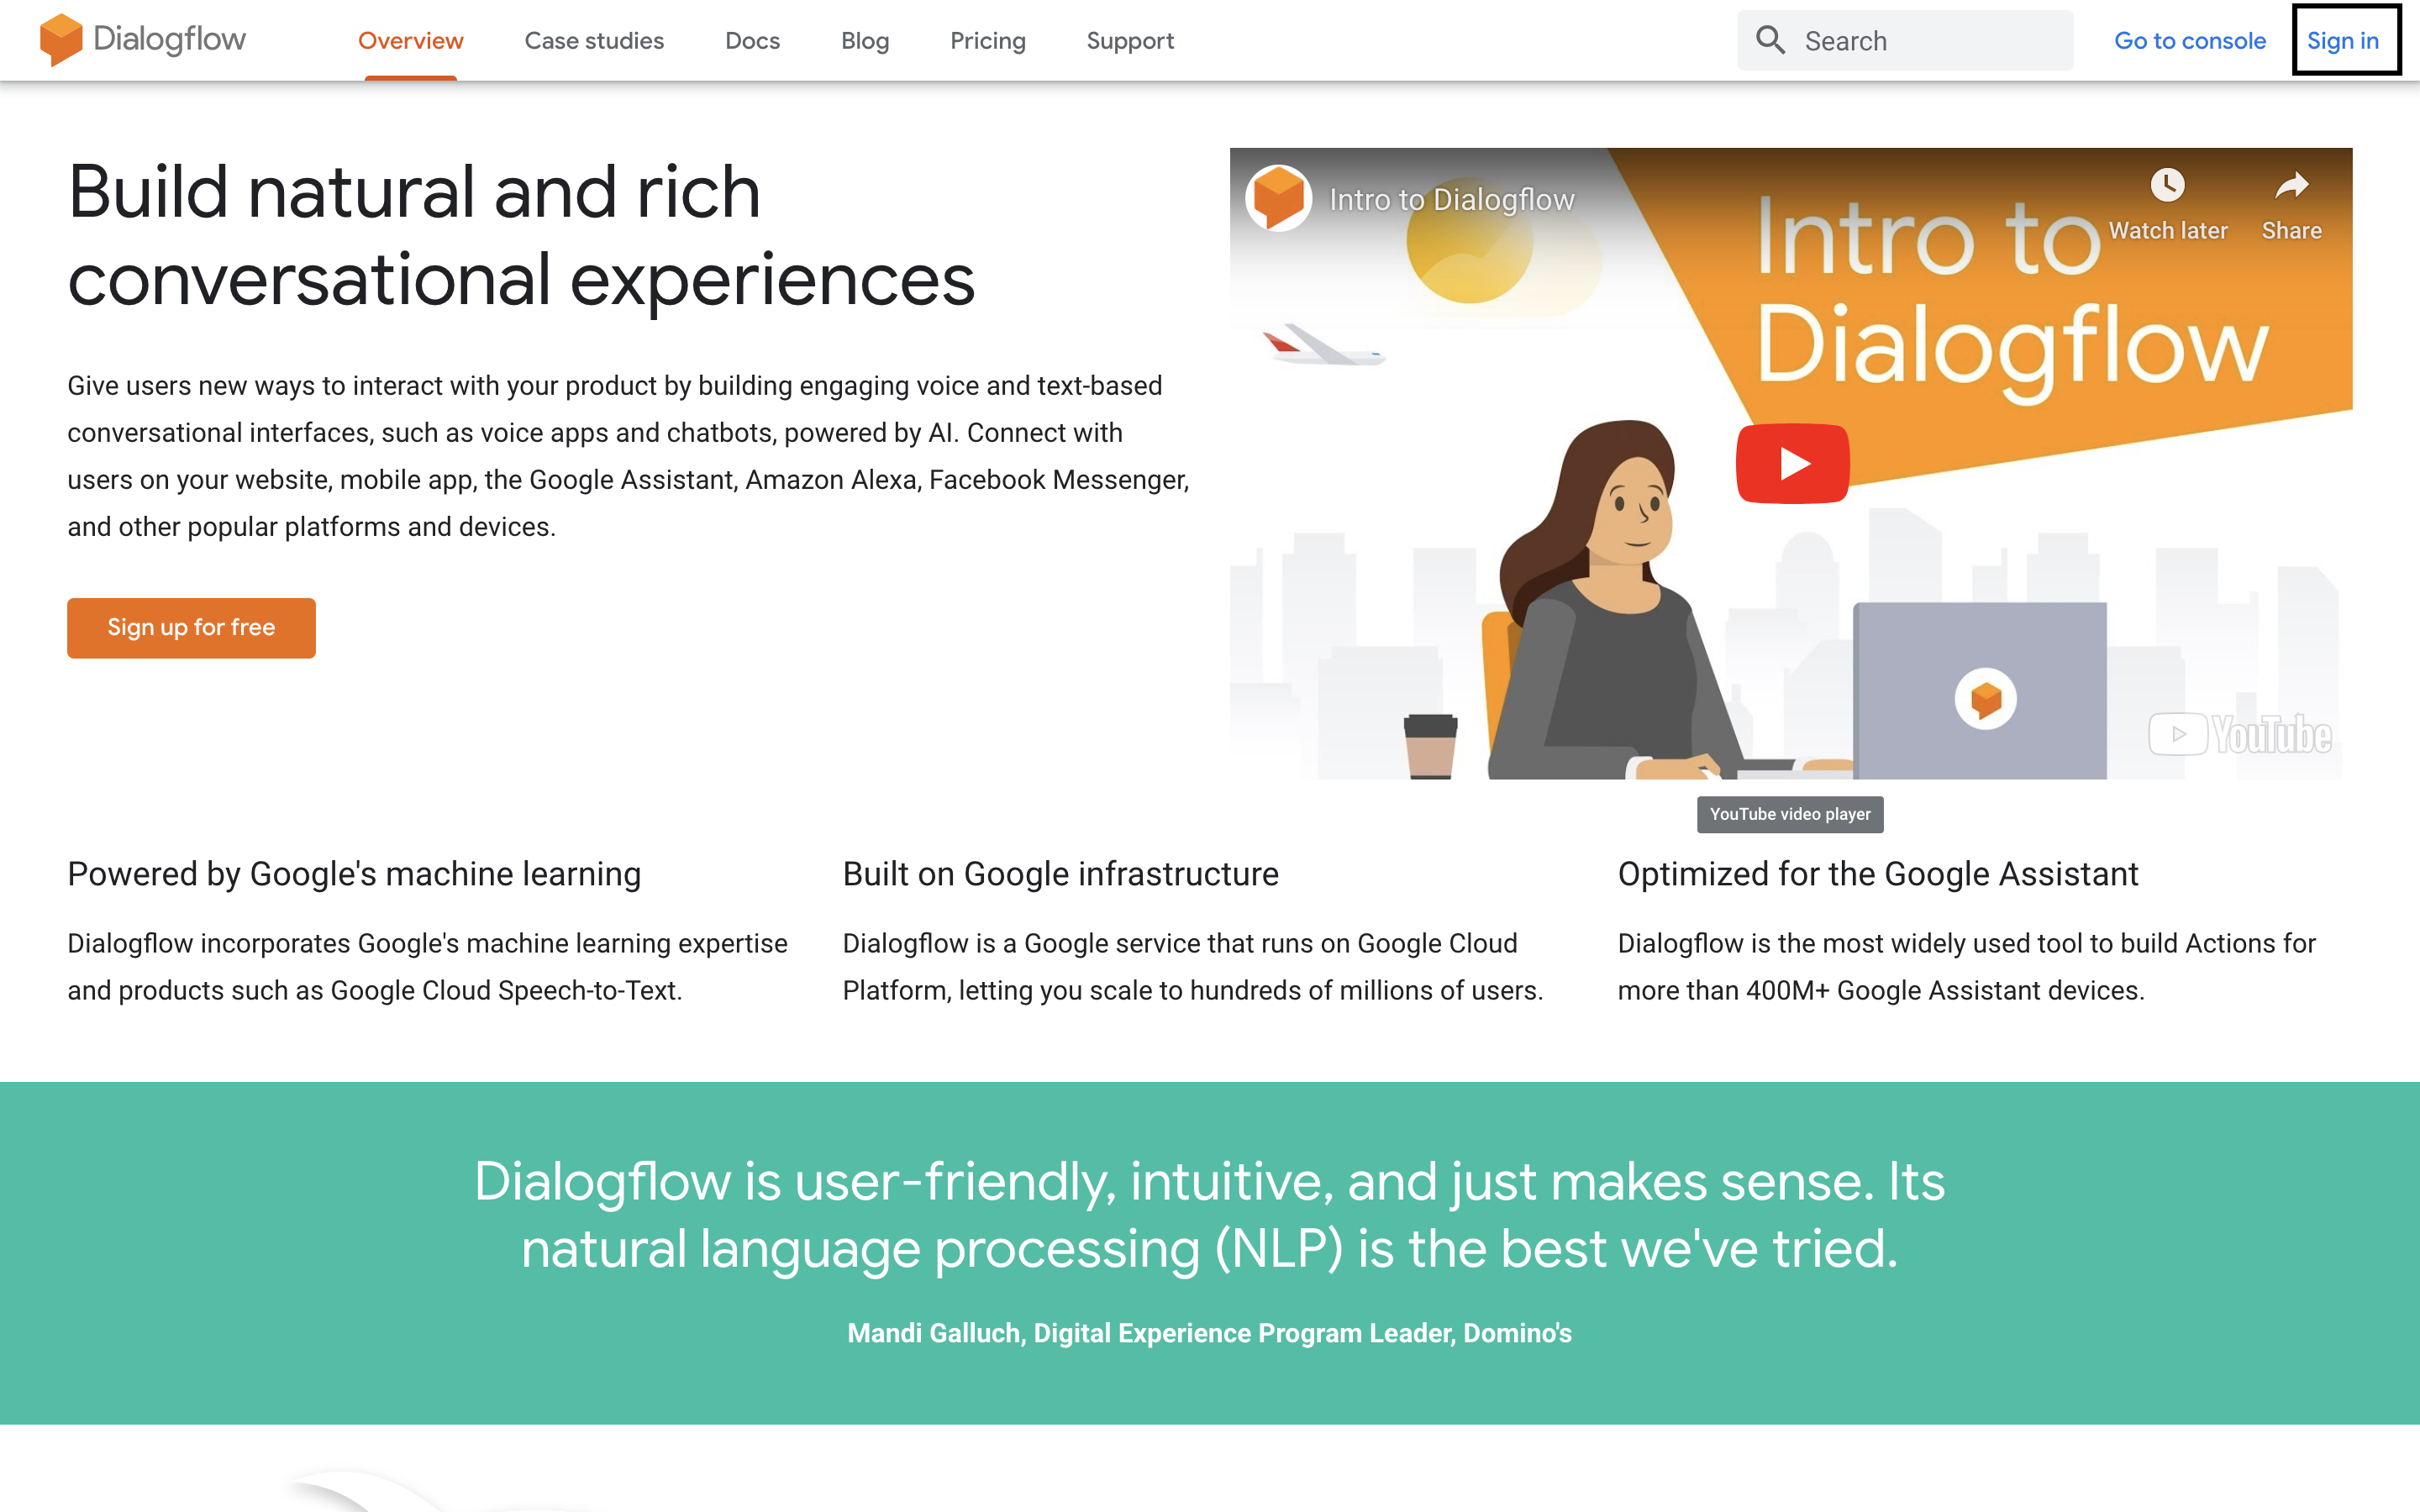
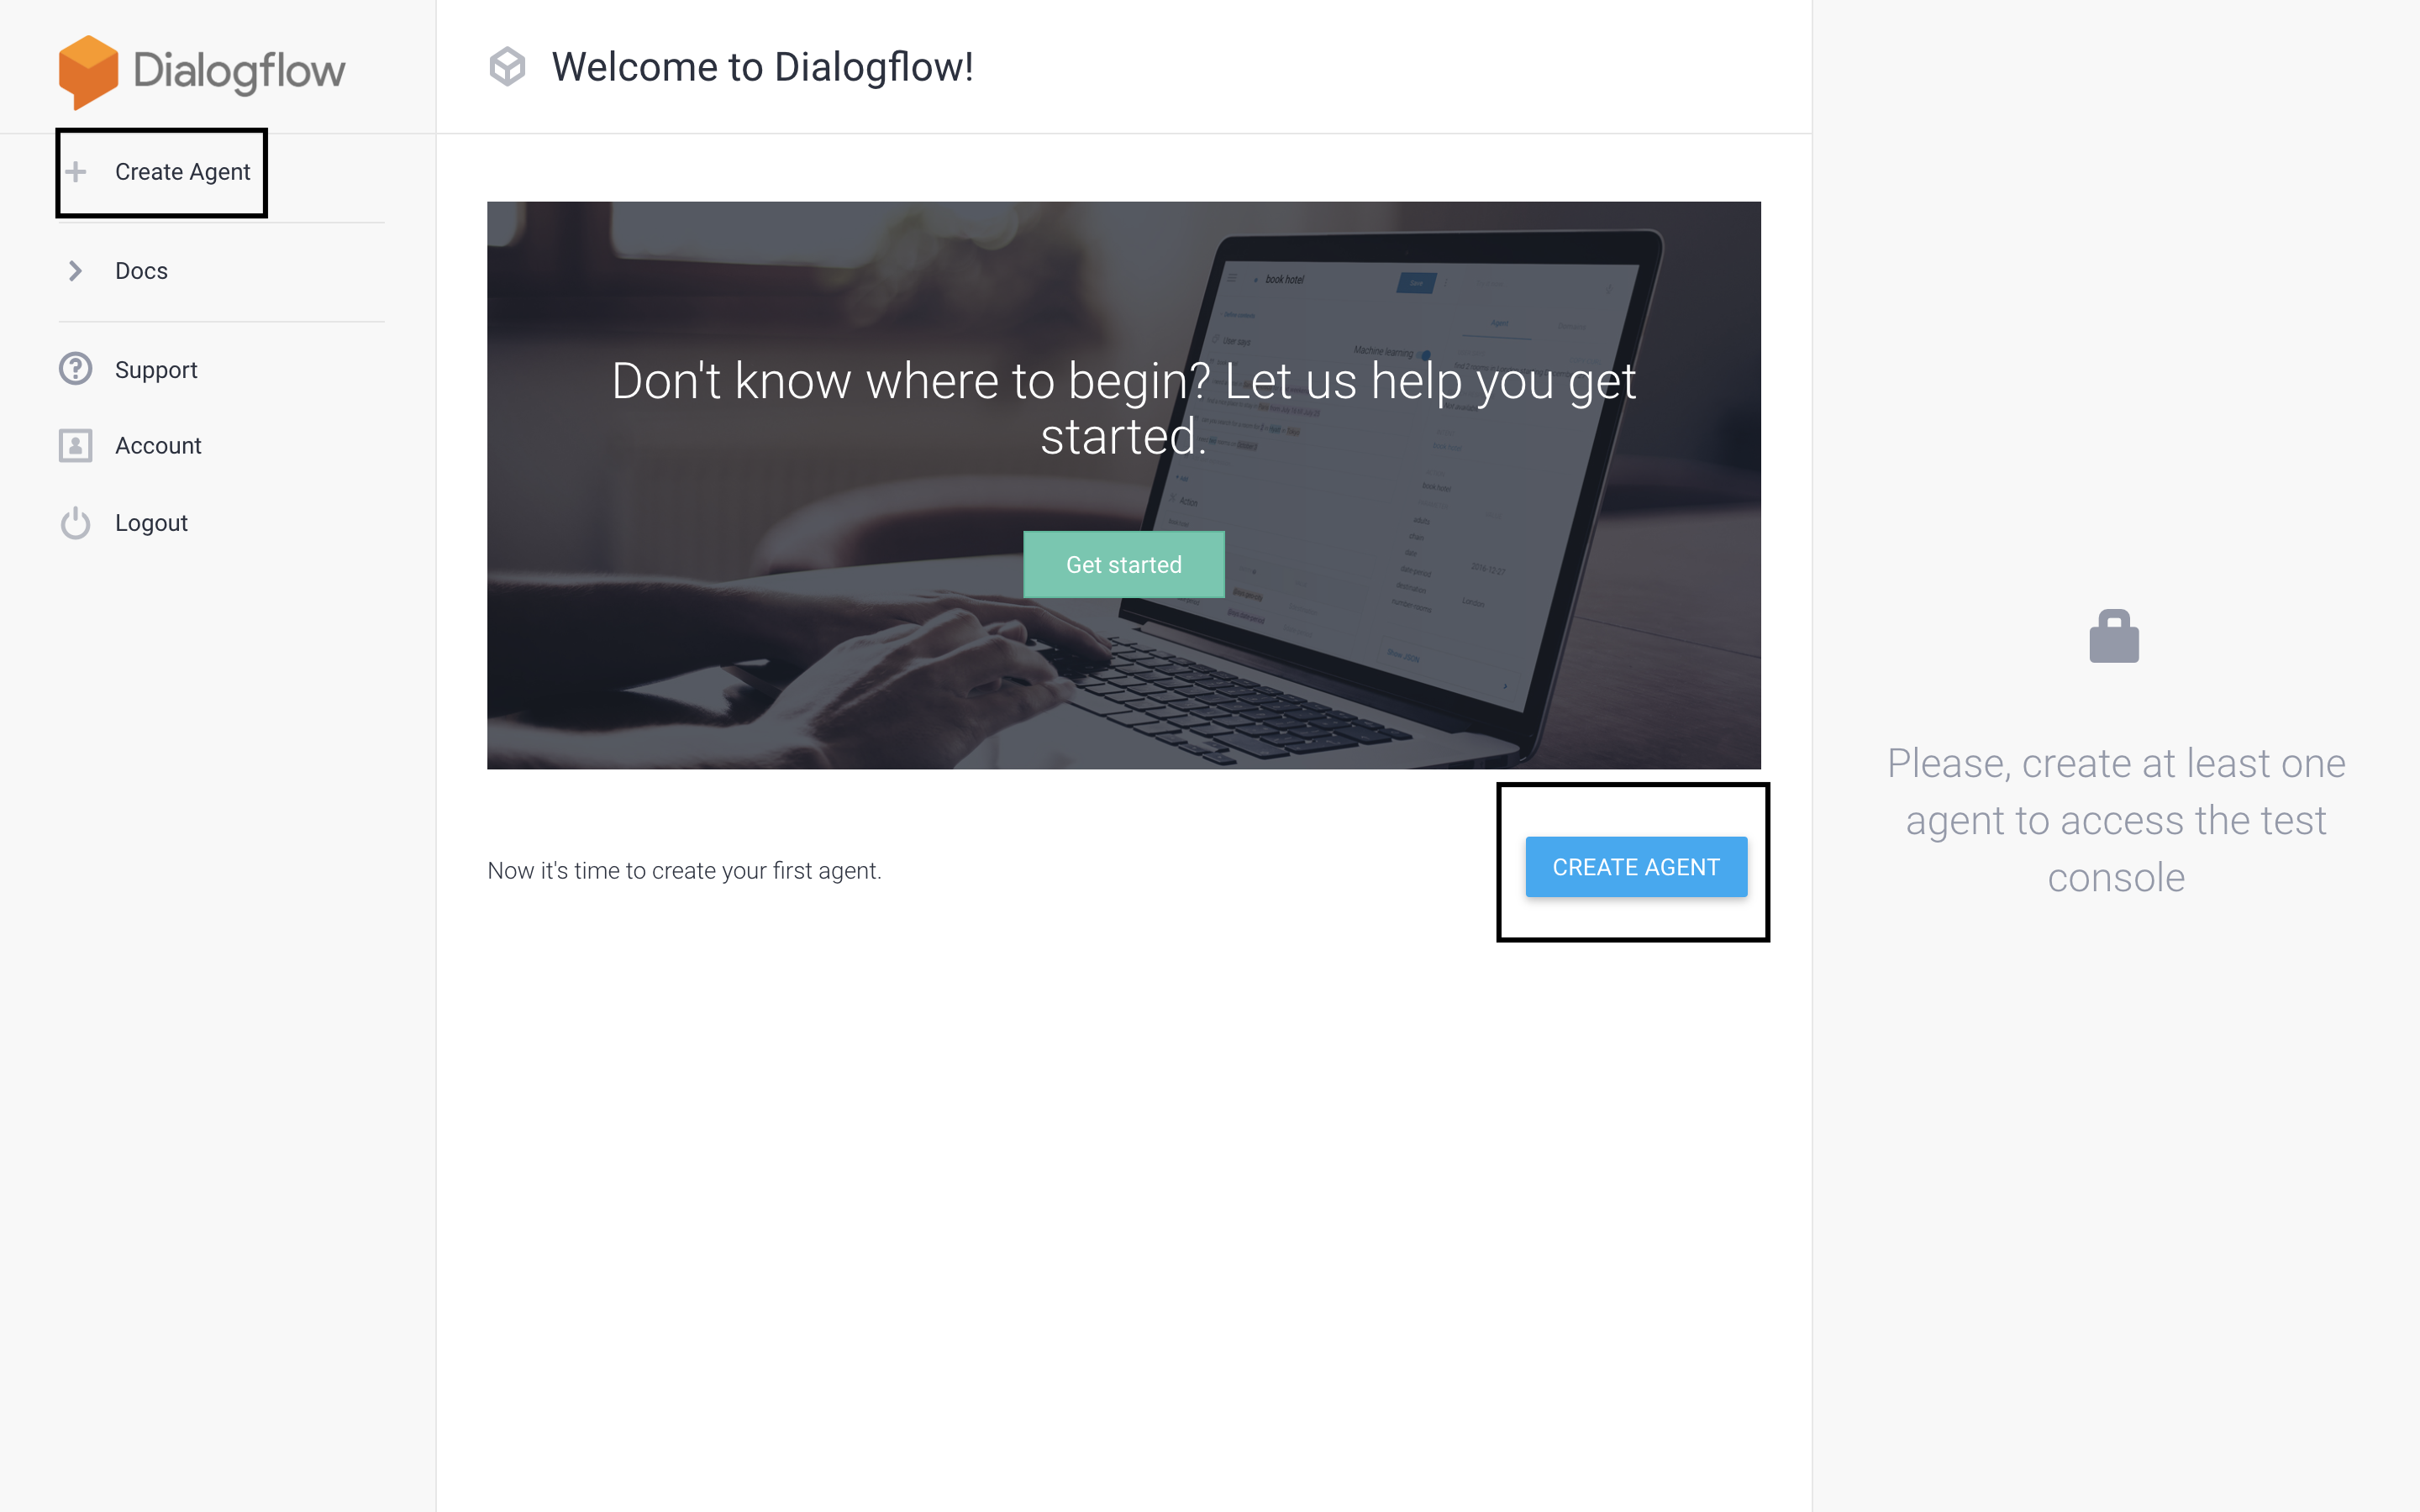
Click on Create Agent to create new Agent for testing the Google Assistant.here
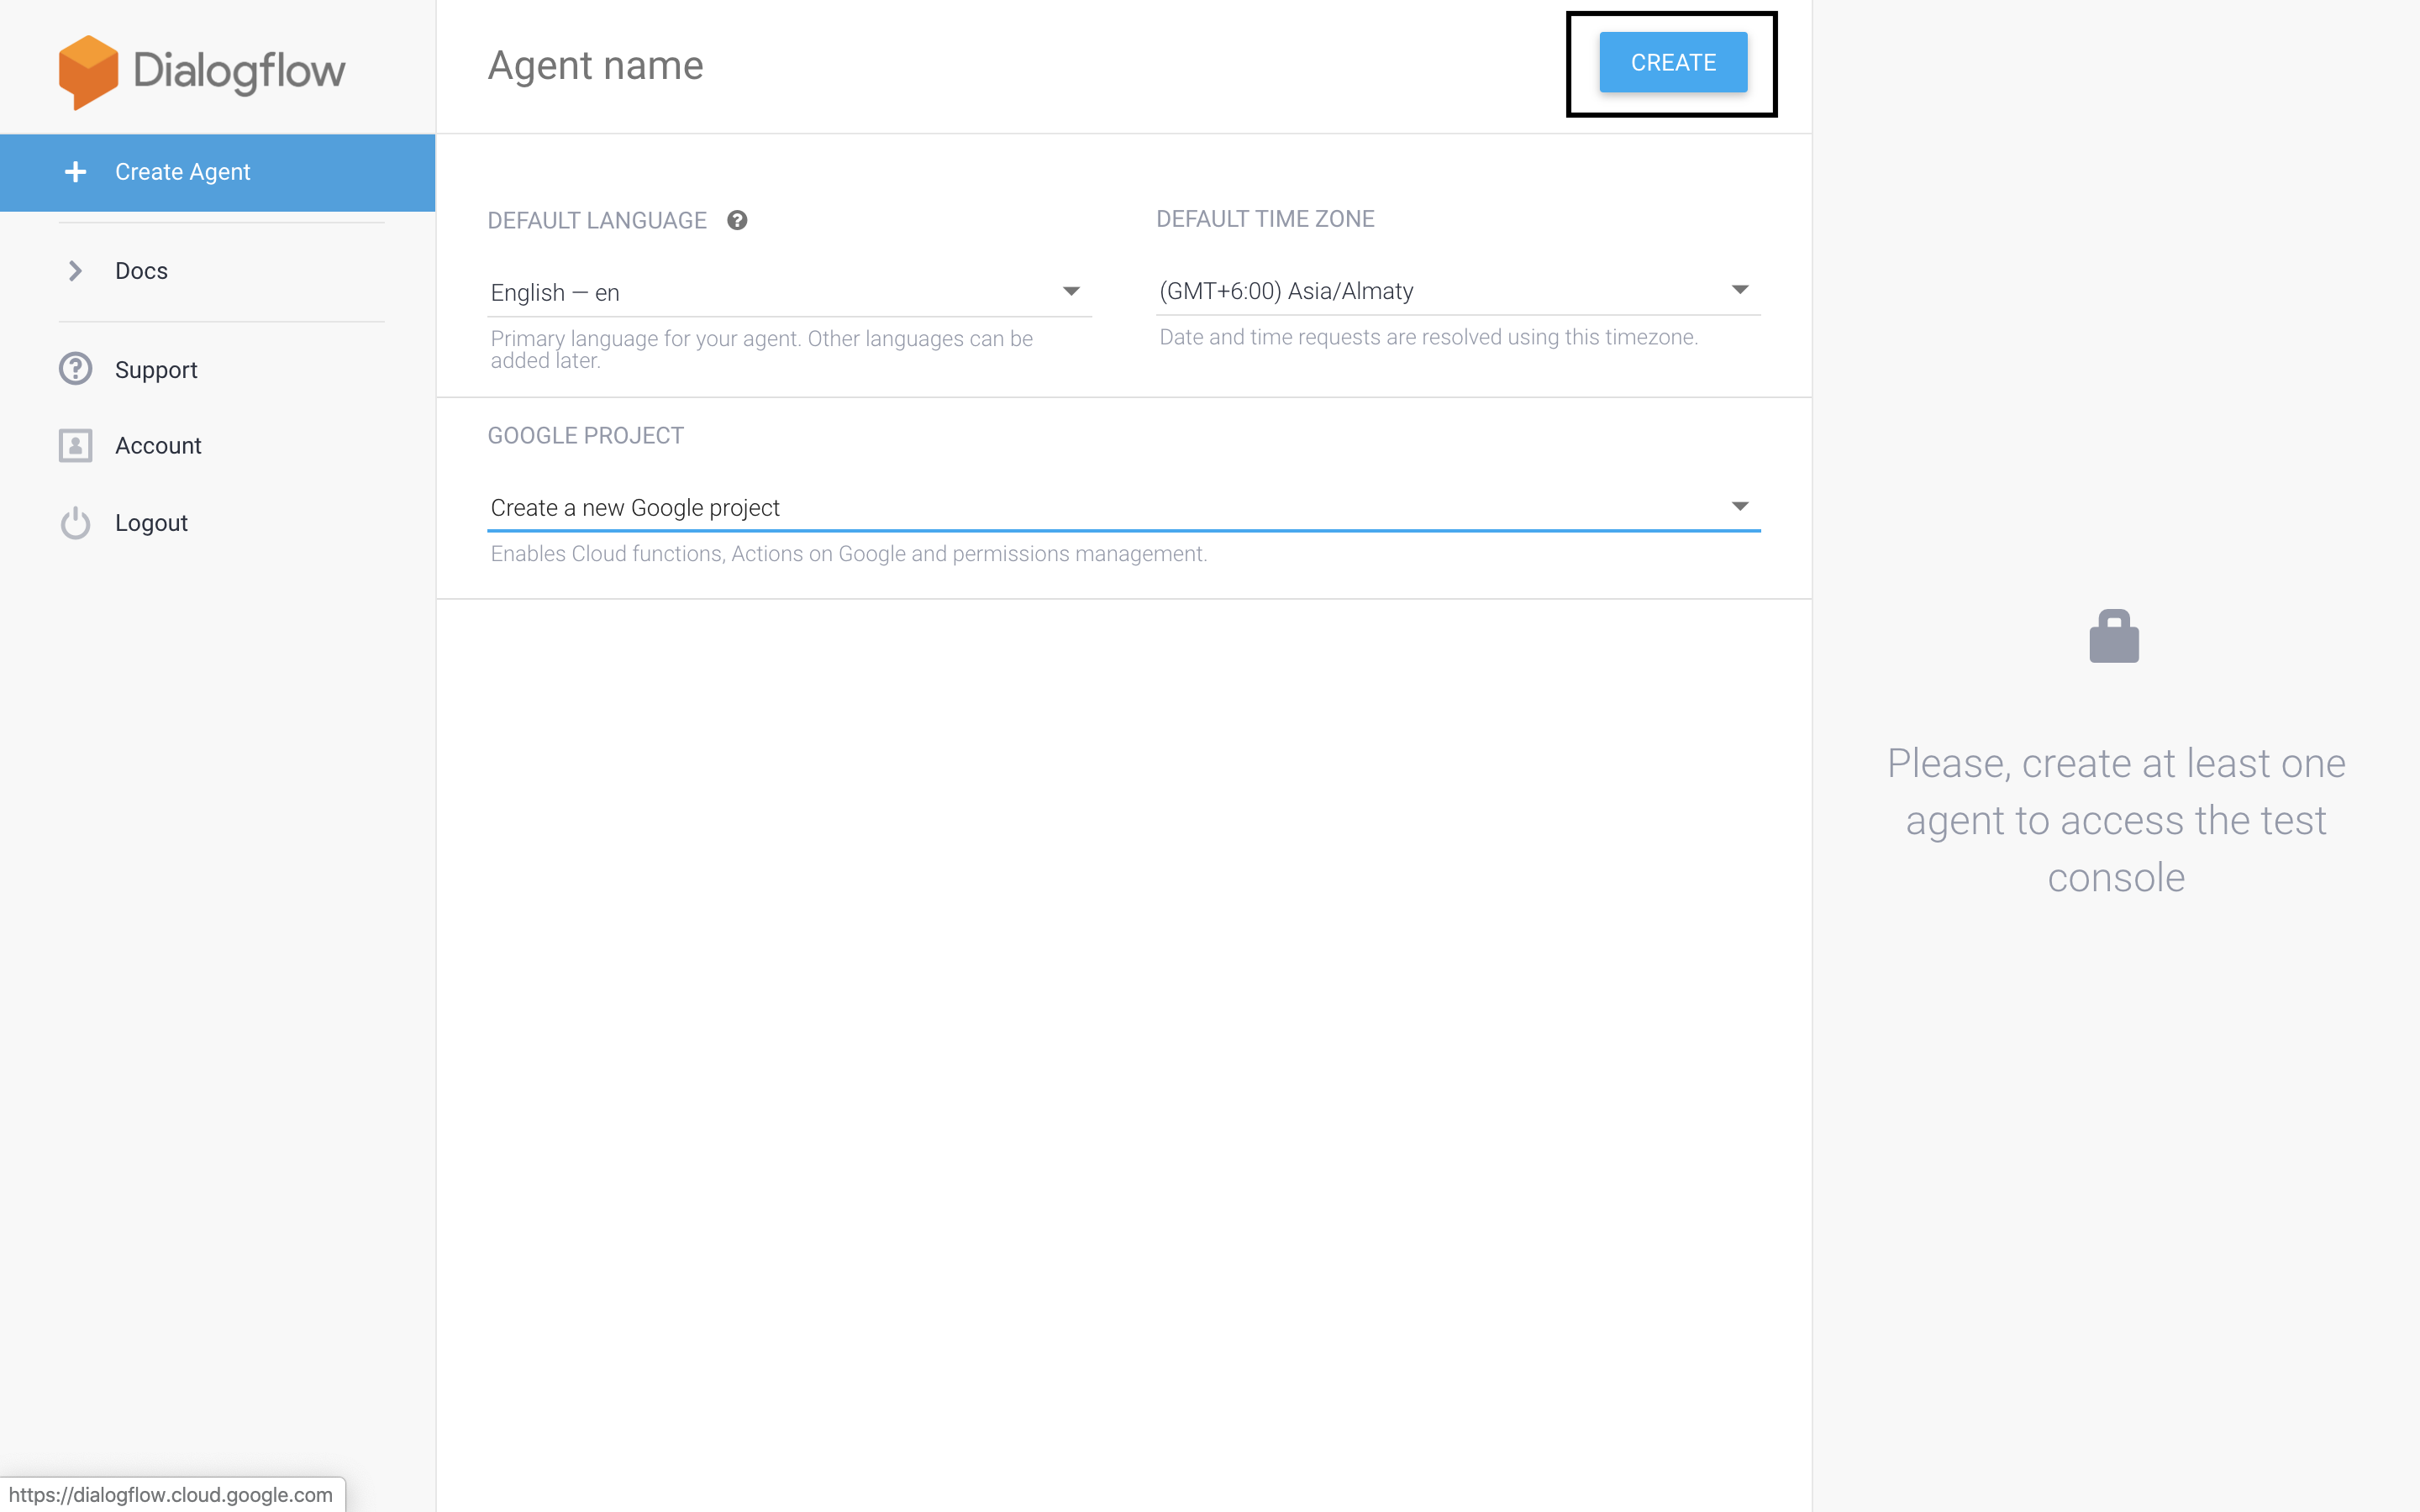
Provide all the information required to create new agent. Agent Name(without whitespaces), Default Language, Default Time-Zone, Import Existing / Create a new Agent. here
Click on the setting icon.
- In General Section, provide all the details according to the requirement, with that select V2 API as default for the agent.
- In Language Section, select the preferred language.
- In ML settings Section, Enable this,when we have large number of intents.
- In Import/Export Section, import/export the Project.
- In Share Section, Invite New People.
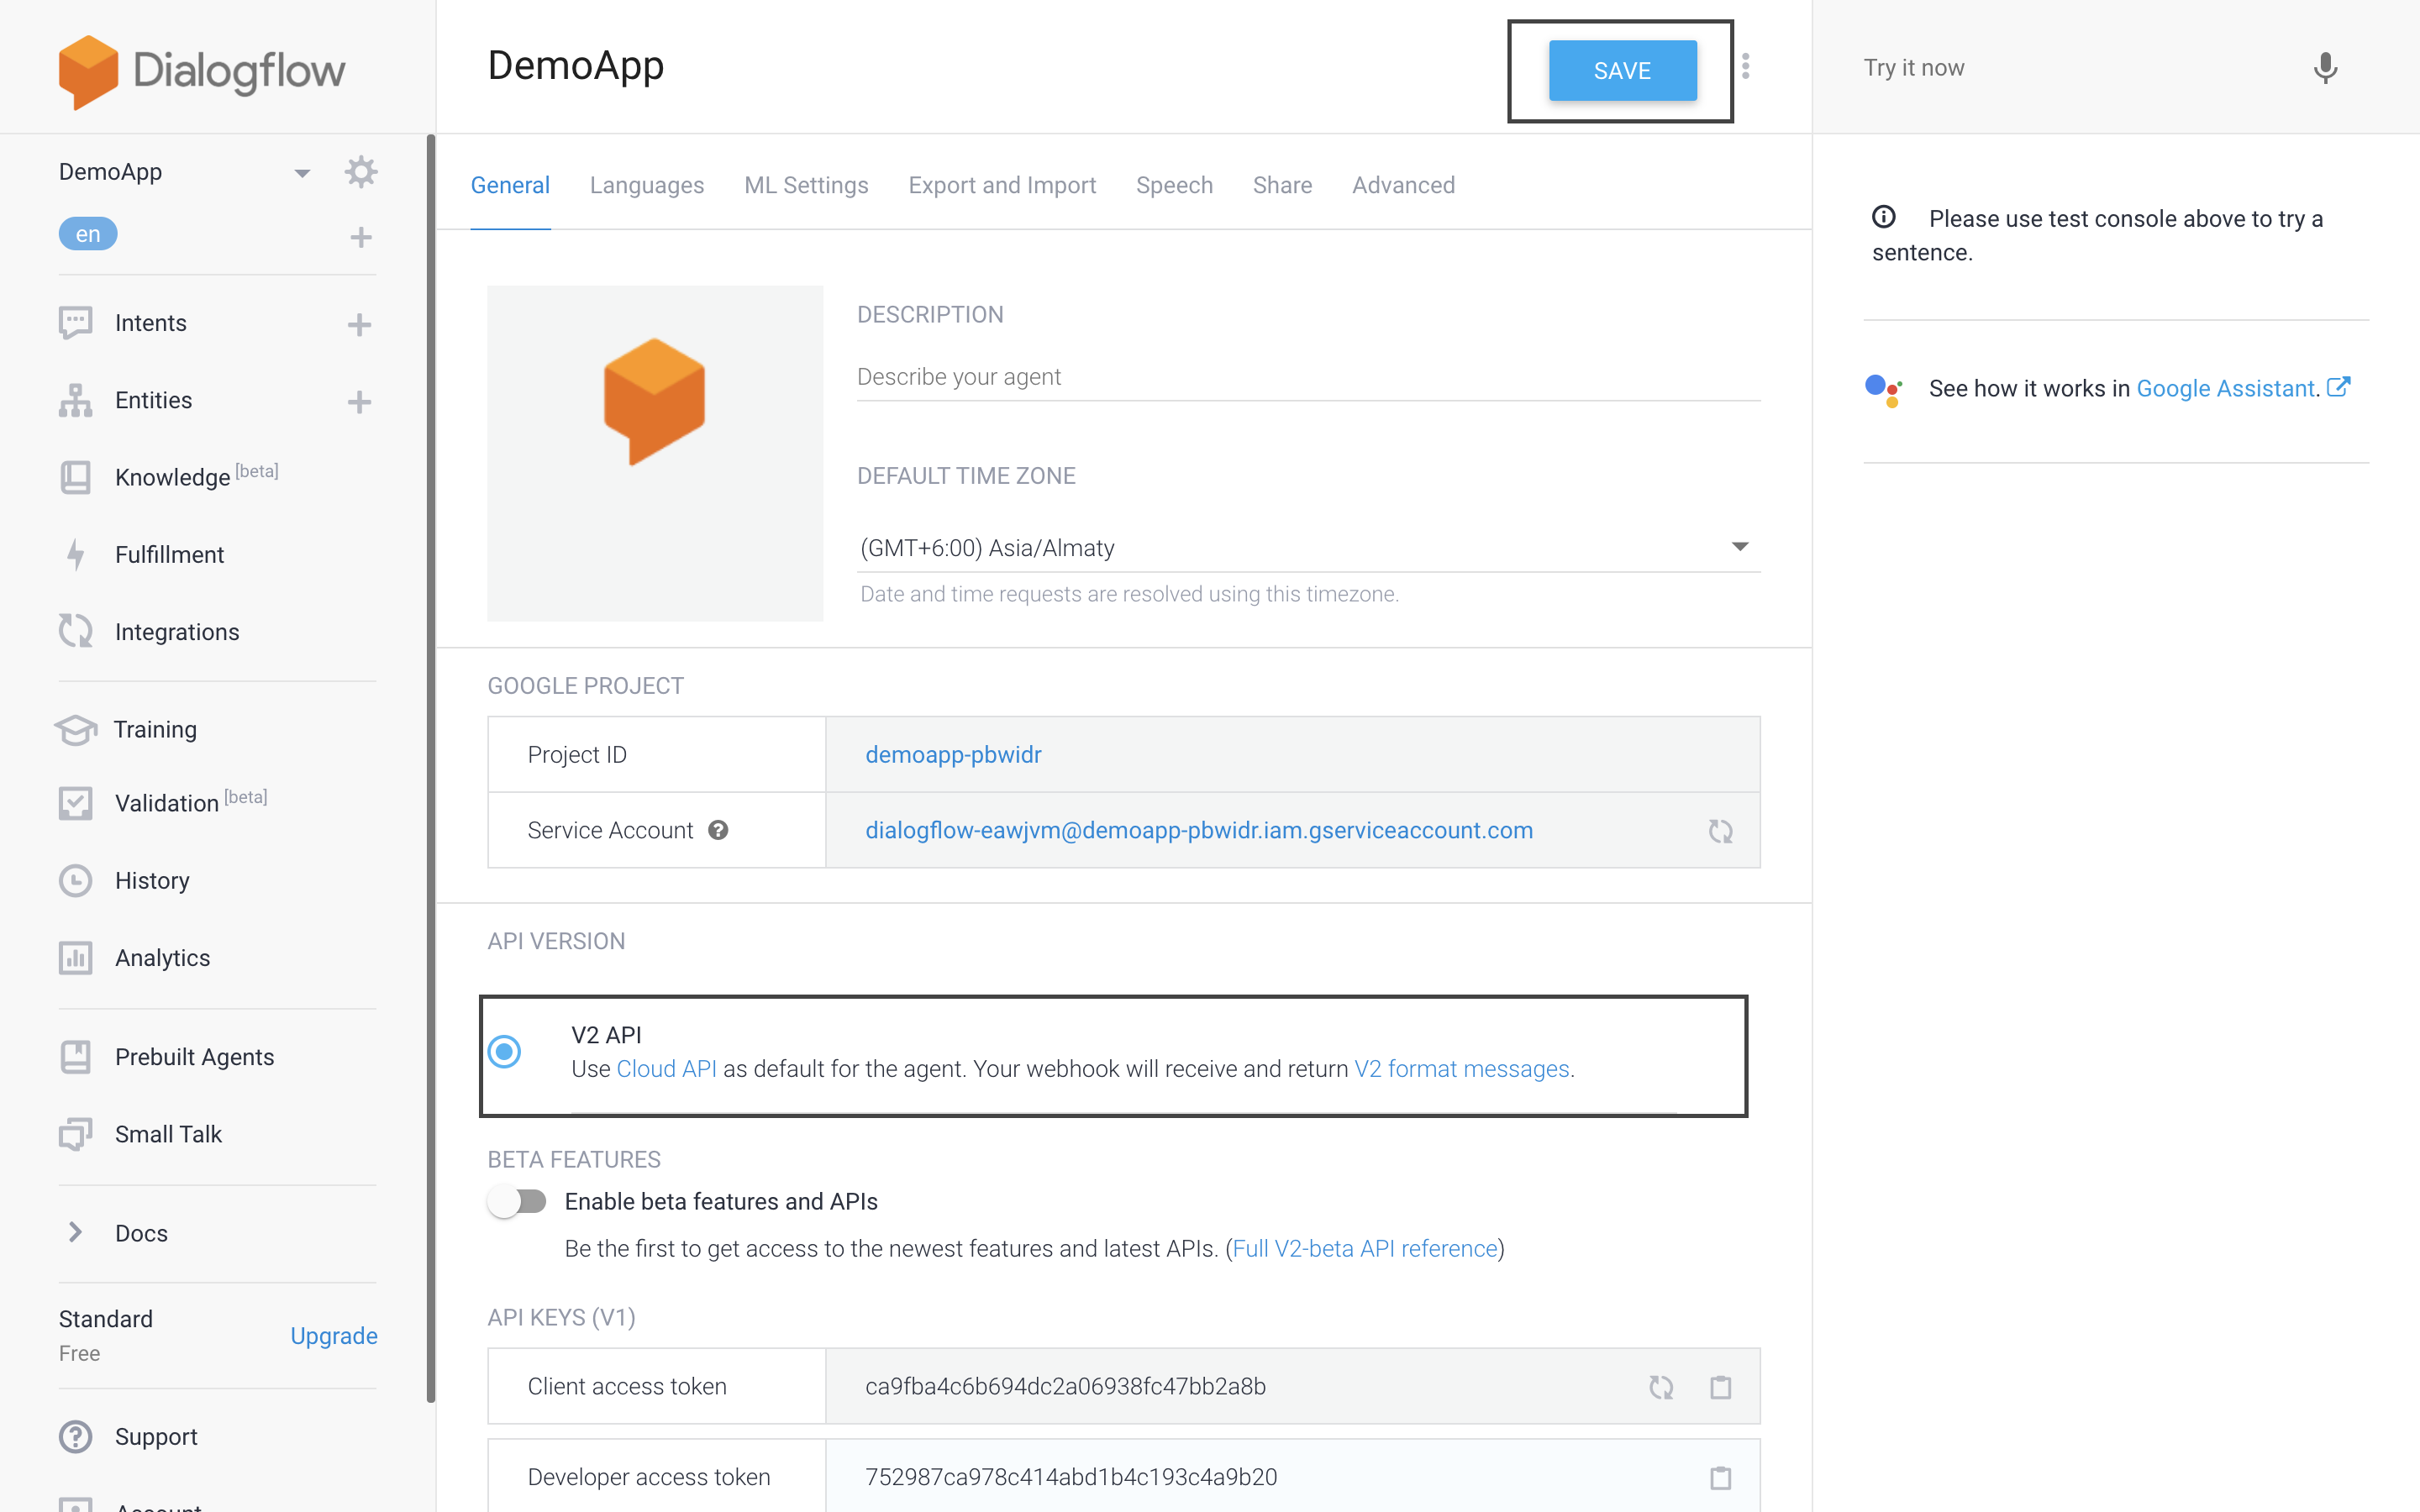
- In General Section, provide all the details according to the requirement, with that select V2 API as default for the agent.
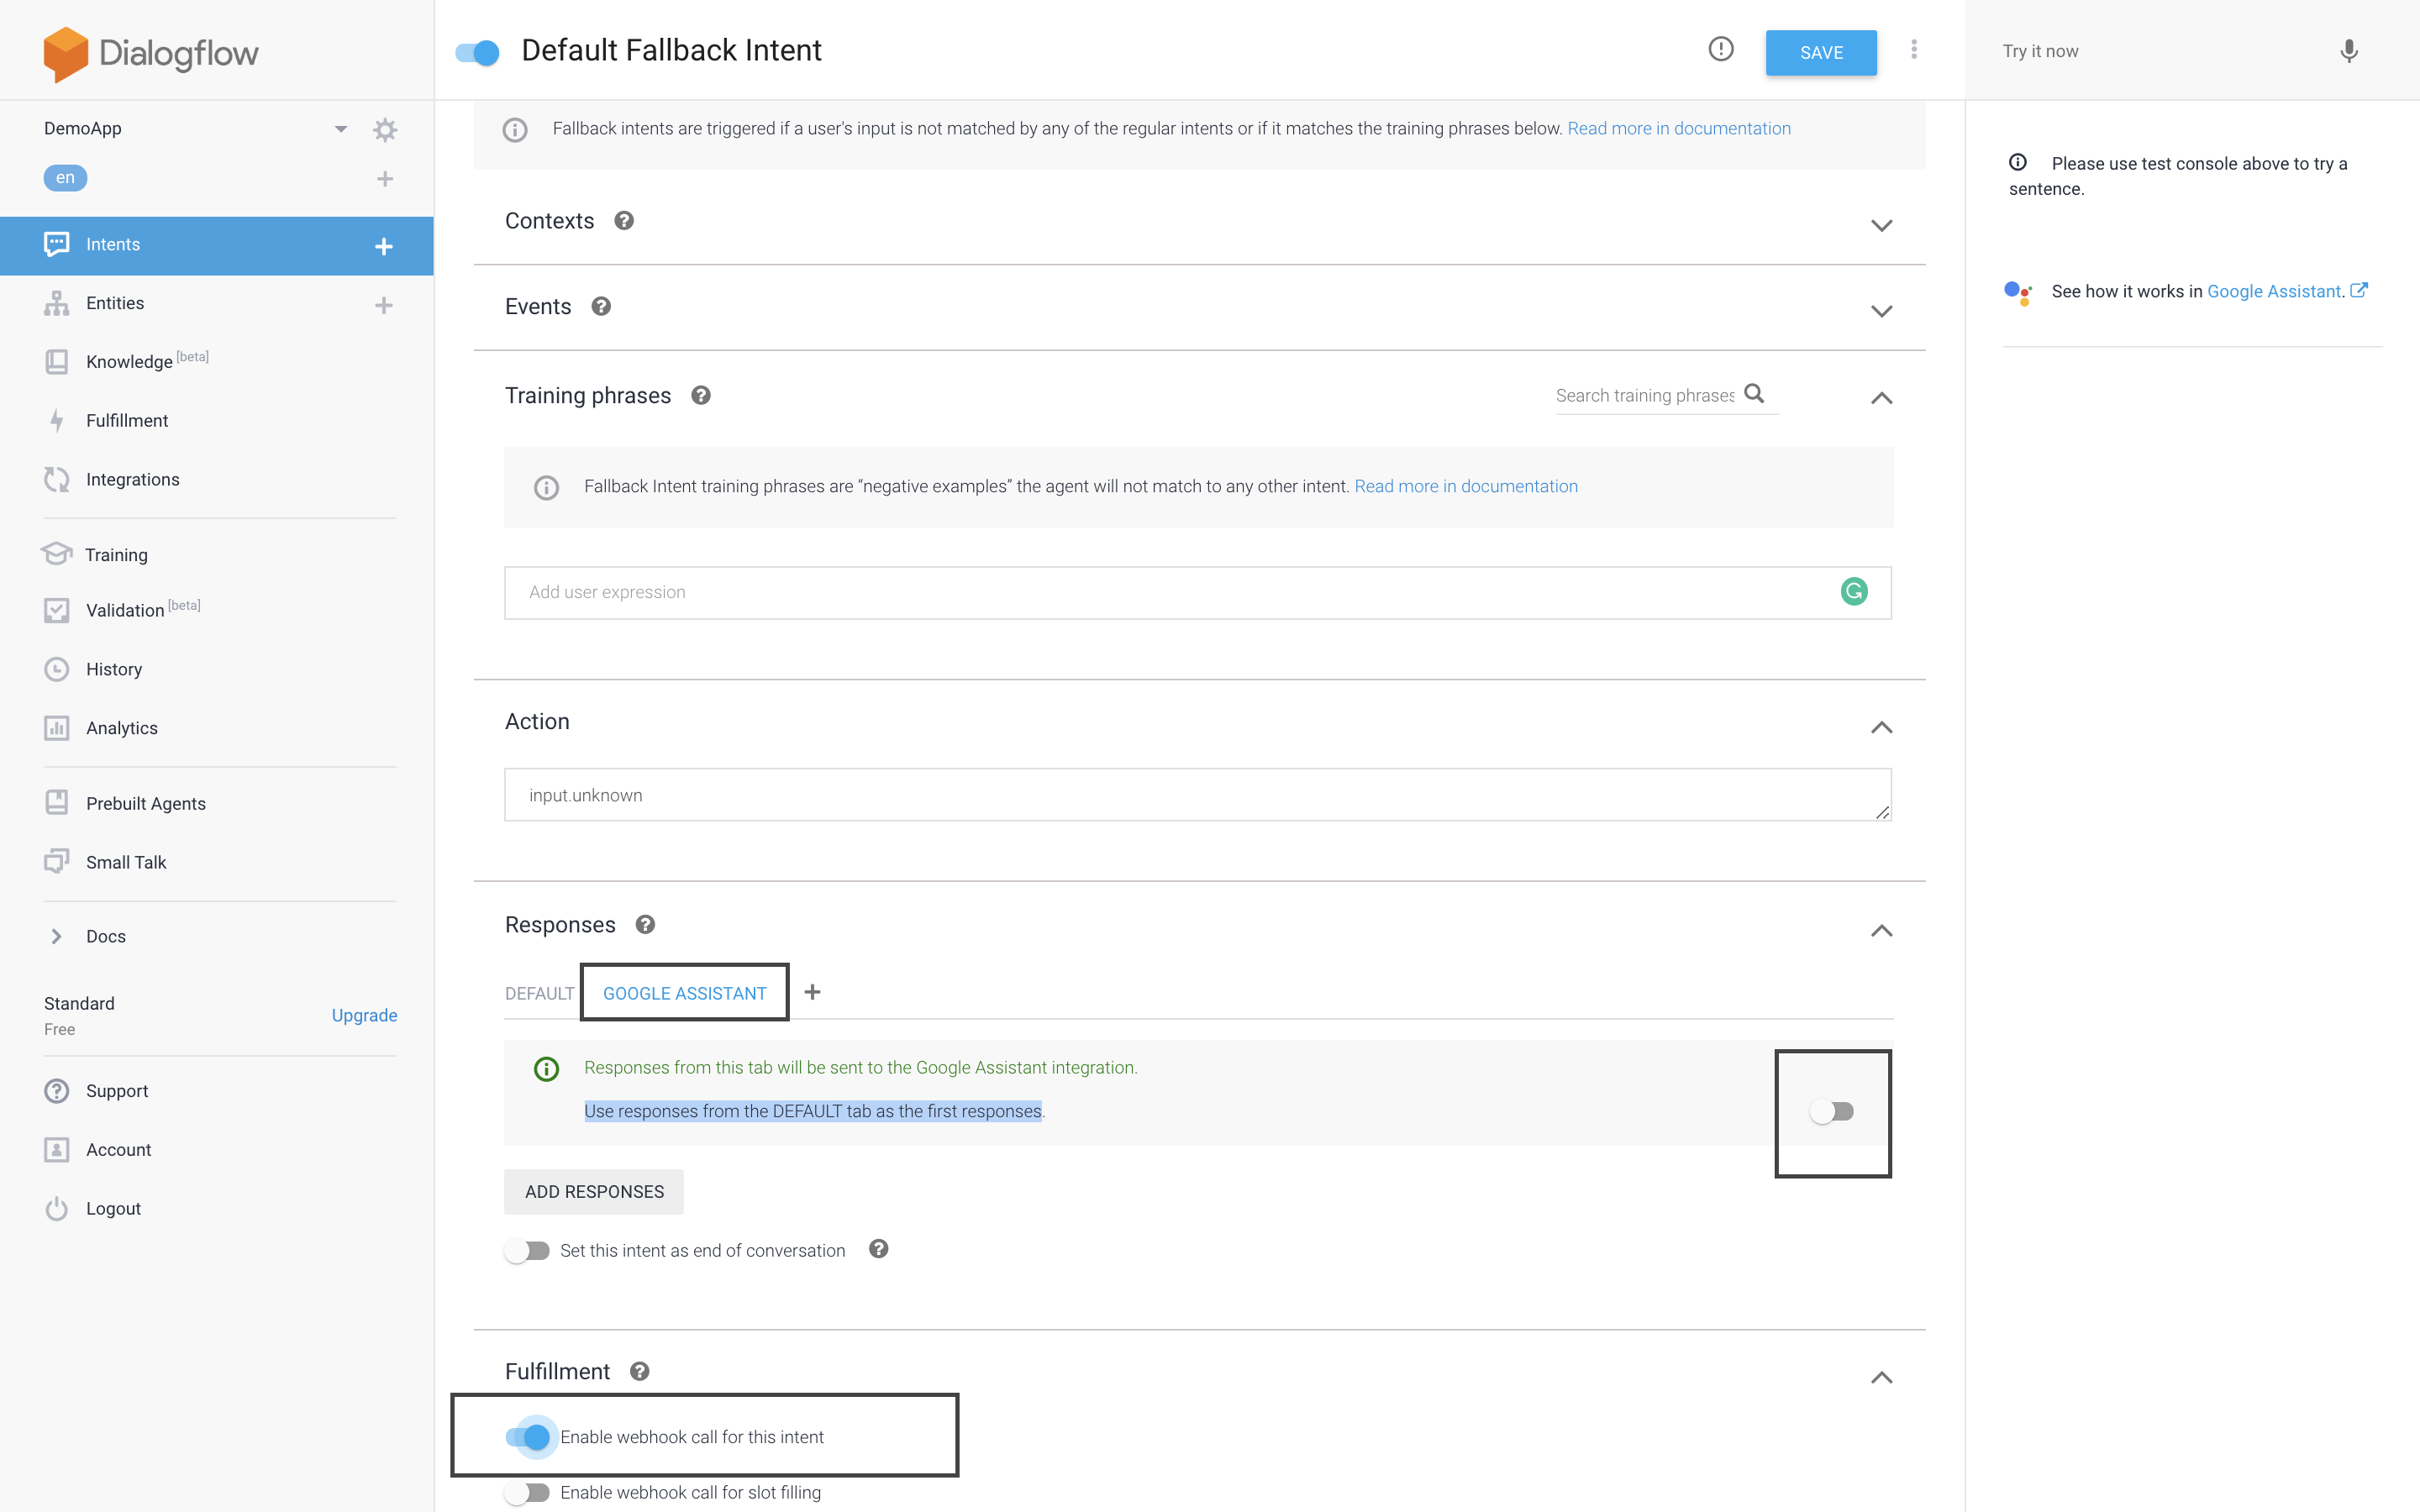
In the Intent Section, go to Default Fallback Intent, in the responses, add google assistant response and disable the toggle "Use responses from the DEFAULT tab as the first responses" which is sent to Google Assistant Integration, also enabled the toggle "Enable Webhook to call for this Intent" in the fulfillment of Intent Section.
Now go to your morfeus admin pannel, configure workspace → Manage-channel → Enable google assistant channel → edit channel → and copy value of "Input Message URL Endpoint " and replace the localhost with your ngrok URL and paste it in Dialogflow's URL section in Fulfillment tab of DialogFlow after enabling the webhook section and save it on clicking the save button at the bottom.
Add the following parameters in the Header section of Fulfillment tab, and copy the URL from ONE Active as described in point no. 10
- Accept – application/JSON
- Content-Type – application/JSON
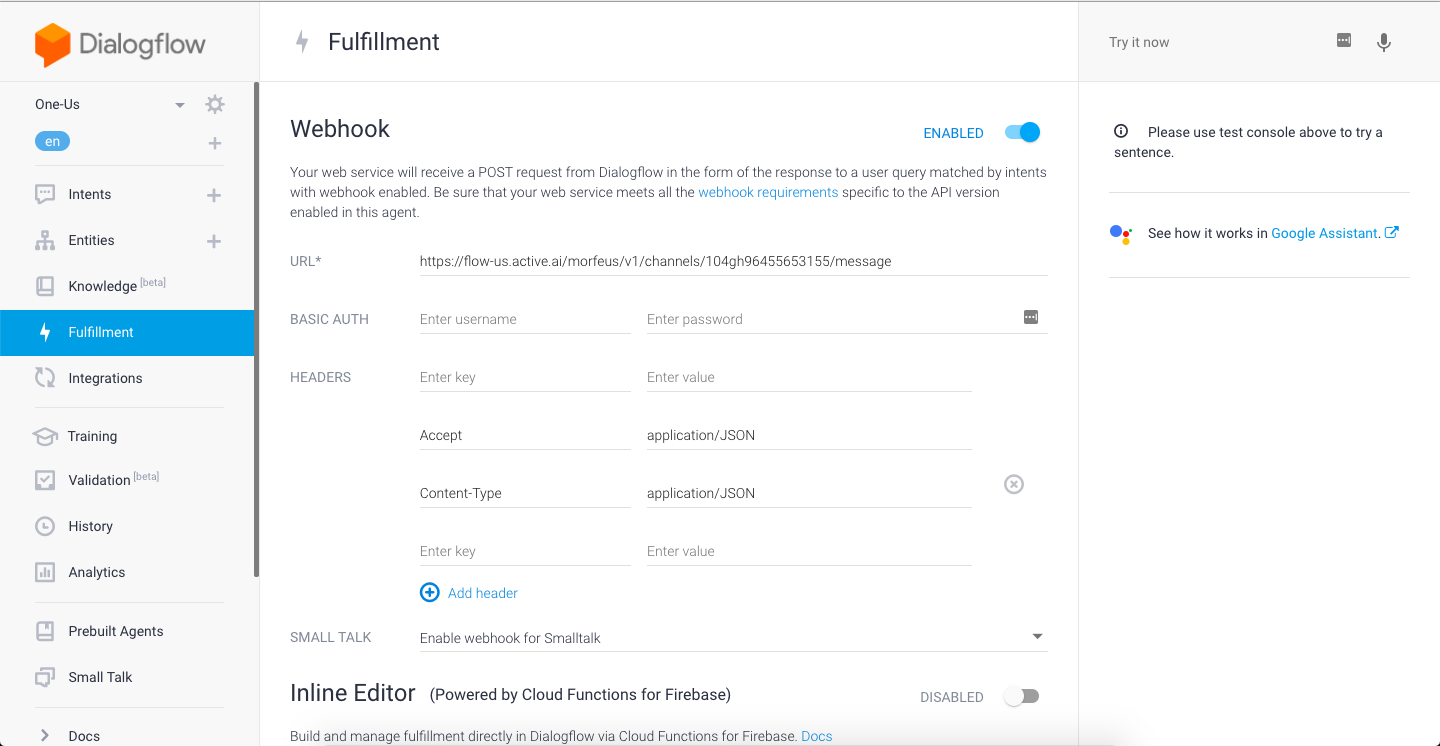
- Accept – application/JSON
Go to the Integration settings tab, select "Default Welcome Intent" and go to manage assistant app.
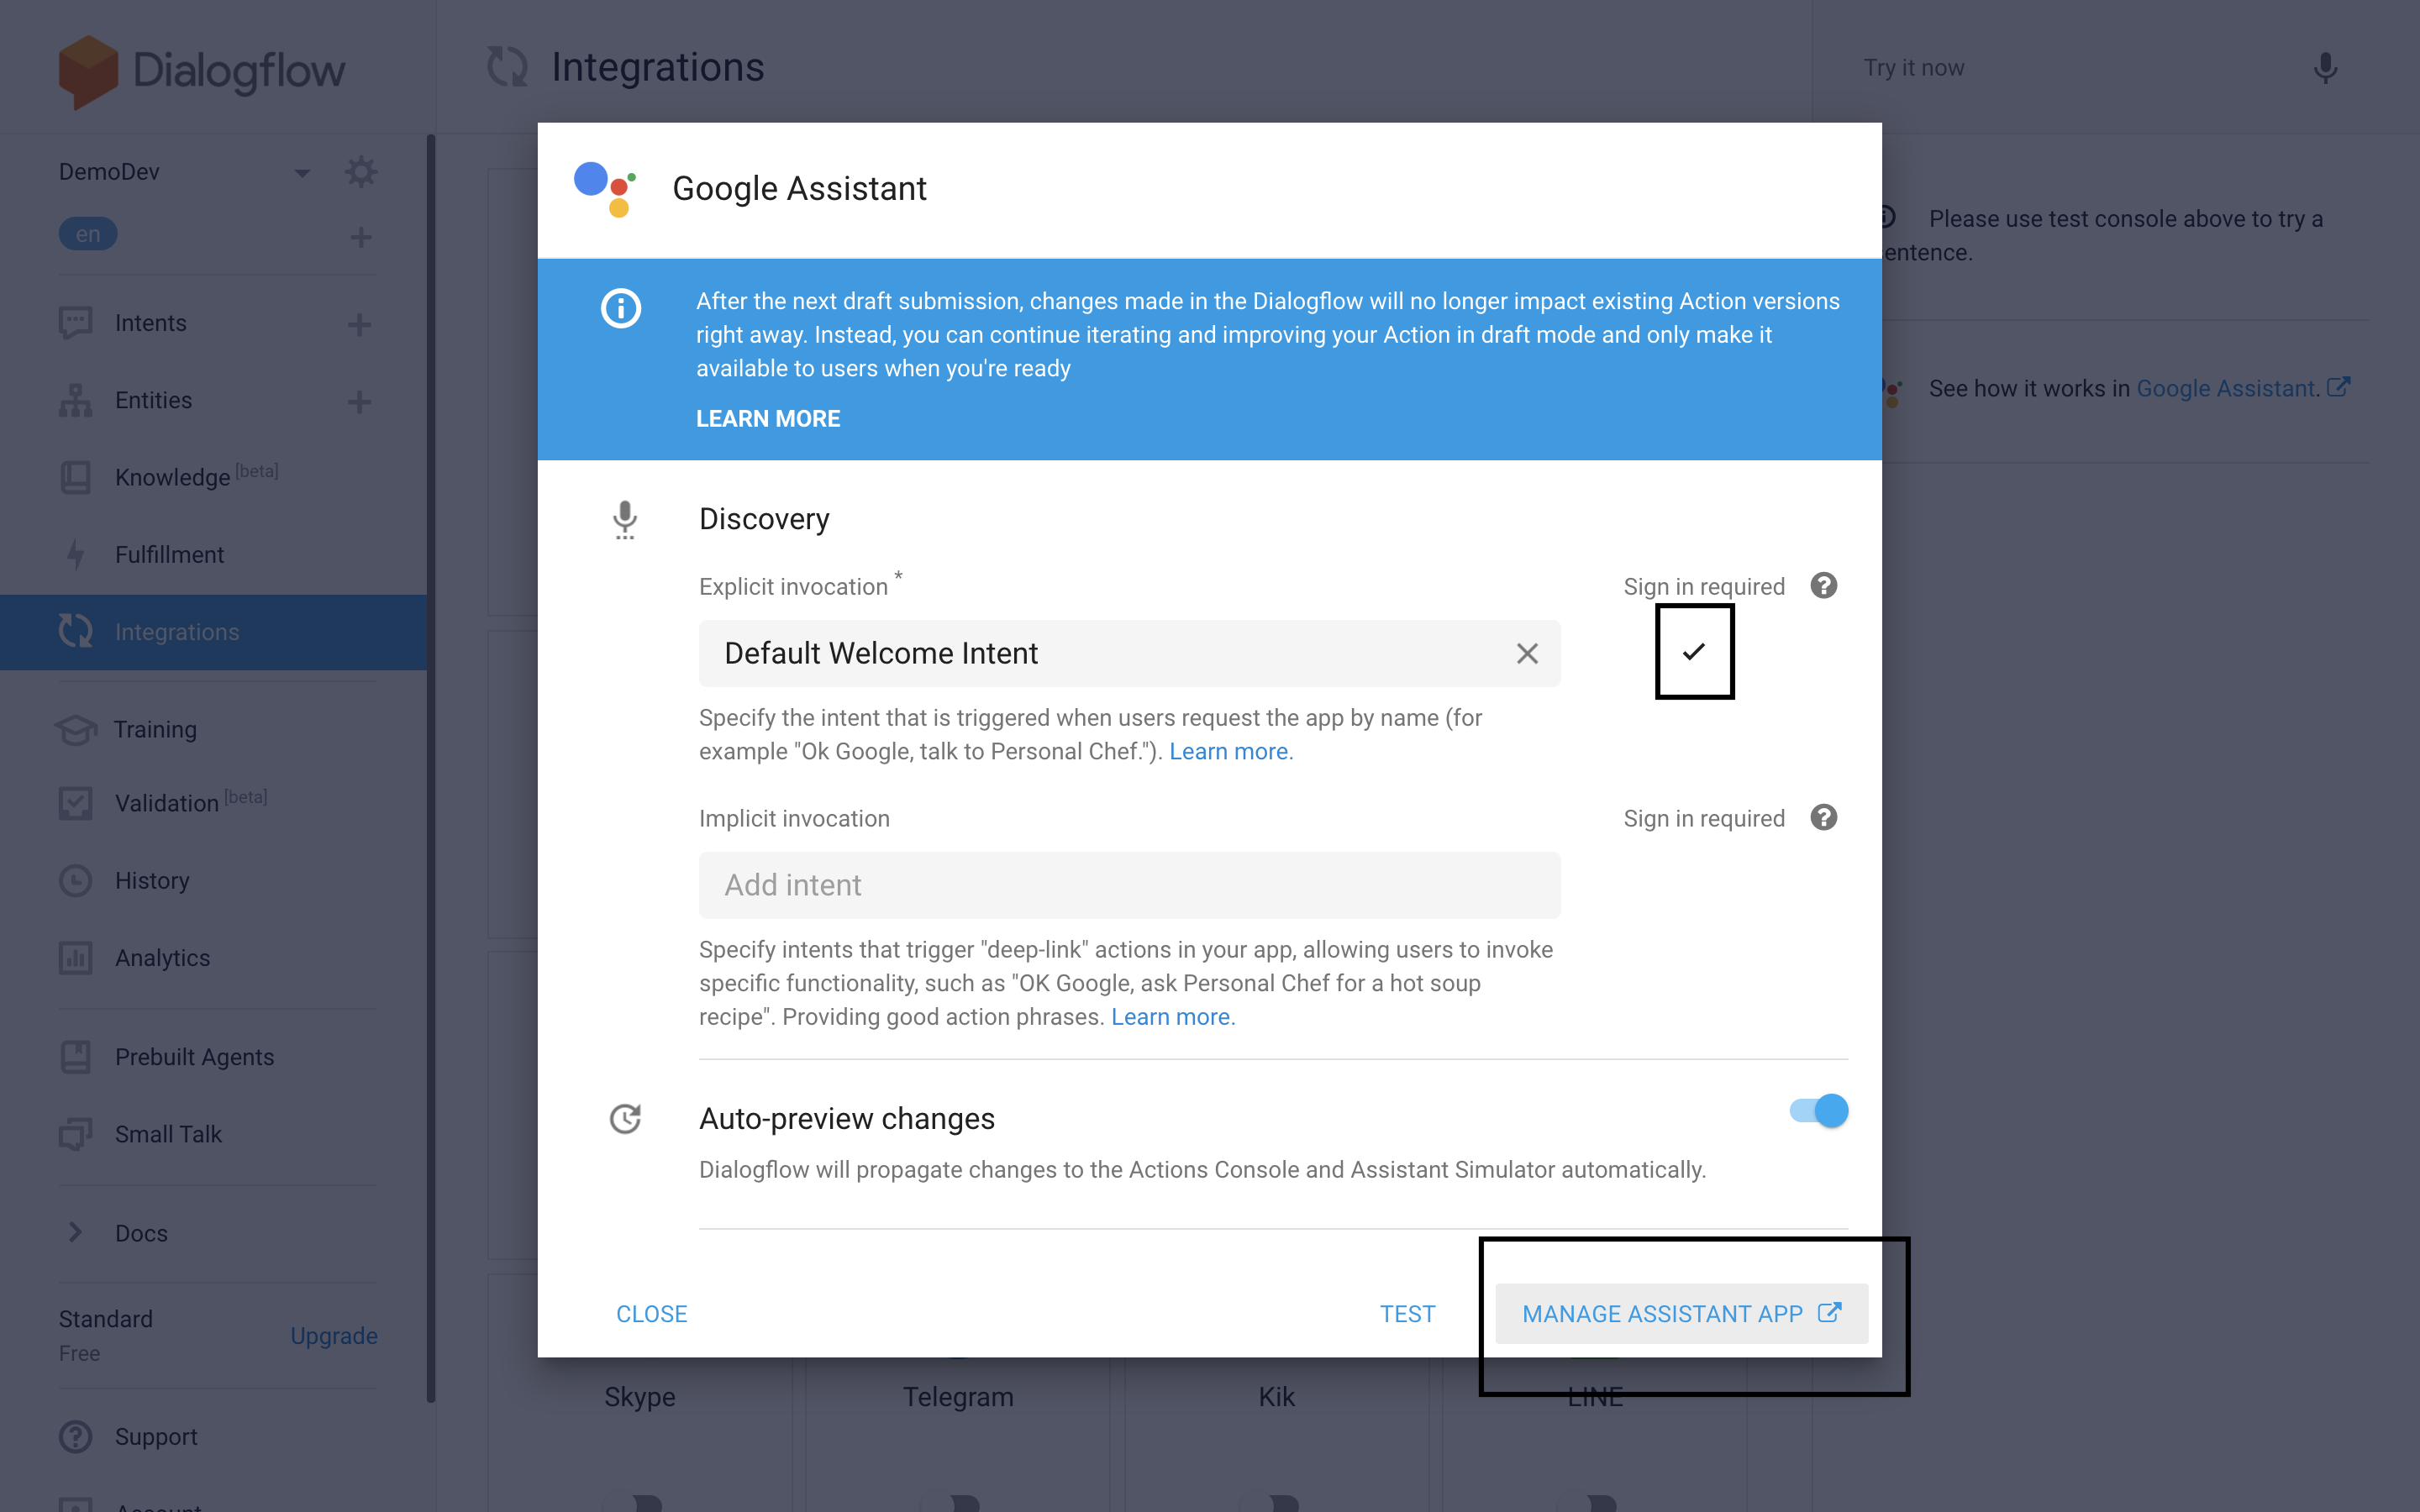
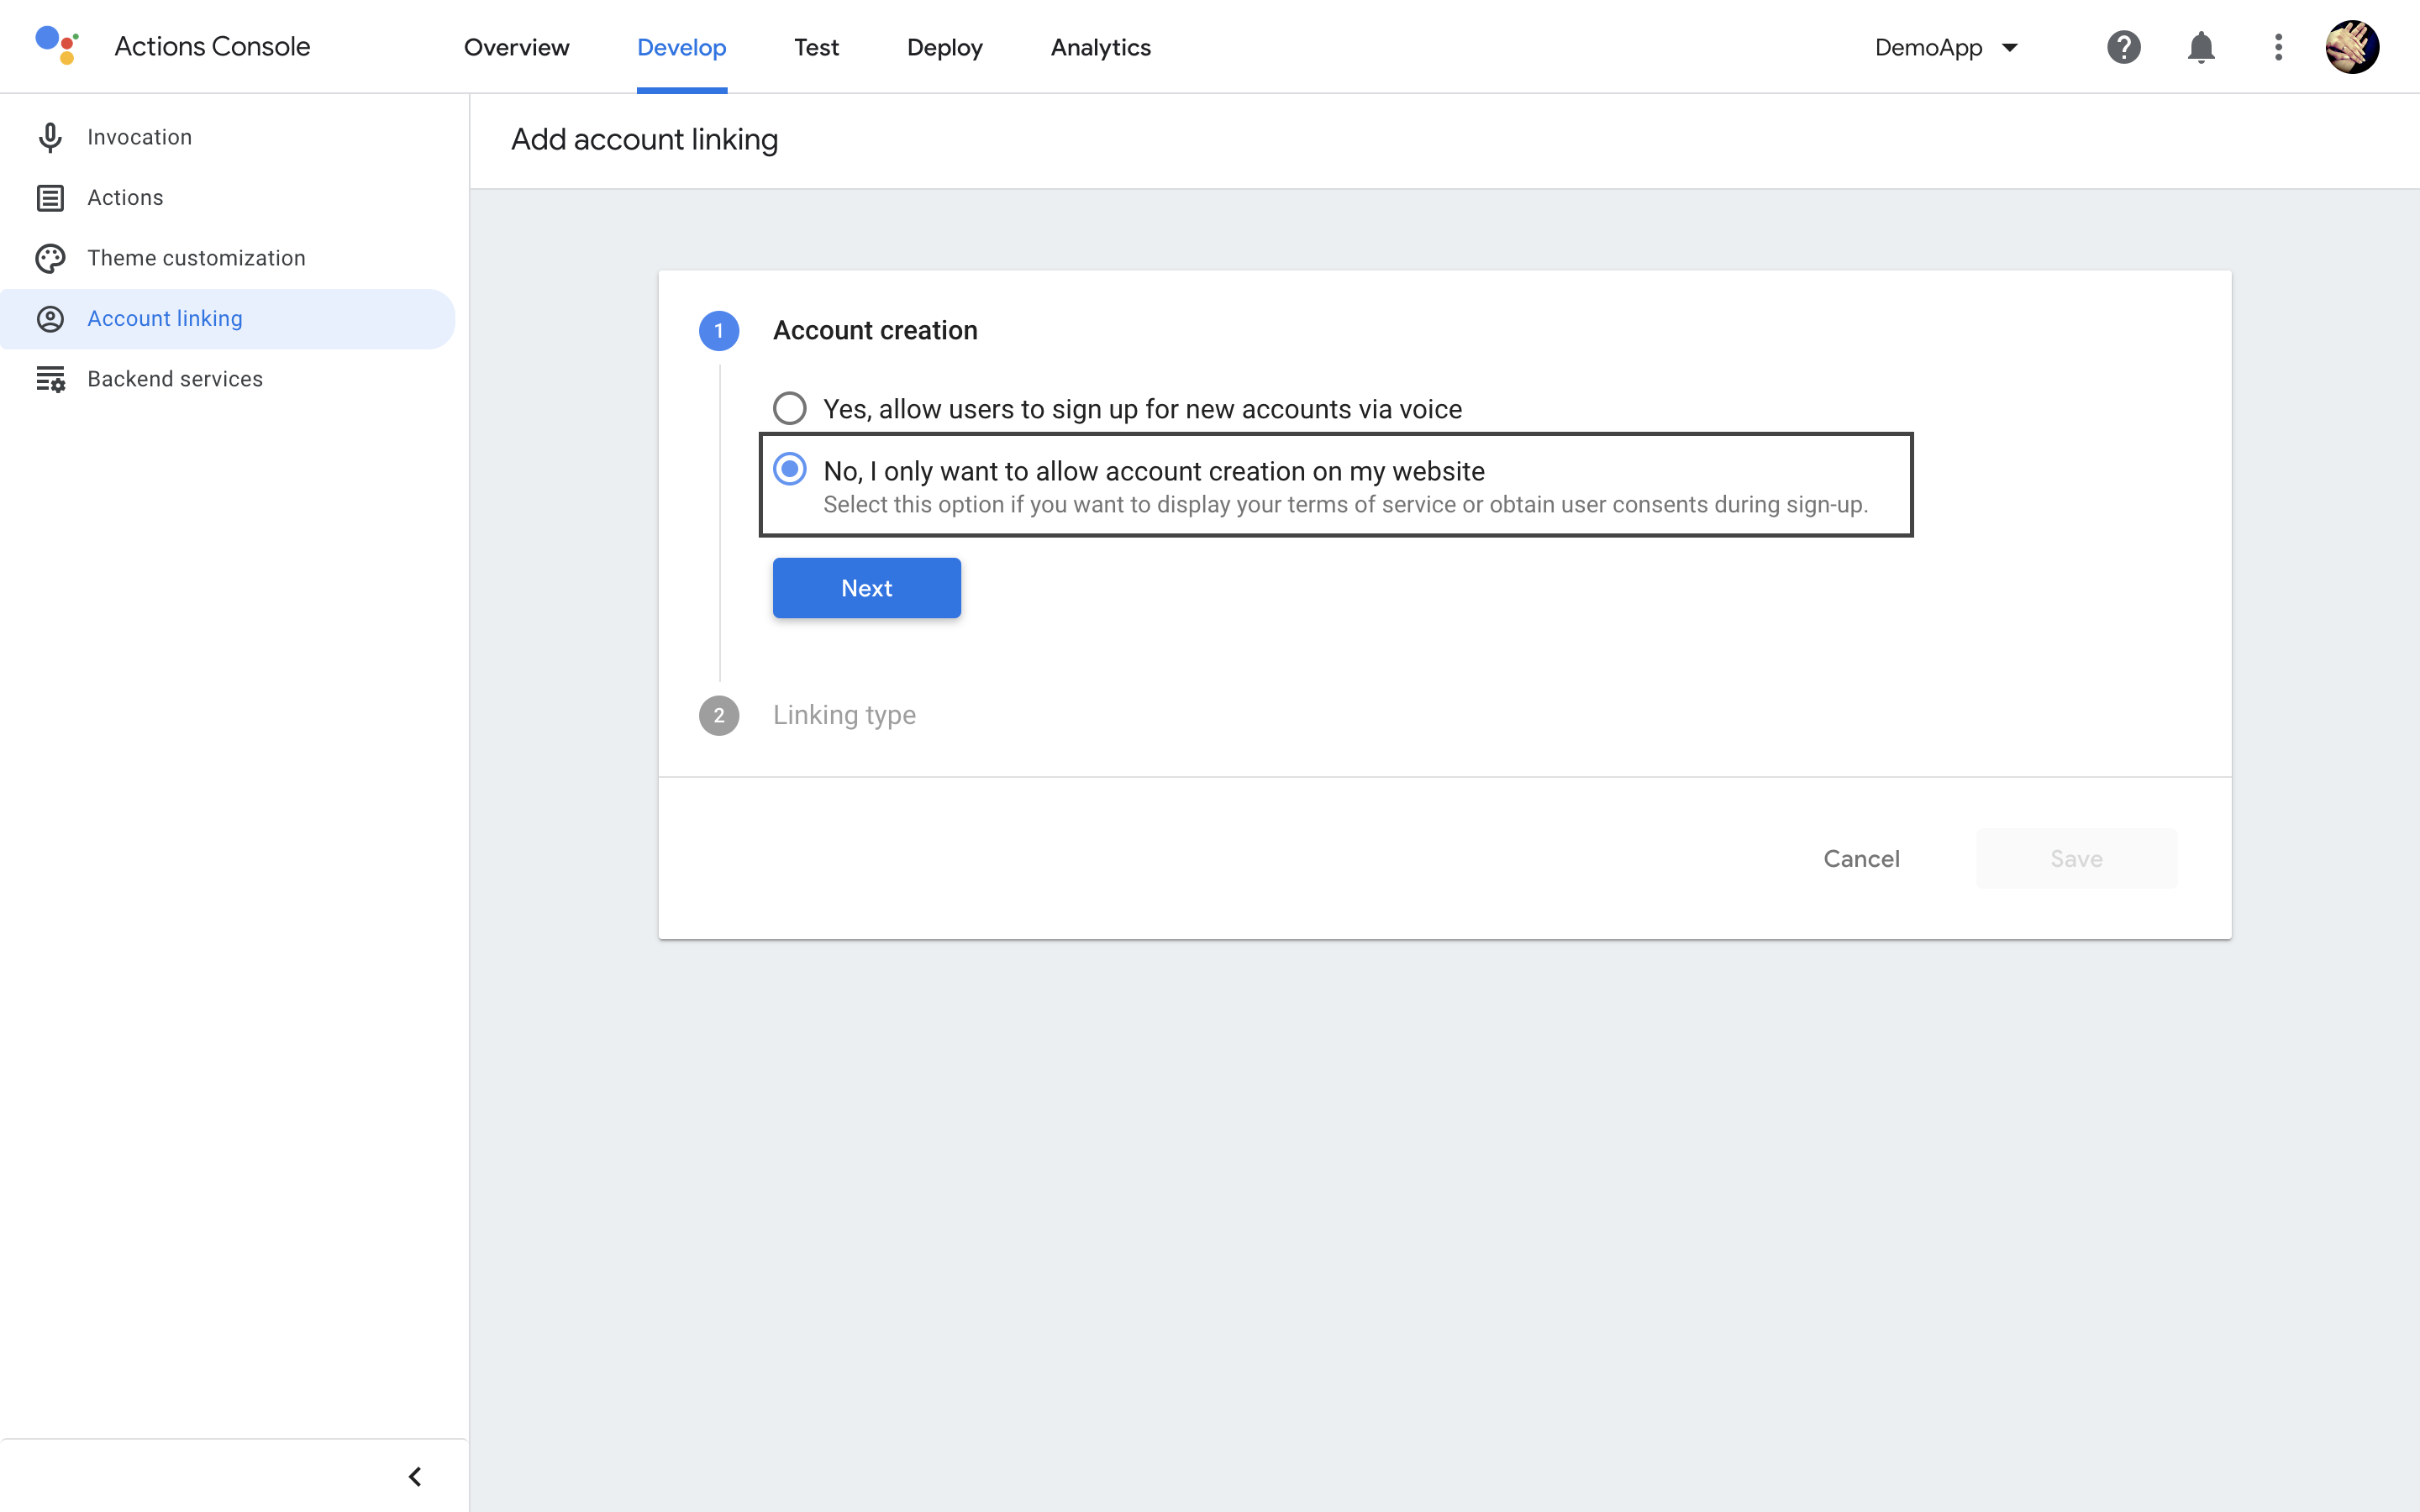
Go to Develop Tab, in that Account Linking Section, provide the configuration for account linking which are required.
Account Creation, Select Yes(allow users to sign up for new accounts via voice)/No(if you want to display your terms of service or obtain user consents during sign-up.)and click on next.
Linking Type, Select Type of Oauth -> (Oauth / Oauth & Google Sign in) and Grant Type as well.
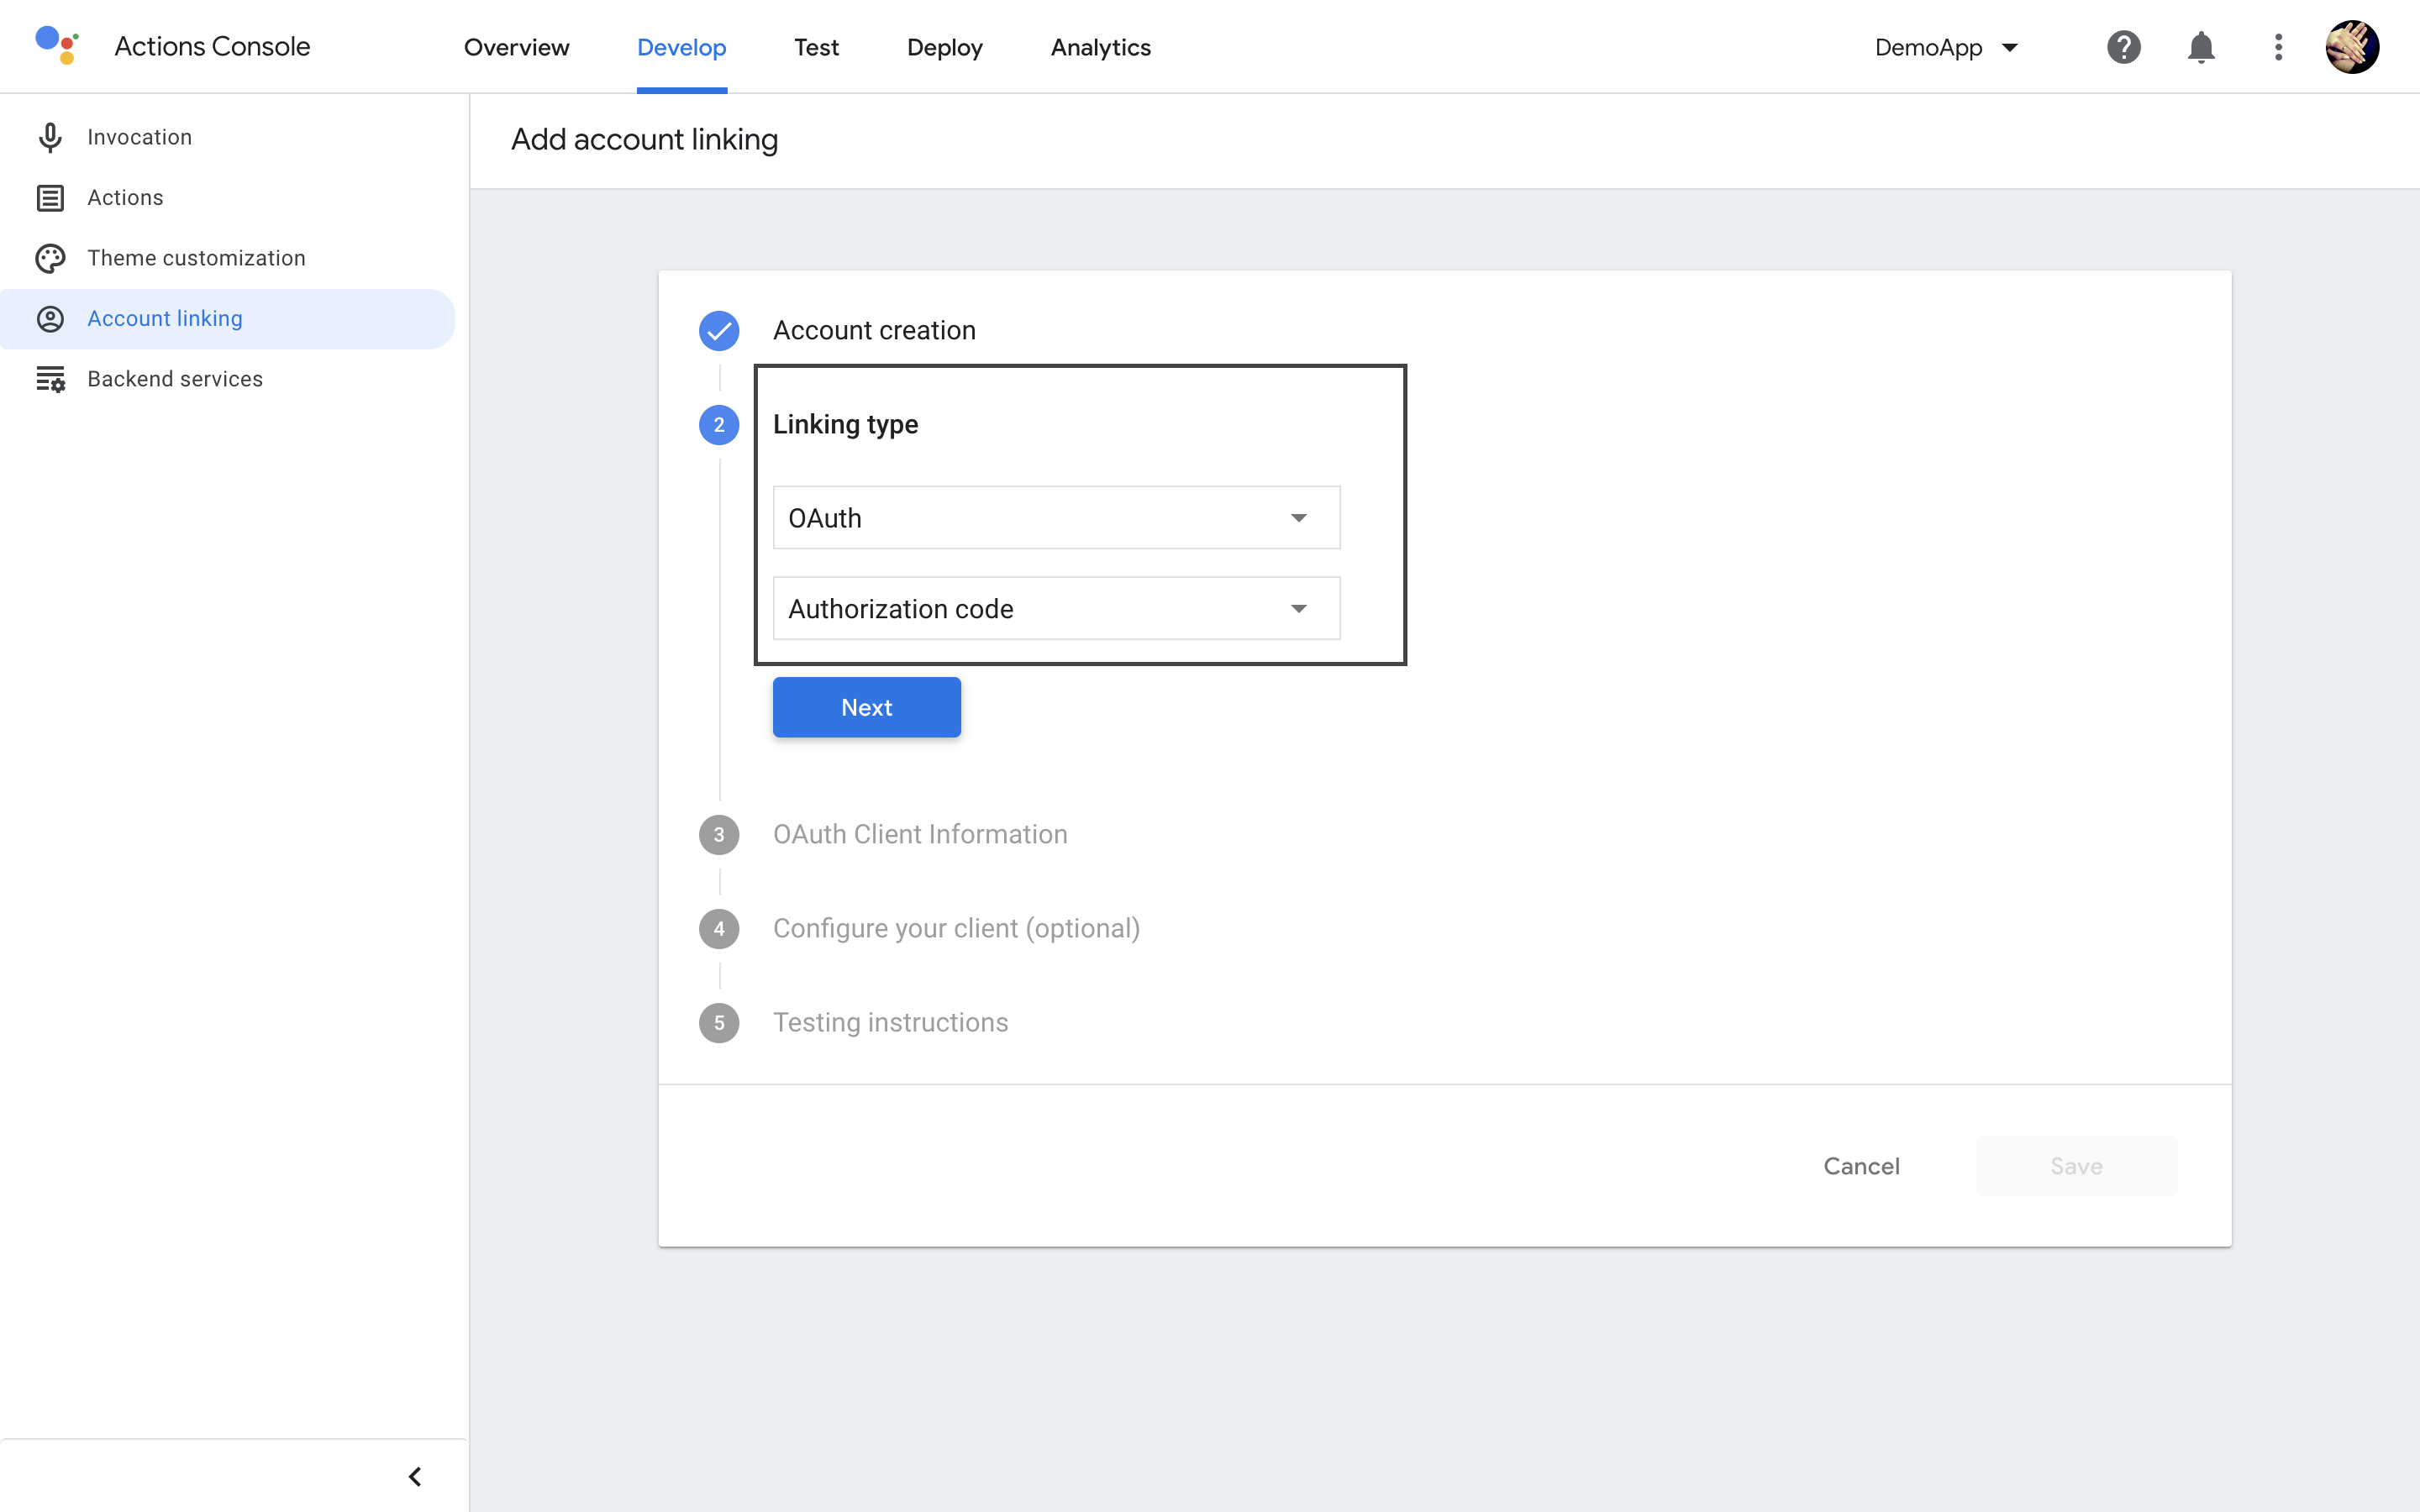
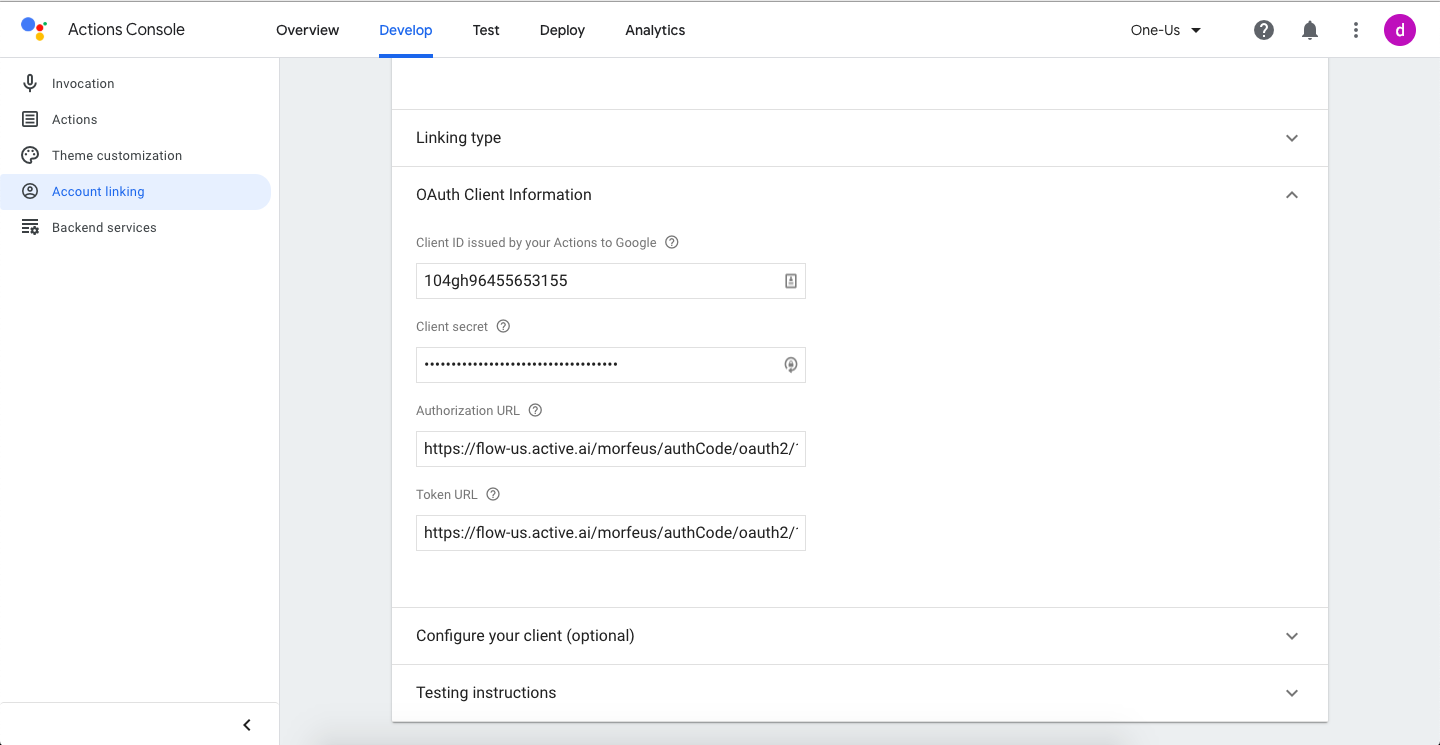
Fill Oauth Client Information, like Client Id, Secret Key, Authorization URI, Token Key from ONE Active.
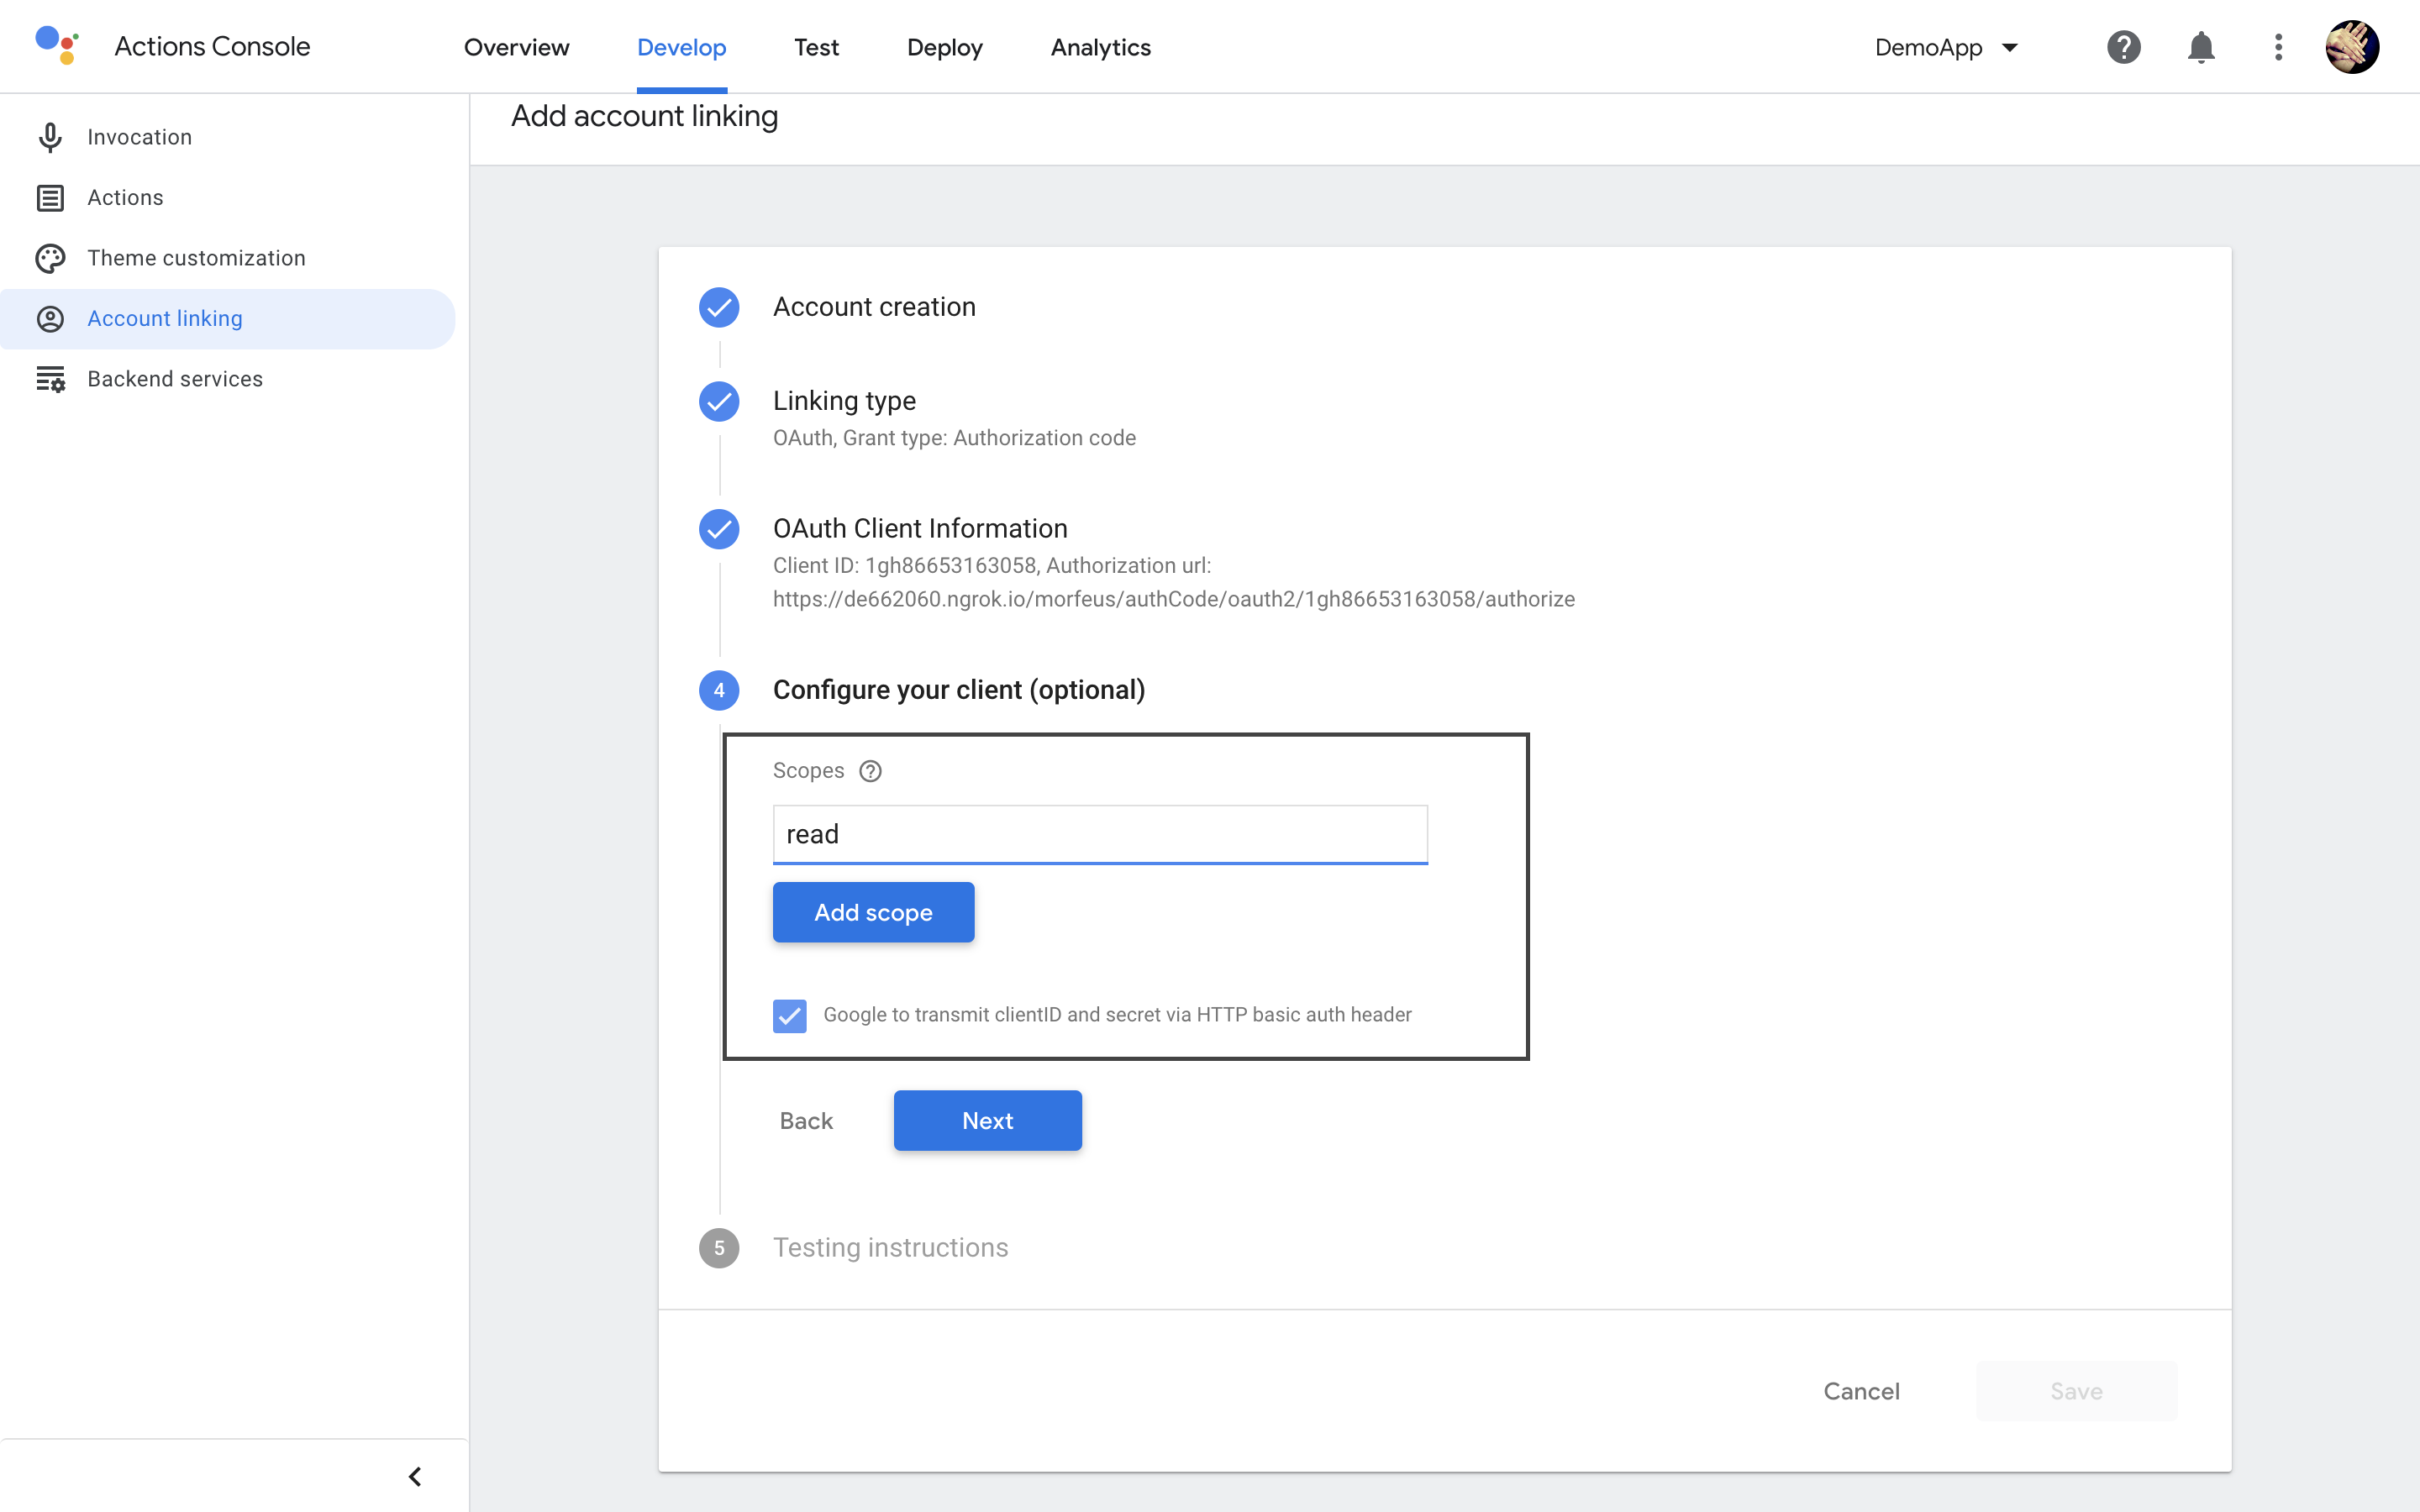
Configure the Client by adding the scopes,and also select Google to transmit clientID and secret via HTTP basic auth header.
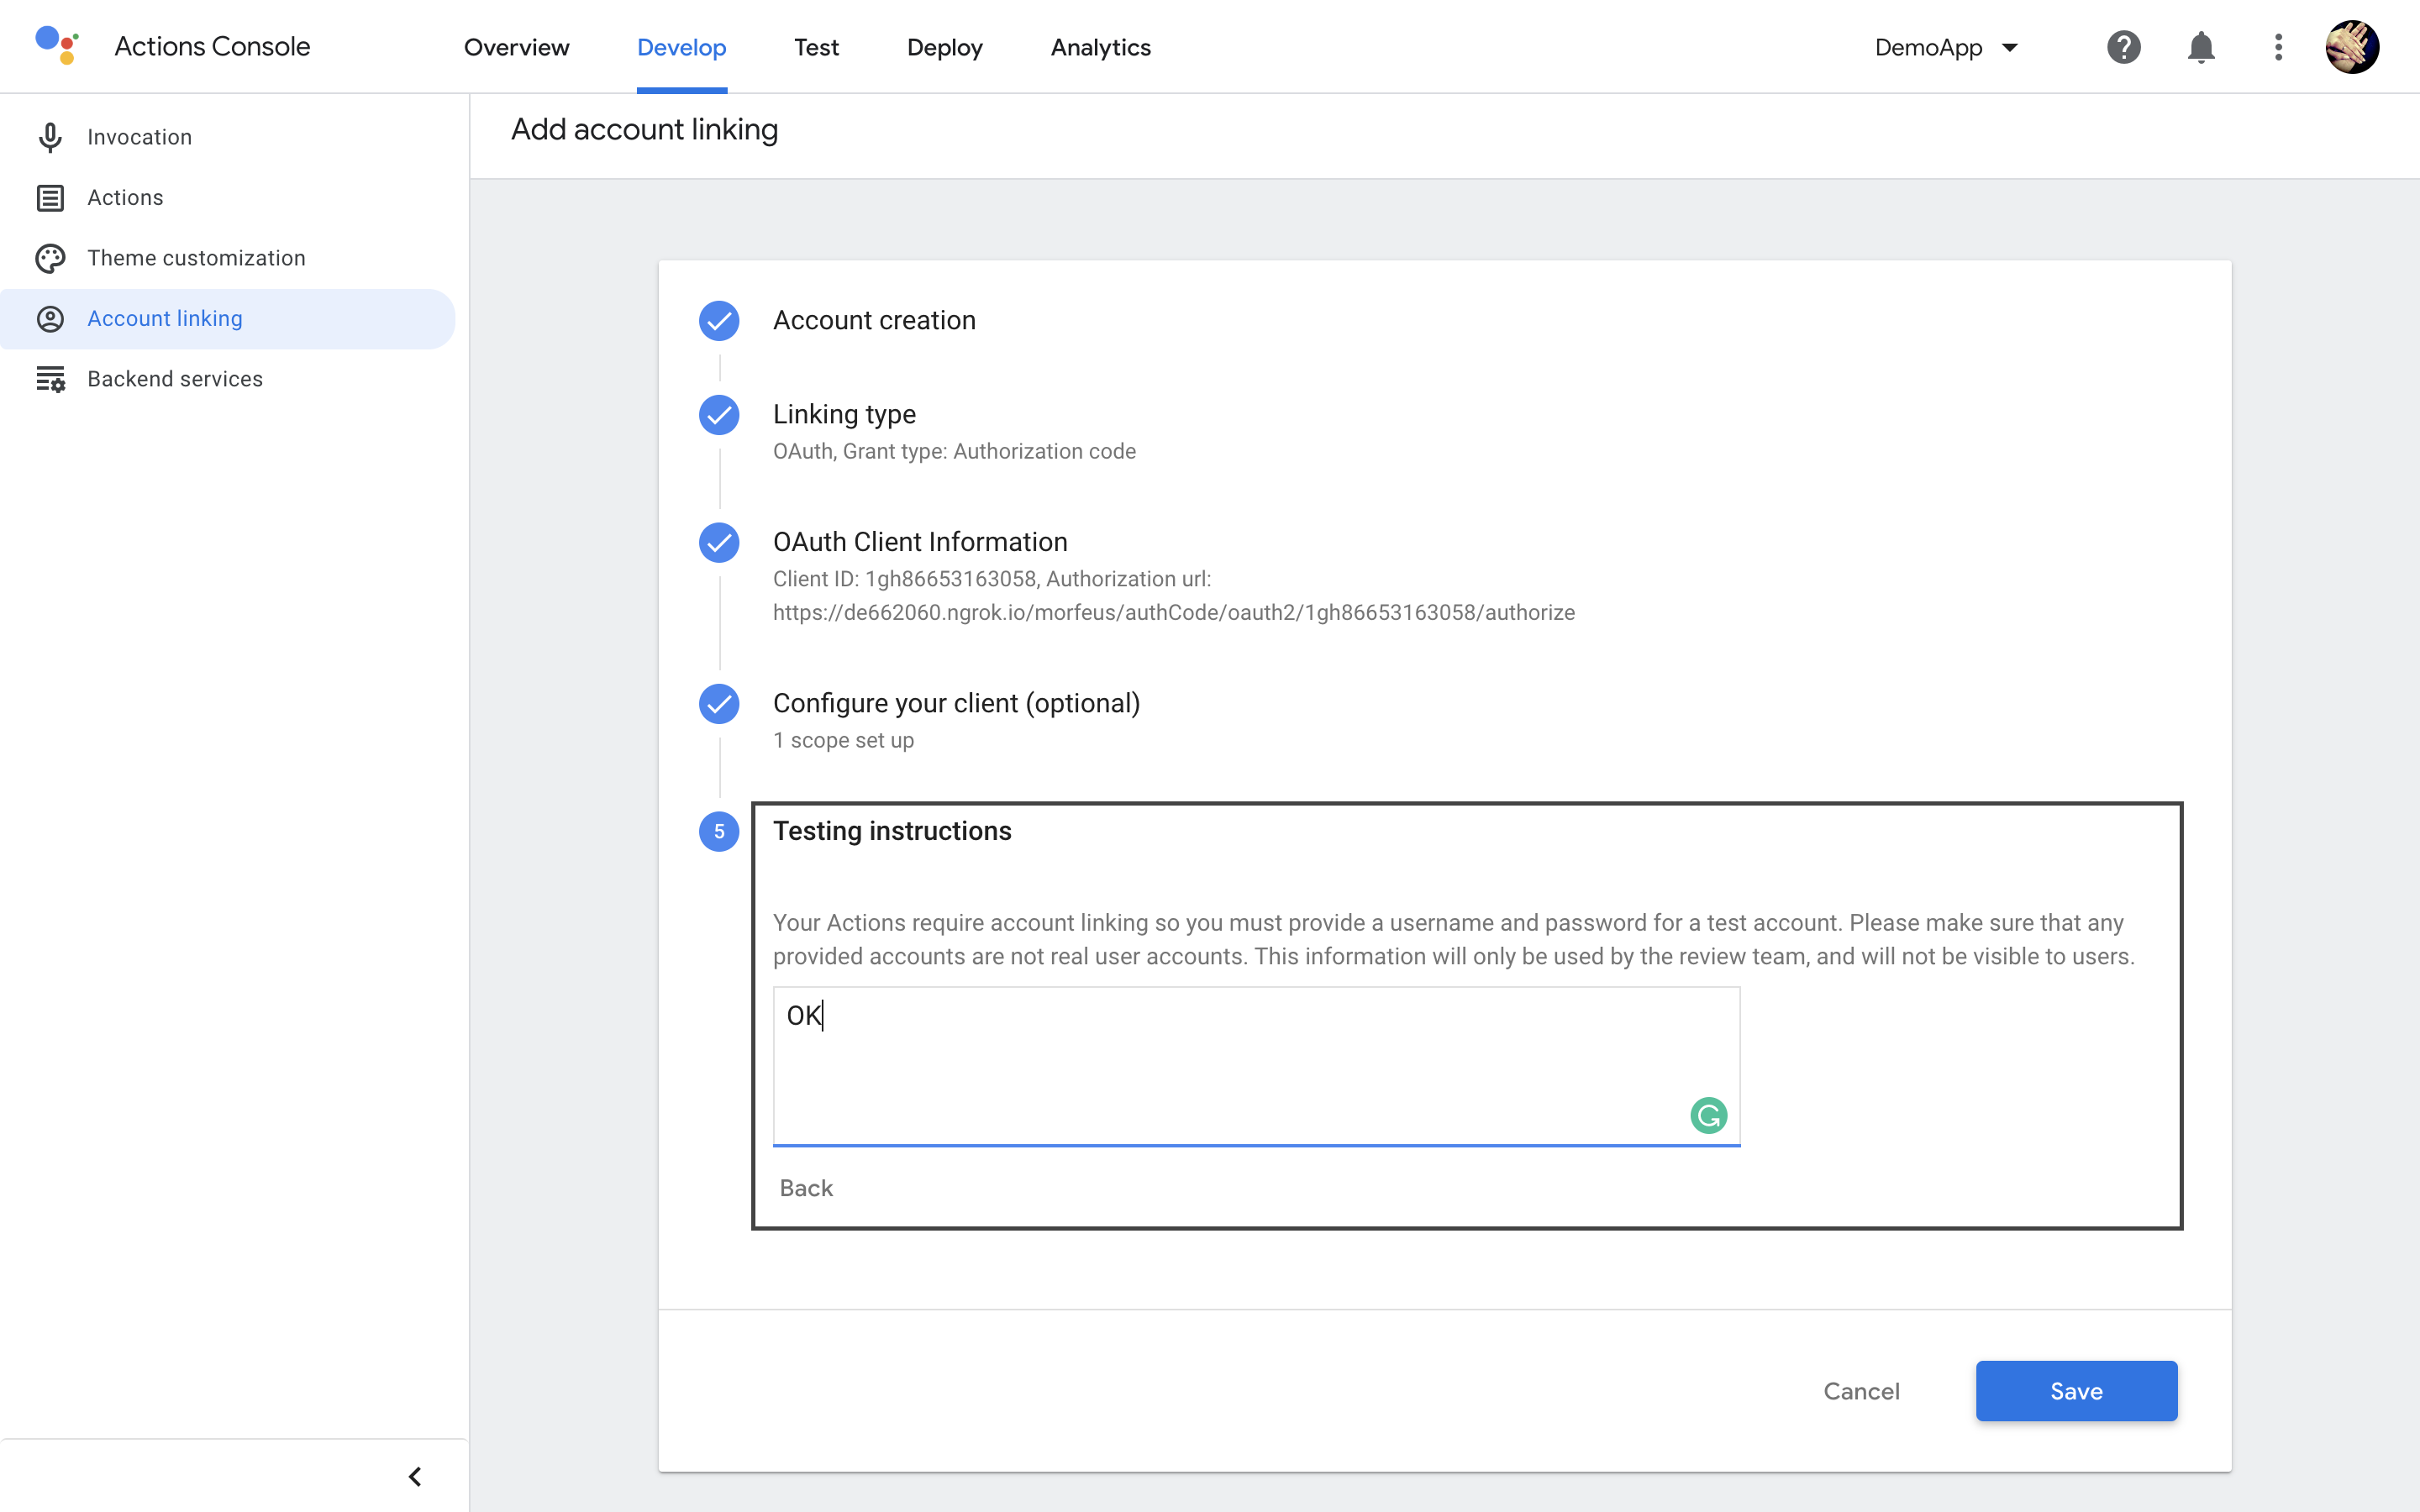
Testing Instructions, In this we need to provide some instructions regarding to test Google Assistant for the review team.
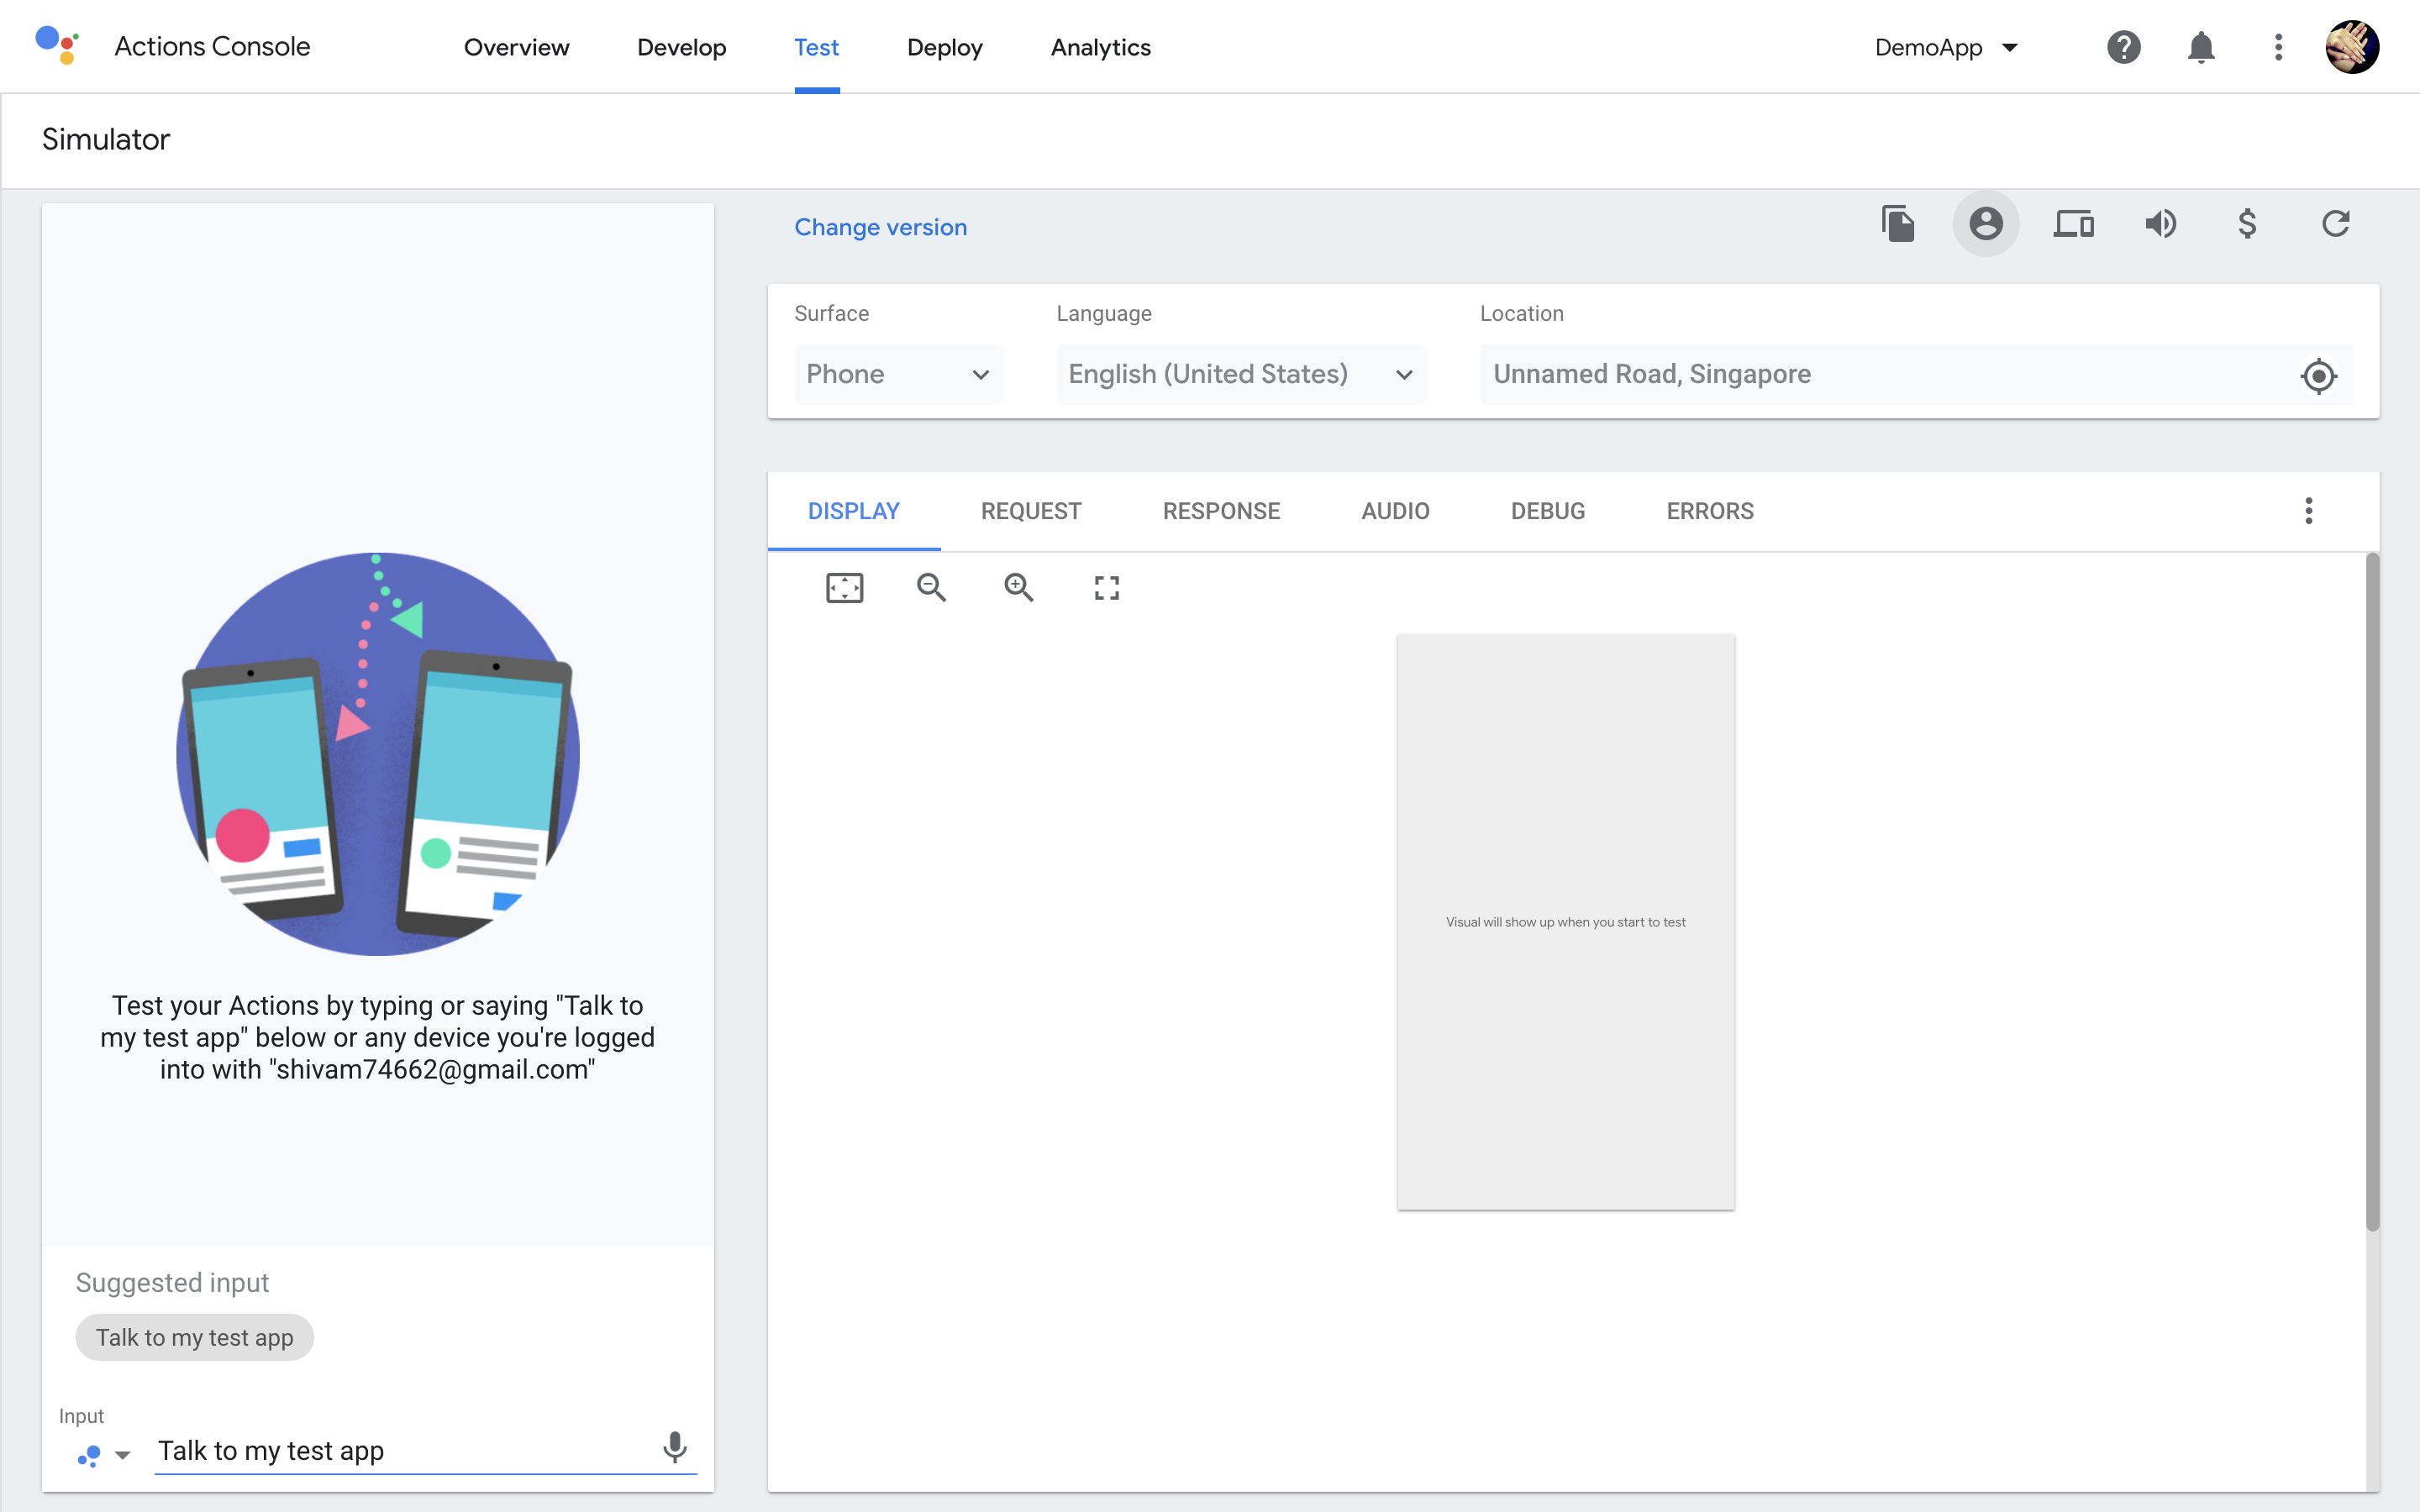
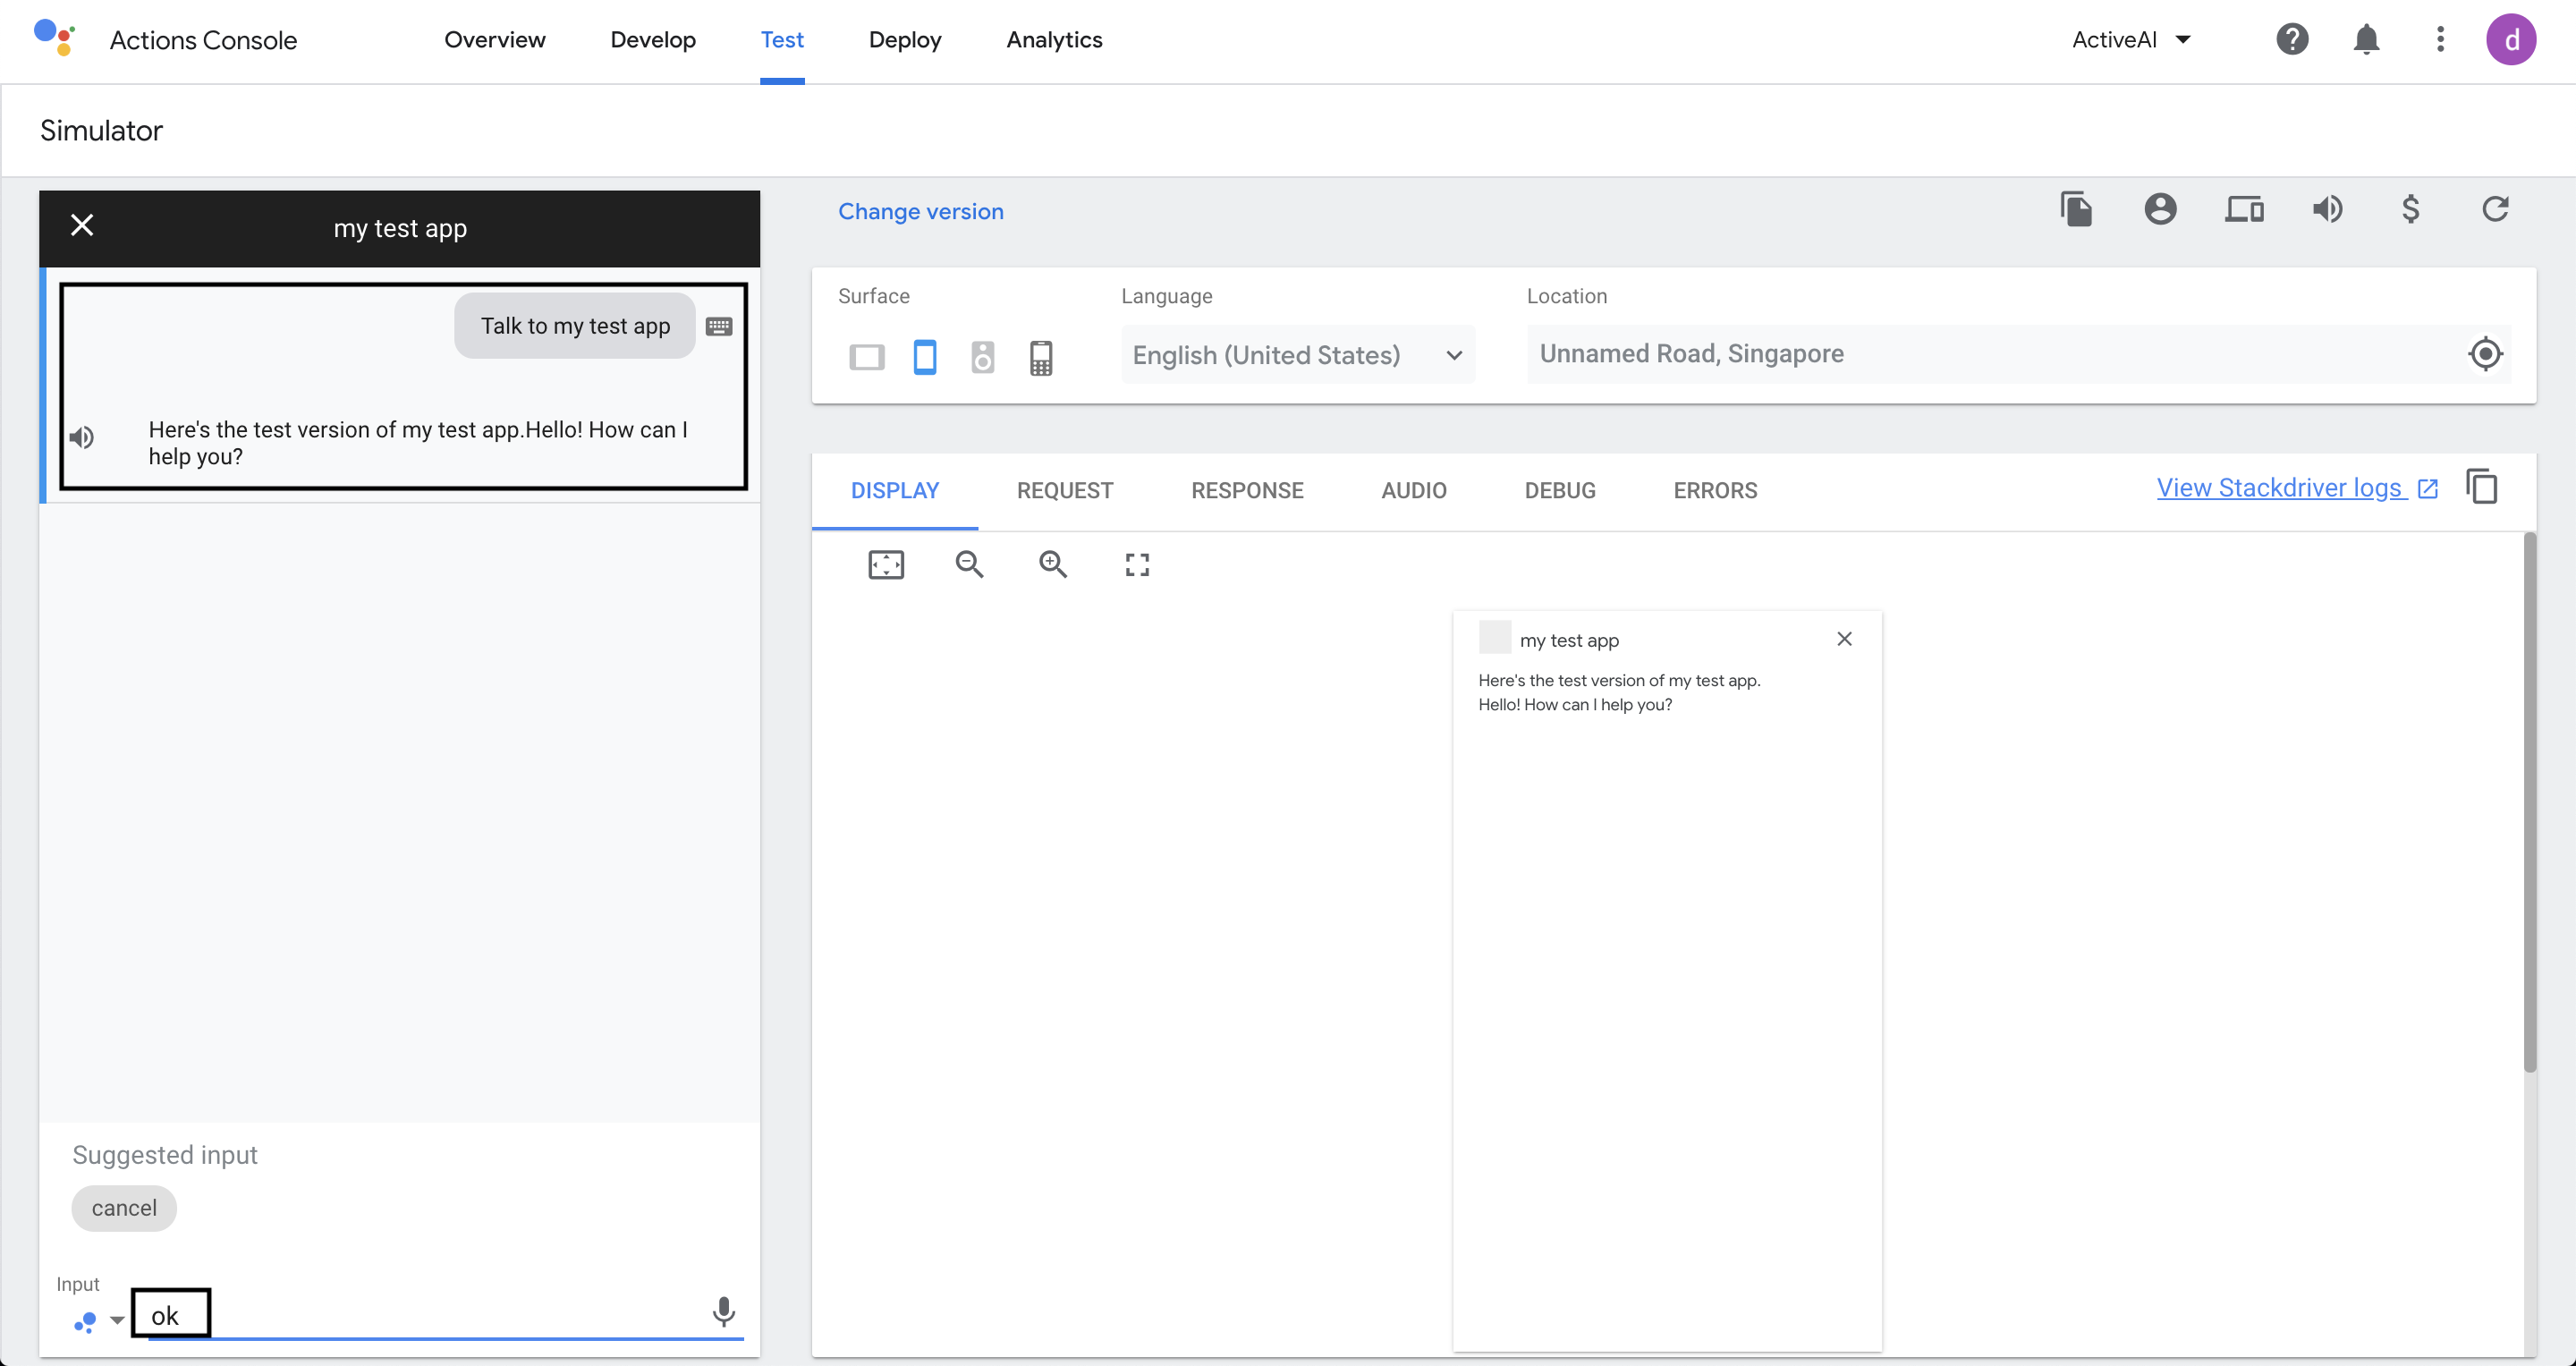
 Save all the Details and click on the Test Tab for testing Google Assistant on its Simulator.
Before we start testing we need to link the Account for conversation, In Simulator, write or click on "Talk to my test app" , so it will ask to link the account.
After that Webview will open for account linking.
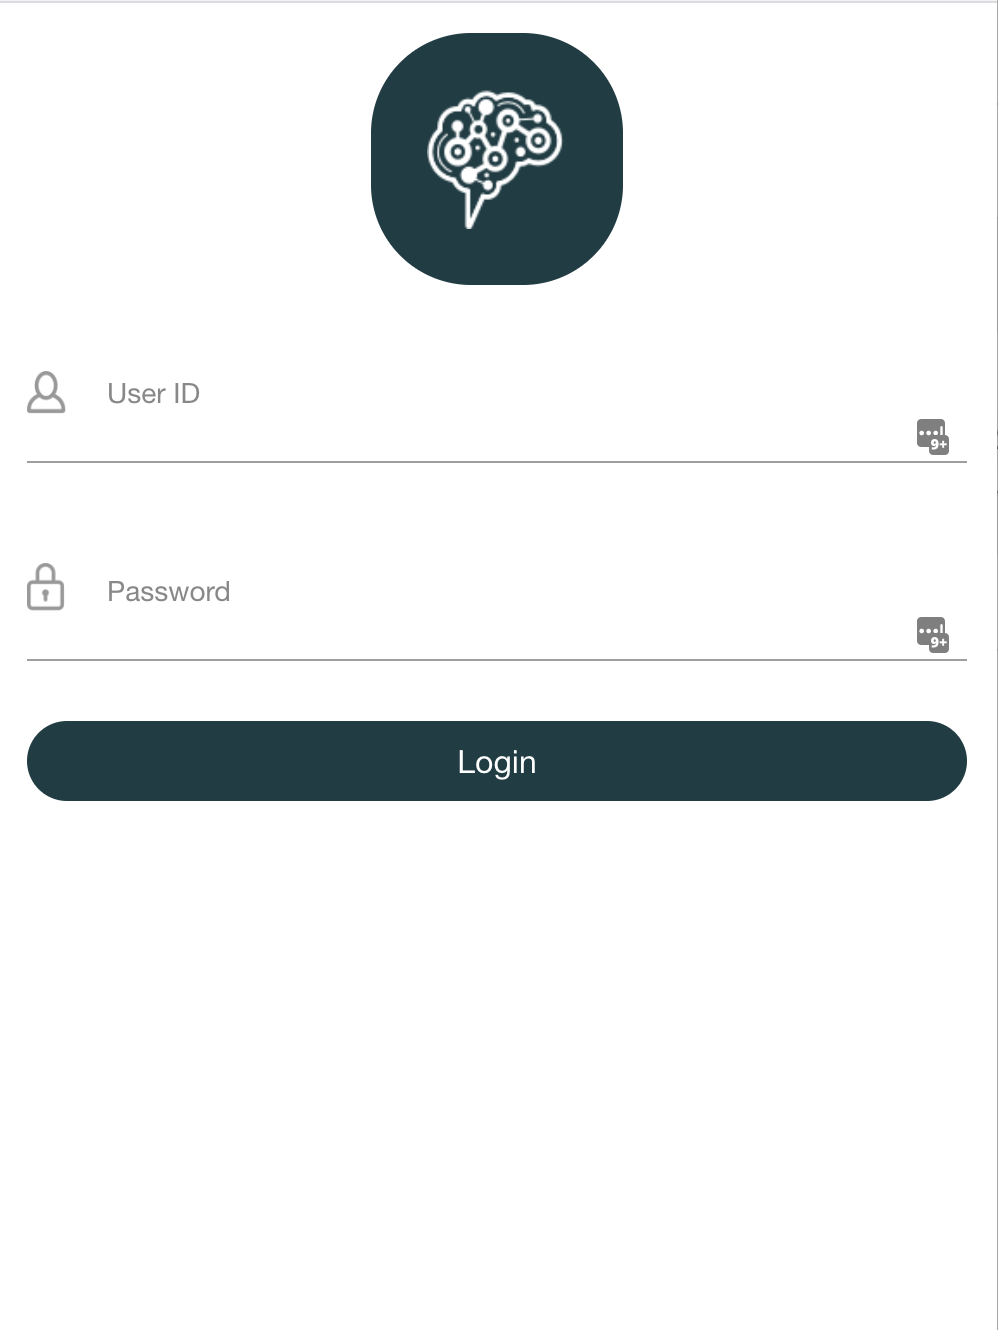
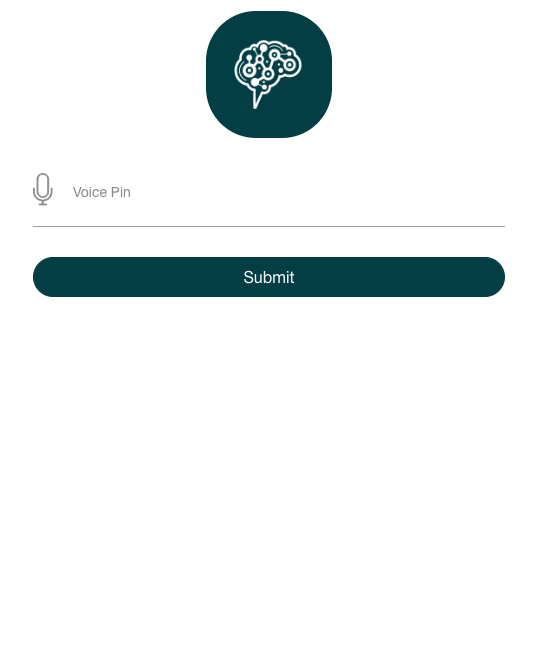
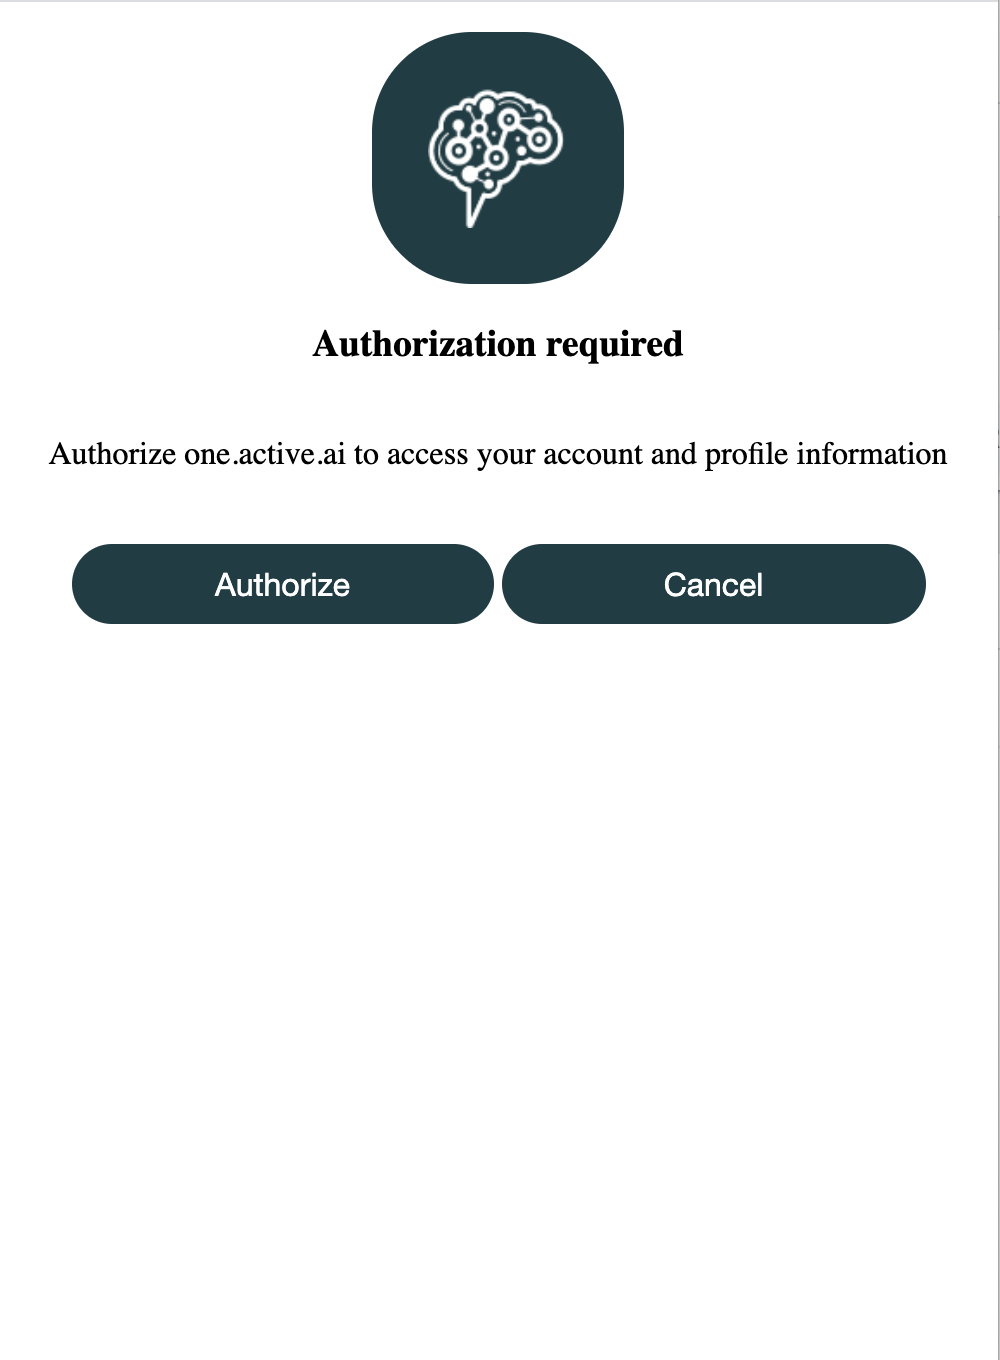
Customizing Account Linking for Google Assistant
For Google Assistant to work, account linking is a mandatory step as a part of the setup process.
The account linking consists of Login, which actually calls the Login API which is being forked and integrated from the RB Stub Bank Integration code.
If you want to customize the Account Linking steps/screen, please clone the code from the path given below and do the required changes.
The assumption is that this customized code will still call the Custom API integrated code which is forked from here
To call your integrated code. Please refer here.
Alexa
One Active Configurations
- Go to your one account and under channels tab, click on Alexa settings icon.
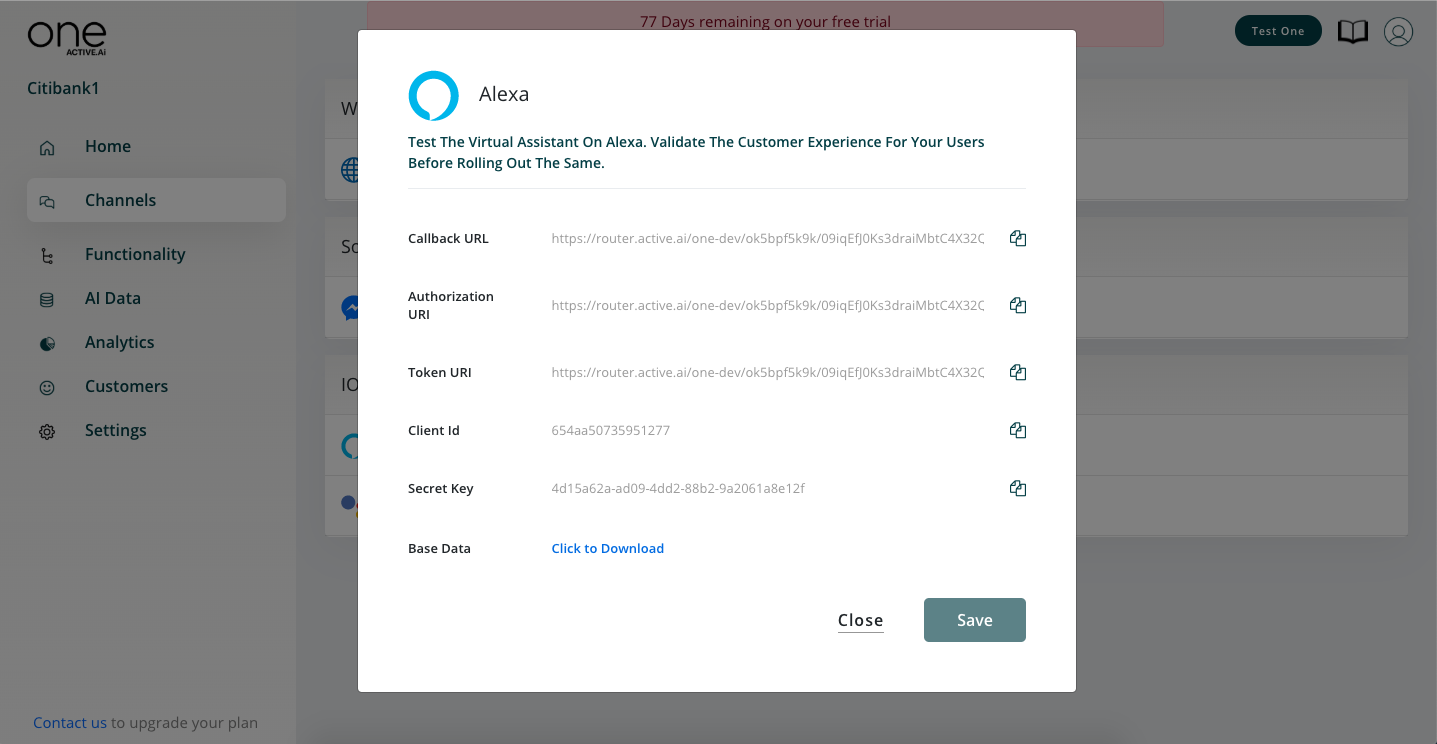
Download the base data.
For Oauth configuration refer Oauth documentation.
Amazon Developers Configurations
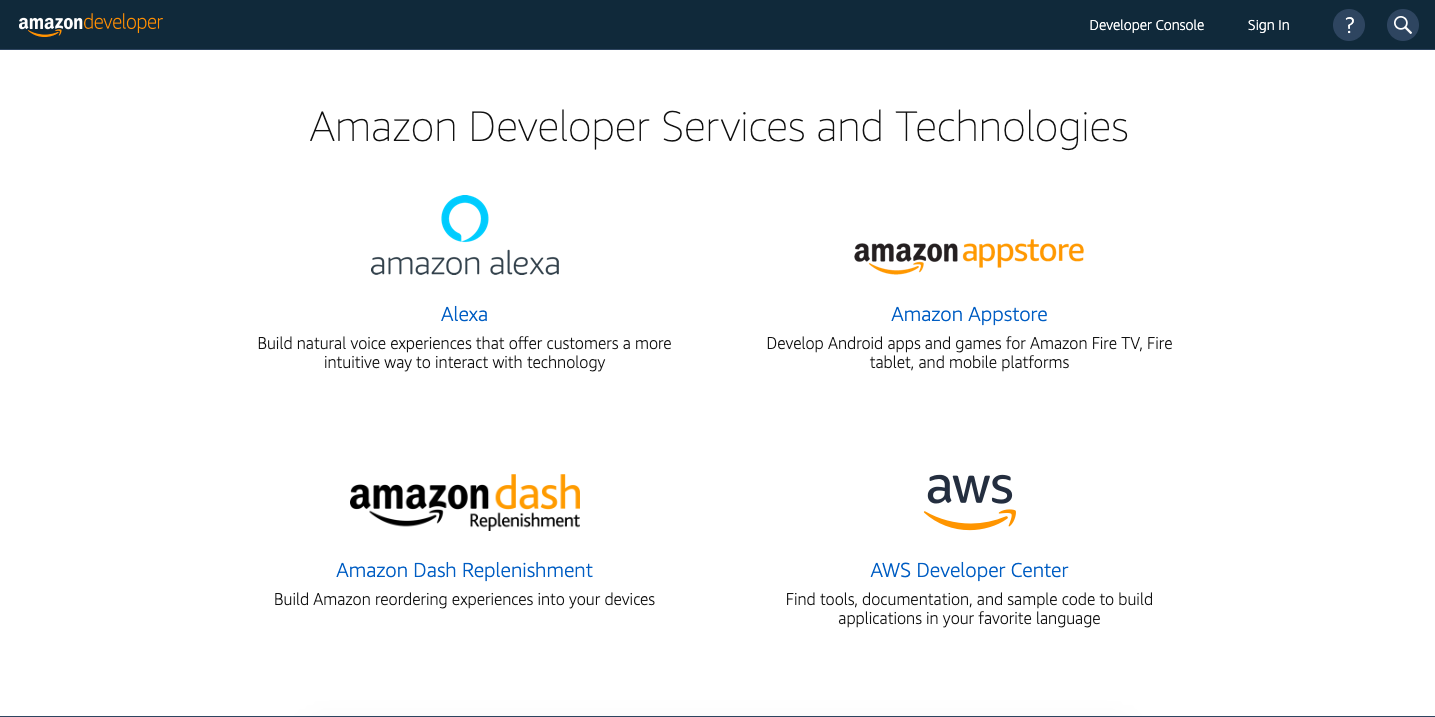
Create an account on Amazon Developer here and click on amazon alexa.
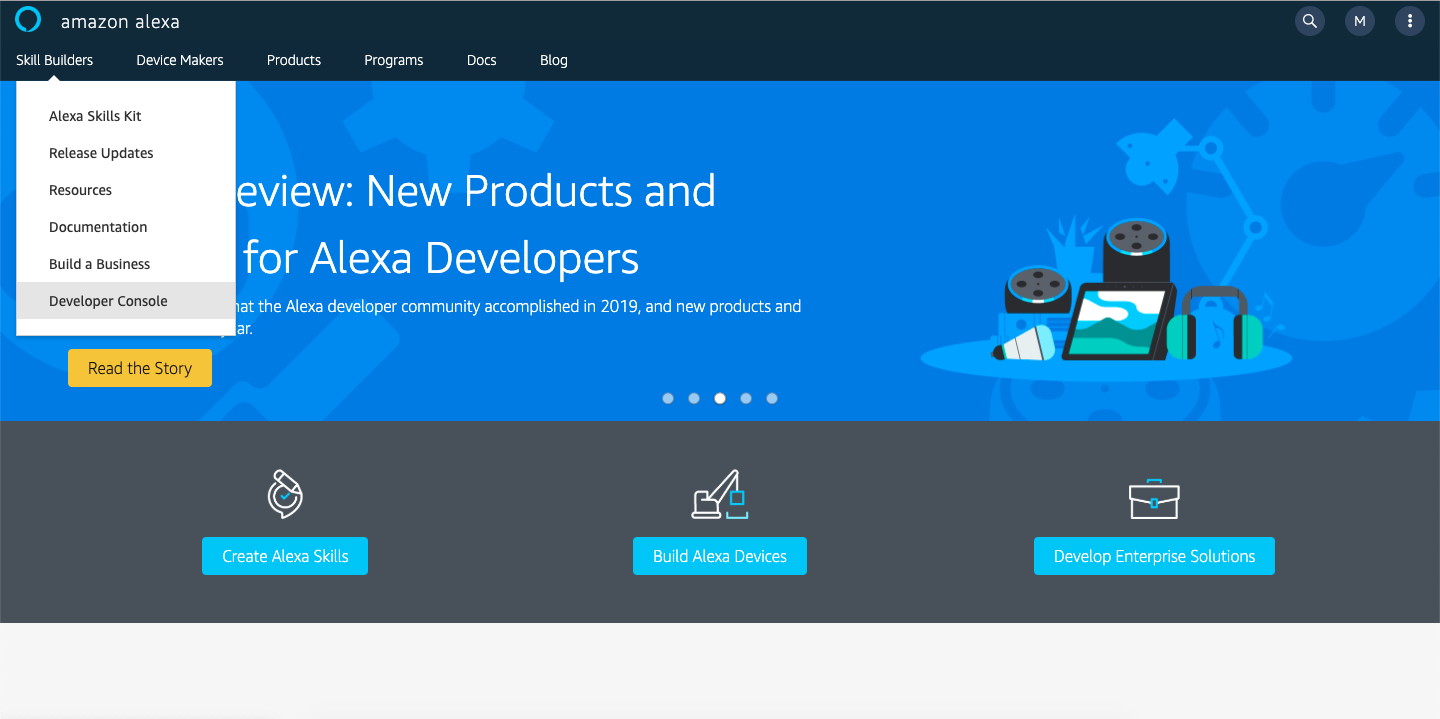
Under Skill Builders tab go to Developer Console.
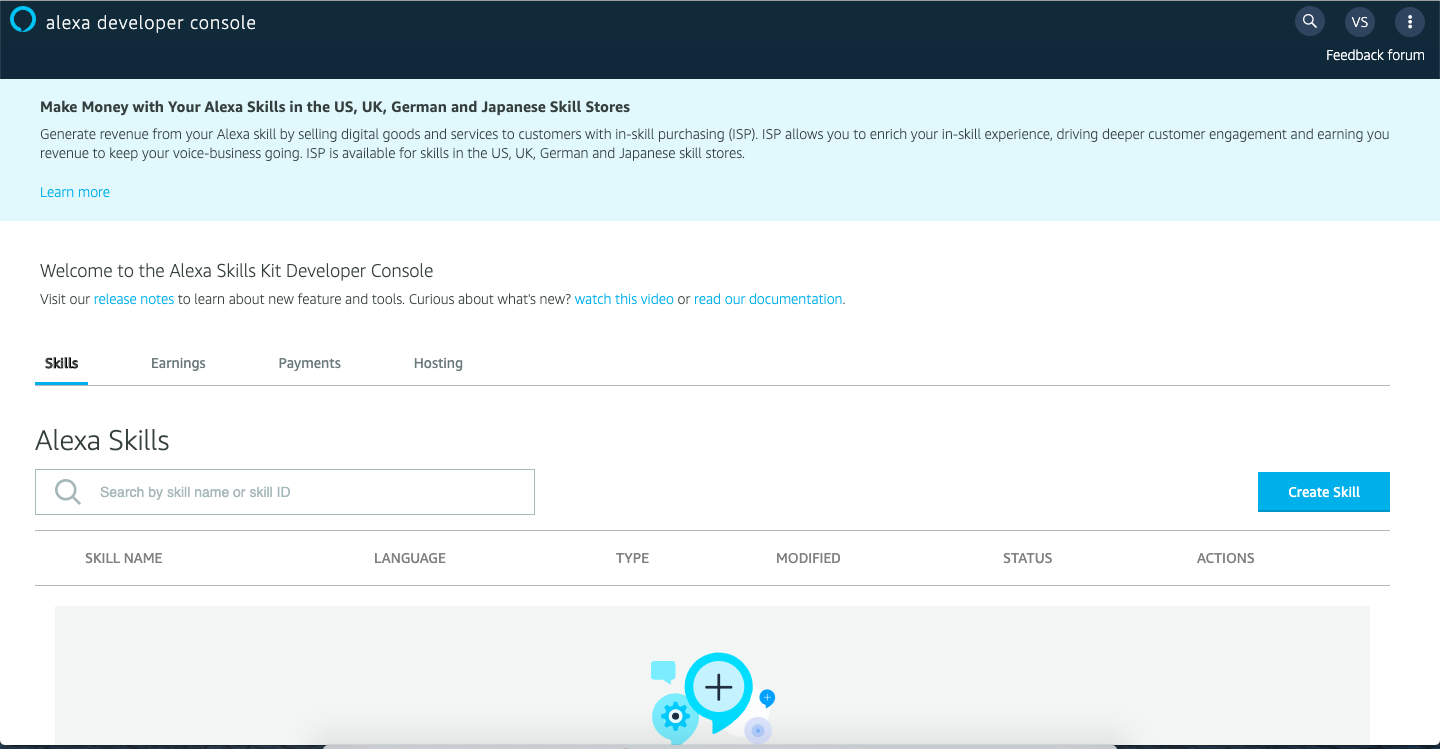
Under Developer Console you can create a Alexa Skill.
Provide skill name and select language, model and method of hosting skill will be selected by default.
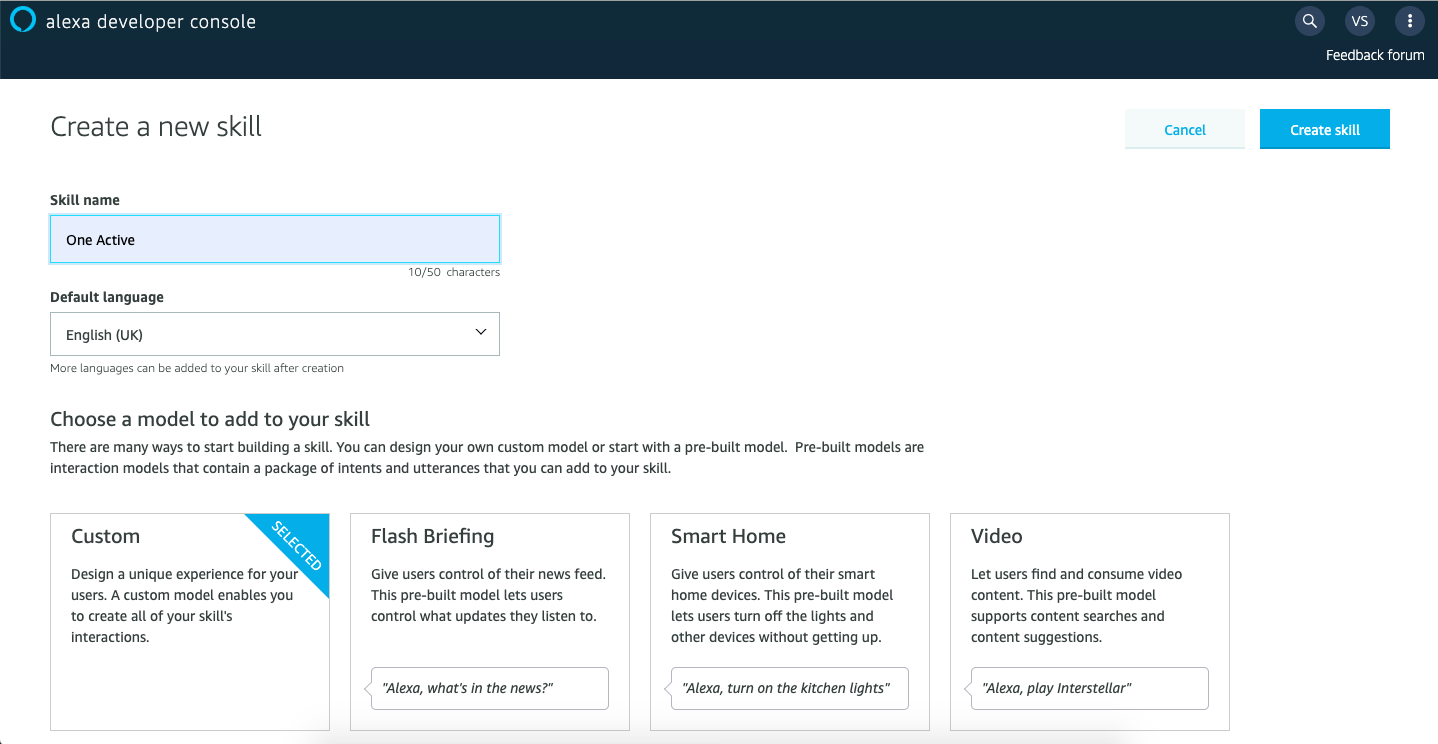
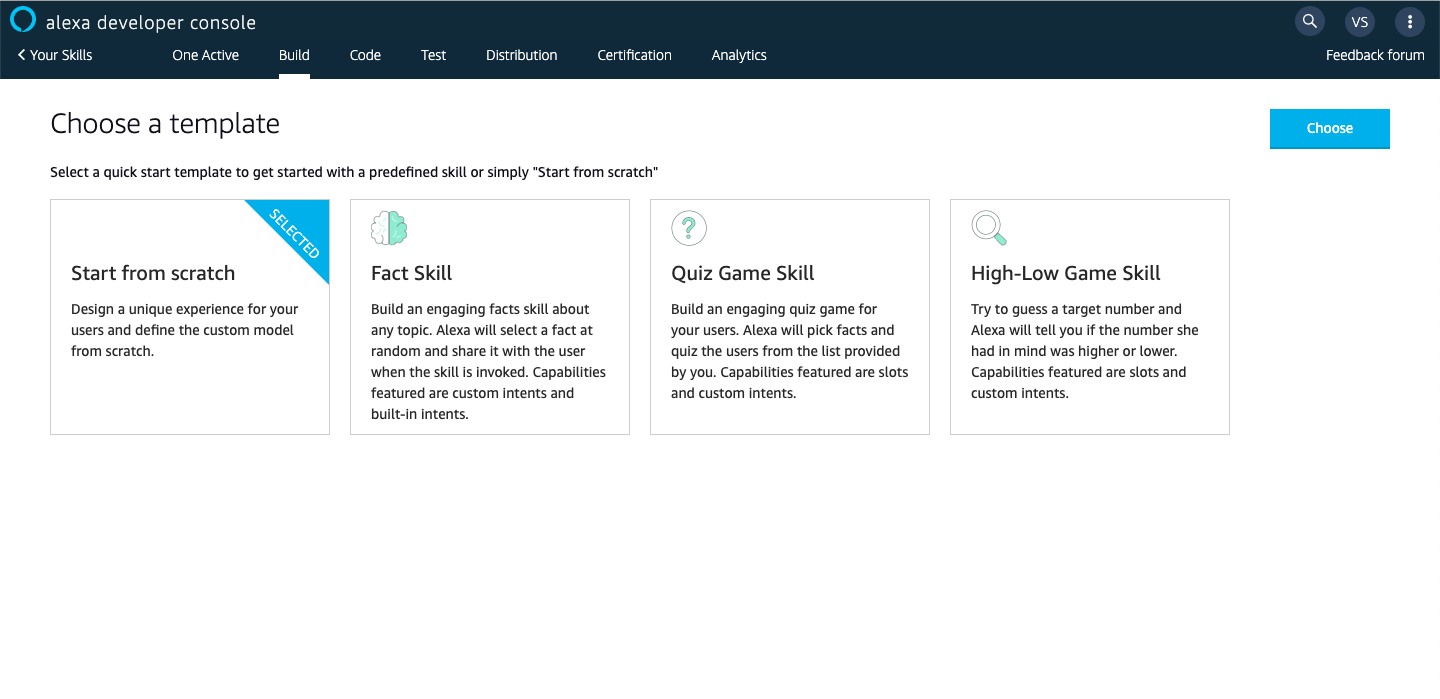
Select start from scratch template.
Open JSON Editor, drag and drop the downloaded base data file.
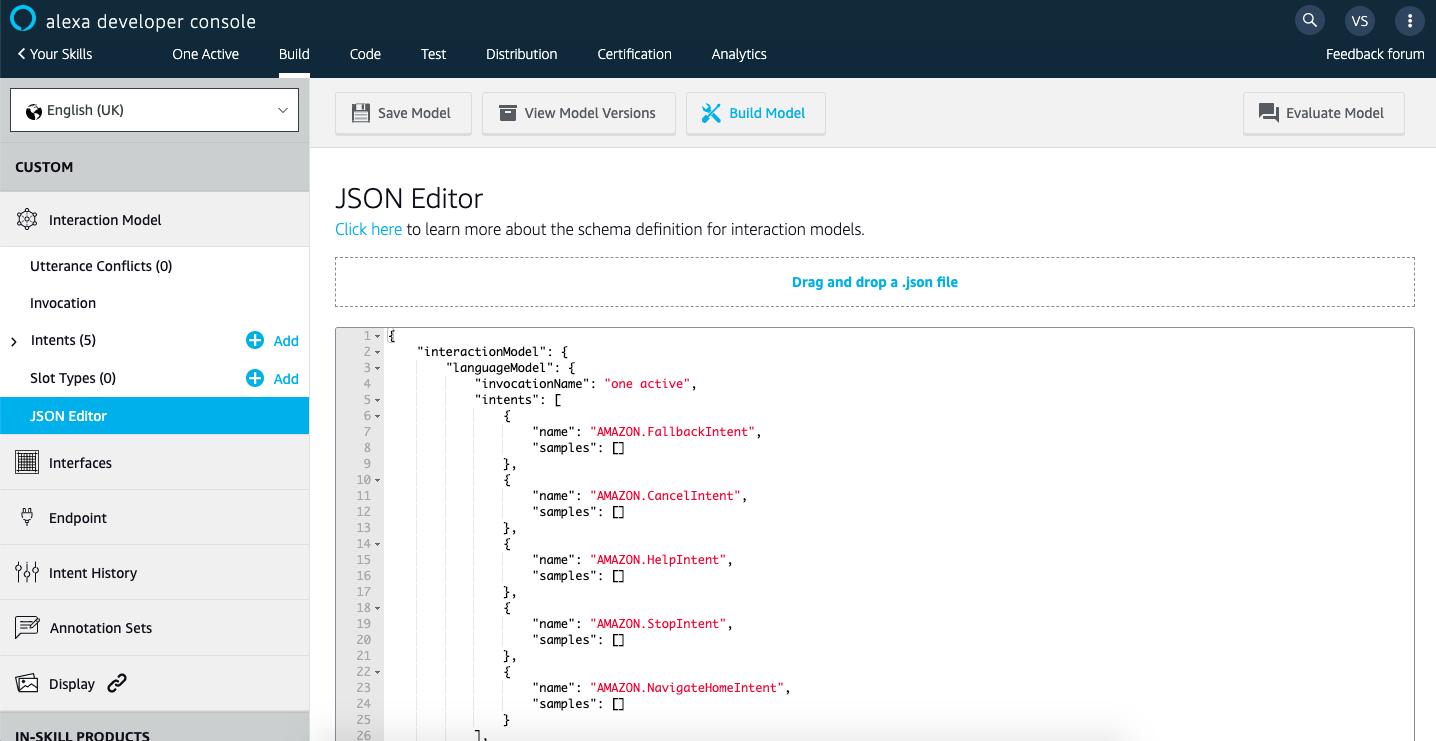
Now provide "invocation name" in your json editor as shown below if you want to change the invocation name. Make sure you are using unique invocation text for each of your skills and save the model.
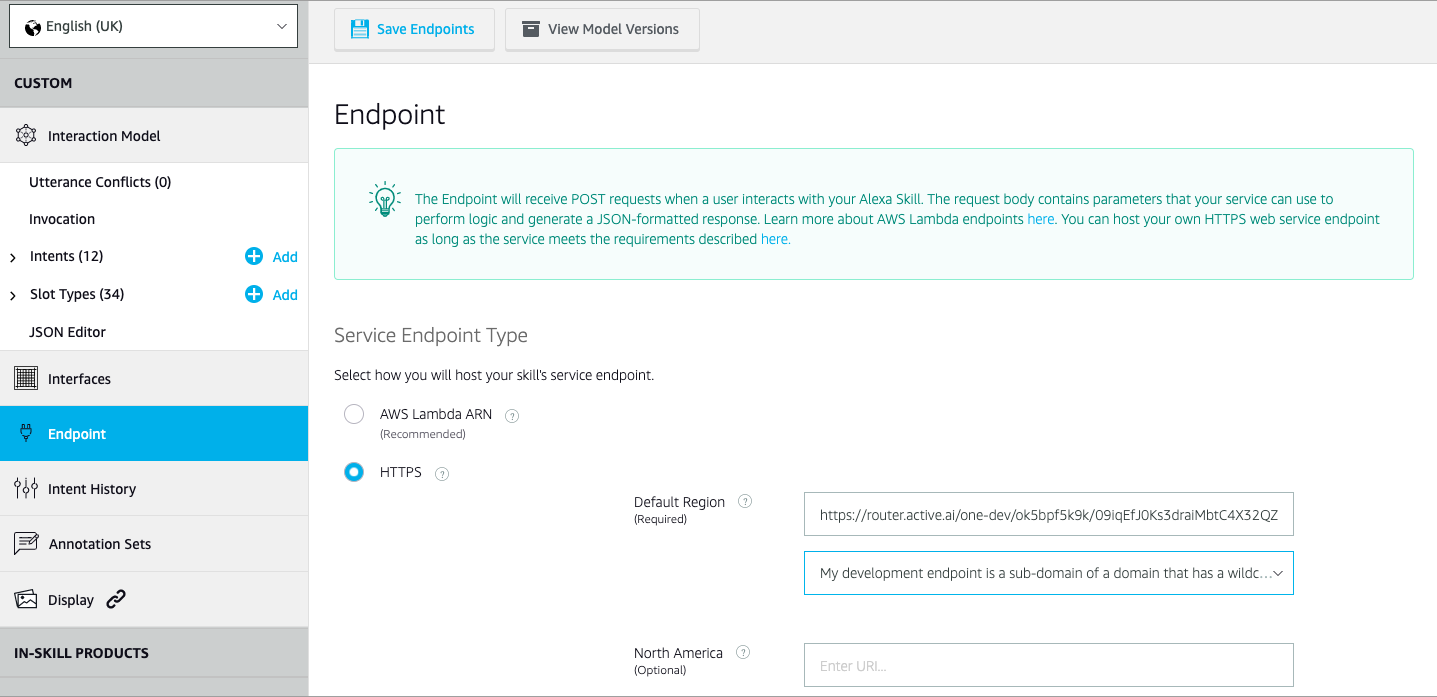
Now we will set up an endpoint for your skill. To proceed to click on endpoint below JSON Editor and select HTTPS.
To finish the endpoint setup, copy the callback URL from your one active account as shown in one active configuration.
You can find one dropdown list followed by an endpoint input box, select options listed below and leave the remaining fields blank as shown in the screenshot and save endpoint. "My development endpoint is a sub-domain of a domain that has a wildcard certificate from a certificate authority".
Select the Account Linking option and enable "Do you allow users to create an account or link to an existing account with you?"
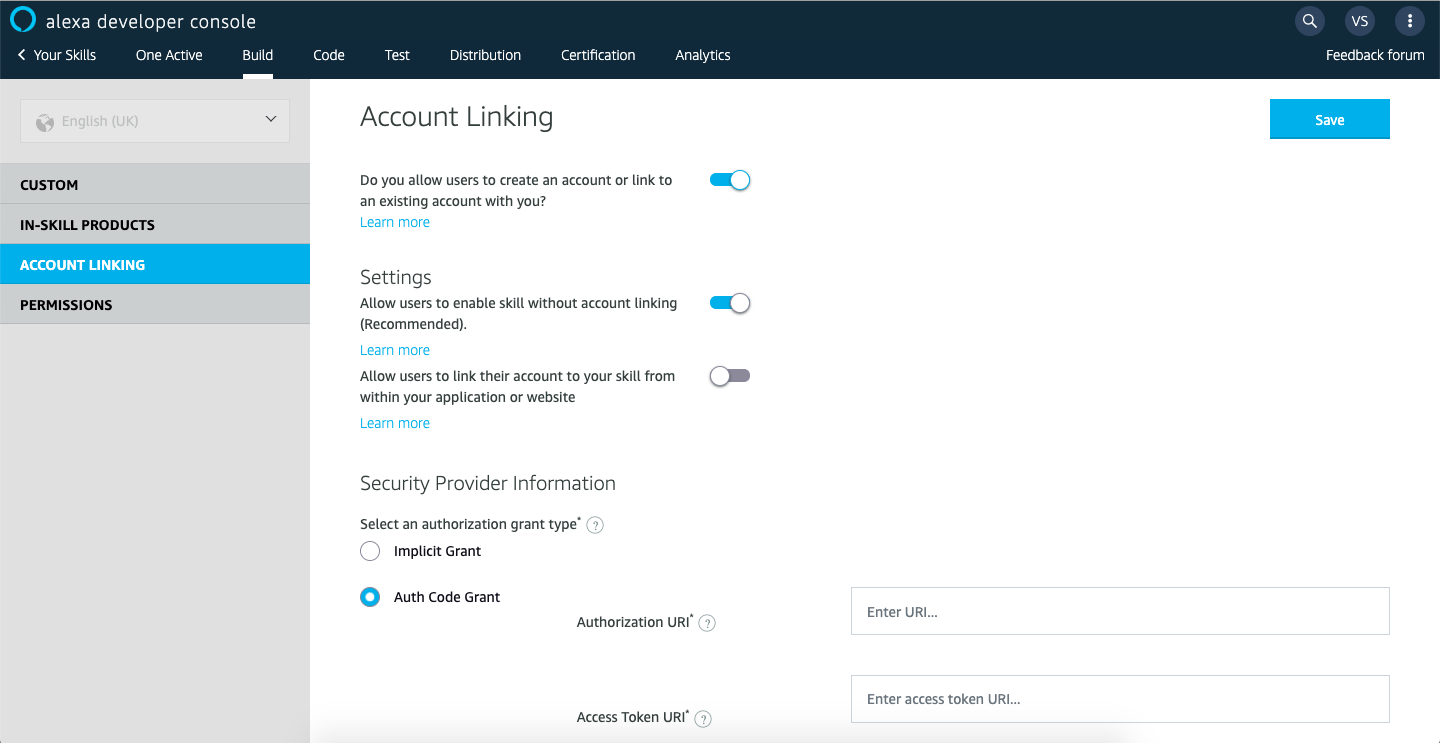
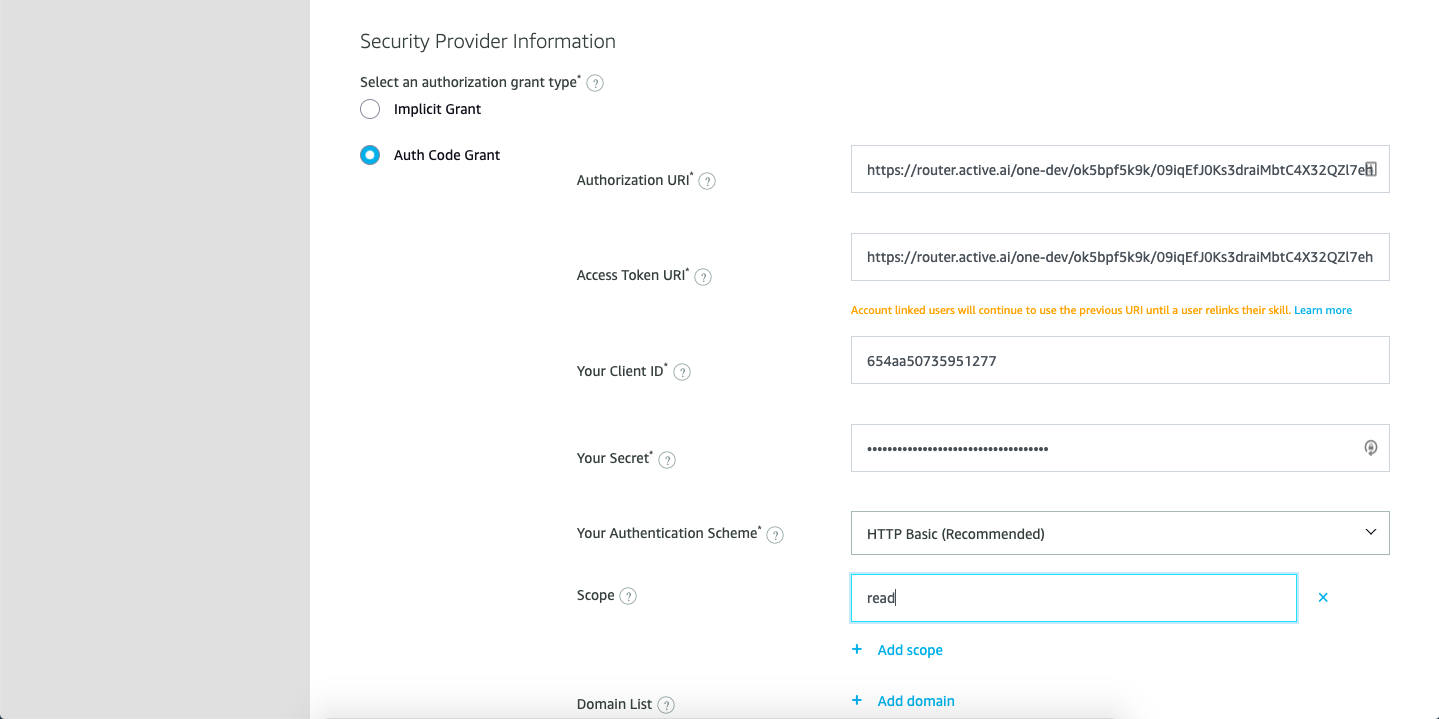
Select Auth Code Grant in Authorization Grant Type.
Copy all URLs present in One Active as shown in One Active Configuration and paste accordingly.
Add scope as "read" and save your changes.
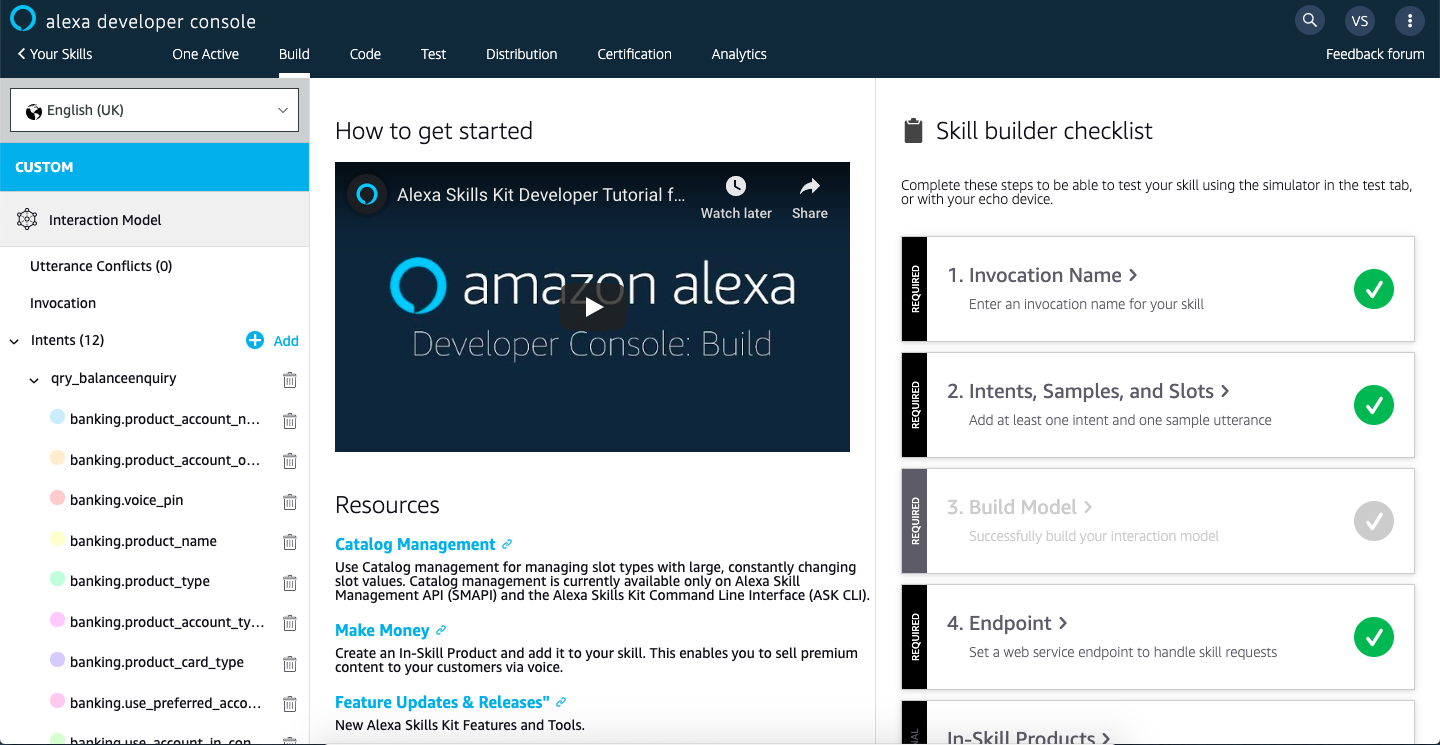
Now navigate to the Skill Builder page by clicking the custom navigation segment bar and build your model.
Enabling Alexa Skill
Visit Amazon Alexa here and click on Skills.
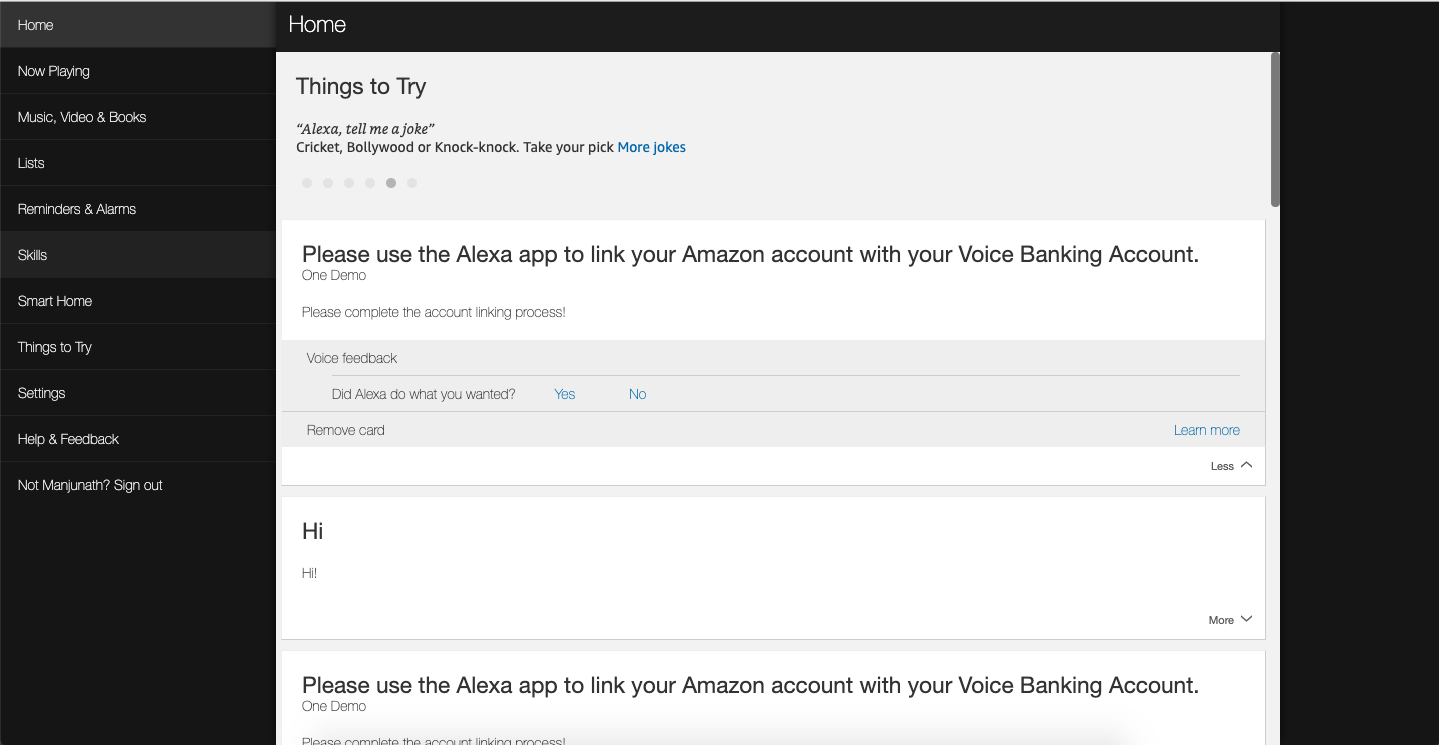
Now click on your skills and go to Dev Skills.
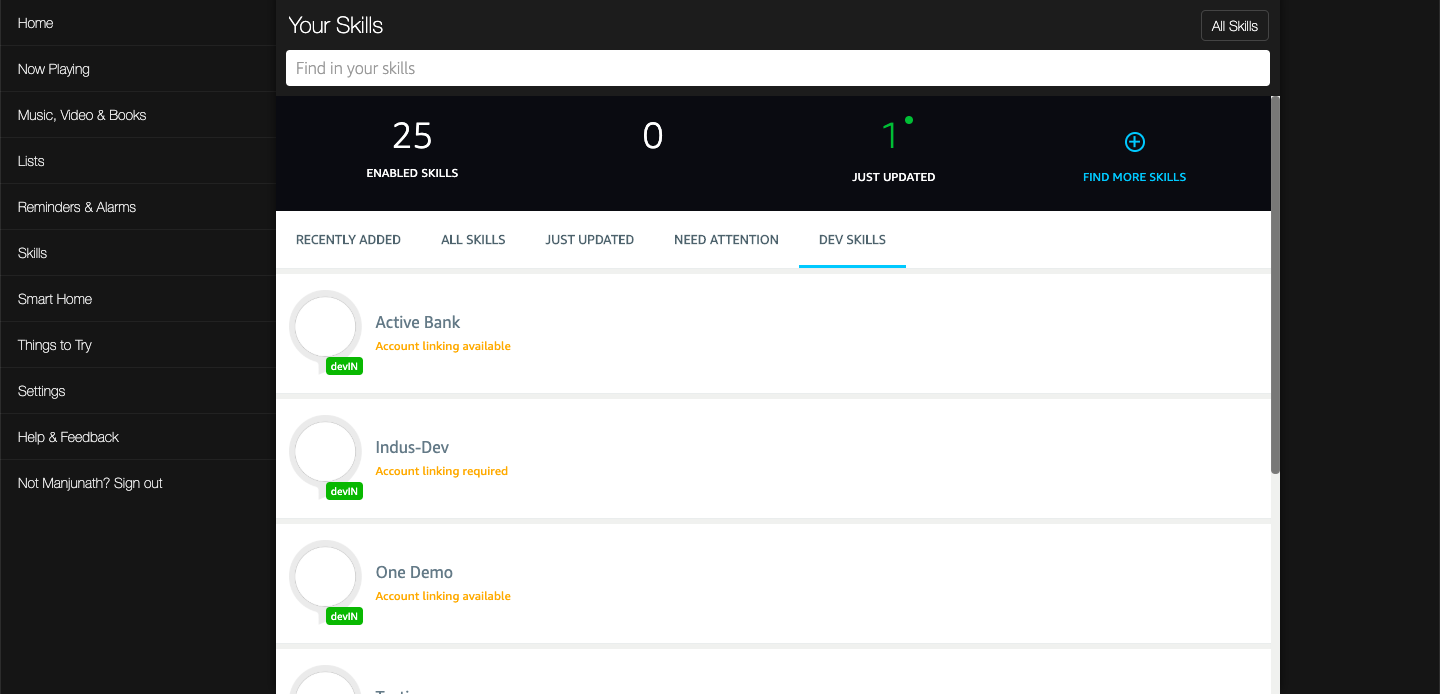
Enable your skill by clicking "Enable" button and go to Settings.
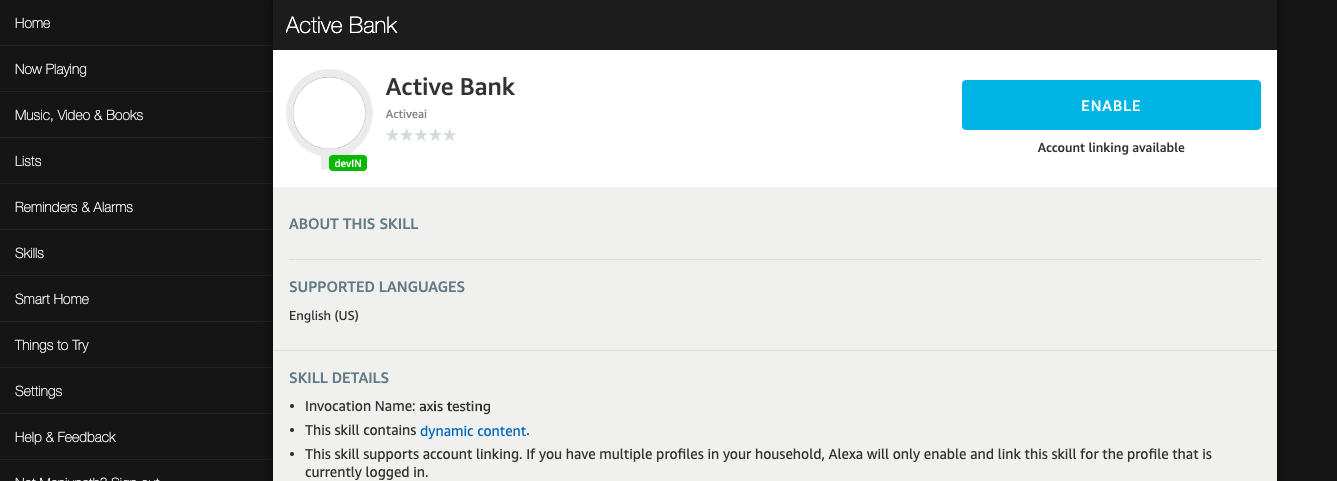
Click on Account Linking and provide the user name, password and voice pin.

Go back to your skill on amazon developers page and click on Test.
Provide the invocation name for your skill and test your functionality.
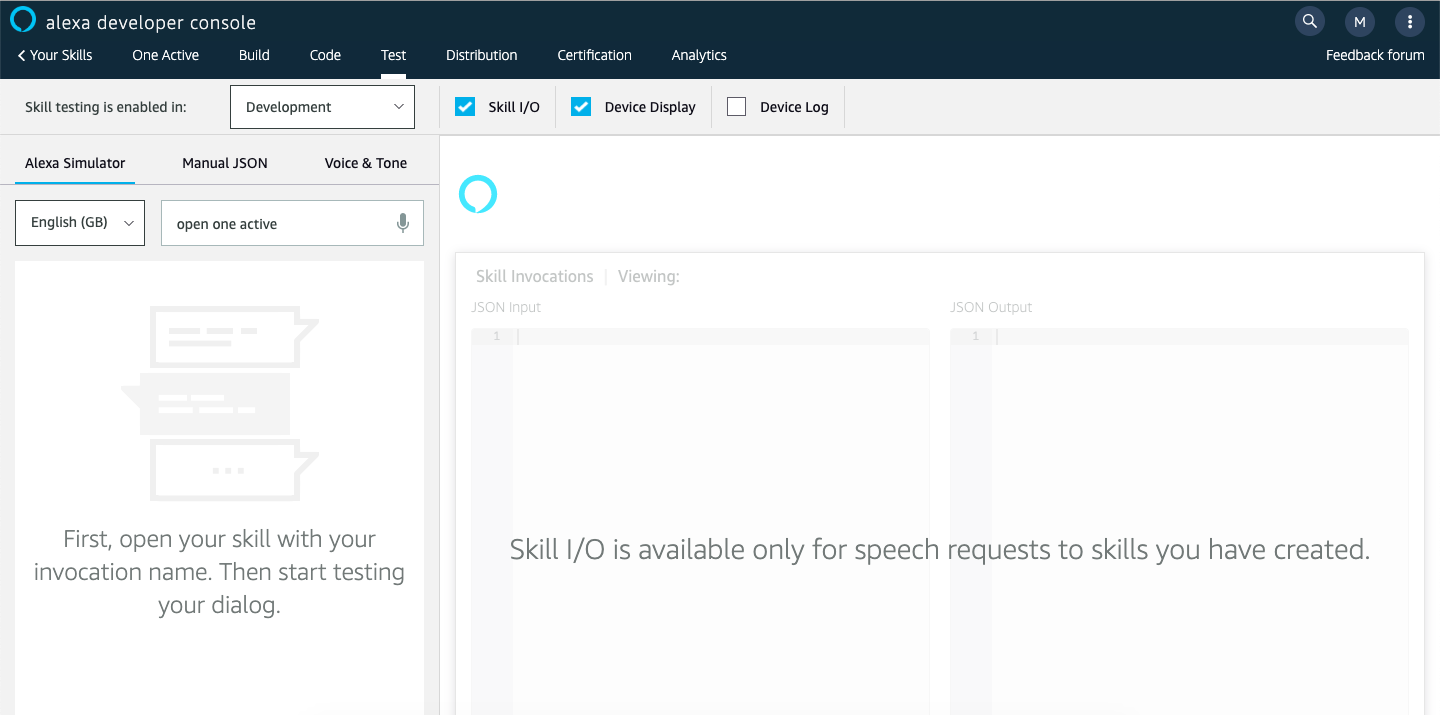
After that Webview will open for account linking.


Customizing Account Linking for Alexa
For Alexa to work, account linking is a mandatory step as a part of the setup process.
The account linking consists of Login, which actually calls the Login API which is being forked and integrated from the RB Stub Bank Integration code.
If you want to customise the Account Linking steps/screen, please clone the code from the path given below and do the required changes.
The assumption is that this customized code will still call the Custom API integrated code which is forked from here
To call your integrated code. Please refer here
Functionality
Once you click ‘Functionality’ various services selected across products, will be displayed.
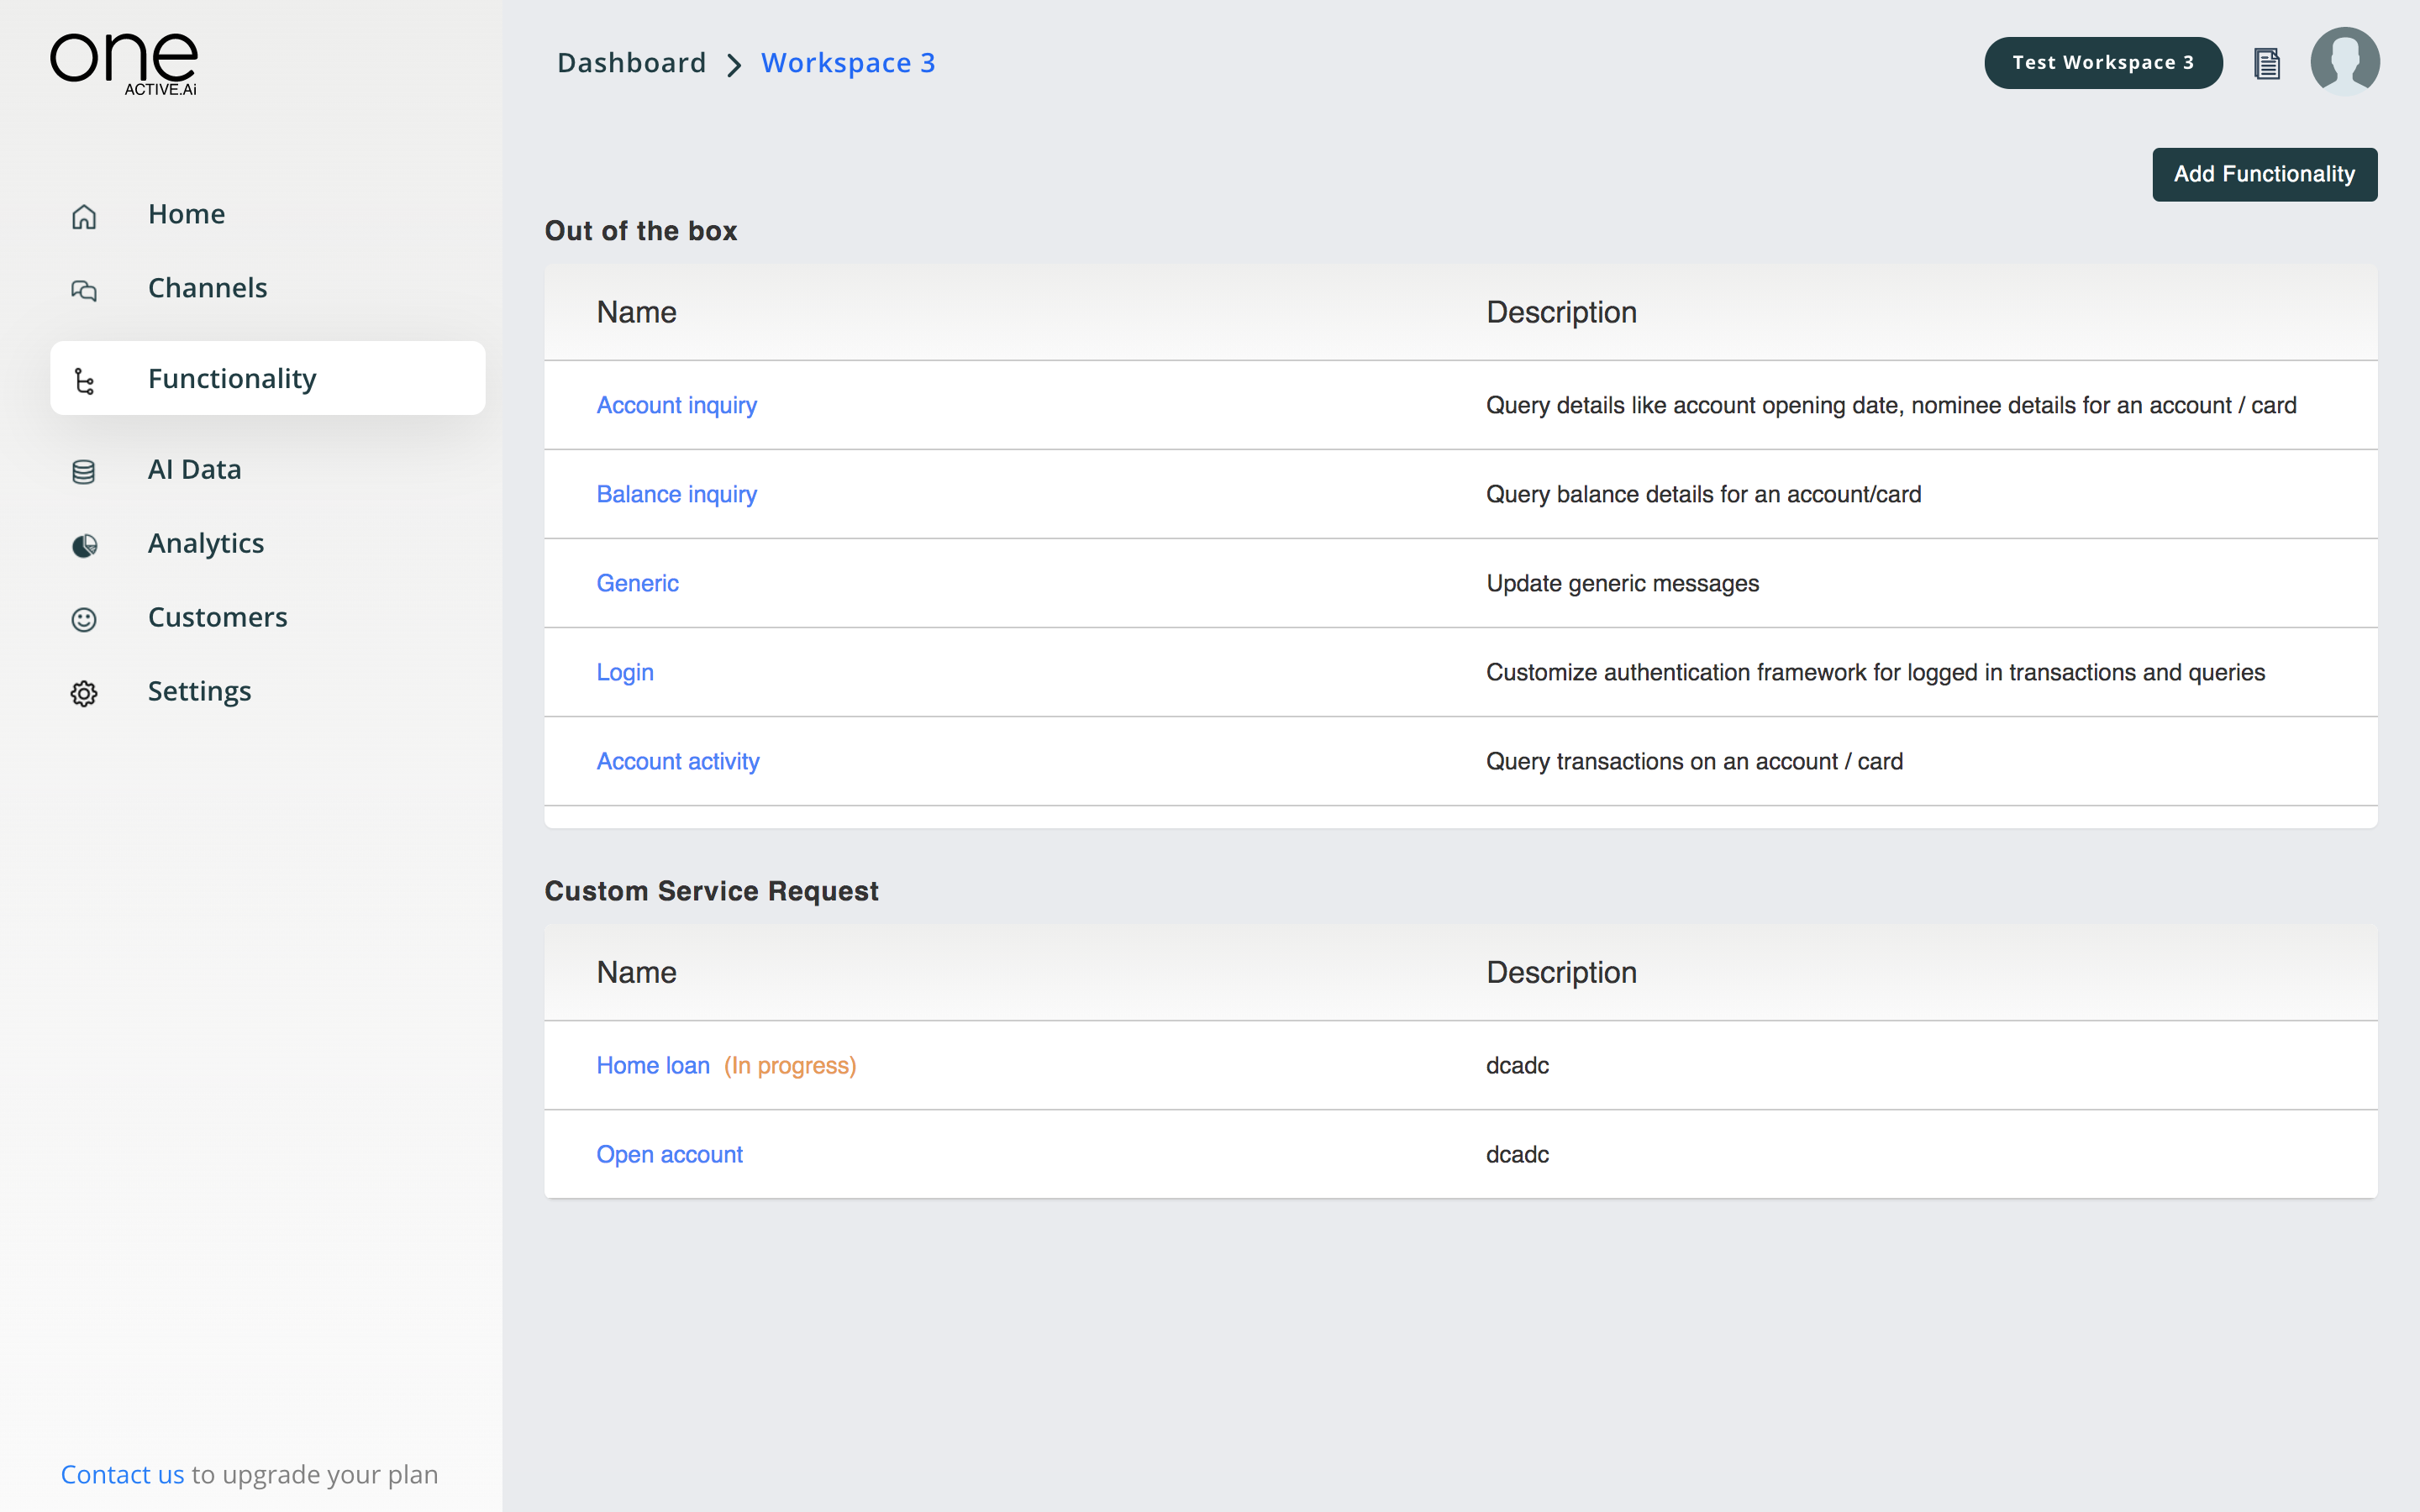
For each use case, a business user-friendly editor is available to manage various aspects of the use case. They are listed below
1.Definition
2.Configuration
3.Rules
4.Data
5.Fulfilment
6.Integration
7.Templates
8.Messages
Note: This can be performed for all applicable use cases one after another, and the user can test it out in real-time using the test AI agent feature.
OAuth
Configuration
Please follow this tutorial in order to configure OAuth2 properties in One Active. OAUTH config is specific to channel, if multiple channels are enabled then need to replicate the same configuration for each channel as detailed below.
Enable OAUTH
Go to Functionality → Login → Rules . Select the value for Login Policy to OAuth from the dropdown list.
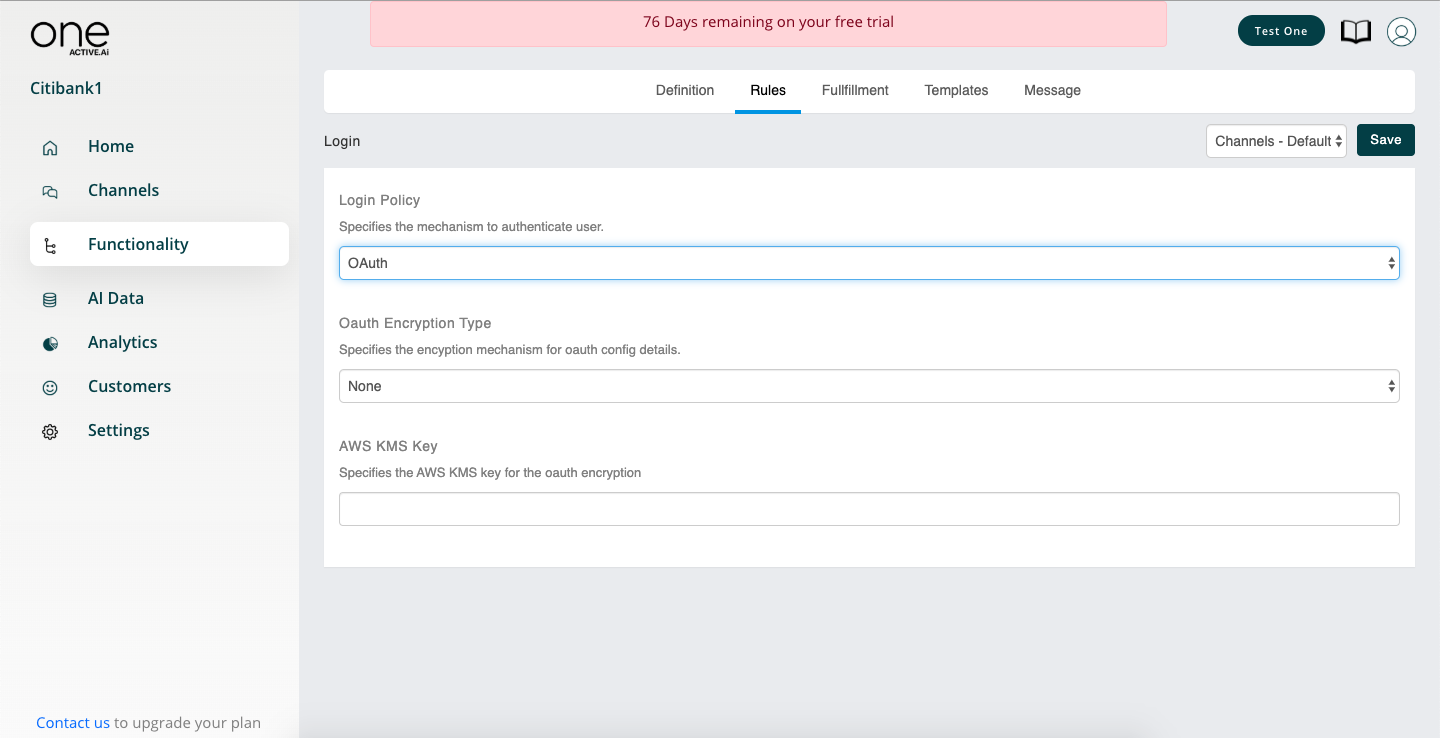
OAUTH config
- Head over to the channels, click on the icon next to channel's setting.
![]()
- As per standard OAuth protocols, set the correct client credentials into their respective fields under this page. Please update suitable values for the following
- Client Id
- Client Secret
- Authorization URI
- Access Token
- Profile URI
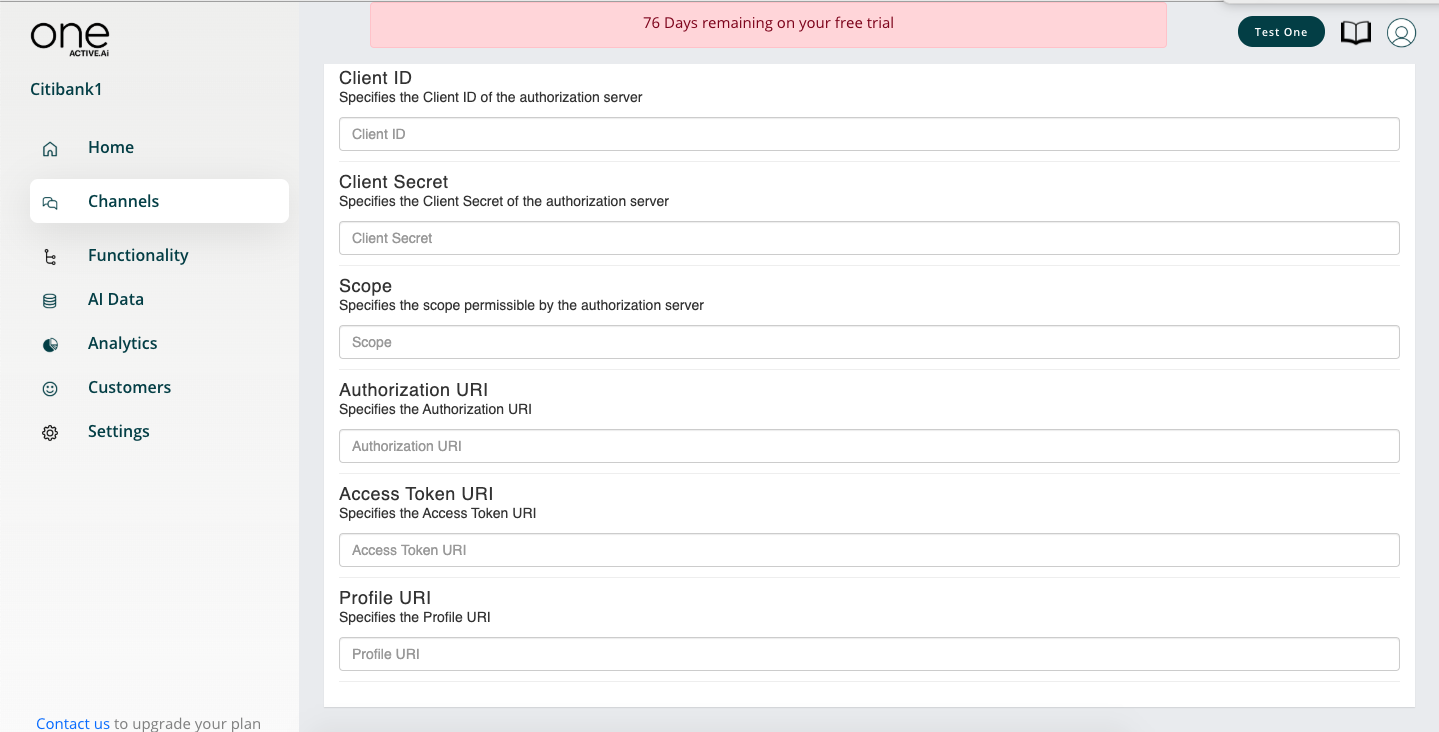
NOTE that these values should exactly match those set in the 3rd party auth server's table - OAUTH_CLIENT_DETAILS in its database against the said client id, otherwise the handshake will fail.
Definition
This is where the intent for the use case, channels applicable and type of fulfillment are defined. The intent is not editable for out of the box use cases. Fulfillment type can be the default, workflow or template-based which is discussed in subsequent sections.
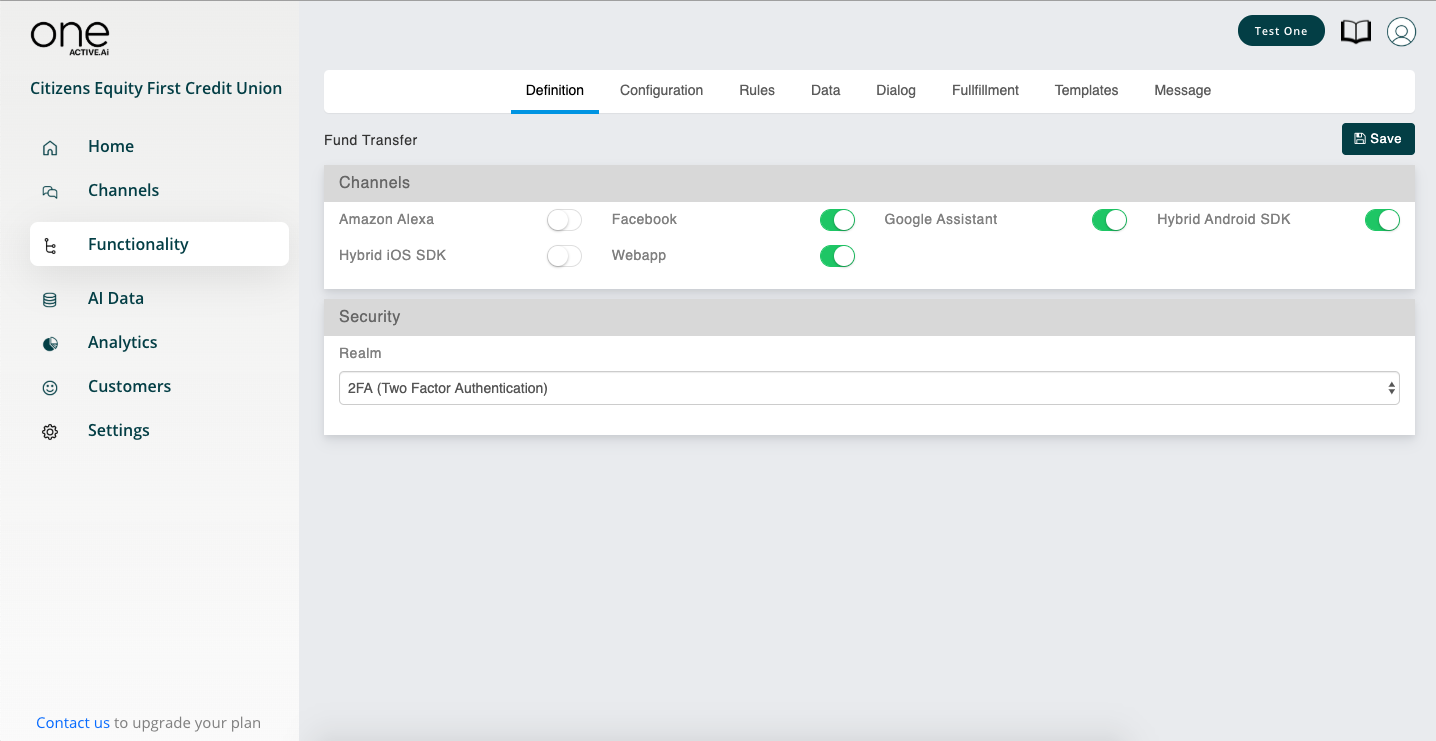
Under definition, the basic details of the use case will be maintained such as
| Field | Description |
|---|---|
| Intent | Intent name, this is how system would understand this use case and trigger appropriate flow |
| Channels | Choose applicable channels for this use case |
| Fulfilment Type | User can choose from among Camel route, Workflow, Template or Java bean, depending on how they intend to fulfil this flow. Camel route is best suited for STP processes |
Configurations
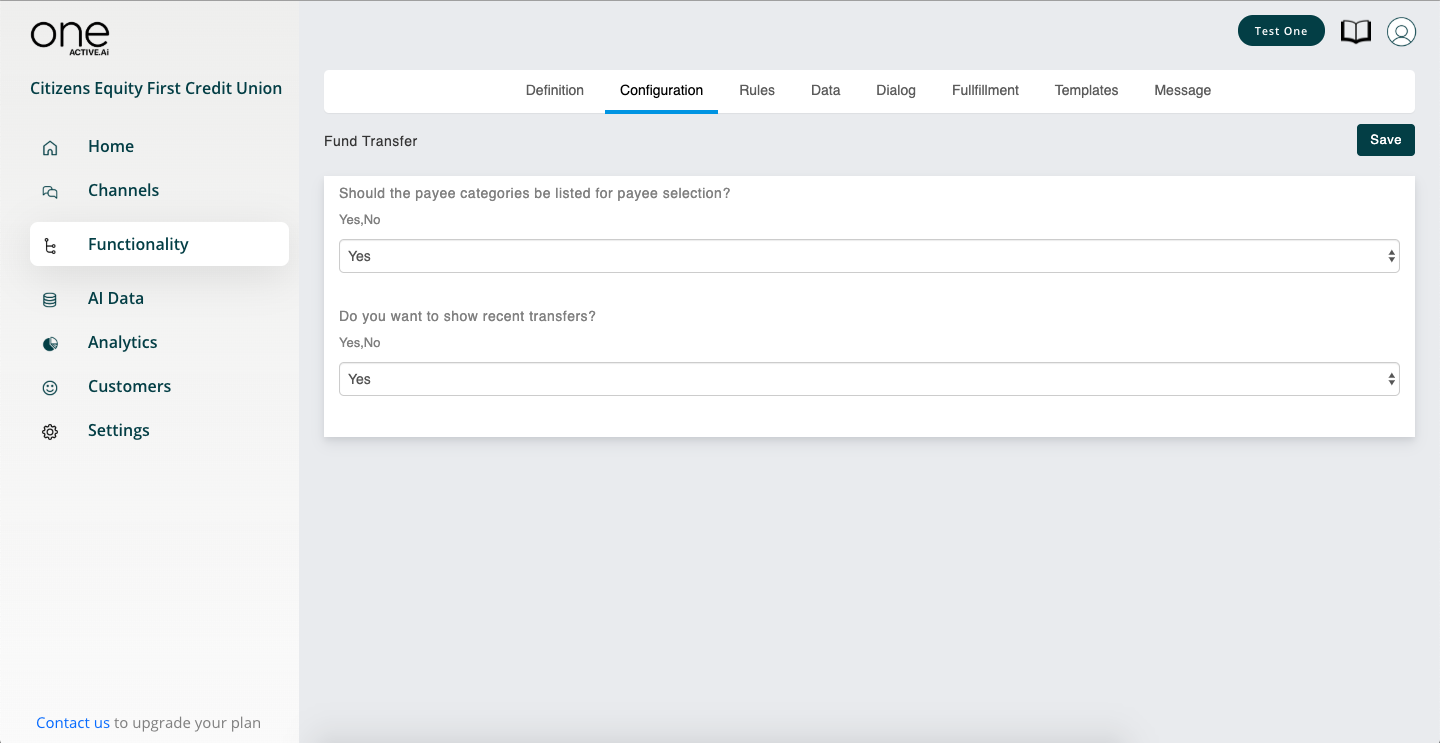
Various business configurations which are typically available in a backend property file have been exposed in this section, to provide better control to the business user in designing the use case.
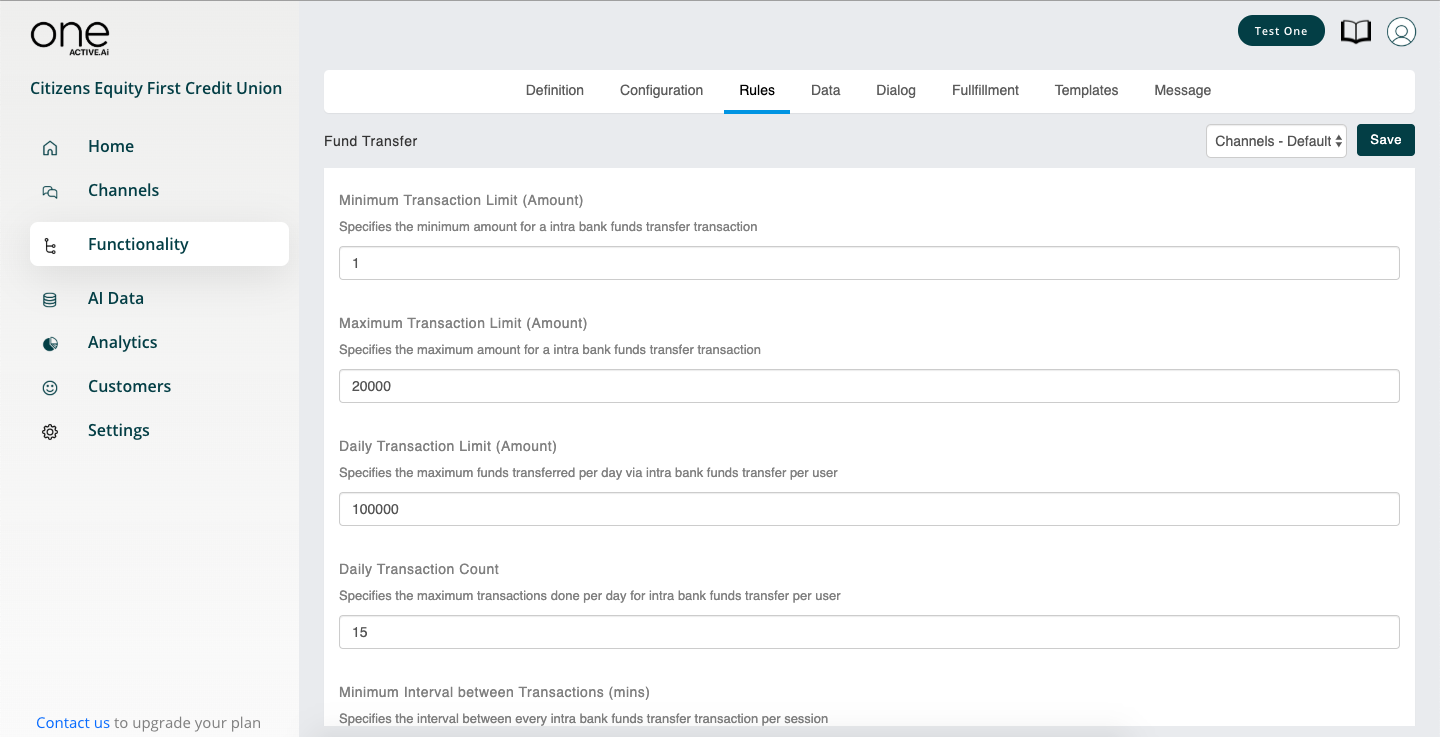
Rules
Business rules such as ‘daily transaction count, ‘transaction limit’ are available under rules. Once set, these rules will be validated when the end-user is performing transactions and an appropriate message will be shown.
Data
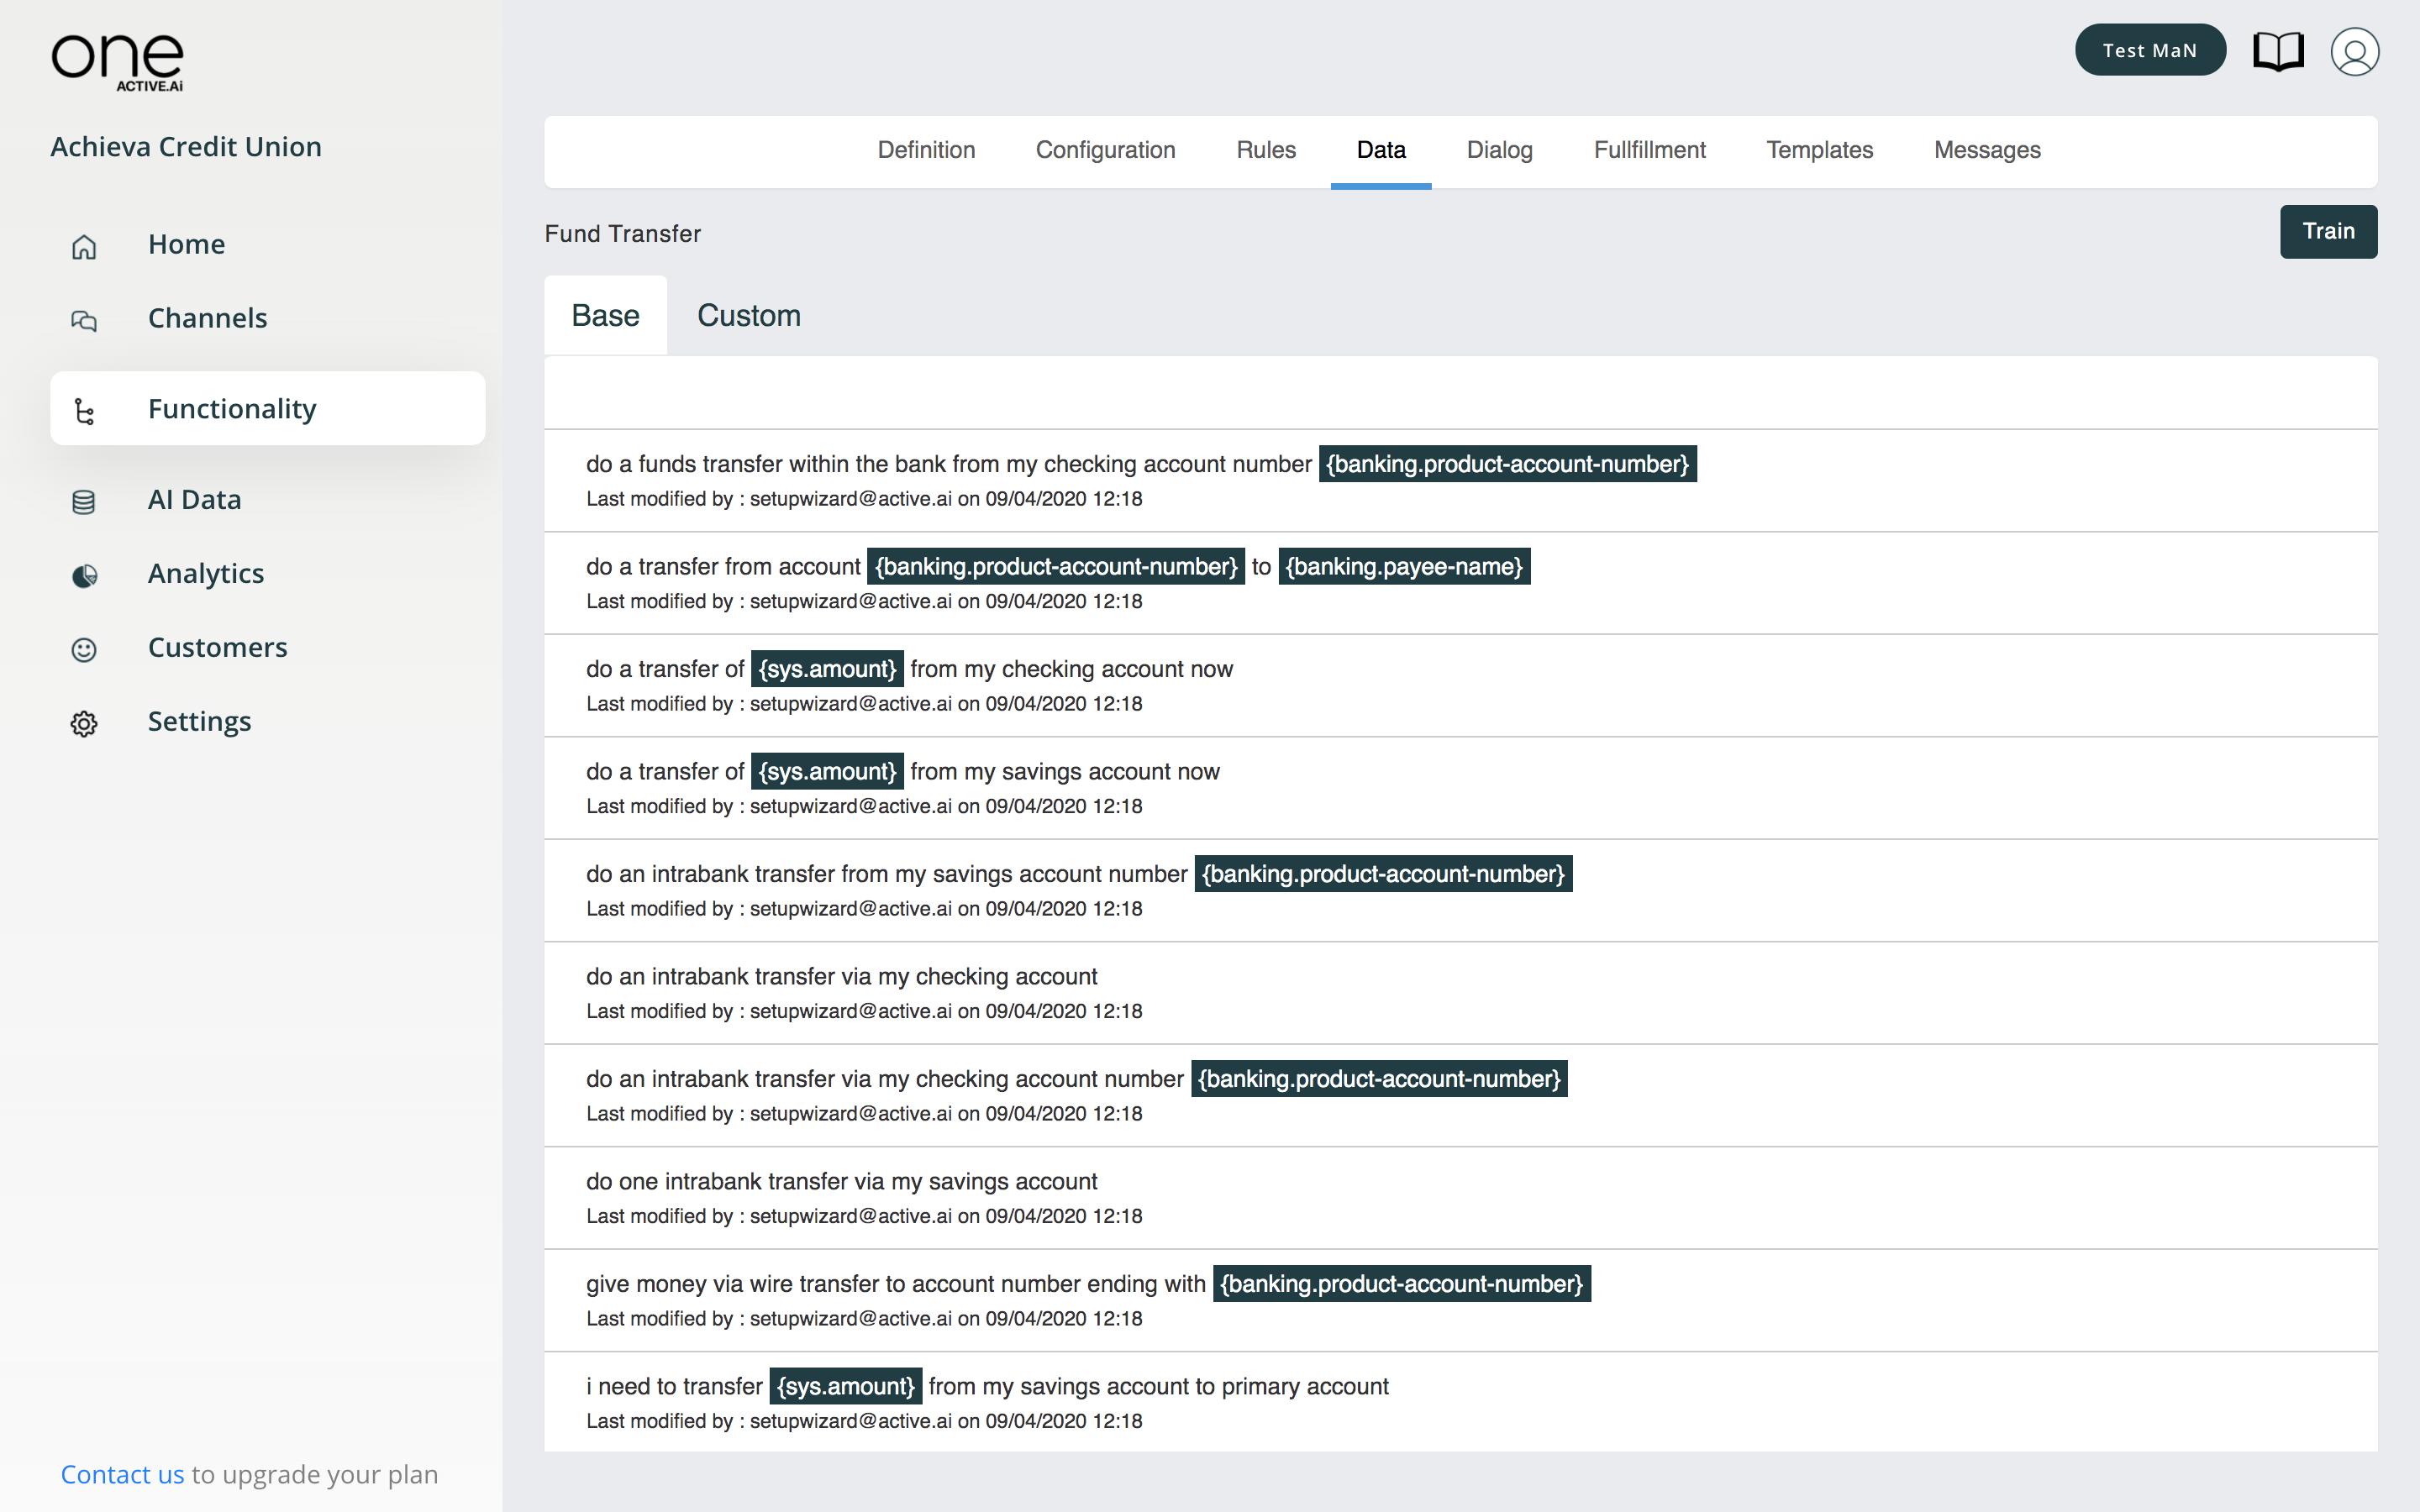
The data for the use case is pre-loaded from Active ONE ‘s extensive data repository. The system is pre-trained for all these data utterances i.e. this use case will be recognized by the system if any of these utterances shown are input by the end-user.
Note; It is also possible to add your own custom data to this repository and train the system, if any such requirements exists
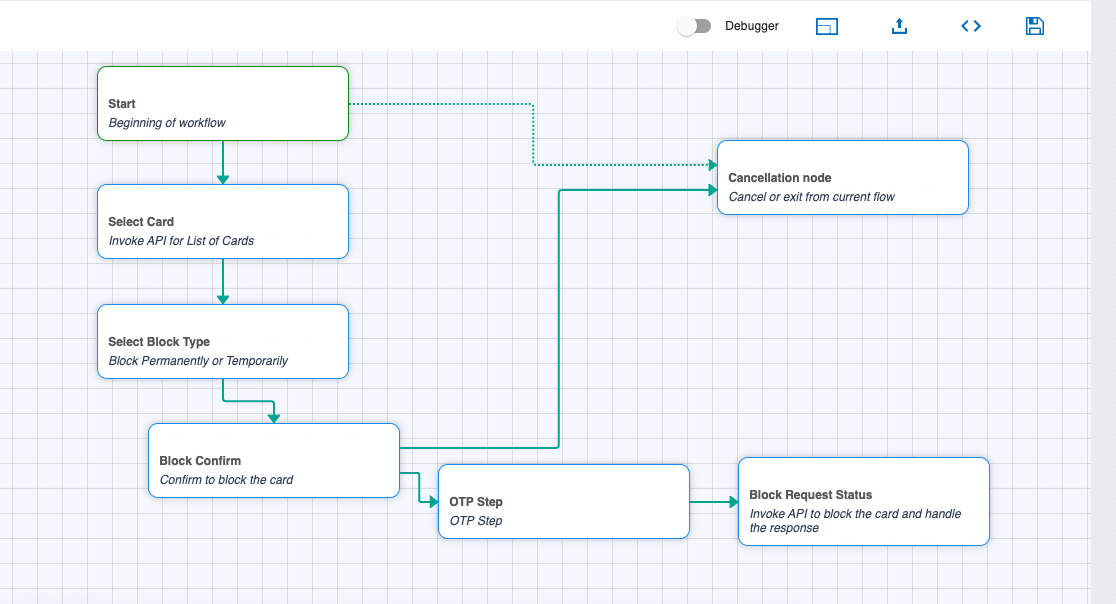
Fulfilment
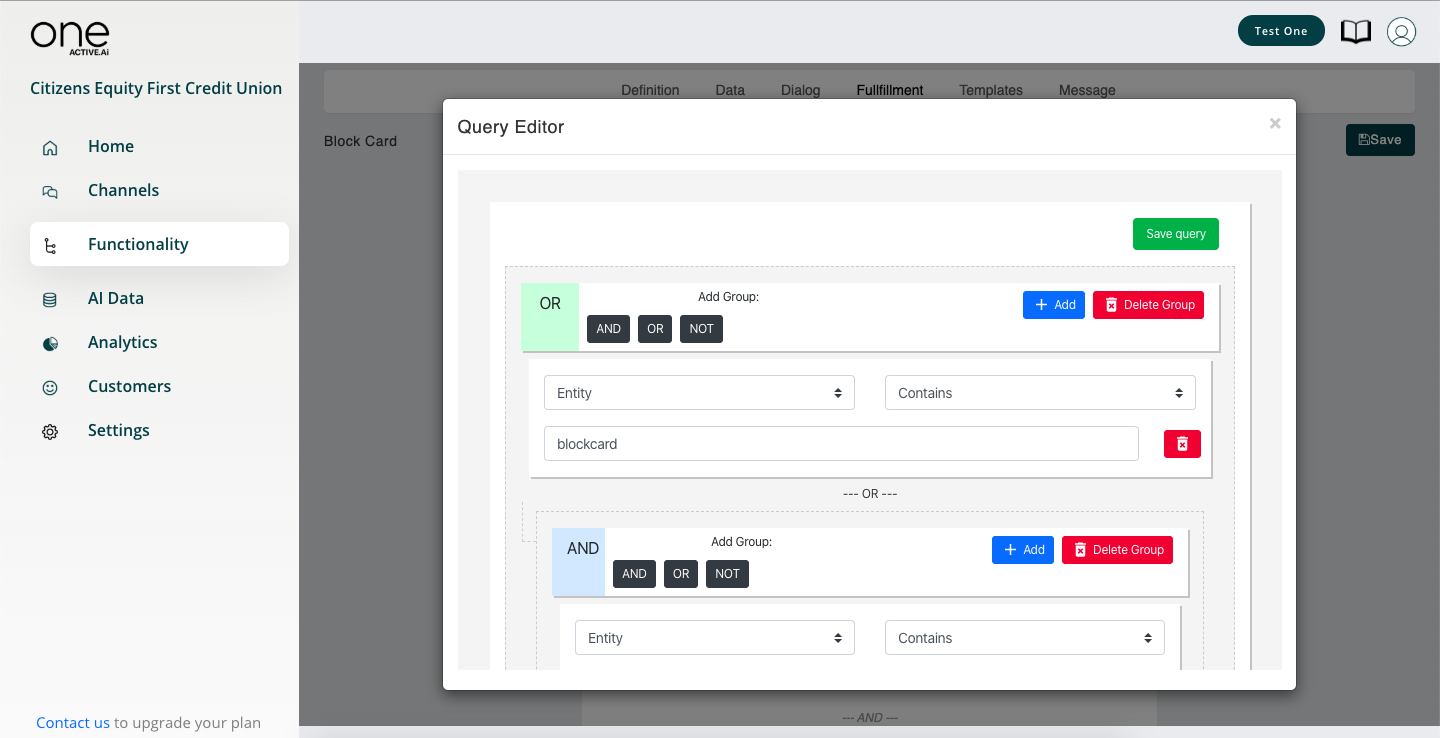
The editor below can be used to define the fulfillment for this use case. Based on defined conditions, a workflow or camel route can be integrated.
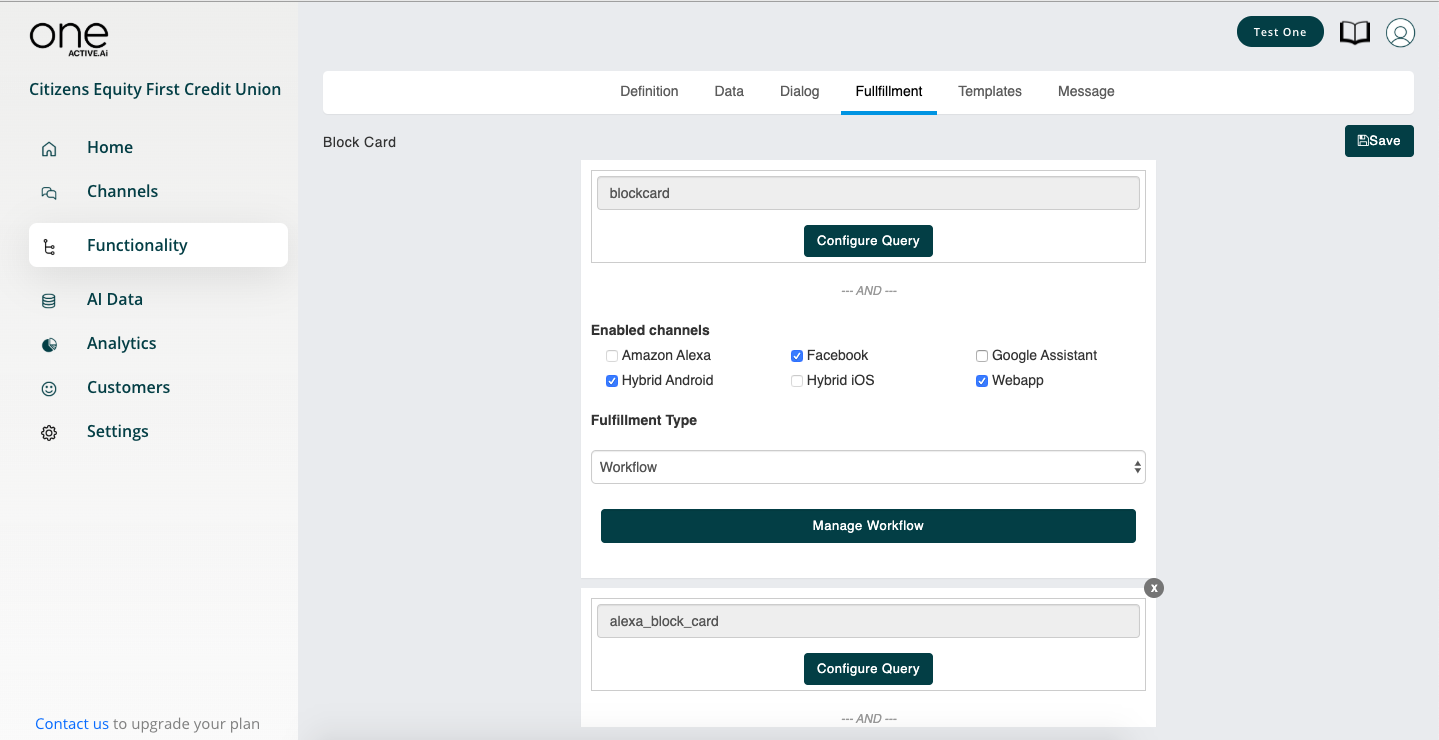
Note: The fulfilment code is shown in this section, which can be suitably modified to your requirement in case you have trained users, rather than depending on professional services.
Templates
For any use case, as part of the conversational experience, the system will use certain templates. Ex: Account list can be shown as a table or carousel. In this section, the business user can select the appropriate templates to get the desired experience in the conversations. Users can try various combinations and test them out by launching the AI agent in the sandbox.
This can be done for all use cases.

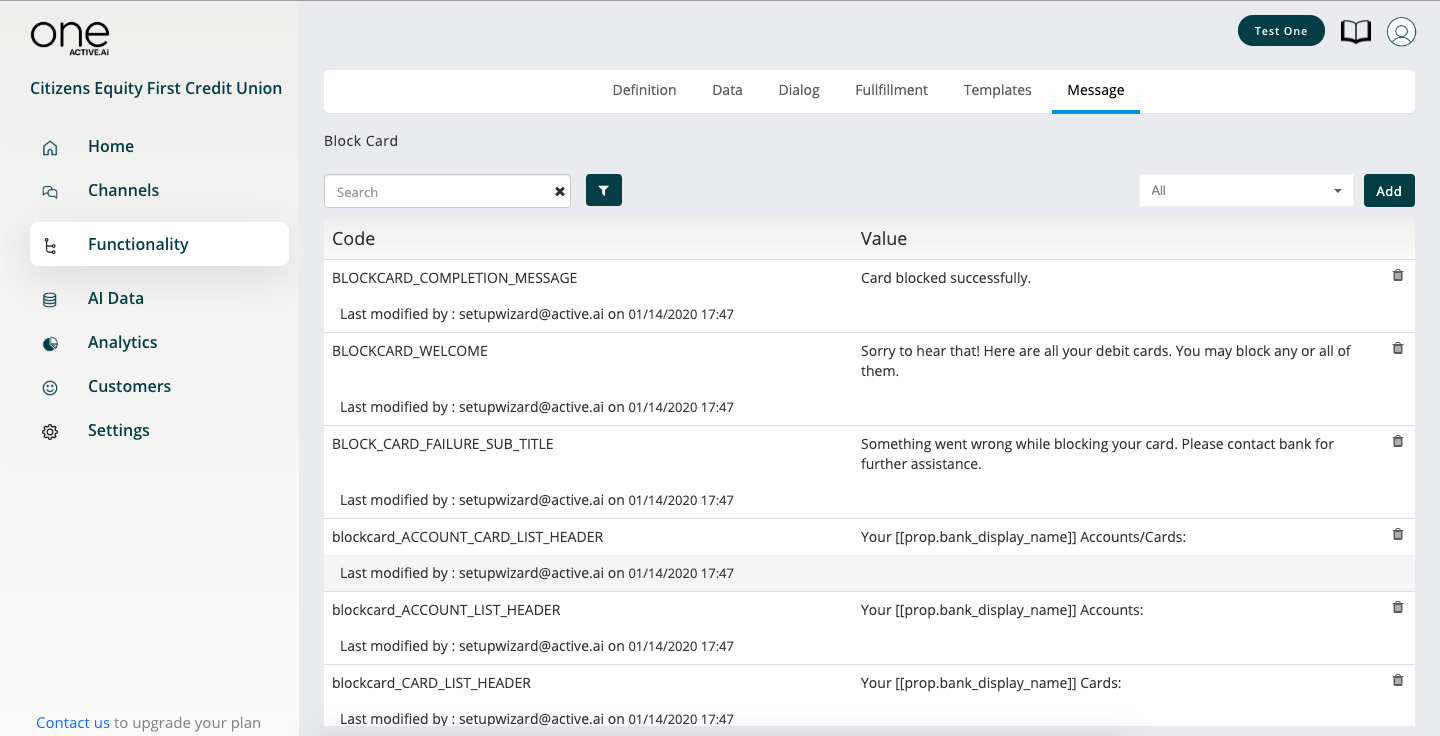
Messages
The various responses given by the agent are referred to as messages. You can tweak these messages to give your agent a unique personality by updating the responses here in this section. for the use case is pre-loaded from Active ONE ‘s extensive data repository. The system is pre-trained.
AI Data
The AI data section is where you manage most of the data requirements for the virtual assistant. In addition to maintaining data for Small talk & FAQ modules, you can also update bank-specific product data and train and monitor the system using various options.
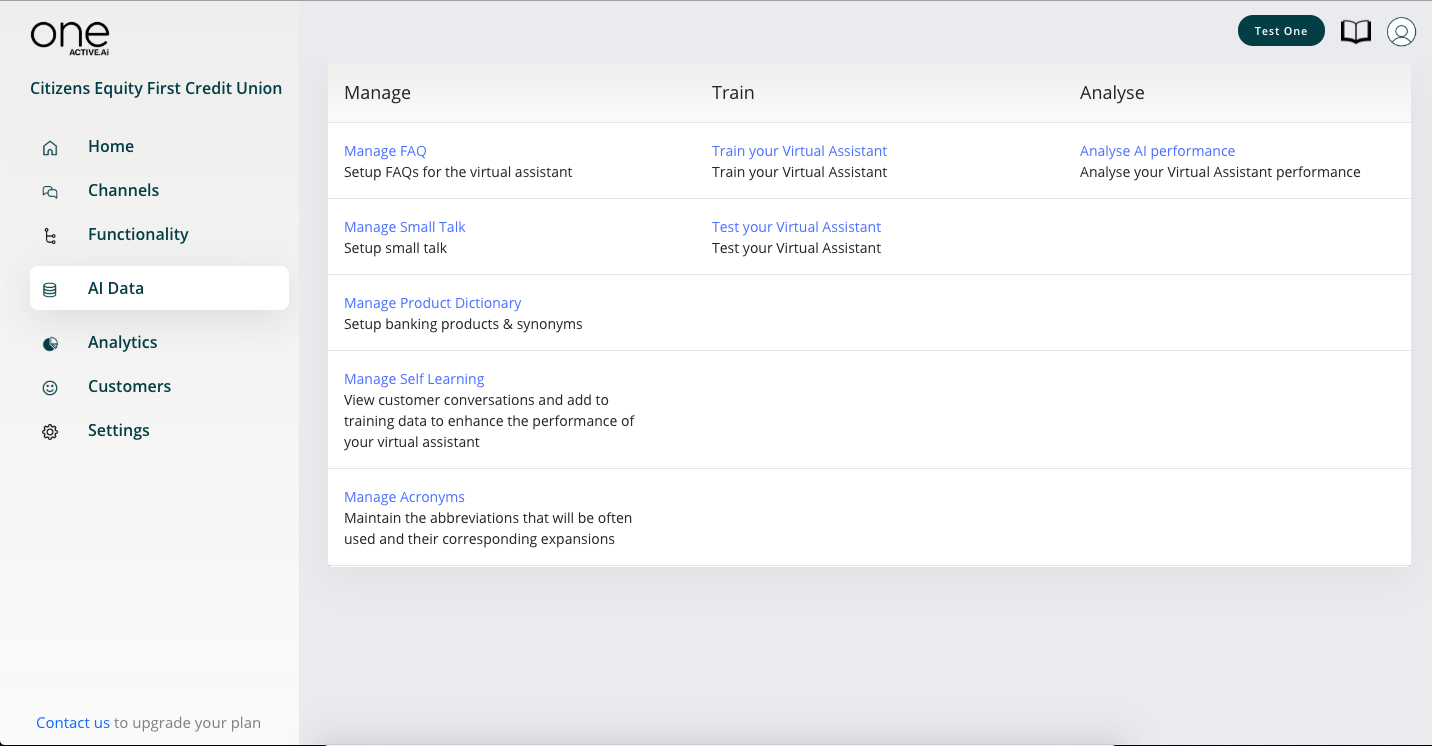
| Activity | Purpose |
|---|---|
| Manage FAQ | |
| Manage Small talk | |
| Manage product dictionary | |
| Manage self learning | |
| Train your virtual assistant | |
| Test your virtual assistant | |
| Analyse AI performance |
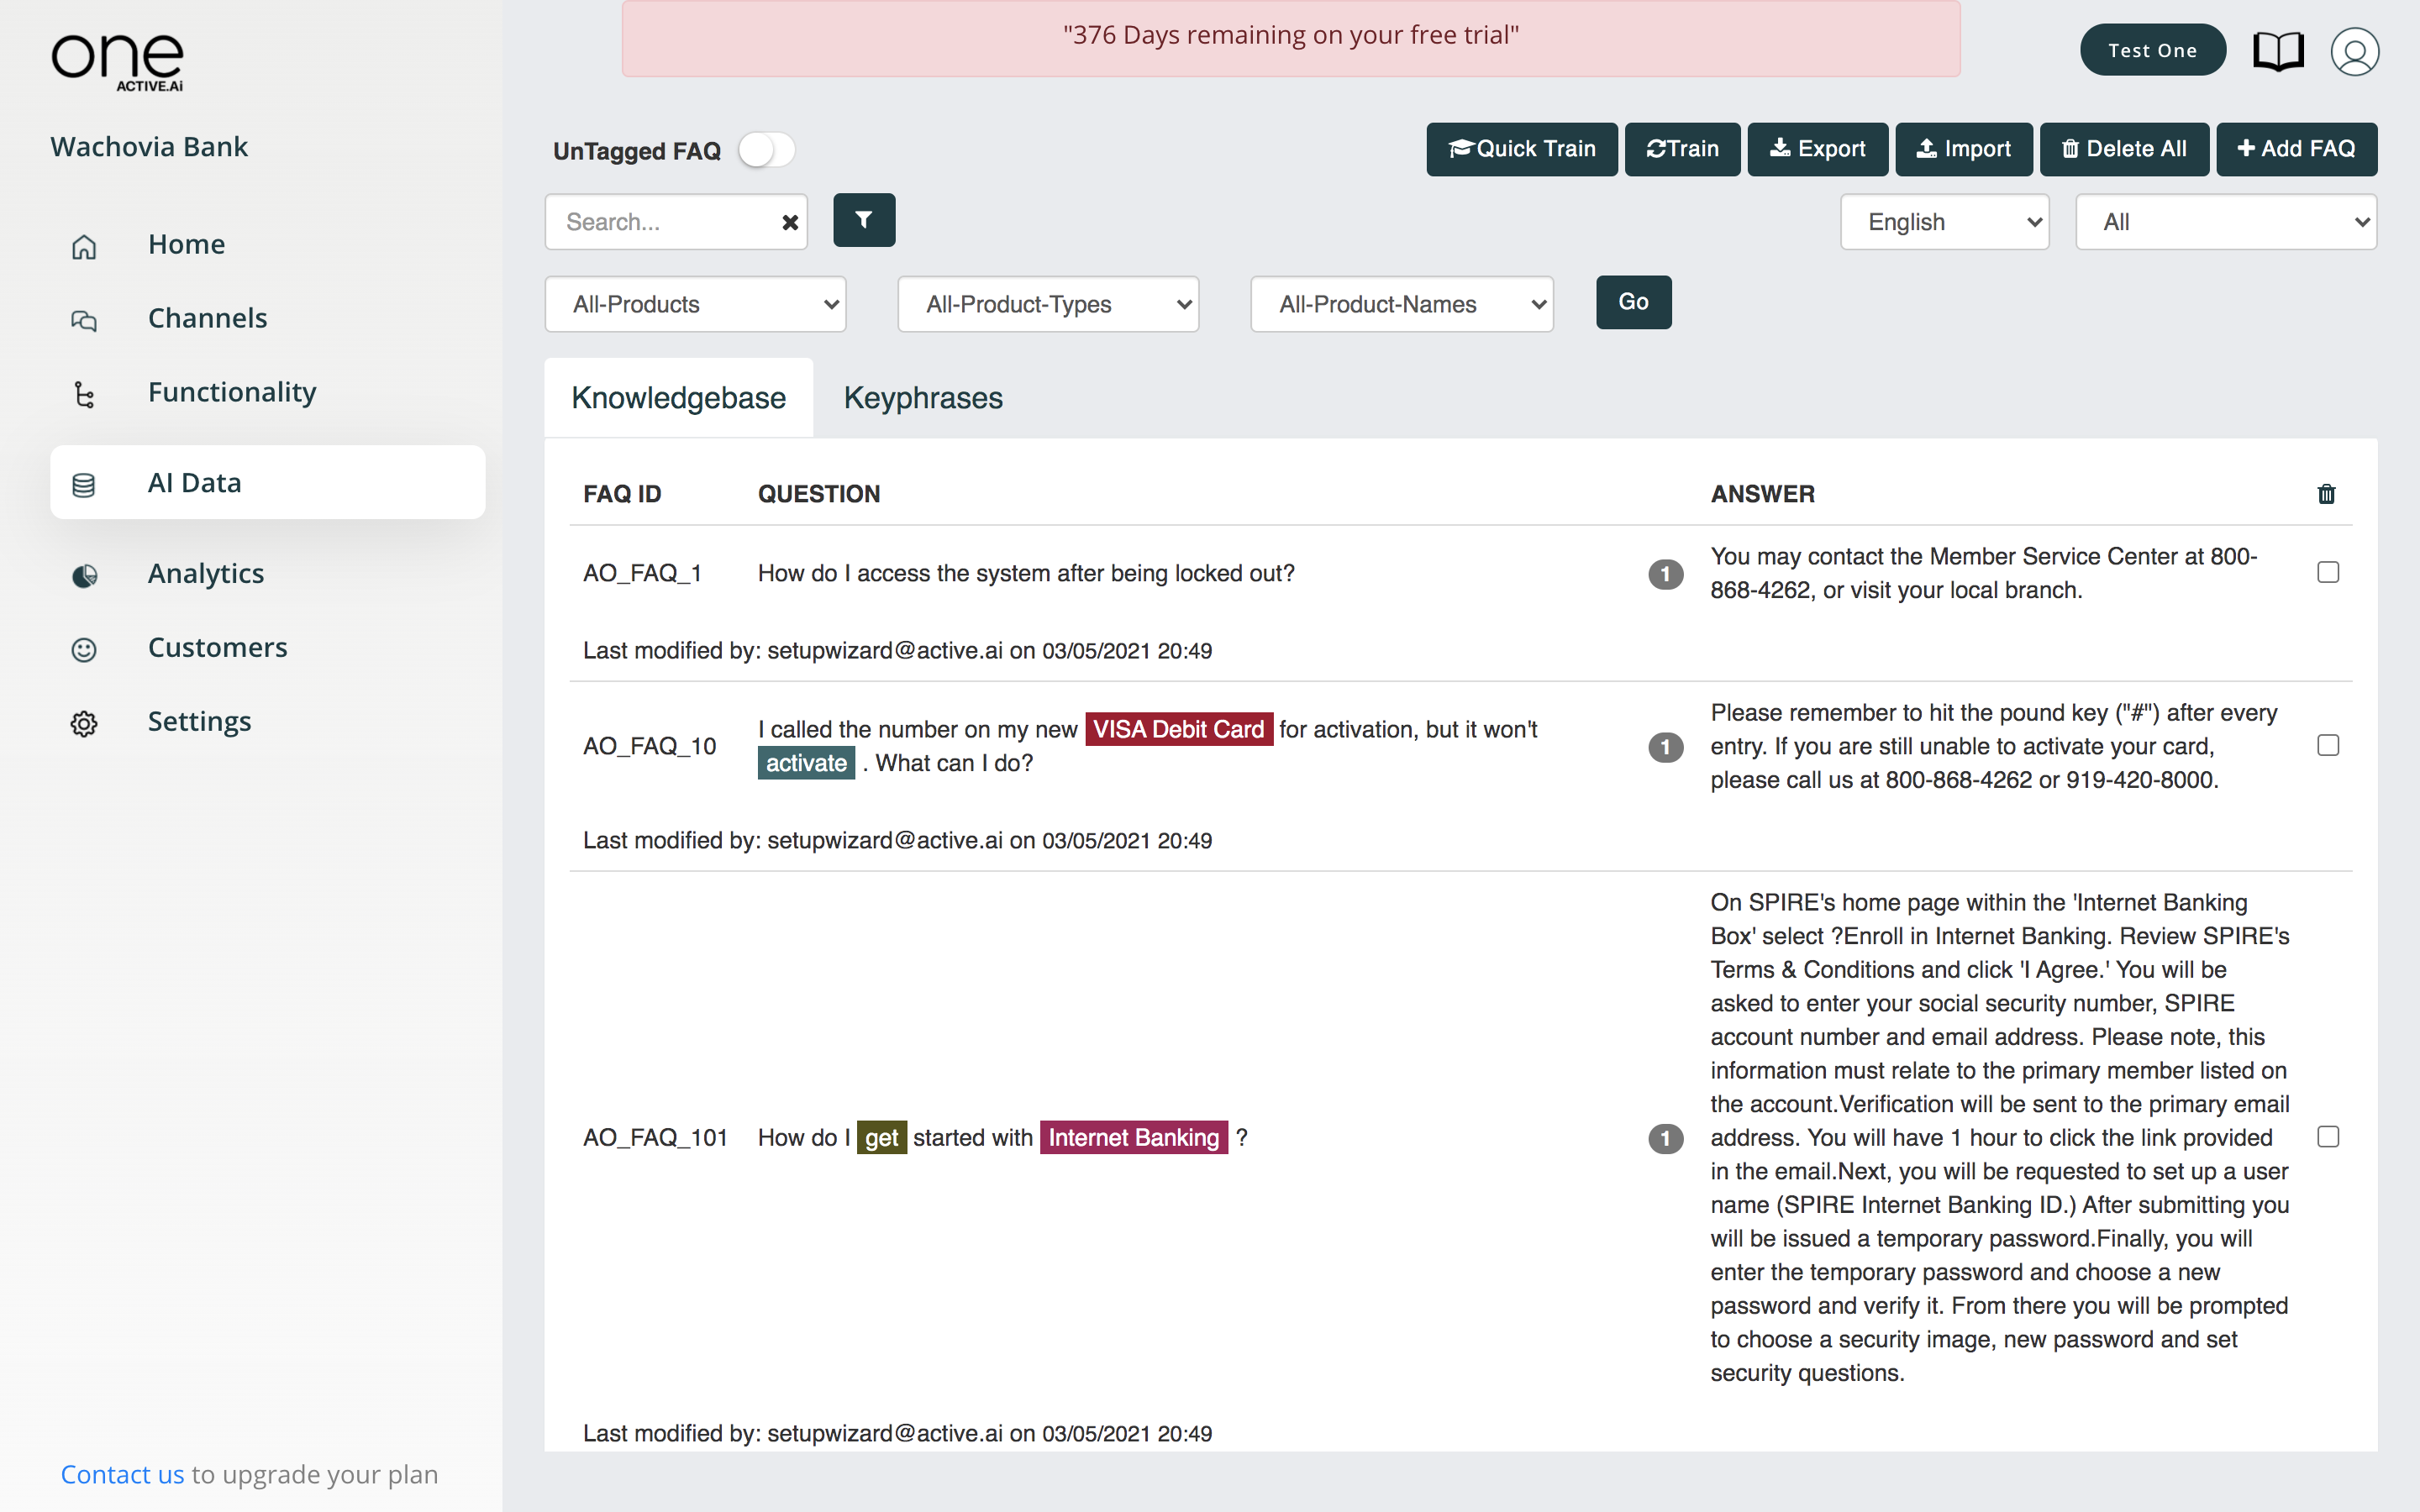
Manage FAQ
The FAQ section is very important and probably the most extensively used as it needs to be constantly updated for the latest business process changes. Here too, we have enabled a pre-trained set of about 500+ FAQs. - The business user can update the response to these suitably using the export/import feature. - New FAQ can also be added by providing the details like FAQ ID (unique reference), Name, Category and then going on to add the questions and appropriate response - The variants to the question can also be maintained here.
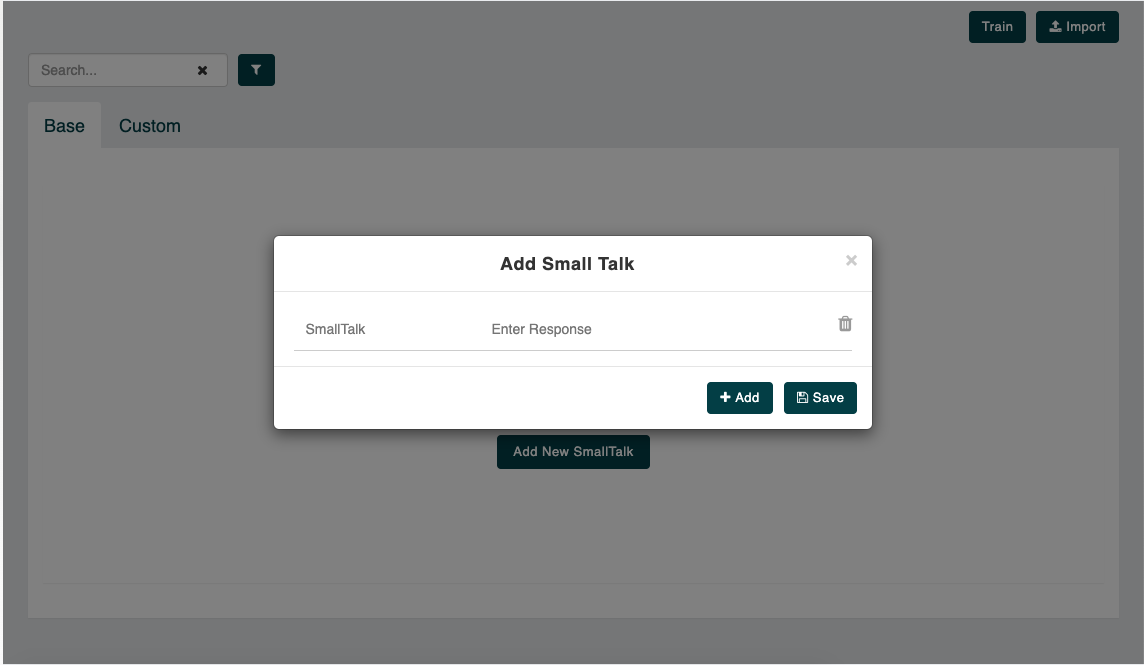
Manage Small talk
Small talk refers to the greetings as part of Opening / Closing of the conversation, which in itself serves no other purpose but to keep the conversation going :). This section shows the out of the box small talk data in ‘Base’ section. Additional small talk can be maintained in ‘Custom’ tab, using Add small talk button.
AI Agent Design
Analytics
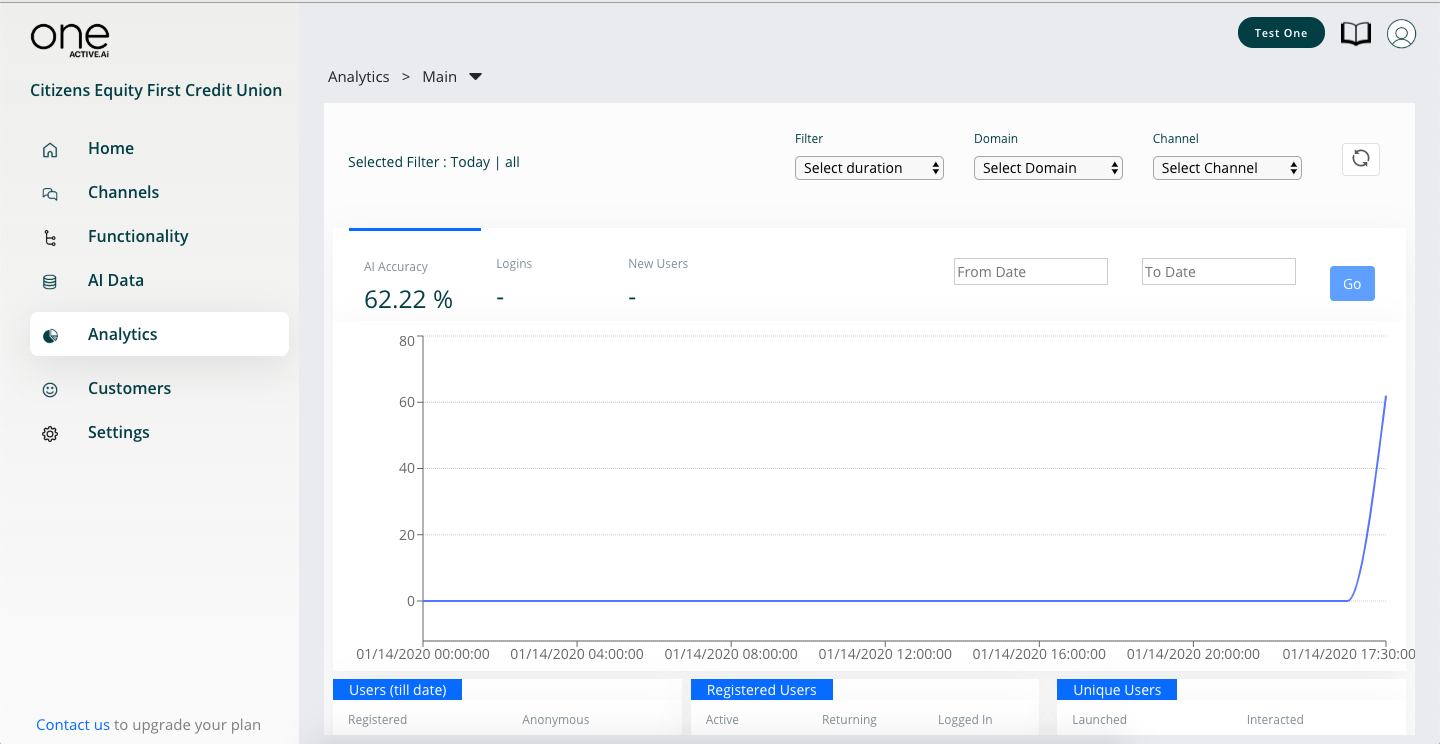
At the dashboard, user will be shown a summary of all the metrics with respect to the conversations handled in the system. This will be very useful once the system moves to production to monitor conversations in real time.
Conversation details can be viewed for various time periods in the 4 tabs - Today - current day’s conversational data - This Week - week till date conversational data - This Month - month till date conversational data - Custom - conversational data for an input date range
Various data points available are a number of logins, number of FAQs, Total transactions, Number of Messages, AI Accuracy, Average session time to name a few. These data are presented in a graphical way for easy interpretation.
Customer
Settings
In this section, you will find links for most of the one-time configurations and also few options like audit trails and other admin activities. Following list summarizes the same
| Activity | Purpose |
|---|---|
| Business profile | |
| Manage functionality | |
| Manage core system connectivity | |
| Setup wizard | |
| Manage agent feedback | |
| Manage campaigns | |
| Manage plans | |
| Virtual agent design | |
| Manage updates* | |
| Manage go live* | |
| Team members | |
| Security history |

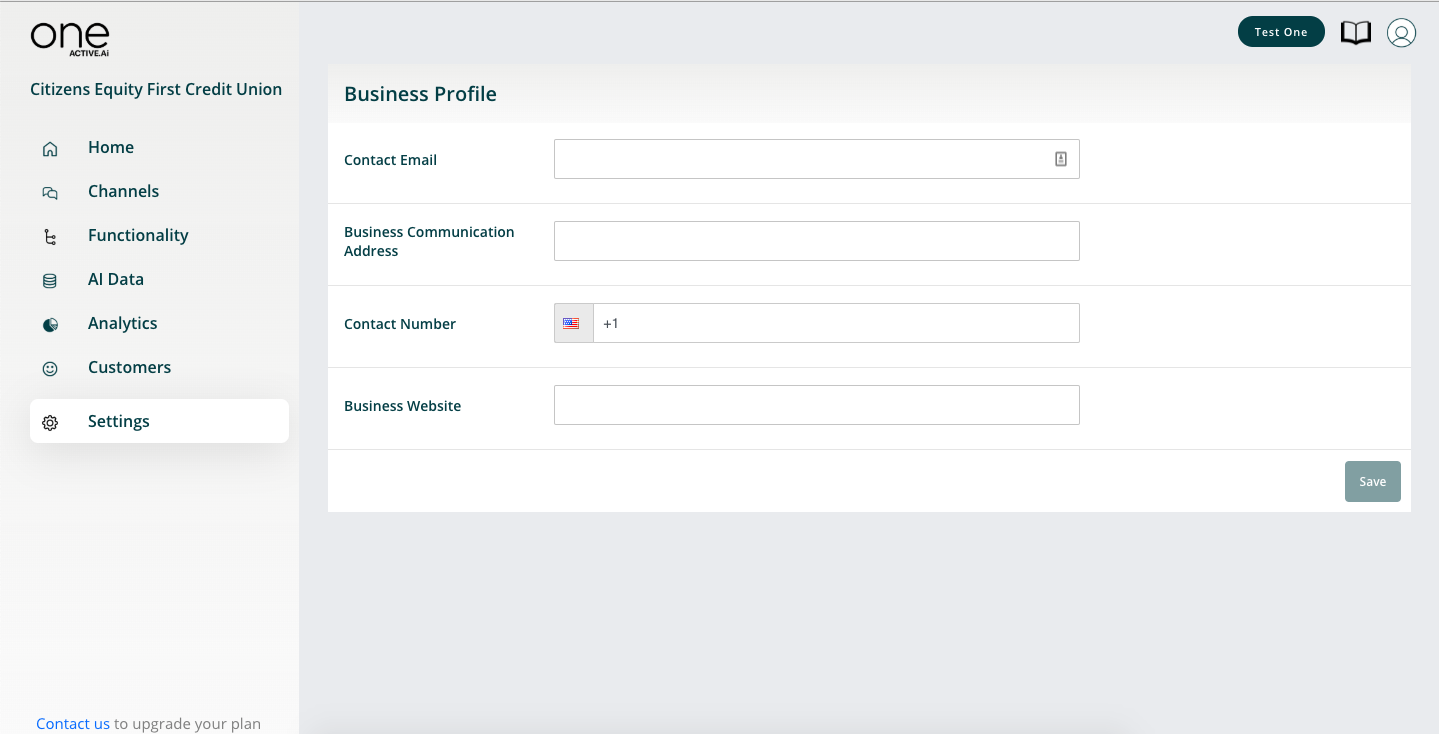
Business Profile
The institution’s profile can be maintained here for our customer success teams to reach appropriate individuals.
Manage functionality
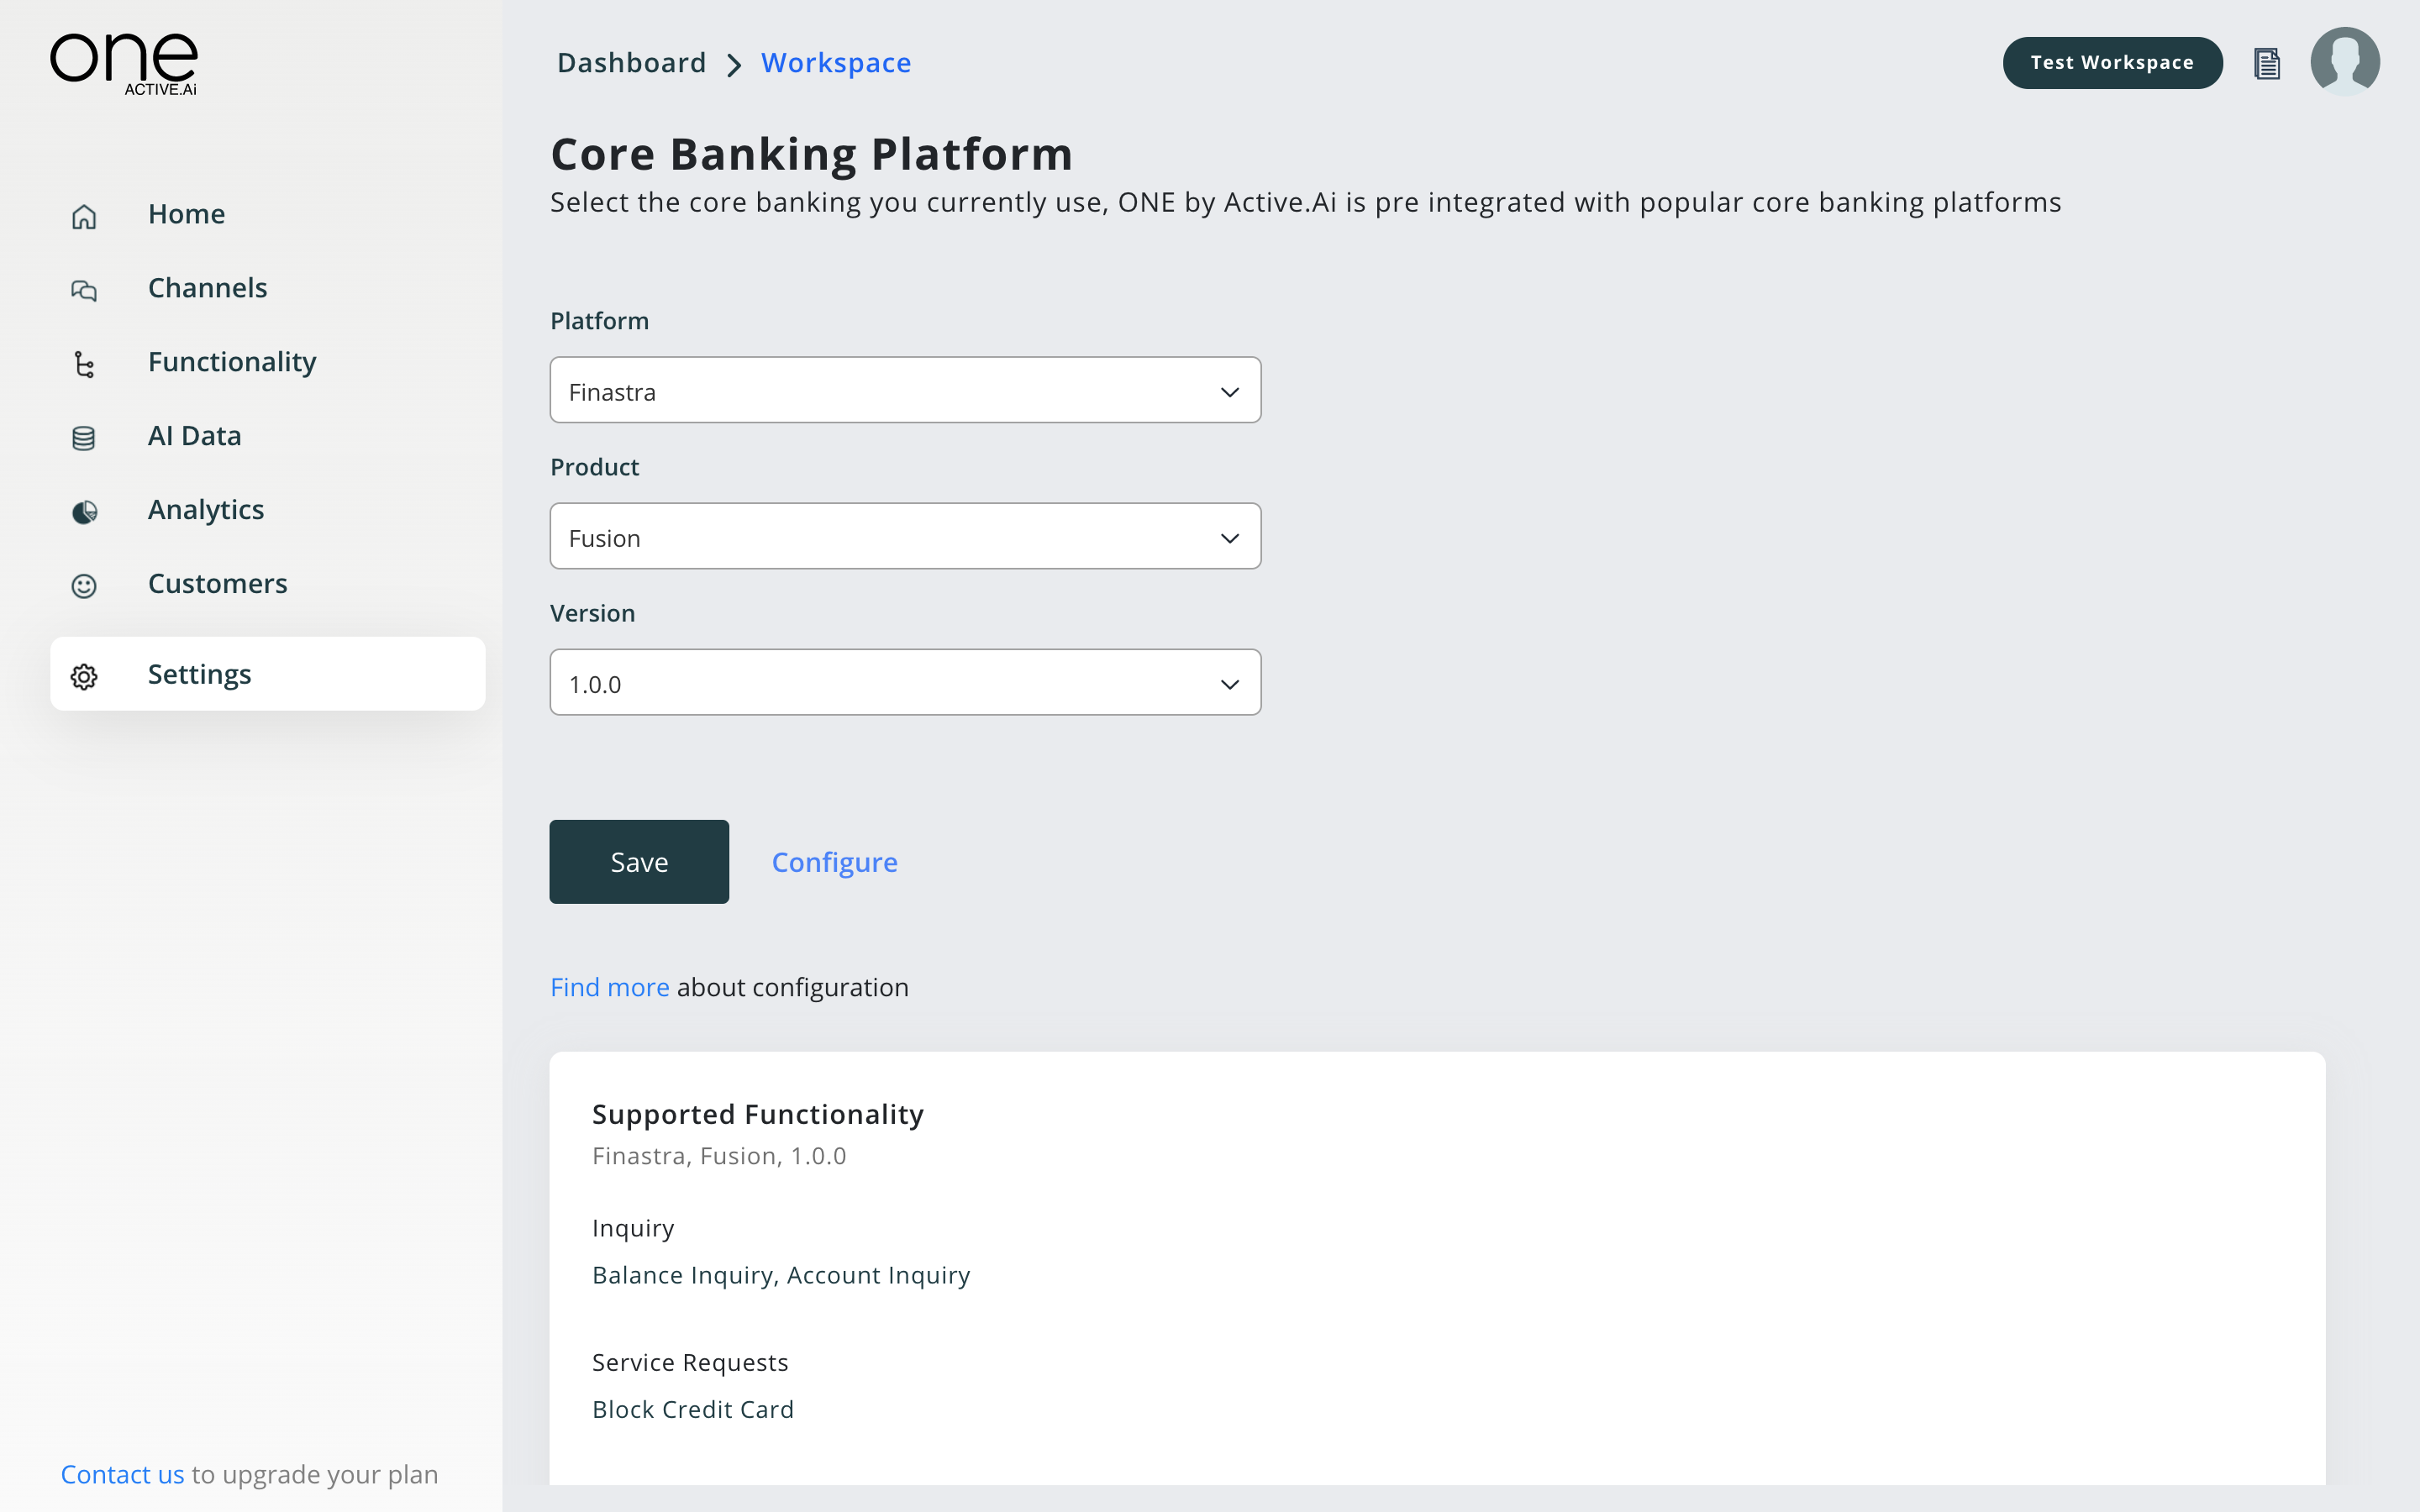
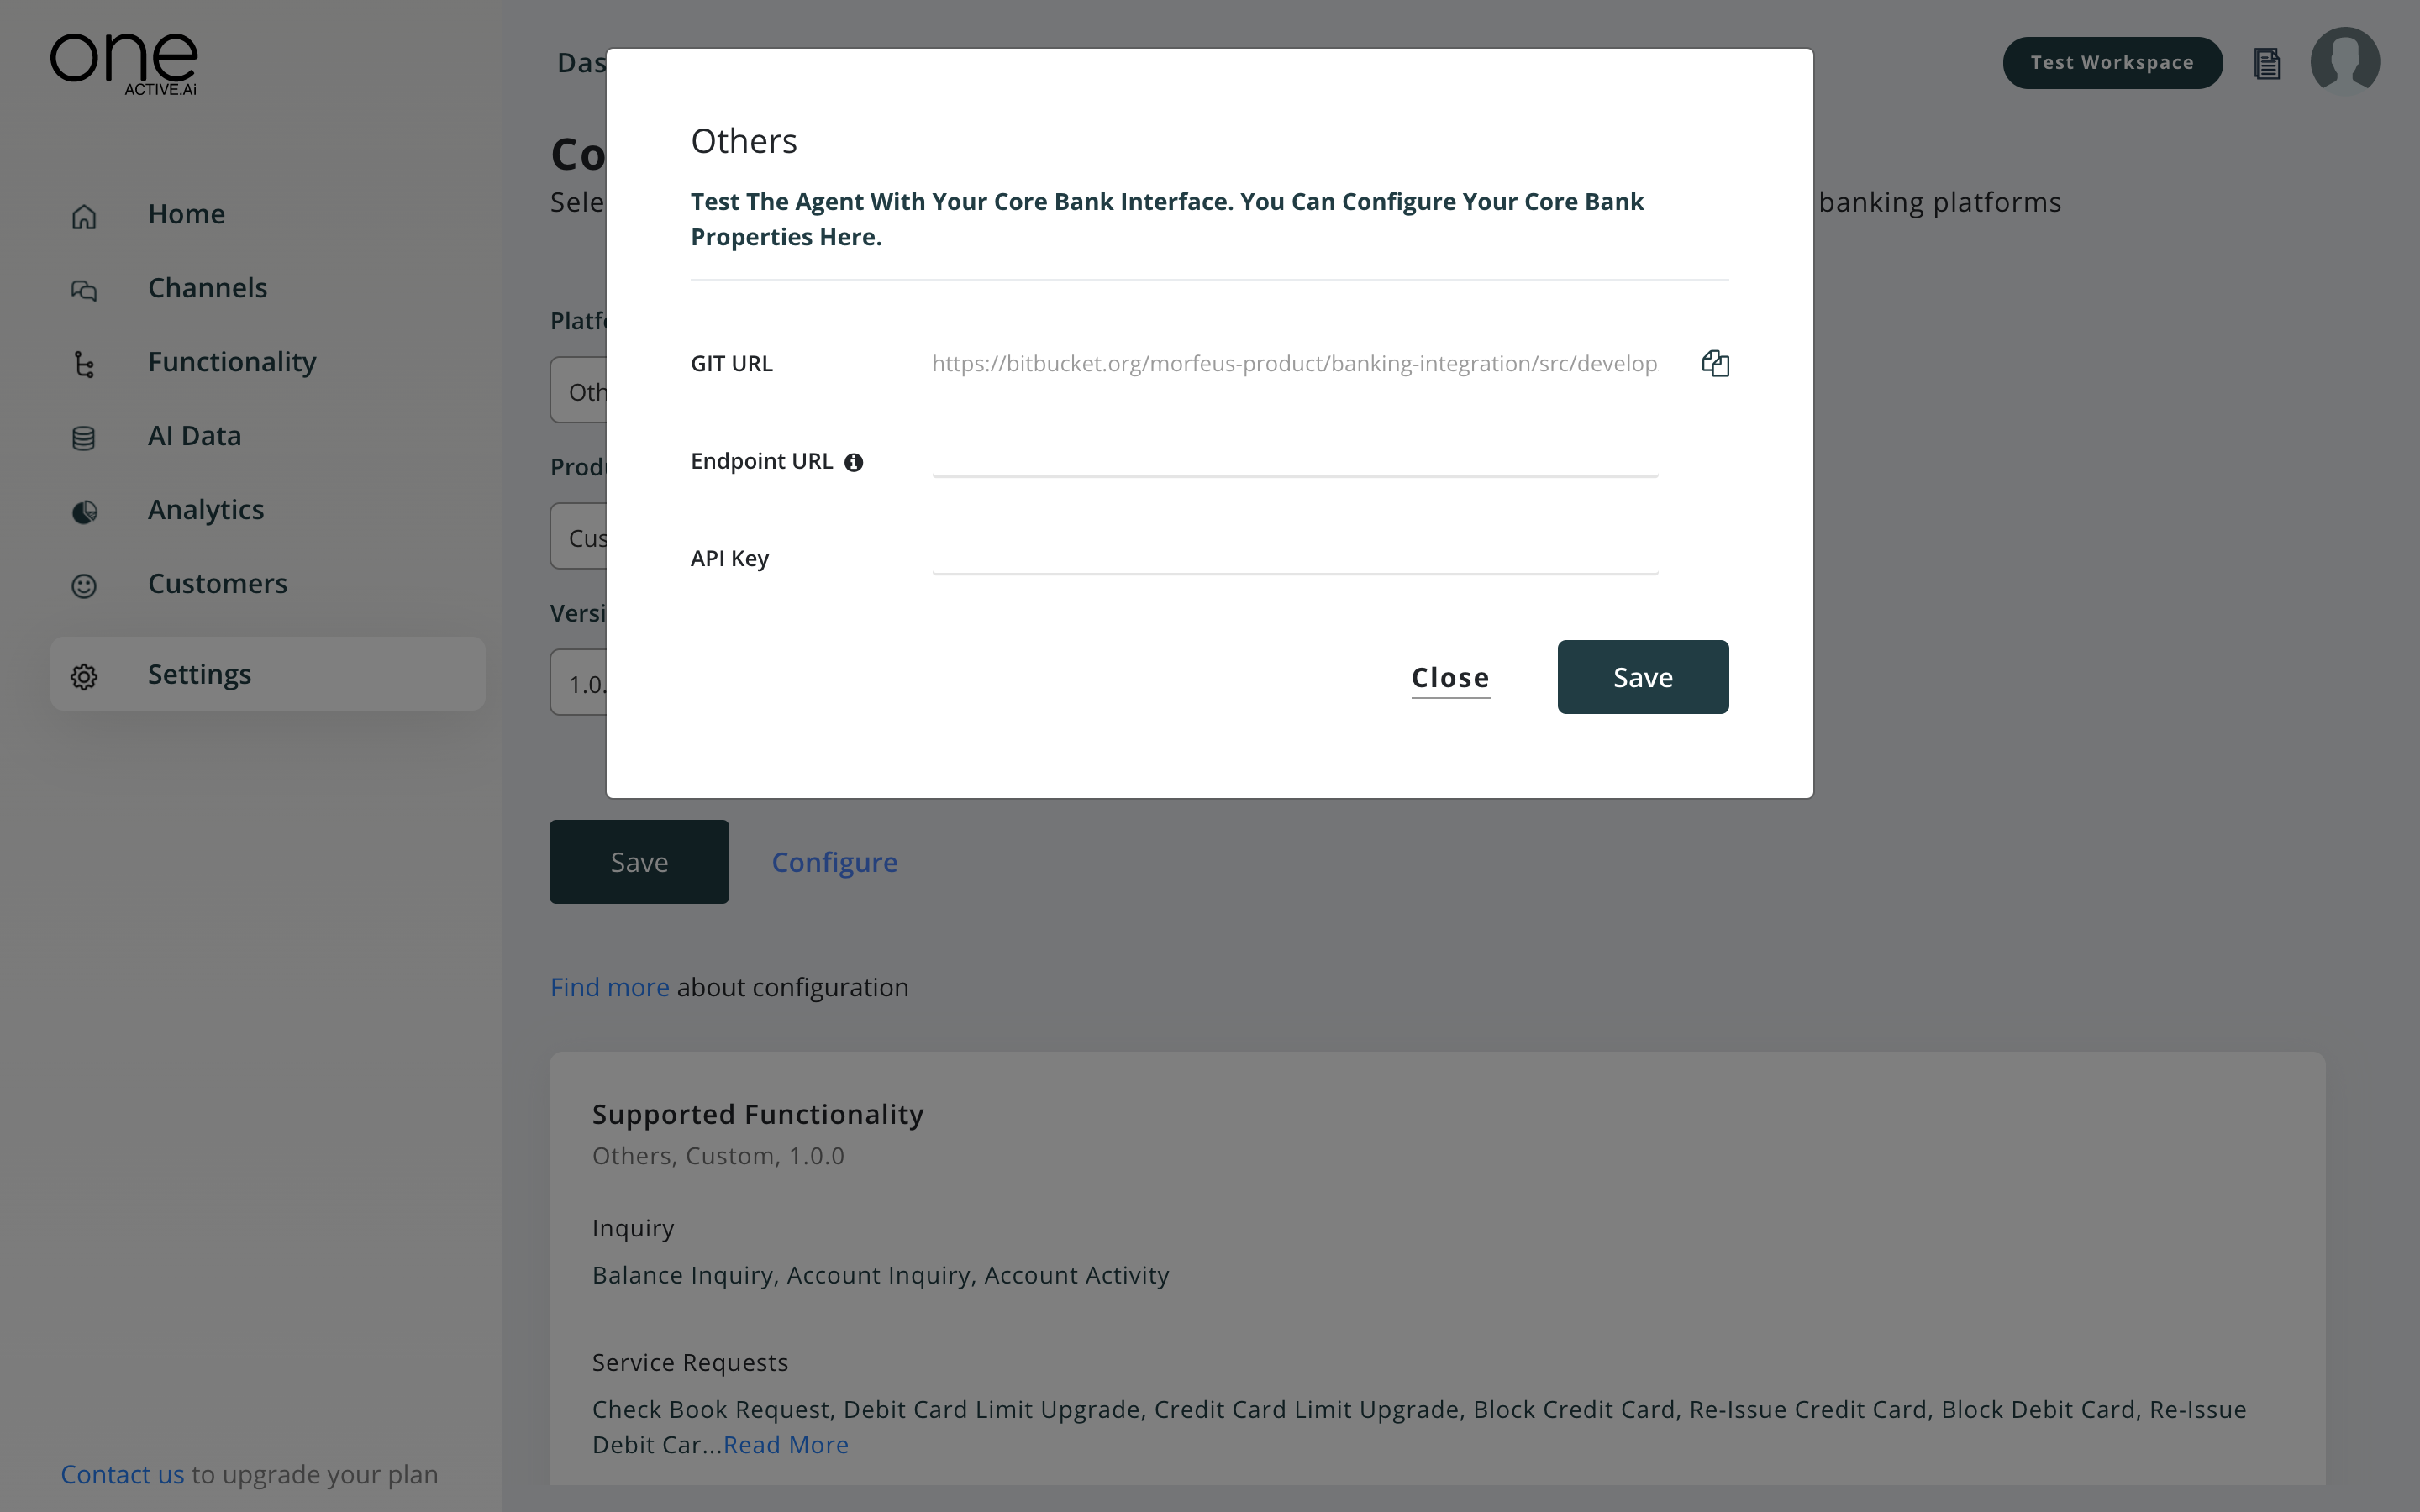
Manage core system connectivity
You can configure your core bank properties in this section
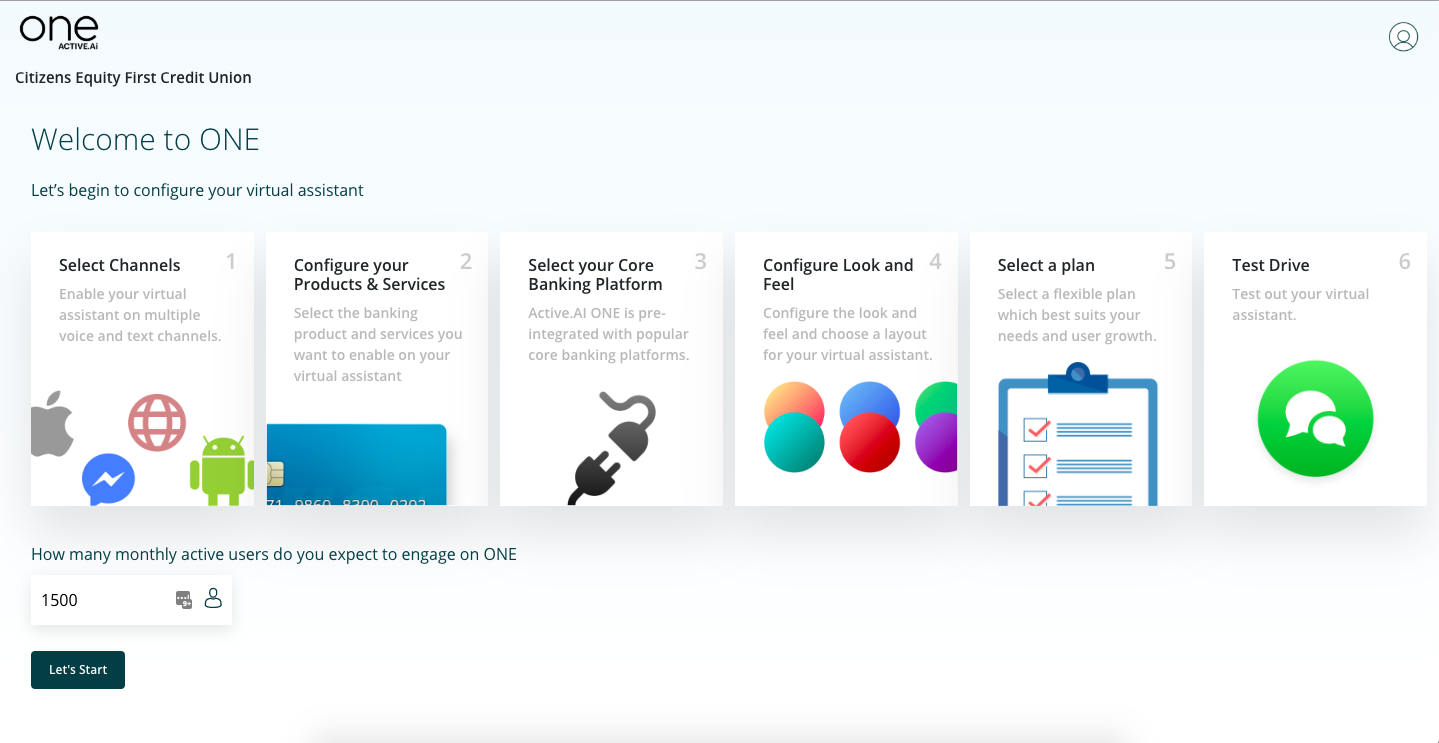
Setup wizard
This will take you back to the onboarding stage, in case you want to modify any of the information provided earlier
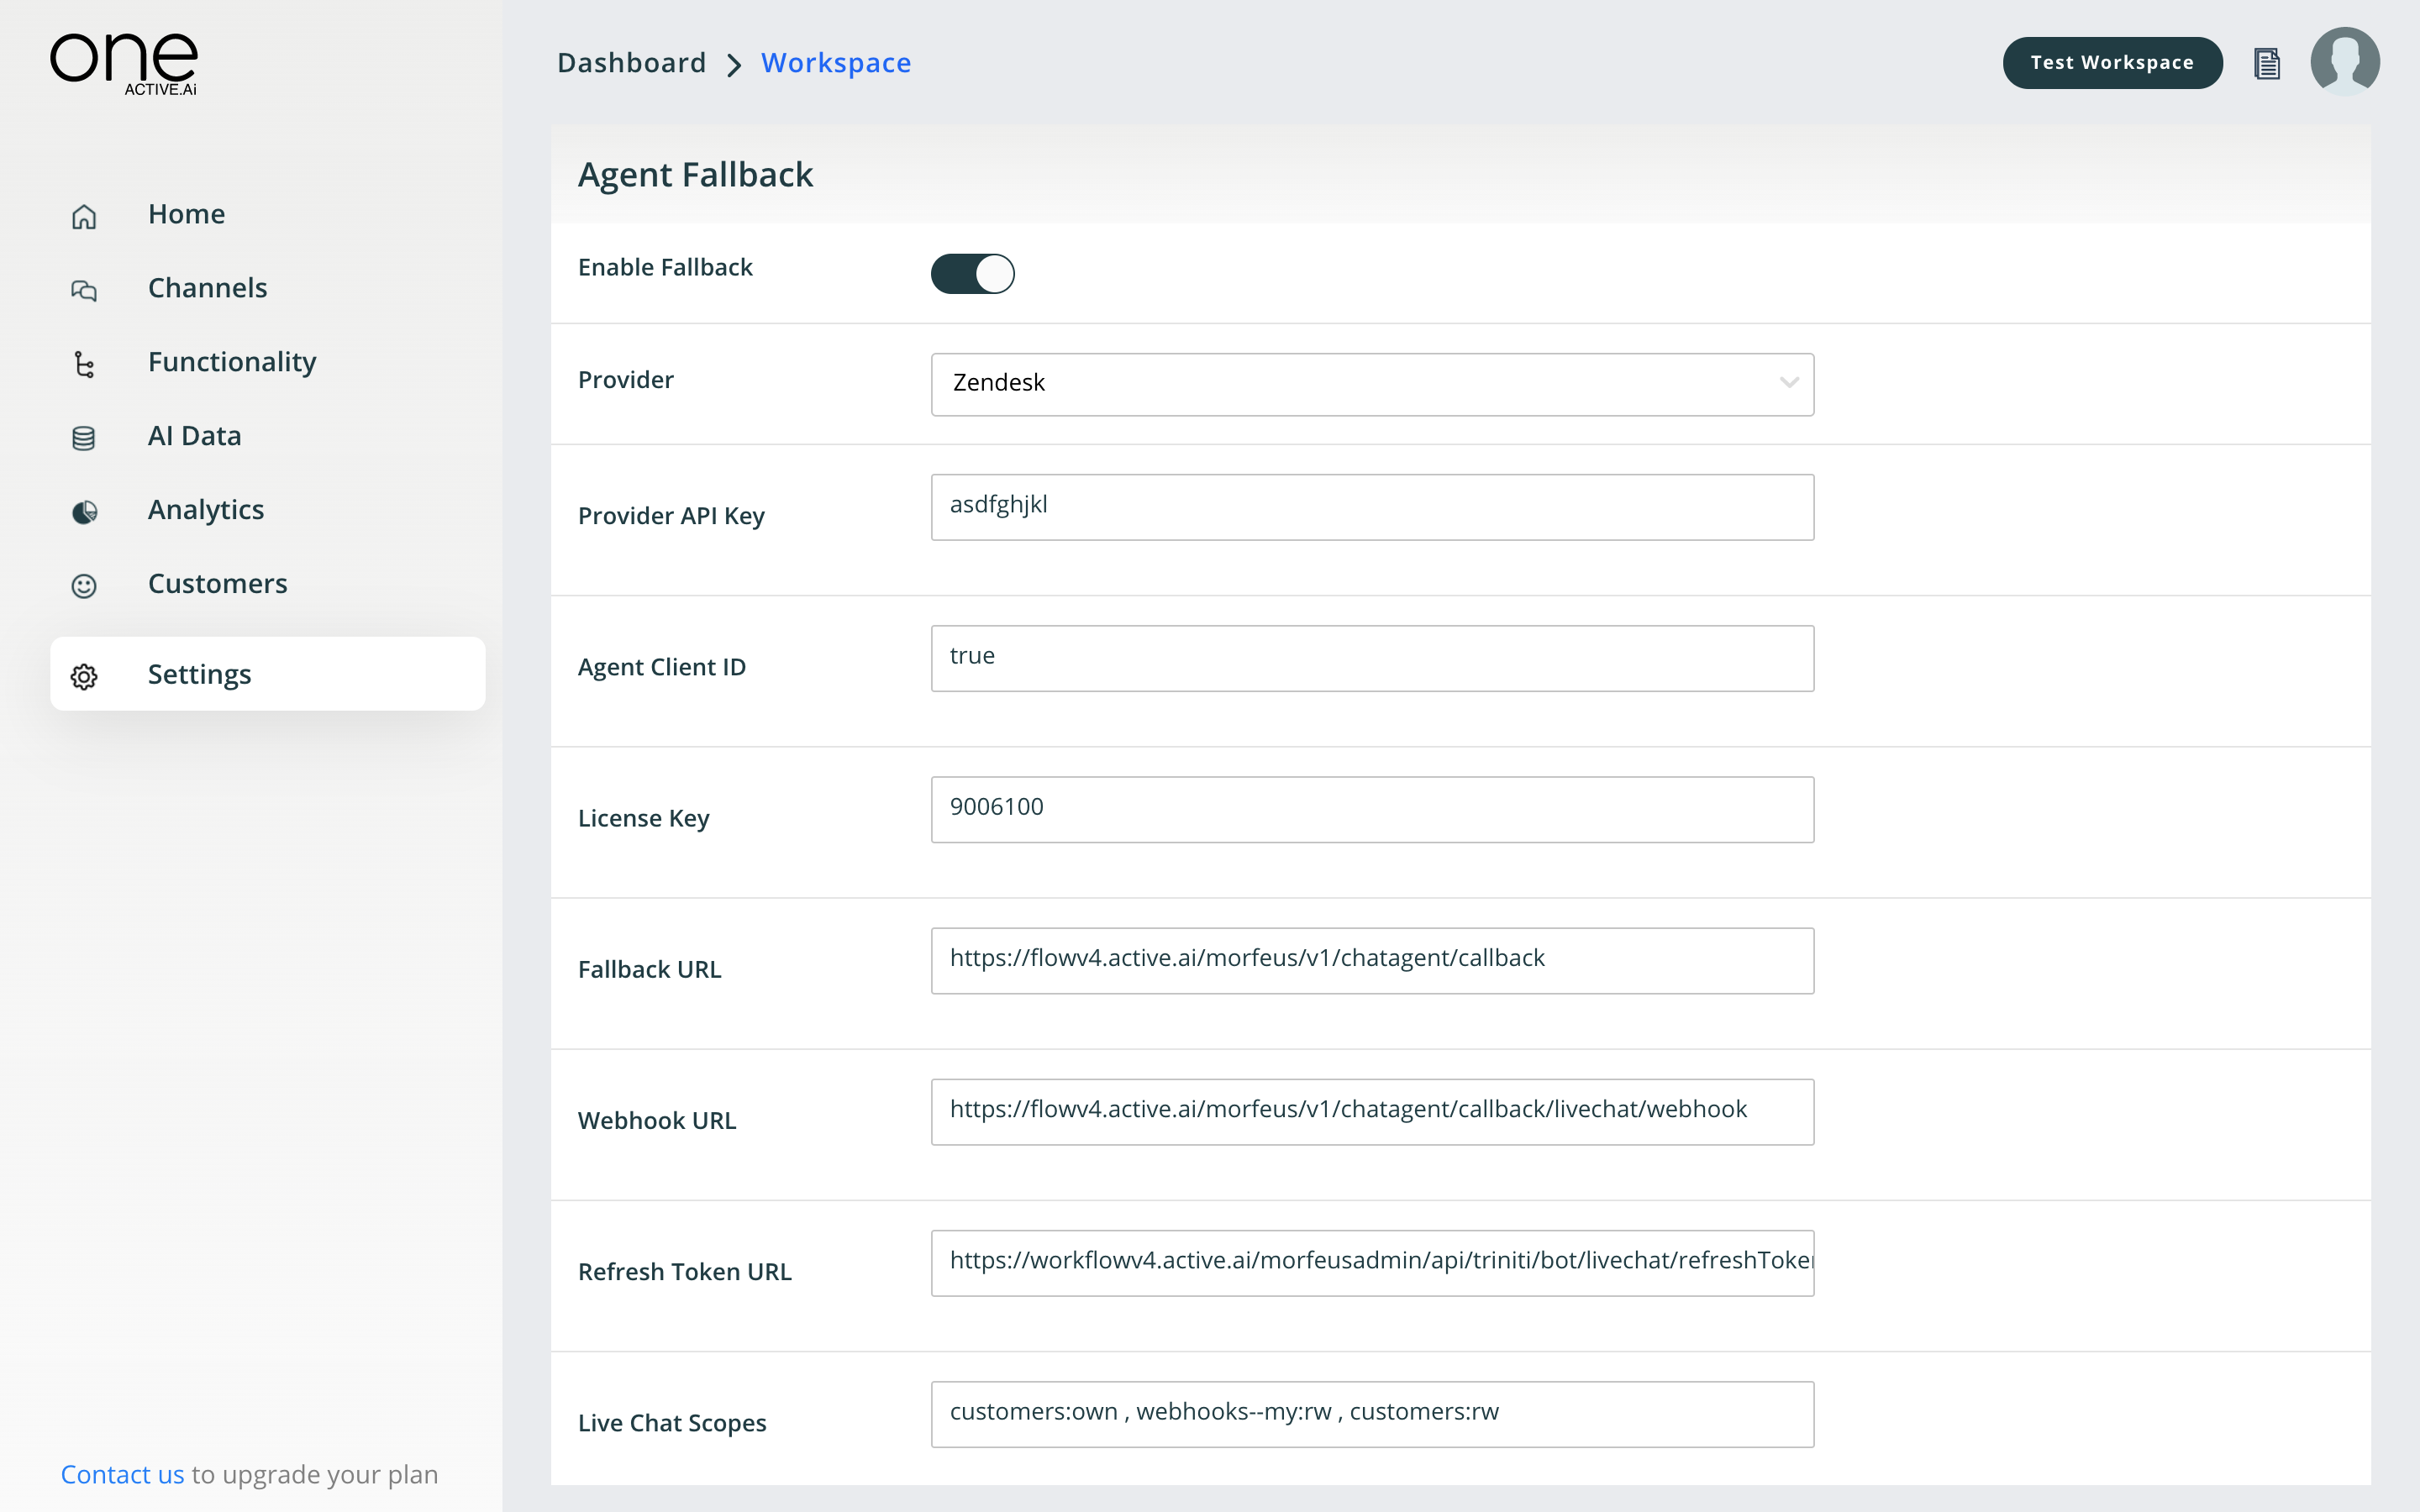
Manage agent fallback
You can integrate the Live agent system of your choice in this section
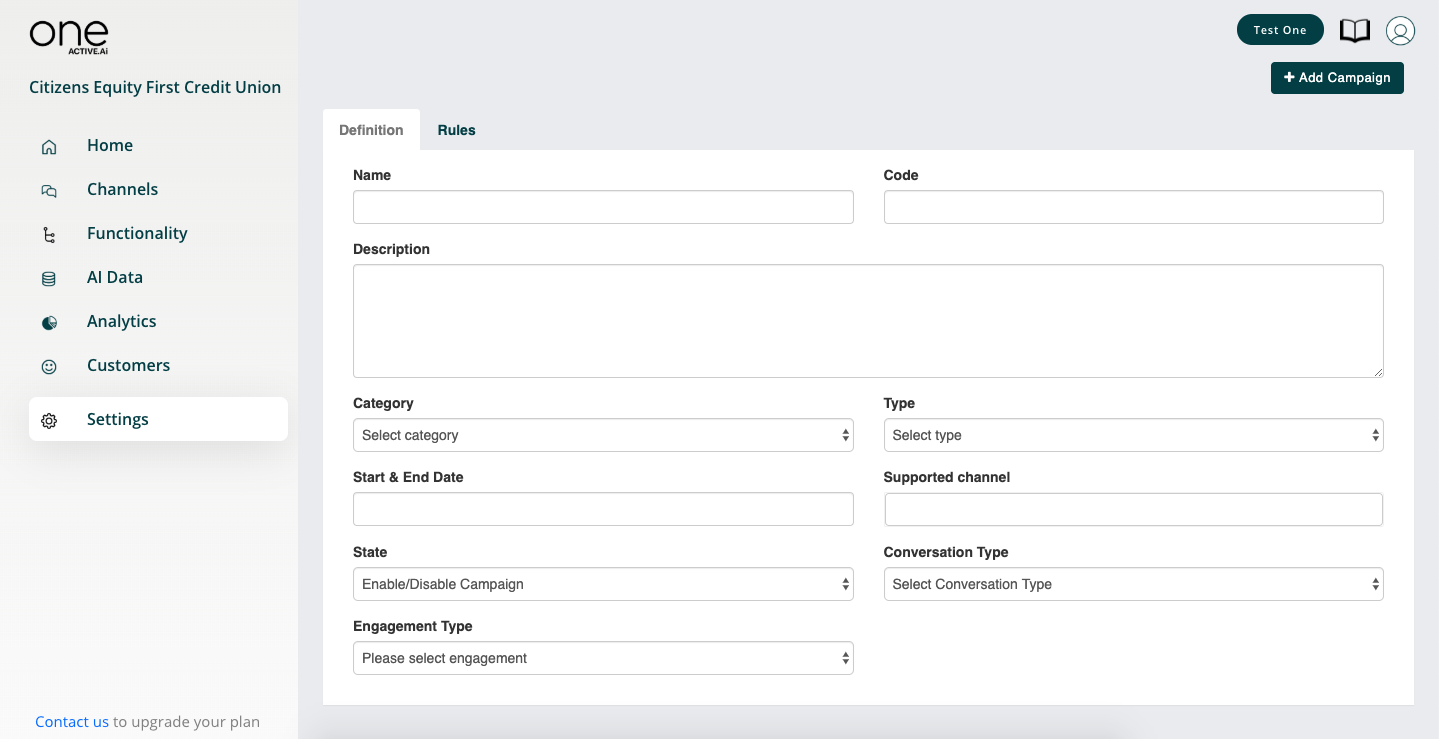
Manage campaigns
A campaign is a process to push any executable information from the server to the client through batch or in the transaction
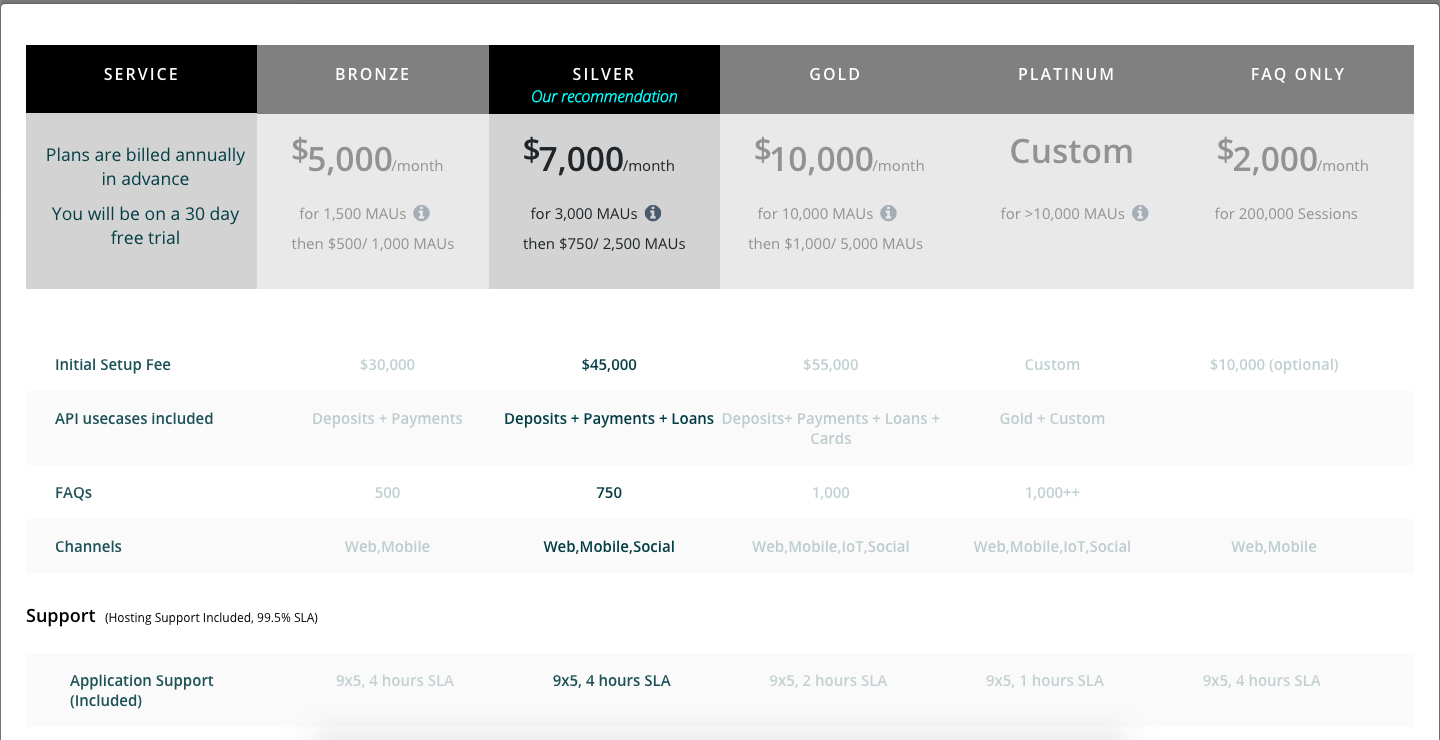
Manage plans
You can update the selected plan in this section
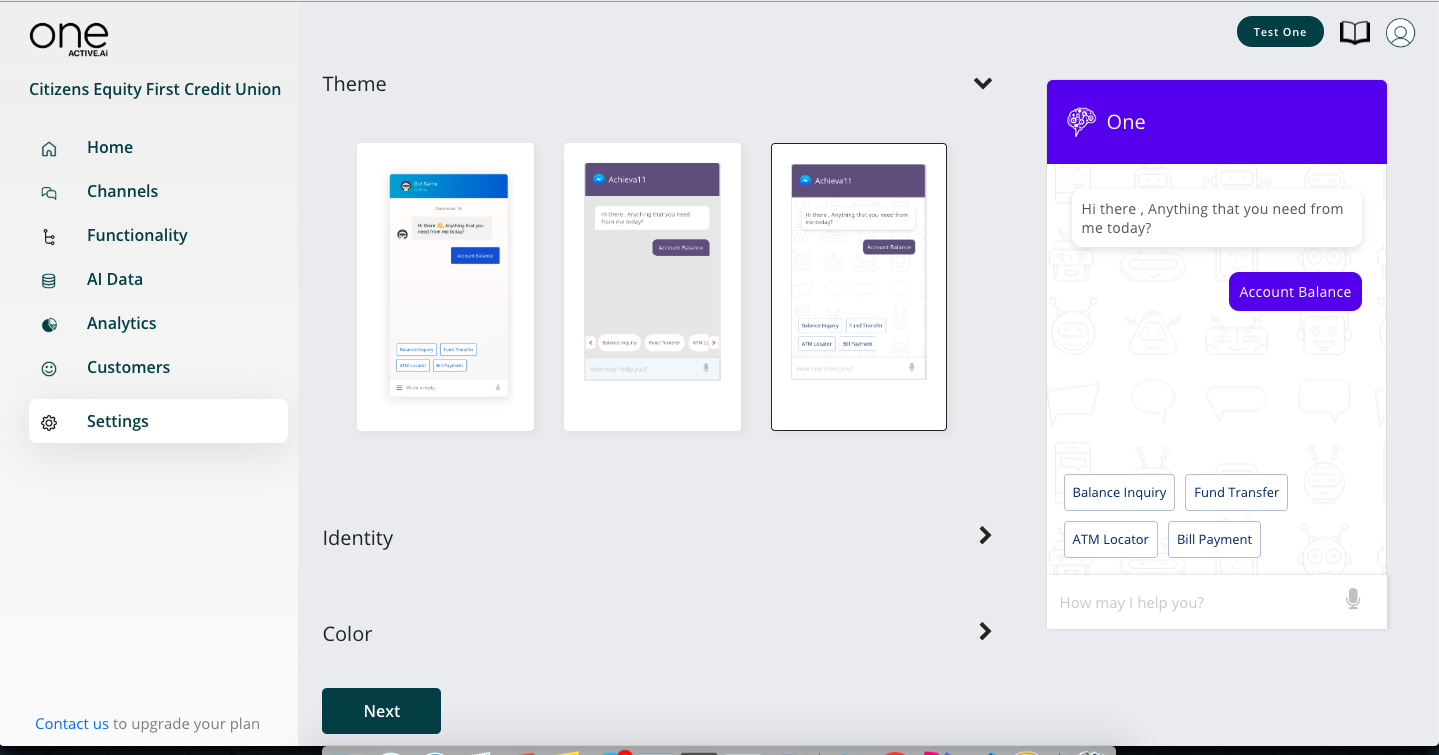
Virtual agent design
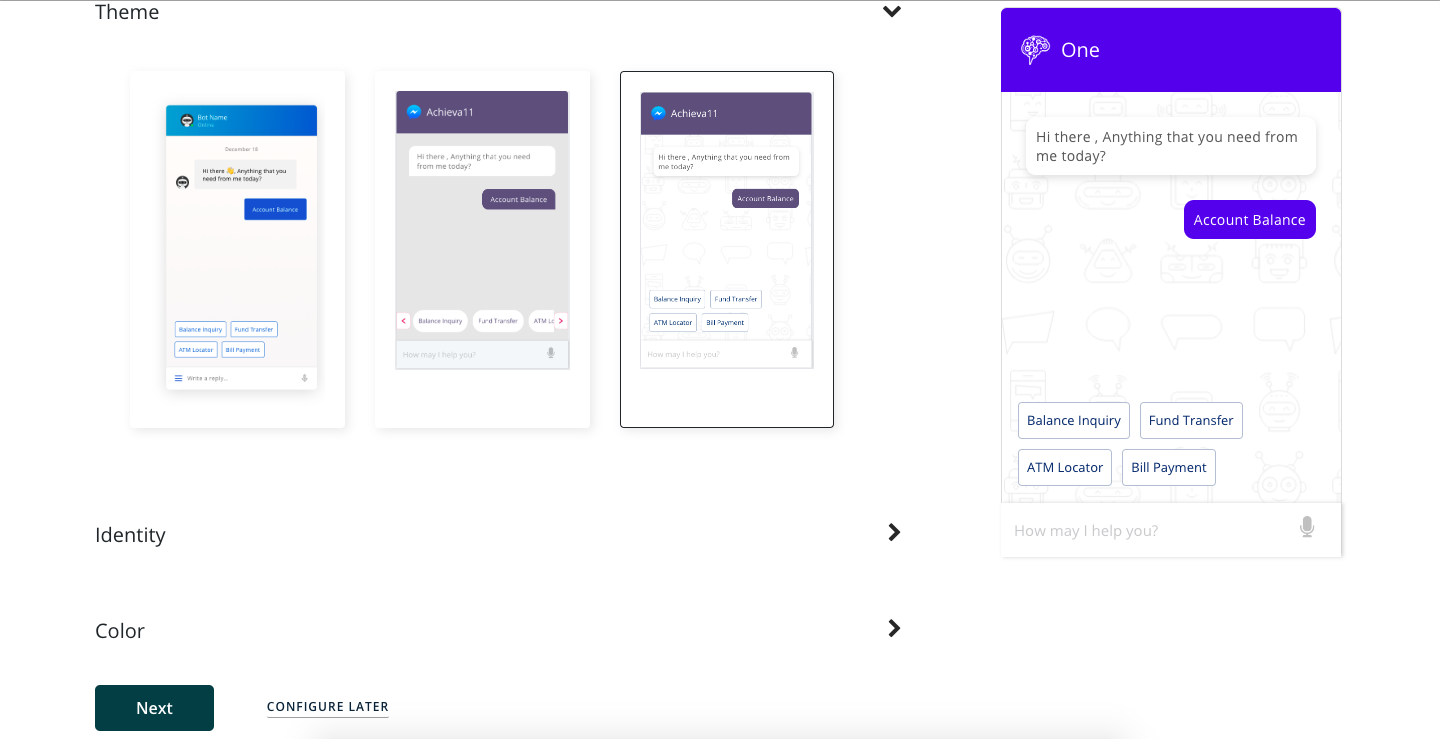
As mentioned earlier during onboarding, the agent design can be handled in sandbox and business user can try various features such as bot bubble change, logo upload, colour scheme change (pick or input HEX/RGB code). This can be immediately previewed on the right side. Any saved changes will automatically reflect the next time user launches the agent using ‘Test AI agent’ feature.
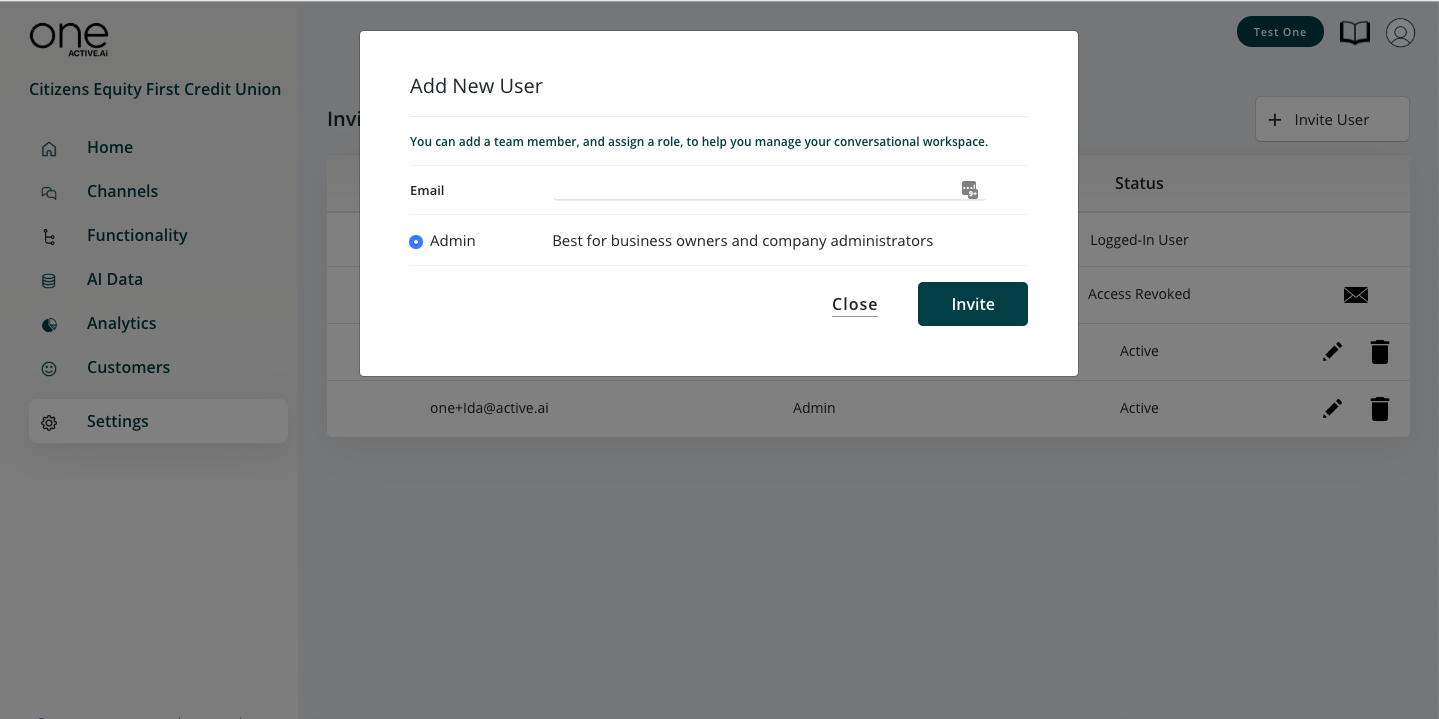
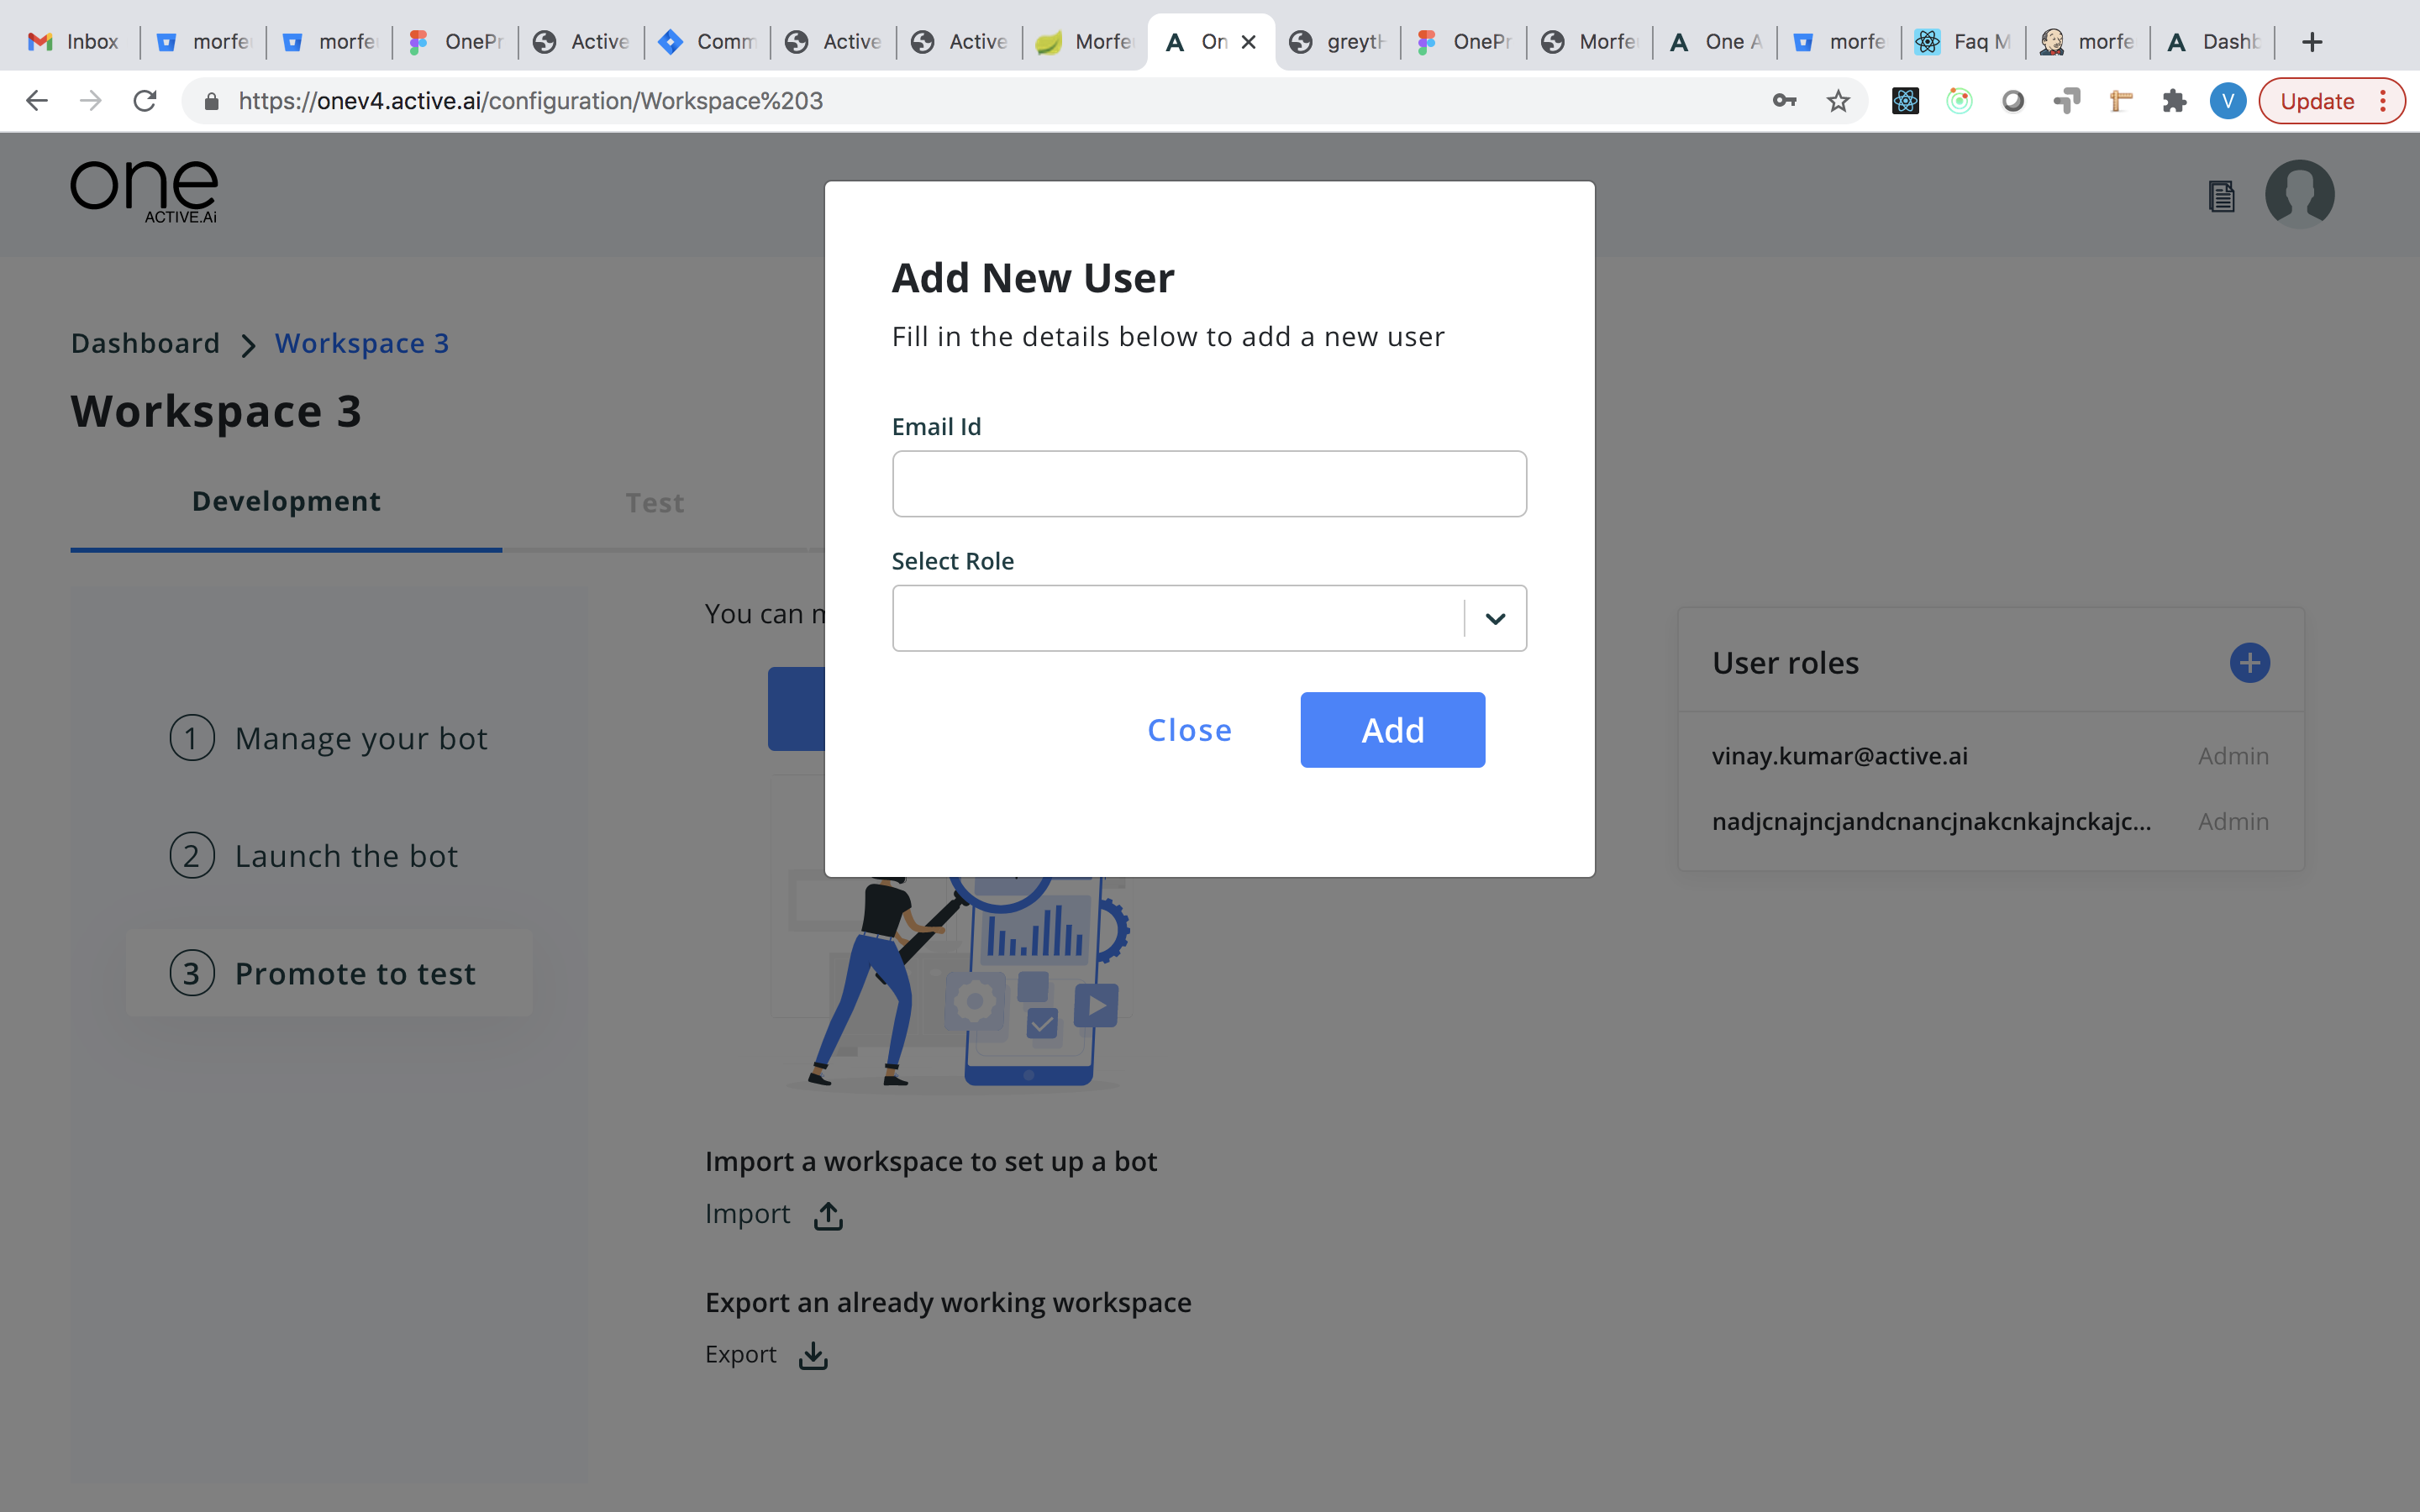
Team members
You can invite new team members in this section
Security history
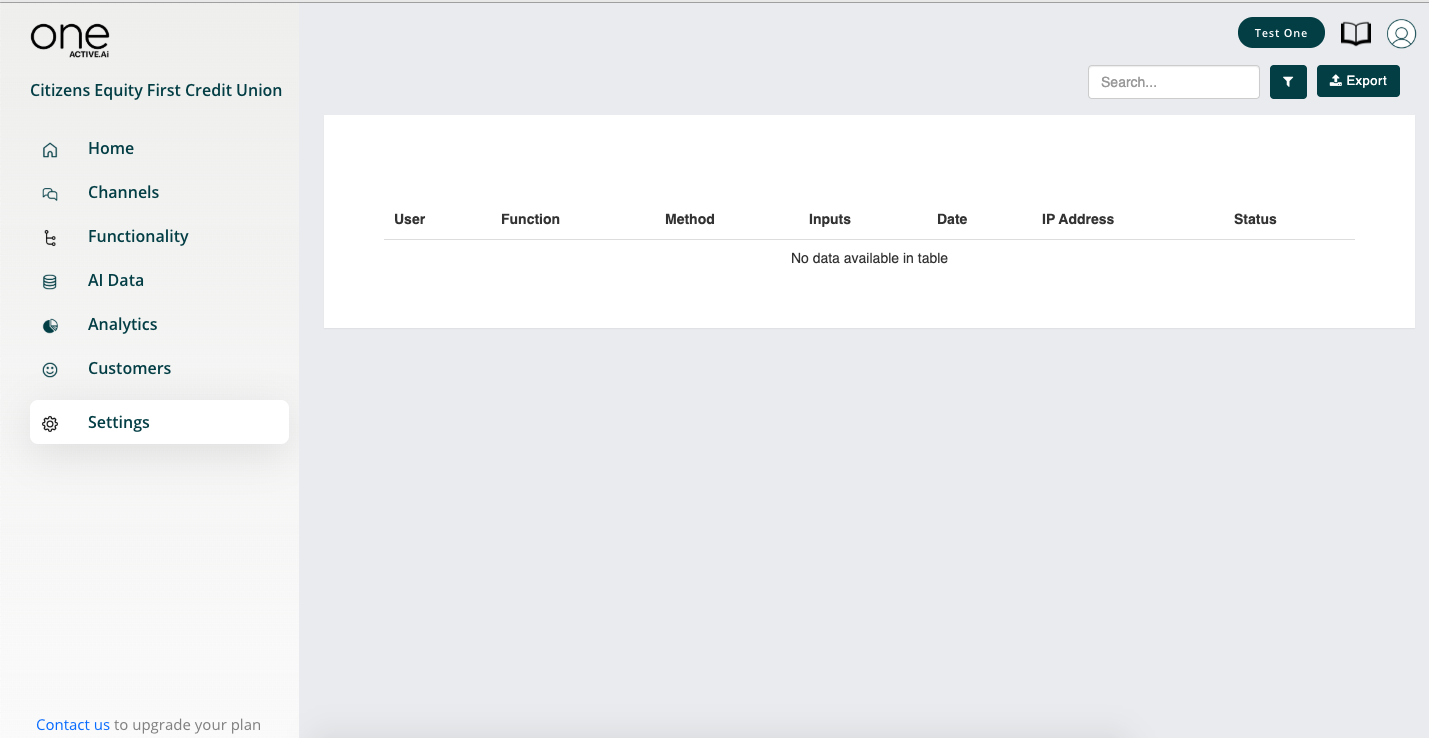
This feature is to audit the violation/access issue that happened on the APIs. You can even check the APIs(which are violated) with the user's name, IP Address, date & time. Also, you can export those Audit Trail by clicking on the 'Export' button.
Eg; If the user has tried to hit some API & API has refused the connection or sent unauthorized error etc.
Manage updates (coming soon)
Manage go live (coming soon)
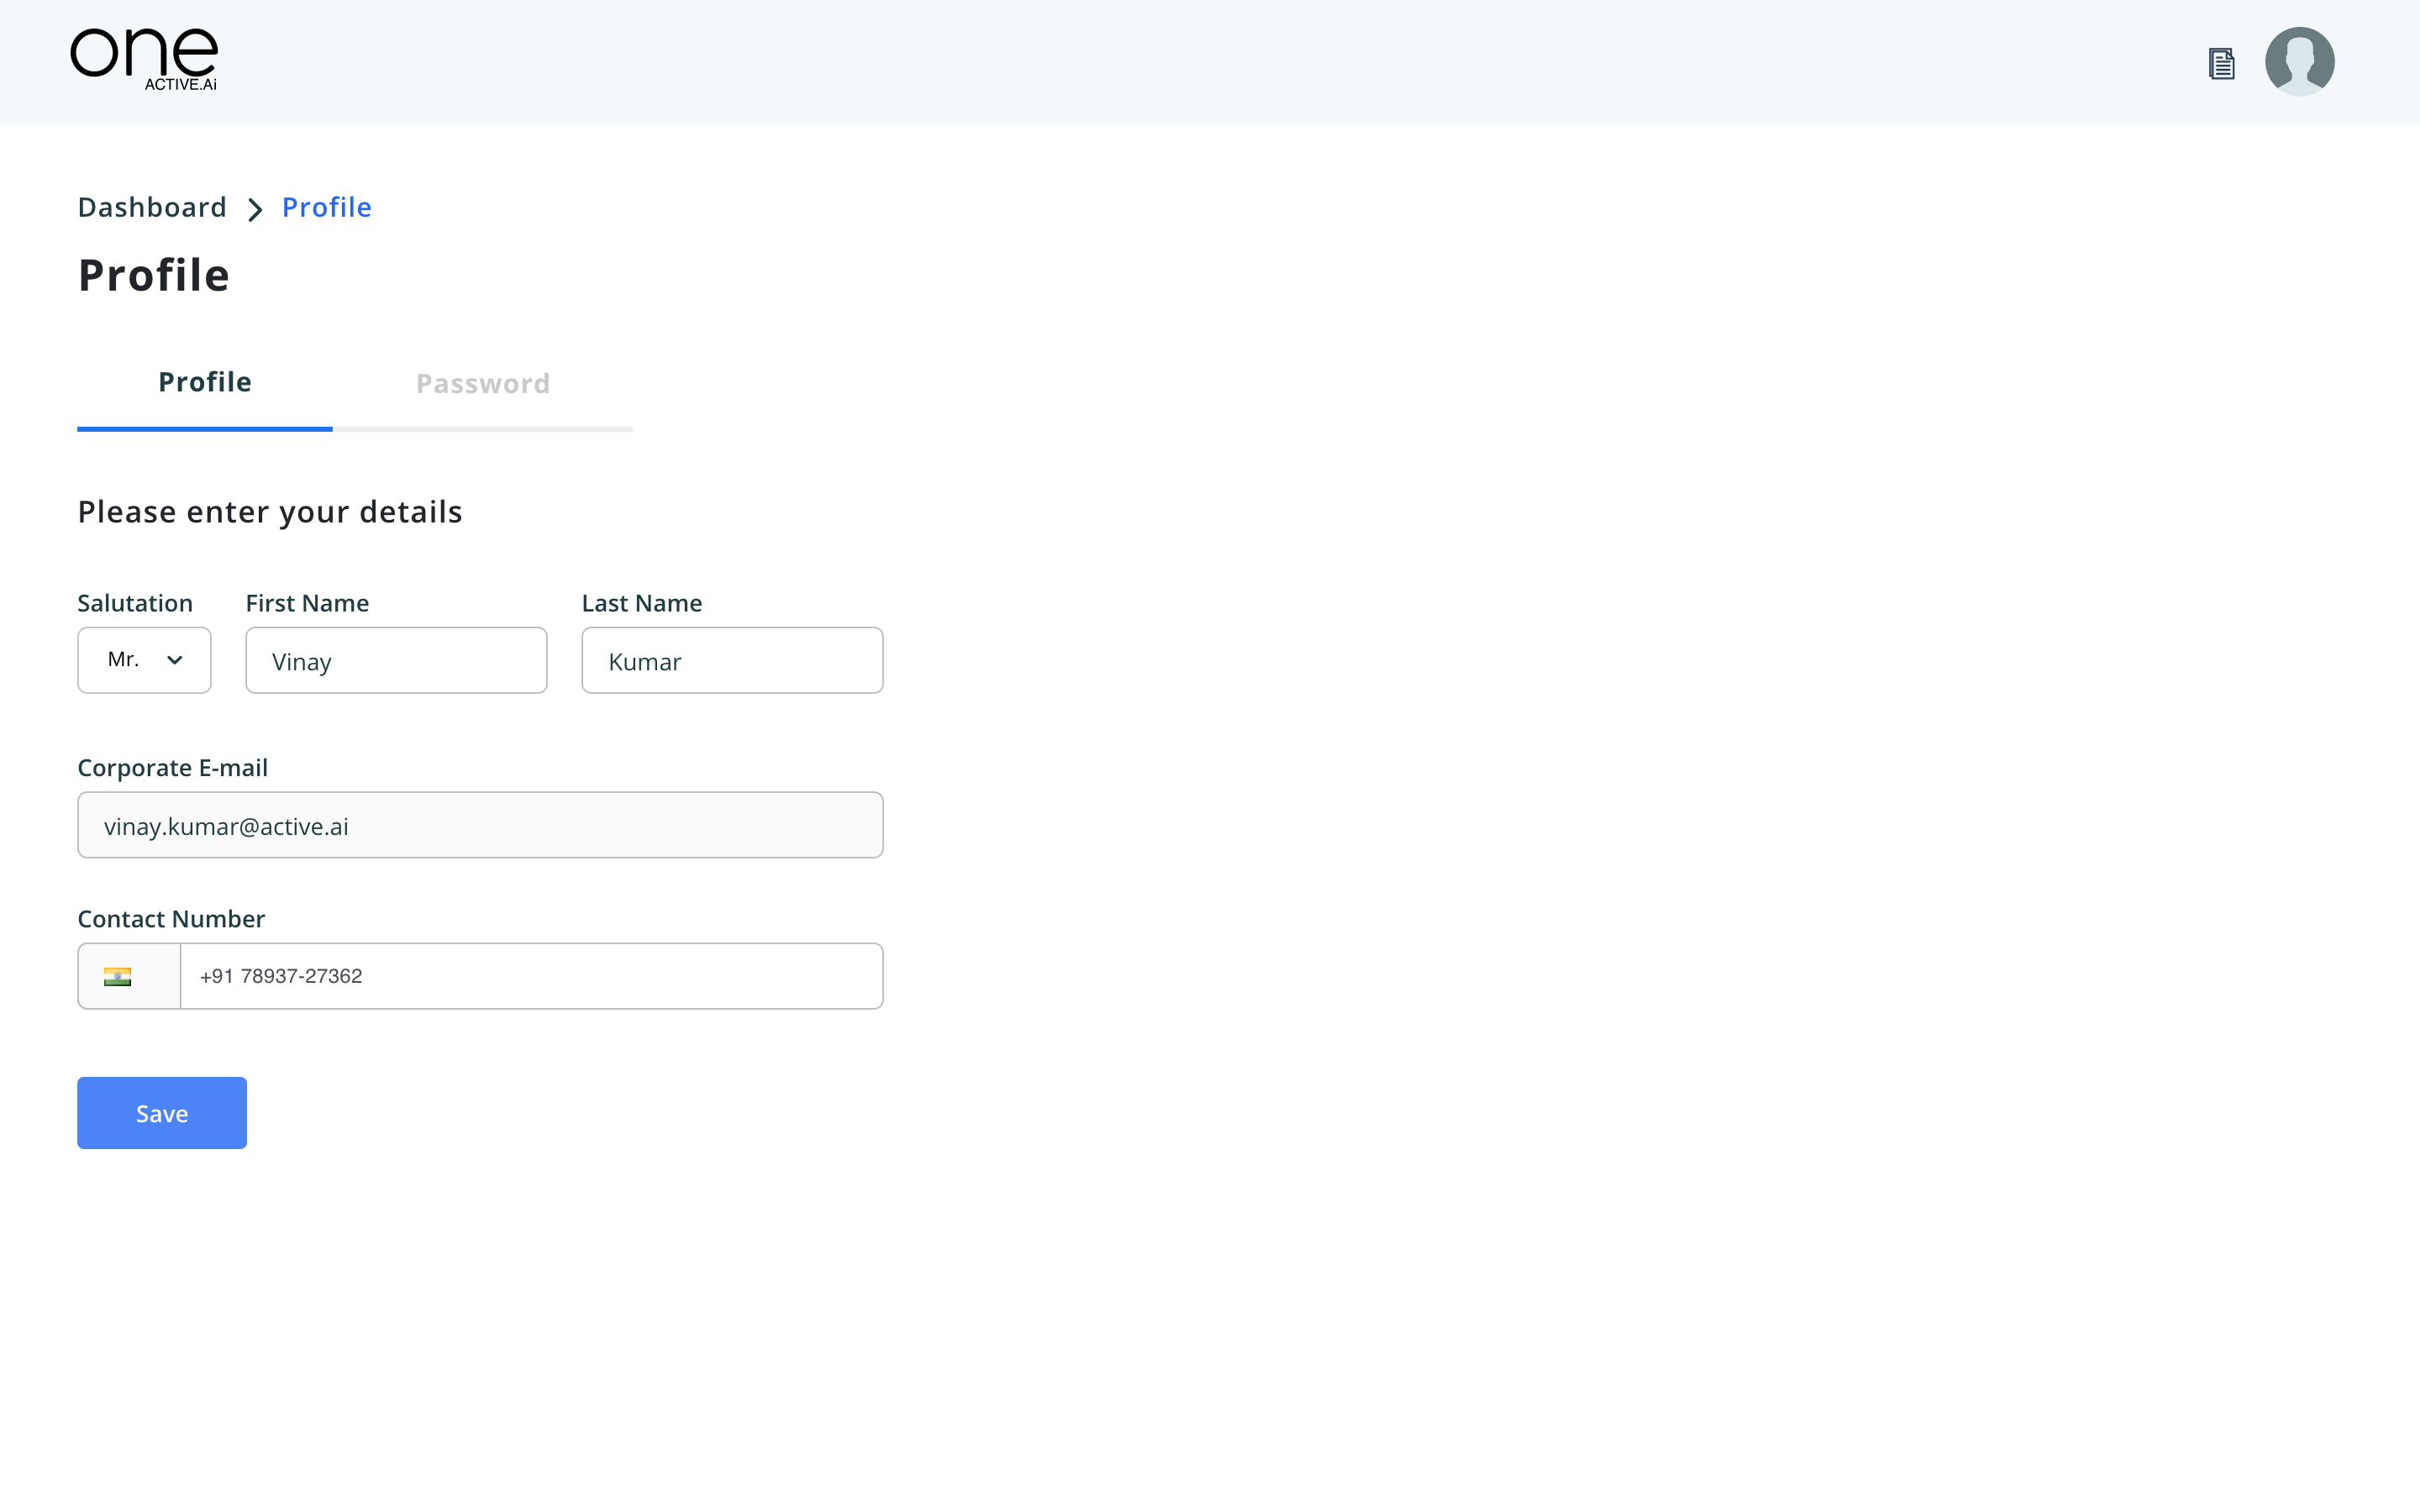
Profile

Documentation & Support
